When we saw Jennifer’s cute customized kids table we just had to share her little DIY makeover. Here’s her letter:
I recently bought my son this Ikea table & chair set for $39.99. Even though I love the {waaaaay} more expensive sets from Pottery Barn Kids, I just couldn’t justify spending that much, so I took a DIY approach. Here’s what I did: I applied three coats of red glazing paint from Ikea for only $4.99 a can (which was enough for all three coats). Then I dug up some old whimsical letter stamps I had from an art project. I got them from Target on clearance for around $5. Using my stash of colored acrylic paints from Michael’s (all under a $1) I stamped the letters on haphazardly just to add some originality to the tabletop. I figured my two-year-old can learn the alphabet while playing in style, right? Last but not least, I took your advice from this post and bought the Pour-On High Gloss finish from Michael’s to seal & protect the tabletop and give it a more expensive look. (BONUS: it’s MUCH easier to wipe down than the original plywood!). Total invested: $63 and a few days of time & effort. The result? A {cheap!} cute and one-of-a-kind table & chair set! I thought your readers with little ones might appreciate it. Thanks and keep up the good blogging! -Jennifer
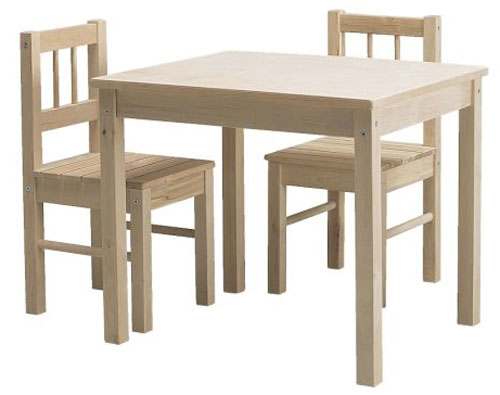
Here’s what the table looked like before the transformation (thanks for the picture, Ikea):
Here’s Jennifer’s table in progress (you can see the foam alphabet stamps in the background and about half of the table covered in whimsical letters):

And here’s the table after the entire alphabet makeover:
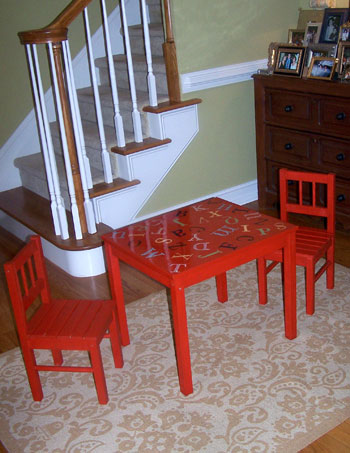
Isn’t that a great little transformation? We love that Jennifer got creative and used her wits to transform a basic Ikea kids table. And we also love that the table and chairs can be painted any color at all (you could even go brown with the chairs and blue with the table and add brown stamps to it). The possibilities are endless. Thanks so much for sending the photos our way Jennifer! What do you guys think? Doesn’t this seem super doable…and, dare I say it… fun!?

Heyruthie says
adorable! i saw that table set at IKEA last week, and thought about the possibilities! i’m happy to see someone who took the challenge. it looks great!
Tannis says
Question re: the pour on high gloss. When John & Sherry used it, it was on a tray. What happens when you do this on a table top, doesn’t it run down the sides? Whats the best way to do that.
Is red “glazing paint” different than regular high gloss paint? If I can’t get glazing paint, what should I use for a similar project (knowing it’s for kids, and don’t want it to chip)
Thanks!
YoungHouseLove says
Tannis- We alerted Jennifer that her Reader Redesign is up on the blog so here’s hoping she’ll drop in with those answers for you (we’re not quite sure how she kept it her gloss from running down the sides of the table other than using a moist sponge to wipe the edges down for a finished look). As for your question about glazing paint vs. regular high gloss paint, glazing paint is a bit thinner like a stain although it turns out opaque for the most part so regular old latex high gloss paint is a great substitute for glazing paint if you don’t have any available. Hope it helps!
Martha- We actually recommend a specific polyurethane by name (Minwax Water-Based Polycrylic Protective Finish in “Clear Gloss”) as we have heard others complain of products that yellow over time but all of our crisp white furnishings never yellow with that specific poly (applied in super thin and even coats). Anything applied thickly (or with an oil-based formula) will definitely cast a yellow haze on your furnishings so you might want to check out our furniture painting tutorial for more details about that poly that we love so much: https://www.younghouselove.com/how-to-paint-furniture/
xo,
s
Martha says
Cute table and chair project, Jennifer!!
Sherry… a question for you…I have read on your blog that after you paint furniture, you apply polyurethane to protect the finish. I did this recently and the white piece I painted has started to yellow. I used Minwax Wipe-on Poly in clear satin. Have you ever had this problem? What type of poly are you using? Thanks!
Kate says
That is very cute! I love the high gloss finish on the tabletop.
Destri says
I love it! I almost bought a cheap folding set from walgreens, and now I believe I will be making a trip to Ikea! thanks!
ellear says
I have to say, although alot of people knock IKEA for their cheap-o furnishings, this is a perfect example of why I personally love them so much. There is so much more you can do with IKEA furniture and knick knacks that you aren’t always able to do with items purchased at other stores. The price is always right, and it allows people to get creative and make whatever piece of furniture they buy work for them and not the other way around. Thanks for sharing!
D says
Love this!
Kasey at Thrifty Little Blog says
Great job thinking outside the ‘big’ box, Jennifer! Another reason why IKEA’s affordable furniture is so great :).
prettythings says
Adorable – and can I say even better than Pottery Barn?! I’m not knocking Pottery Barn; I use their store and catalog for inspiration but seriously… they’re overpriced and everything is so matchy-matchy. ;) This table, on the other hand, is original, fun and a STEAL. Great job! And when the kiddos outgrow the table, you can use it as a little plant or lamp stand. :)
I did something similar to my son’s nightstand with an unfinished piece I picked up for around $50. I penciled in fishes and coral and seaweed (a la Finding Nemo)carefully painted everything in with acrylics, then glossed over the top… that’s what I love about DIY kiddo furniture – the decor theme options are endless.
Erika says
SO adorable! Possibilities are endless!
Kelsi says
OOOH I’m so glad someone did this before me and it turned out so well! I was planning on painting the table/chair set for my son for Christmas to go with a kitchen that I am making him from old side tables. I love how you did this! I would have never thought to do letters…. I was thinking of using the same fabric that I was going to make curtains with to make little seat cushions to tie them in… but I really like the letter idea! It seems easier, too!! I like easy! Do you suggest red/silver or blue/brown? I want an all boy kitchen but I want to be able to easily repaint it if I have girl someday (fingers crossed….). I’ll have to submit the results to you, too. This is awesome. and i’ll have to remember about the poly finish!
Laurie says
Oh I LOVE that! I had horrible plastic table and chairs for my kids when they were little… I was far too frazzled to think of anything like that when they were young :)
Lauren says
I work at an architectural firm and every year the Interior Designers in my area get together and purchase these tables from IKEA. Each participating firm or design student in the area creatively designs/transforms the table and chairs into an incredible play/work area for children! They are all auctioned off and the proceeds go to a local Children’s Hospital :)
Gota’ love IKEA!
julia says
Which type of finish would give a painted white table the look/durability of high gloss lacquer finishes? Should I try the finished she used on the kid’s table, the Minwax Water-Based Polycrylic Protective Finish in “Clear Gloss”, or something else? I also heard of a Benjamin Moore product called Stay Clear High Gloss finish? Has anybody used this? Is this the same type of finish as the Minwax?
Also, if I don’t know whether my table was painted with oil based or acrylic paints (because I bought it already painted), is it ok to still use one of these protective finishes?
YoungHouseLove says
Hey Julia,
Definitely the thick pour-on gloss that Jennifer used will give you much more of a lacquered look. I would guess that the Ben Moore high gloss finish is a lot like poly or just like high-gloss paint which isn’t nearly as thick and glossy as the pour-on acrylic that Jennifer used. That coating should be safe to put over oil, latex or acrylic based paint (I would guess it’s actually latex). Hope it helps!
xo,
s
Lelsie says
Yeah yeah yeah… this is fun.
I found this exact table and chairs set at a garage sale in our neighborhood in the spring… for 3 bucks.
And have had so many ideas swirling around for it… I will defientely be bookmarking this after the move.
So fun and cute.. I was thinking of doing a chalkboard top on it for the kids so it could be half easel art station.. since it will be there craft table…
Lindsay says
This is so dang CUUUUTE! Makes me want to do this project for my nephews as a fun present! Hrmm…..thanks for the inspiration!
Jen Z. says
OMG how cute is that. Will have to keep that in mind when we have kids. ;-)
Erica S says
Another great option is to paint the top with chalkboard paint.
Jennifer says
Hey guys!! Thanks so much for the compliments!!
Tannis: Ikea’s glazing paint is more like a pigmented stain. It has a matte finish and comes in lots of colors. I just painted it on and wiped it with a rag till I got the color I wanted. I think I did two coats.
As for the pour-on gloss, it definitely drips. I did it in the basement where I wasn’t worried about damaging the floor. While the gloss dries (for about the first 30 minutes or until it becomes tacky), you will want to keep going around the edges of the table with a straight edge to smooth away the drips. I used stiff index cards (keep plenty on hand and trade them out frequently!). Also the gloss will form air bubbles, but if you blow on them gently they will go away (like you would blow to clean off your eyeglasses).
Hope these tips help!
Anna at bathroom vanity says
Wow that is such a great idea! The prices they charge these days for kids stuff are ridiculous, so this is a perfect approach. The kid still gets the table but you dont have to spend so much money. And the table looks really cute with the letters!
Tannis says
Thanks Jennifer! Makes sense. I’m definitely going to try it!
Sarah says
I love it! The letters are such a cute addition – it would have been cute enough just painted red, but the letter really make it super adorable. I would love to have something like that that I made beautiful over something Pottery Barn any day because I did it myself. I hope her son loves it just as much as all of us here!
Jennifer says
I have recently replaced this table and chair set with a larger and sturdier set. My two kids use it A LOT and it was just too small and uncomfy for both kids. However, I feel like I got way more out of this set than I paid for it and I still have it. I painted it with outdoor paint and put it on the back porch so the kids have a place to do messier outdoor stuff. You’ve given me inspiration to revisit this set and do some sort of fun design on it!
Gail says
We’ve had that same Ikea table-and-chairs set for five years, through three moves, two kids and countless art projects. Indestructible! We painted ours, too, and I am loving your letter-stamping results and am inspired to up the fun factor on our set, too. This turned out so cute–thank you for sharing it!
Dianna says
It’s fun being creative and I’m sure the table is more appreciated. I took a table that was my daughters as a little girl, brown early American looking, and painted it for our grandkids. It led to re-creating a whole kitchen set for them from finds at flea markets and junk Stores.
http://www.decormadesimple.com/kids-wood-table.html
Jen H. says
I have the same set. I painted the table white and the tabletop with blackboard paint, then one chair blue and the other green. I’d send in a pic, but it was done three years ago and has taken quite a beating since!
YoungHouseLove says
Definitely send a picture! We’d love to see how your set turned out. Fun!
xo,
s
Jaimie says
I have a plan to customize this Ikea set too. My idea is to paint the chairs and table legs, and staple a piece of wipeable oilcloth over the tabletop. Then any food, glitter, etc. can be wiped right off!
To give full credit, I saw the idea on the Yvestown blog (link below). I’ve been saving an adorable piece of Cath Kidston strawberry-printed oilcloth for this project for over a year!
Here are the instructions:
http://www.yvestown.com/archives/2008/02/table_stapling.html
Yvette says
WOW! Its time to update a small garage sale table that we have for a new one, and this one is perfect for our two children!!! I love the idea of an oil cloth on top!!! Hmmmm, how about a chocolate pleather type of material on top (to match our furniture) and then maybe even cover the seats with the cloth too and the rest of it white??? Do you think that would look purdy???
YoungHouseLove says
The oilcloth idea is great! Definitely send us photos if any of you tackle that. We also love the idea of white legs with a chocolate faux-leather fabric on the top of the table and the chairs (our only tip would be to make sure it’s durable enough to hold up to banging and scribbling). Happy table transforming!
xo,
s