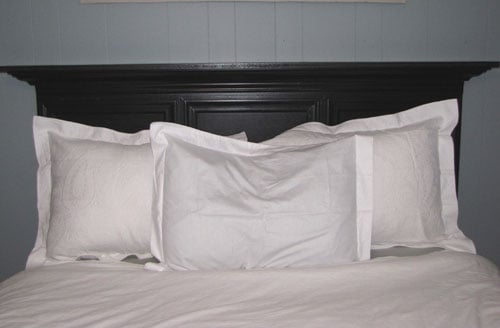
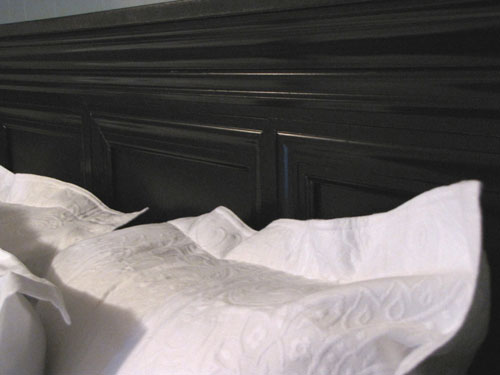
Ok, this is pretty darn fabulous. Alyssa and her handy hubs were in love with a $1640 Restoration Hardware headboard… so they made it themselves. With remnant molding they just happened to have laying around. For free.

How swank is that?!

All I can say is wow. Thanks so much for the pics Alyssa!

Siobhan says
Love the Headboard! Can I please have more details on how it was made? I am currently looking for a DYI headboard to make this weekend.
Julienne says
I think I like theirs better!
Ashley Nichole says
WOW! Love that. I love those lamps on the side tables too!
heather s. says
Beautiful! It puts my padded headboard to shame. ;)
Erin says
personally i think theirs looks way nicer than restoration hardware one! good job!
bungalow_bliss says
Ummm…WoW! I agree with Erin–I think they did a better job than RH. Way to own it, guys!
momomatic says
Theirs looks way better! Good job y’all!
Kristal says
Alyssa is the Queen of DIY. I love her blog – she’s always got some new project up her sleeve!
Melissa says
Awesome! I’ve been getting ideas in my head to make a headboard for awhile now and this post and the other headboard post a few days ago has got my inspiration flowing.
Kyle says
Not only is it swank, as you say, it looks a lot nicer than their RH inspiration!
Cindy says
Great job Alyssa. Looks great and especially love the price point!
Heather says
That looks great!! How did she do it?
Kelli says
Alyssa’s really does look better than the original. Great job!
Stacey says
This looks even better than the original, the extra details look amazing! I wish I had a shred of craftiness in my body!
jbhat says
I love it and I want one just like it. Nice work!
Jen says
It looks better than the original.
Stephanie says
Looks a whole lot better than the original! Love it!
Sara says
Wow! I wish I could make something like that! Very Nice!
Sonia says
Great job, Alyssa and hubby@ think you could provide a tutorial?
love it!
Alysia says
Yes, please provide a step-by-step! It is gorgeous. Plus, it looks like the one I’ve been eyeing at PB.
YoungHouseLove says
Whaddya say Alyssa? Think you can break down how you whipped up such a fabulous DIY headboard for us? We’d love some details!
xo,
Sherry
Alyssa says
Hey guys! Thanks so much for the feature :) I’m working on a step-by-step for the blog, so make sure to check back soon.
Have a great weekend!
-Alyssa
Kalee says
Wow! My husband and I are looking at buying our first house when we move back to the States in 6 months (currently looking at a 1950’s ranch, so boy are we gonna need some help….the bathroom has the basketweave tiles I was wanting, too bad I cannot for the life of me tell what color they are!). Between moving expenses and taking on a mortgage we are planning on doing a lot ourselves…so definitely am looking forward to instructions on how to make this!
erin says
wow! it looks so much better and more expensive than the original!!! awesome job!
elizabeth says
Love it!! We can’t wait to see the step-by-step. I’ve been contemplating trying to build one of the PB storage beds, so this will definitely get me inspired…
Debbie says
Absolutely beautiful and I feel so inspired!! Will instructions soon follow? :)
YoungHouseLove says
I sure hope so! We dropped Alyssa a line requesting some directions for her fabulous headboard project so our fingers are crossed that they’re forthcoming. And just in case we don’t get detailed instructions straight from the horse’s mouth, we think a similar look can be achieved by following these semi-simple instructions:
1. cut a piece of plywood or MDF to the desired headboard size
2. use decorative molding to create three boxes (mitre the corners at 45 degree angles and secure these boxes of molding to the plywood or MDF with wood glue or a nail gun)
3. top the plywood with a thicker piece of decorative molding (angled on both ends for drama) with wood glue or a nail gun
4. paint the entire piece with deep chocolate paint for a luxe look
5. screw the headboard into the wall (using metal anchors for security) and you’re ready to push your bed in front of it and enjoy your new creation
Hope it helps!
xo,
Sherry (& John, the construction guy around these parts)
Alyssa says
Oh jeez! I can’t believe I forgot to come back and post a link the instructions I posted over on my blog. Duh!
Here ya go! http://alyssamazing.blogspot.com/2009/01/this-was-spur-of-moment-project-so-we.html
YoungHouseLove says
Thank you thank you thank you for the lovely tutorial! Everyone go check it out at the addy above!
xo,
Sherry
nature's sunshine says
wow! i really fell in love with the headboard! it’s perfectly combined with the white pillows and the white bedsheet!
denise says
Great blog with great tips! Glad I found you ;)
Jenn from San Diego says
I just want you to know that one of the gazillion reasons I love your site is that you’re “there for” your readers.
A+ for putting up your own directions on how to make this headboard, because Alyssa’s blog is no longer a working link :( and I’m dying to make my own headboard!!!
THANK YOU!!!!!!!!!!!!!!!!!!
Michelle says
I agree with Jenn….I love this site and obsessed!! I check it twice a day!! Thanks for the headboard instructions Sherry and John—-I may try to make one!! I also have been looking at makeing a tufted fabric headboard…. THANK YOu for all your tips! :)