When you see the pictures in this post, you’ll agree that Meghan and her husband can churn out a huge transformation. But what we also loved about Meghan’s email was the story behind how their before became a stop-you-in-your-tracks after. So if ever you were to not scroll right to the pictures and just read as you go, this might be a good time.
“Like the two of you, my husband and I bought a house that needed work, though in our case we couldn’t reuse much thanks to some frugal prior owners. We decided to gut our kitchen, family room, dining room, and bathroom down to the studs/subfloor when our first child was 12 weeks old. Oh and we both worked full time AND DIY’ed EVERYTHING because my husband is cheap ambitious. There were a lot of late nights and weekends and our son learned to snooze away to the sound of a nail gun. With a refrigerator in the garage we actually had to go outside in the middle of the night to get a bottle for 2 AM feedings. You’d think we’d have learned our lesson, but have since renovated most of the rest of the house with two additional babies. Three boys in under three years while totally renovating a home DIY style. Do not try this at home. Here are some before shots, orange paneling and all (don’t be jealous):
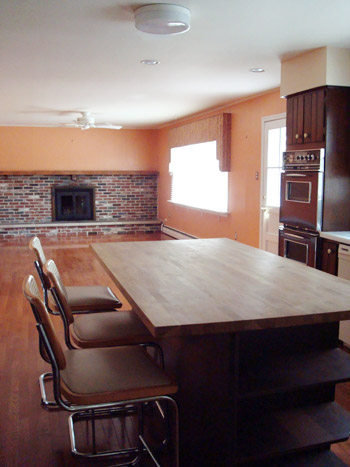
Notice the back and left side walls. Now you see them…
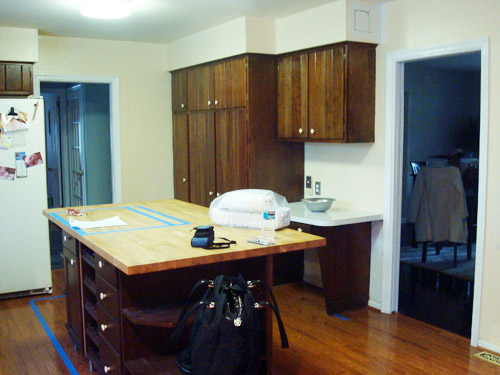
…now you don’t:
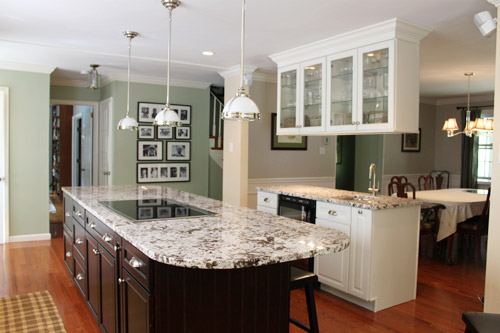
We also turned all the doors into windows and the window into a door (because why do anything the easy way?) and had to shut down the heat for a week to move the baseboards around a bit. Of course we did this when it was freezing outside so our poor son actually slept all bundled up with mittens. But he didn’t seem to mind.
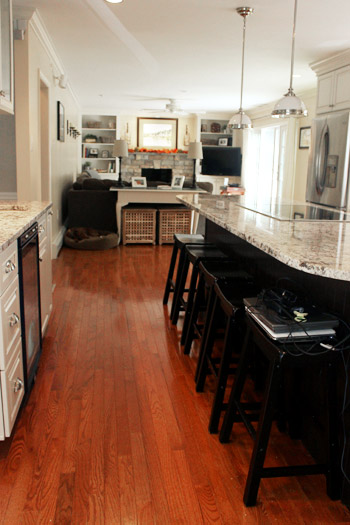
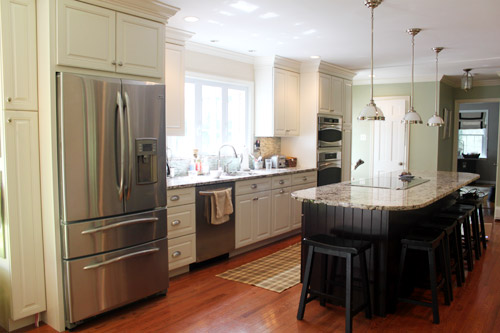
The cabinets, windows, and sliding door (really almost everything in the room) are from Home Depot, the lighting is Restoration Hardware, one of my two splurges (the other being the Ming Green marble backsplash), the toy boxes under the console table are Ikea end tables, and all the accessories are HomeGoods and Ikea. Thanks for letting me share!” – Meghan
So… is anyone else exhausted just hearing that story? Sometimes we find it hard enough to DIY something with one toddler. So we can’t imagine it with a twelve week old baby. Job well done – Meghan! Thanks so much for sharing. And can you guys believe that’s the same house? Amazing, right? Let’s play the what’s-your-favorite-part game. Sherry loves the thick crown molding while I’m all over those pendant lights.

Laura says
Favorite? It’s hard, but the first picture that shows the wall gone is my favorite! So it’s a something that’s no longer there….does that count?
Amazing transformation.
Laura
YoungHouseLove says
Haha, yes that counts for sure! I’m with you- that change is the best!
xo,
s
Cate says
All 3 houses I’ve lived in as a grown up have dishwashers to the left of the sink. My mom’s house now has it to the right. Either way goes :)
Lizzie says
I am particularly in love with the refrigerator..
Kathy PH in LH says
Wow! I never comment on these redesigns (even though I’m WAY impressed by all of them), but this one is really, really good! I love ALL their choices! I think I could move right in without changing a thing … no doubt the rest of the house is just as spectacular! And you’re right, John, that was a VERY ambitious undertaking, given all the contributing factors! Well done, Meghan and hubs!
Autumn@Fallfordesign.com says
It looks great! But I think their dishwasher is on the wrong side of the sink? Is it normal to put a dishwasher on the left side of the sink? I would prefer the right side.
YoungHouseLove says
Is there a standard on that? Ours is to the left though, and we don’t mind it at all!
xo,
s
Alison says
Ours is to the left too… I don’t think there is a standard, whatever works.
Christine says
Mine is on the left as well. Actually, I know a lot of people with them on the left, I’ve never heard of a standard.
Sheila says
Funny you should say that… our current house has the dishwasher on the right (opposite our previous house of 10 years) and it took me a long time to get used to it because it felt completely backwards to me!
erin says
hmm our dishwasher is usually to the left of the sink.
sara says
Mine is also to the left. I find it easy to get stuff from sink to dishwasher, no problems!
Lindsay says
Mine is on the left, too!
Wrenaria says
Ours is to the left as well.
Anne says
Our dishwasher is on the left at our house. It was at my last two apartments as well.
Laura says
My parent’s house the dishwasher was on the right, in my house its on the left, and I actually never realized this until I read this very comment! Haha! So odd how things seems so different to other people others don’t even see. :)
Janice says
My dishwasher’s on the right, my parents’ current house has it on the right, my parents’ new house has it on the right. I had someone tell me one time that where the dishwasher should be placed is based off whether the person using it is right or left handed, but whether that’s accurate or not is something I don’t know.
Lisa E says
Maybe they’re left handed and prefer it that way?
bbruce says
Most of their cupboards are on the right. Placing the dishwasher on the left here would make it easier to empty the dishwasher.
Caitlin @ Desert Domicile says
What an amazing transformation! I may be biased though since I chose dark espresso cabinets and bianco antico countertops for my kitchen too :)
Carley says
W.O.W.
is there anything else to say??? oh yeah.
Amazingly gorgeous
Erica says
Holy Moly! that looks AMAZING! Does she have a blog?
YoungHouseLove says
She doesn’t – so sad! We love linking to them when folks have them!
xo,
s
Rhonda says
My question too.
Too bad. I’d love to see their other projects. This one is fantastic.
Meghan says
So I decided to bite the bullet and give a blog a try – thanks for the encouragement! I think a fireplace post should be next…
http://megandmartinmen.blogspot.com/
I’m an accountant by day, renovator by hobby. Definitely NOT a web designer and that is very obvious :)
Diana says
I want that refrigerator! Great job! Beautiful results!
Ashley B says
I love those new counters! Great job Meghan & family!!
btw, I chuckled because at first I thought those old cabinets had googley eyeball knobs like your guys’ old cabinet knobs. hah!
Julie B. says
Absolutely amazing. It’s looking more and more like we too will be buying a fixer-upper…I love seeing the after, but can’t believe these people DIY-ed and had all those babies!
Meghan says
Ha! Neither can I most days!! Thanks so much for your kind words!
YoungHouseLove says
Thanks for stopping in to see all of the love for your space, Meghan!
-John
Zuzanna says
This looks so impressive…almost as impressive as your kitchen ;)
Lisa@wanderdownpennylane says
WOW! I love the dark wood on the bottom of the island and those built ins around the fireplace are amazing.
What an ambitious couple!
betty in munich says
I bet those IKEA wood boxes are hiding cat litter boxes. Check this out: http://www.ikeahackers.net/2011/05/hol-cat-litter-box-with-sliding-top.html
amazing remodel!
YoungHouseLove says
LOVE it! So smart.
xo,
s
Chrissie says
Thanks for the link, I want to do something like this for our messy kitty.
Meghan says
The last time I was at IKEA they said they were going to stop carrying these tables (so sad) so get ’em soon! I’ve seen people stain them, put soft close hinges on them, etc. They’re perfect for toys! Love them!
Rebecca says
I love that the island cabinets are a different color than the rest of the high cabinets. Makes the island really POP!
Brandi @ His Shabby Her Chic says
I love the countertops! And, well, pretty much everything else. What a transformation!
Brenda says
Wow! That’s some hardcore DIY. I love the green wall with black frames. The pendant lights are really pretty, too.
Lesley says
Wow! Nicely done!
nicole says
would LOVE LOVE LOVE some details on how the fireplace was transformed. We’re looking at a 60’s half walled fireplace in our family right now and cannot quite figure out what to do with it. I think it makes the room feel short, but do we paint it? Cover it? Knock it out? Any and ALL suggestions welcome :)
YoungHouseLove says
Maybe Meghan will be able to provide some more detail on that. Good question! You know we’re always fans of a painted fireplace. :)
-John
Emily says
The fireplace wall transformation was also my favorite part. The masonry and built ins are great.
Meghan says
Knocking the brick out was MESSY! We knocked out a lot of it but left enough bricks around the fireplace to put a stone veneer over it. Then we framed and drywalled the sides. Nothing to lose by giving paint a shot first! A heck of a lot cheaper and easier than stone and John and Sherry’s is total inspiration! Maybe pre-made bookcases prettied up with some trim to look custom?
Sean (Meghan's hubby) says
We used eldorado ledge stone (veneers). http://www.eldoradostone.com/
– Applied a stucco mortar skin coat over brick. (This can be tricky if brick is sealed…. spray with water and if beeds of water appear, will need to strip / sand down or rough up to help adhesion.)
– You can nail mesh to brick, then stucco to help stucco stay while it dries, we didn’t, but had issues with stucco sagging and probably should have
– Measure surface (with stucco) and dry fit everything first. We measured and taped off on flat surface and laid it all out, and made the cuts….before mixing any veneer mortar.)
– Once scratch coat is dry (~1-2 days), “back butter” veneer stone using veneer stone mortar then set.
– May need to build support frames to help keep in place as they dry (e.g. above fireplace opening span and corners.)
– Apply same veneer stone mortar as “grout”, can also drystack with no gap if desired.
– We used a blue thermal flagstone for the mantle and hearth and added that at the end setting in mortar. If you’re going this route, will need to add a corbal for support to mantle. I turned 2 bricks in the top row sideways (protruding out of fireplace plane), and mortared in place prior to the skin coat. Then used a corner veneer to cover the brick bottom and face that was exposed (top was covered by mantle.)
Here’s a good veneer stone how-to video if my rambling doesn’t compute:
http://www.quikrete.com/athome/Video-Veneer-Stone-Mortar-Application.asp
Hope that helps.
YoungHouseLove says
Thanks for sharing that info Sean!
xo,
s
Amy L. says
I am always so amazed when people take down walls (you guys included). I just don’t have the vision to look beyond what’s already there. Amazing!
Rachael S says
Wow I think my jaw hit the floor seeing that transformation what an awesome job! I wish they had more pics to share I want to see more!!!
Shannon says
Looks amazing! they did a fantastic job!
Amie says
The second sink on the other side of the island is clever! A rinse station before going into the dishwasher.
I also love the dog in his bed.
Meghan says
I would love to be able to say we get a ton of use out of that bar sink at our rockin’ parties b/c we’re so cool but in reality it is where we hide our tools for our latest renovation :) The dog is always in his bed…it is good to be Kai :)
Cara says
Does she have contact info? I’d love to know how she applied the stone around the fireplace.
YoungHouseLove says
She does, but I’ll leave it up to Meghan to share it if she’s comfortable. I figure it’s not my place to start posting people’s email address. :) Feel free to leave yours here if you’d like to invite her to get in touch.
-John
Meghan says
I’d love to help! mlinds02@gmail.com
Stephanie says
LOVE the paint choices!!! The green and white combination is so clean looking with the stainless steel appliances! Especially the double ovens:) Love it all!
Natalia says
I think we have the same granite counter tops! Love how they opened up this kitchen, what a difference! Definitely love the two different colors of cabinets…would love to do that in my next house, either a different color island, or a different top and bottom (like off white and light green/bluish or grey color). Is it weird I say “in my next house?” We just bought our first home last year, it’s a 2 family and we’re not planning on staying there longer than 5-8 years tops, so I always talk about what I’ll have in my next, bigger, one-family home:)
Lauren @ Around the World Food says
Love the kitchen! And I love how the island is black while the rest of the cabinets are white.
Kristi says
Wait, how is that goodness even possible?! Loving it!
Stephanie Phillips says
I. Love. It. All. Seriously. I wonder if they would come help with my kitchen/dining/living reno? I envision a space just like this!
Pam says
I love that they used two different color cabinetry. I didn’t even notice til my second read through, but having the island a dark rich color really draws it in as the main hub of the room. So in love! I wish I was brave enough to do all this!
Kristen @ Popcorn on the Stove says
I can’t believe the before and after – it looks like two totally different homes! Absolutely amazing!!
Alisa says
Wow! That is a fantastic “after”. I have a small galley kitchen and would love to tear down a wall (even partially) – how do I know if it’s load-bearing? A remodeled kitchen is nice, but not if it’s flattened by the second story!
YoungHouseLove says
The surest way to know is by checking with a contractor or an engineer. But if your home has a fairly simple layout, like our brick ranch, you can take a pretty good guess by figuring out which way your joists run (you can go in a crawl space to see the floor joists, or in an attic to see the roof frame). A load bearing wall will be perpendicular to the joists. If that’s not possible, you also can sometimes look at your floor boards. Since they usually are laid perpendicular to joists also, any load bearing walls are likely parallel to your floor boards.
-John
Meghan says
Ditto with John on check with an engineer thing. Luckily I’m married to a stud muffin engineer. Some other clues other than joists and floor boards are to look at the pitch of your roof and check out any obvious support stuctures in the floor beneath it (beams, columns, etc). If you have a load bearing wall there should be some kind of support on the floor beneath it as well. That is all coming from an accountant so I could be wrong so definitely check with an engineer.
The Mrs @ Success Along the Weigh says
Wow! What a makeover! It never ceases to amaze me how much hidden potential lies in older homes just waiting to be freshened up!
Cate says
Amazin transformation!!! And that they DIYed it – even more amazing! Absolutely love it :)
Courtney says
Amazeballs. They need to blog if they truly did most of that themselves because it’s gorgeous! I wish I could see the back splash better. Love love love how it turned out.
Emma says
Wow! Is her husband a contractor or something? That place looks amazing! All of it. My fave detail was their choice of glass cabinets between the kitchen and dining room. That really opened the space up while still proving storage.
darbi says
OOOMMMMGGG! That island makes me swoon! It is amazing! Dark cabinets, beautiful countertop…..DIE! This makes me hate my tiny kitchen even more.
Christine says
It’s so beautiful! She and her hubby are (crazy) ambitious! They did a great job, it looks very professional.
Kim @ Wonderings says
Love the hanging cabinets! Breaks up the rooms without getting in the way.
Caroline Hill says
Love the kitchen redesign. I think the contrast between white cabinets and dark island cabinets is done very successfully! Beautiful work.
Karen F says
one word – WOW!
that’s a beautiful renovation, and when you consider that it’s a DIY???? Just WOW! Amazing job!
My favorite part? All the openness from taking down those walls!
Kristen says
Is it possible to pick a favorite?? I don’t think I can! I love the entire room!! I go have island envy right now, I picture those three boys coming in after school and eating cookies and doing homework! What an awesome transformation!
Gwenalyn says
Wow! I also love the wall removal. What color green is that? I love that part, too. The whole reno is amazing! And with working full time with a 12 week old? This couple deserves a pat on the back!
YoungHouseLove says
Hopefully Meghan will stop in with the answer to your green paint question!
-John
Katie says
That was going to be my question as well! Would love to know! And would love to see the rest of their house DIY on here maybe as guest posts since they don’t a blog of their own to share :) Looks amazing, looove the pendants!
Meghan says
Behr Premium “Restful.” It looks super green in the store thanks to the fluorescent lighting of Home Depot but it reads more green/gray in natural light.
Chris says
I was hoping to find out what color green that was as well, I love it.
Beautiful kitchen, they should feel very proud:)
Gwenalyn says
Thank you Meghan! It’s beautiful (as is the rest of your kitchen!)! :)
Emiles says
ah.freaking.mazing. all of it. for reals. and way sad they don’t have a blog. i could eat up about 50 more pics
Meghan says
Be careful what you wish for :) John and Sherry inspired me: http://megandmartinmen.blogspot.com/
I’m an accountant by day, renovator by hobby. Definitely NOT a web designer and that is very obvious :)
KiTx says
My jaw dropped at the removed wall “before and after” sequence. Holy flippin moly- and with a 12 wk old and later 2 more kids?? Amazing, HUGE kudos to Meghan and her hubs!
Lindsay says
Alright, this chick is officially jealous! Congratulations on an AMAZING makeover.
Can you please come to my house now:)
Urban Wife says
I am in complete AWE. Talk about impressive and dedicated.
My fav detail is the bottom of the kitchen island. The pallet-esque dark wood is just gorg. When can they come redo our home? I kid. ;)
Beth says
Wow. The see-through hanging cabinets are pretty awesome looking and they did a great job picking their countertops/island. So great.
Stephanie B. says
WHOA.
Elizabeth says
Since they don’t have a blog, can you please go house crash them? I would LOVE to see the rest of their house.
YoungHouseLove says
Oh man, that would be fun!
-John
Emily says
I second this comment! I am dying to see more!
Meghan says
Younghouselove.com Philly bound????? You’re always welcome!
YoungHouseLove says
Oooh, thanks for the invitation. Perhaps if the book tour bring us up that way we’ll have to take you up on that!
-John
stacy t says
I love it – and I want to see more, especially what they did to their fireplace!
Lucy says
I’d love to hear more about the fireplace too. We have an “ugly” fireplace that I’m itching to fix.
stacy t says
Yep – we have that same problem with the same concrete shelf they have!