Vanessa sent us her kitchen makeover that clocked in at just over a hundred beans and it made us more than a little giddy. But we’ll let her take you through the story of how she got so much bang her buck. Here’s her letter:
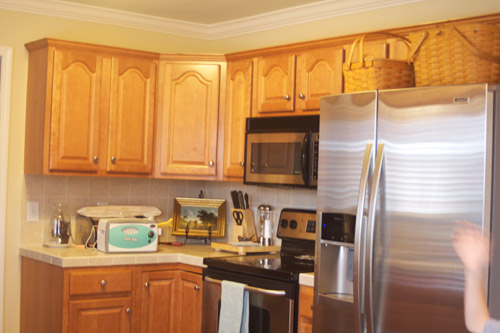
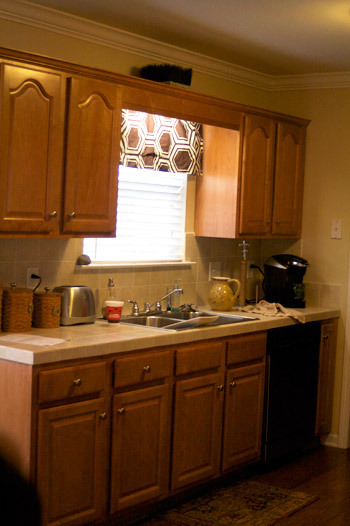
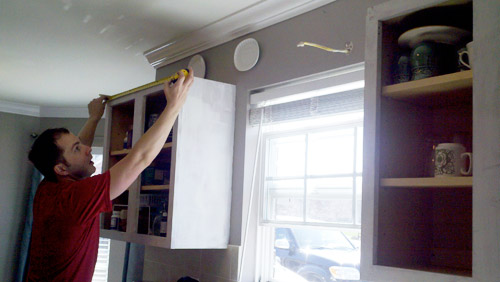
In 11 years of marriage, my husband and I have lived in seven cities and sometimes have moved multiple times in each city. Needless to say, I have become a pro at making each house a home. One thing I have always wanted to do, but have been too chicken to tackle it – is paint my kitchen cabinets. Now, in our seventh home, I finally decided to do it. All. By. Myself. When we moved in, things looked like this:
After priming and painting several coats, I rehung the cabinet doors and began sanding the edges. I then used some distressing oil around the corners where I’d sanded. After letting the oil sit on the door for a minute or so, I simply wiped it off (you can see the oil sitting on the picture on the left below, and what it looked like after I wiped it off on the right).
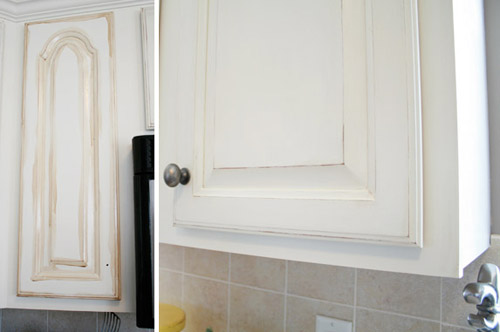
I love the way the oil brought out all the little scratches in the wood and created a sealer of sorts. Once all the cabinets were distressed, I replaced all the knobs that I bought for a steal! I chose an antique pewter for a nice contrast against the cream, but to tie in with the stainless appliances.
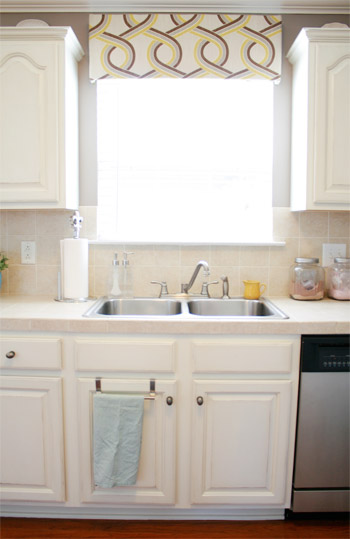
One thing I had always hated about the kitchen was the apron that connected the two cabinets on either side of the sink. My awesome husband took down that piece along with the cabinet molding. Then he recut the molding to fit around the two cabinets. It is amazing how much more light came in with that simple fix.
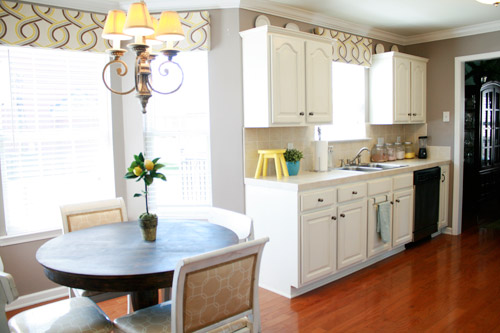
In addition to refinishing the cabinets, I also made new window treatments. I used a tutorial from Little Green Notebook for some awesome pelmet boards that were so easy to make!
Source list:
- Paint: Valspar cream oops paint $5, Danish oil for distressing $11
- Primer: Zinser oil-based $14
- Cabinet hardware: Resale shop $10.50 (21 @ 50 cents each)
- Valances: P. Kauffman fabric (Old Time Pottery) for $20, other supplies $11 (used this tutorial to make them)
- Accessories: Yellow step stool (Hobby Lobby) $12, small yellow pitcher (Goodwill) $1, three glass jars (Target) $6 each
- That’s $102.50!! Woo hoo!!
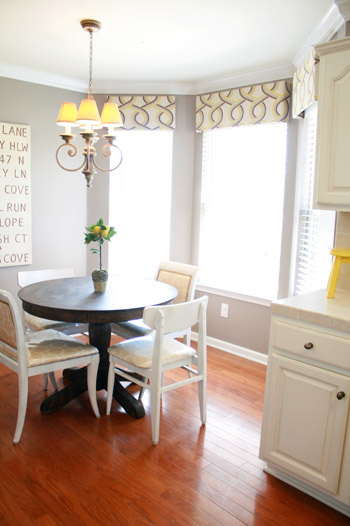
And as a bonus little tidbit, the kitchen chairs were Goodwill finds that got a new life for less than $100. The table was originally black (from Target) that I already owned. I simply stripped it and re-stained it for less than $20. All the other accessories, I already owned. If you consider these previously completed projects in the final total, the makeover still comes in around $300. I say, that’s not too bad for a full kitchen makeover, right?! -Vanessa
Not too bad at all, Vanessa! Actually, it’s pretty darn amazing. We love how fresh and light it feels, and the existing backsplash and counters work so well with the new look. Anyone who’d like more pics / details can hit up Vanessa’s blog, but first let’s play the favorite part game. Sherry loves the window treatment fabric and that fun yellow step stool, meanwhile I loved reading about distressing oil since we haven’t tried our hands at it yet.

Penny Smith says
Isn’t not including the price of the changed WALL paint kinda cheating on the price? They were apparently a yellow prior. :)
YoungHouseLove says
I think where she included other things in the bottom list (ex: the four Goodwill chairs, etc) that 100 bucks might include the wall paint along with those four chairs. Sorry if that wasn’t clear (we get long letters and try to condense them for the post) – here’s hoping she drops in to clarify!
xo,
s
mp says
Gobsmacked! That’s a night & day change!
I love that hubby took down the apron. A kitchen designer at Lowe’s shoved one down my throat when designing my kitchen, which is one reason I haven’t offered them my business. She would NOT back off it and took to citing her membership in NKBA. I was tempted to tell her I was a member of ALA (American Library Association) but wasn’t telling her what to read.
YoungHouseLove says
Hahahahahahha, that’s a pretty hilarious analogy.
xo,
s
Alana of Domestic Bliss Diaries says
Vanessa did an amazing job on her kitchen.
I just posted my kitchen/dining area plans (several parts inspired by your home): http://www.domesticblissdiaries.com/2012/05/house-dreaming-kitchendining-room.html
YoungHouseLove says
Aw, that sounds like an awesome plan! Can’t wait to see how it goes- keep us posted!
xo,
s
Michelle says
WOW! Totally inspirational! I’ve been living with an “eh” kitchen for 8 years waiting for the big remodel. I might just have to rethink that…
Love your blog – I’ve only been hanging around for a month or so and I have been totally “getting on that” around my house. You are just what I needed, thanks! And my boys (9 & 3) loved the Clara/Worms video:)
Jen says
What an amazing change! This is an example of kitchen I always dreamed of – I love white furniture, especially in the romantic provence style.
cara says
Wow, amazing makeover. Looks great!
Lauren says
I’ve been toying with the idea of painting our cabinets for so long. I think this just gave me the boost of gusto that I needed!
Great job!
Esmael says
Now that’s being smart to the buck! Those cabinets are extra-cool and it made the kitchen look more spacious.
John@RemodelingBIBLE says
Remodeling is all about being savvy, too! Thanks for the very nice post.
Ashley says
This is amazing! It really shows the power of paint! The room is beautiful…thanks for sharing!
Threadbndr says
Love the color pallett – the creamy whites, brownish greys and yellows are so fresh looking.
I’m trying to get up the courage for a major kitchen overhaul – and it WILL include painting the cabinets.
franky says
this is such an affordable makeover! thanks for these wonderful photos!
Autumn@fallfordesign.com says
Wow, Love this. Our kitchen is just as dark and dreary before they did their make-over.
Mamaw03T says
INCREDIBLE! Love the fabric. Love what the oil did to the cabinet. Total transformation on the cheap…gotta love it!
Torey says
These are my favorite kind of makeovers. :)
Chenell Tannure says
Great, great job! Those cabinets look really high-end now. Congratulations! I’ll check out your blog.
Amanda says
Wow! I kind of wonder the locations for some of the re-dos. There tend to be significant price differences based on locations, so it helps to put things in perspective.
SueP says
I love the distressing oil. I have been mulling over the idea of painting my (worn!) bedroom furniture. This could give it a whole new life.
Donna says
Oh, wow! That was an inspiring makeover. I guess I find myself avoiding a lot of DIY projects b/c of budget constraints, but this proves you don’t need a lot of cash to change a space! Great job!
lori says
I have that same stupid apron between two cabinets. Any idea how to take that down? Just take a saw to it?
YoungHouseLove says
Sometimes it can be knocked off with a hammer (it can be a separate piece or a long board that goes across everything that can be replaced with trim like they did here). Hope it helps!
xo,
s
Vanessa Dolberry says
Thank you all so much for the nice comments! I am so honored to be featured on YHL! I guess my head has been spinning a little too much, because I totally didn’t think to check comments on here & answer any questions! Duh! Sorry about that. I think most people found what they were looking for except for Candace. I chose NOT to paint the inside of my cabinets. I may regret it one day, but for now, I’m totally fine with it. It was an extra step, that really is only benefiting me since I’m the one opening the cabinets. If you think it will bother you later on, though, I suggest just tackling it from the get-go! Also, I didn’t use any deglosser and only lightly sanded the cabinets. I emphasize the word “lightly.” The oil based stain really did its part in helping the paint to stick! At a little over a year later, the paint finish has really held up well. As far as a distressed finish vs. regular painted finish. I like both, really. I honestly was leaning toward a clean fresh, painted look with no distressing. However, I have a 9,7 and 3 year old. If I don’t distress it, they will! : ) Also, after sending in the submission, I switched to wordpress and my new blog is at : vanessadolberry.com.
PS- John and Sherry, you guys are an awesome inspiration!
Vanessa Dolberry says
Actually, the new blog is vanessadolberry.com/blog!
YoungHouseLove says
Aw, thanks so much for stopping in! So happy to share your awesome makeover!
xo,
s
Amber says
Hi what colour paint did you use and what type of oil ?
Thanks so much
Amber
YoungHouseLove says
Here’s hoping she’ll drop in with that info for ya soon.
xo
s
Angie says
Did you paint the bottom of the base of the top cabinets? We are in the process of painting our cabinets and I have no clue what to do with the bottom of the top cabinets.
Ang
YoungHouseLove says
In our case we painted the bottom (since you see them when you sit down in the room) but not the tops. Hope it helps!
xo
s
margo says
Sigh ………..having the same husband vs painting cabinet issues …….. so much wood in a kitchen makes it a bit heavy for my liking ….LOVE the distressed look…..ill keep working on it ……. ( the husband :)