When Karen sent us the DIY headboard that she whipped up, we couldn’t wait to share her amazing results. Here’s her letter:
I just wanted to show you how I used your tutorial to make a headboard for our bed. The only difference was that I used 1 X 2’s cut to size from my home improvement store (I attached them with L brackets which only cost me $5!). I did use designer fabric by Patricia Bravo but I got a great deal on that on Etsy so the whole project was really affordable. Thanks for the tips! As you see our Min Pin likes it too! -Karen
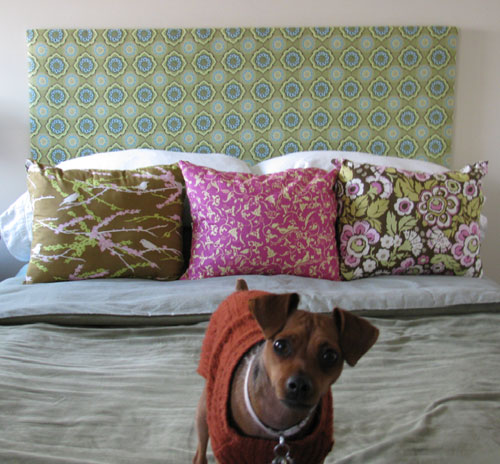
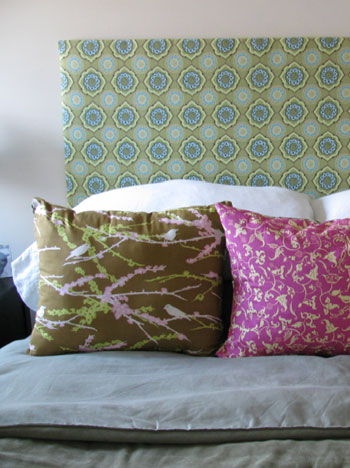
Didn’t Karen do a great job? We love that she used such a pretty pattern to add ambiance and interest to her bedroom. And the fact that she paired it with such lively and lovely pillows (which she picked up on the cheap thanks to Etsy) really is the icing on the cake. And while we’re on the subject of eye-pleasing arrangements, isn’t her pooch the ultimate accessory? He really makes that DIY headboard pop.
Psst- Looking to make your own homemade headboard. Here’s our super simple tutorial (seriously, if you can wrap a present you can upholster a headboard).

Heidi H. says
Very pretty!
LOVE the pooch!
monica says
Gorgeous! I esp LOVE the fabric of the pillow on the right.
Dana @ House*Tweaking says
Yet another reason why Etsy floats my boat. That headboard is awesome. And I love the pattern/colors against the neutral wall. Great job!
mary s says
Wow, looks great! I have a burning question – what to do ti the bed is a quarter under a window and 75% under the wall? I don’t want to cut out the window at all with the headboard! Any ideas, anyone???
YoungHouseLove says
Hey Mary S,
We would probably cheat the curtain rod way over so it looks centered above the bed and hang curtains down so they look like a headboard. That way people won’t really notice the off centered window and you’ll have some nice punchy fabric above the bed. Hope it helps!
xo,
s
kitarita says
So impressed and inspired–nice work! I am wondering one thing…I just posted this dilemma on my blog, but, when you have an upholstered headboard like this, what do you do for a bedframe? My husband is super opposed to a bed skirt, but I’m worried that just the metal bedframe will not look that great. Any ideas? Or do I have to convince him on the bed skirt?? :)
YoungHouseLove says
Hmm, you could try to go without a bed skirt but we think you’ll probably want a more polished look so you might end up with one. Luckily they made fitted and crisp modern ones (they’re not ruffly at all) that your hubby might just like. Good luck!
xo,
s
rosanna says
I love how easy this project looks and the amazing results. I can’t help but imagine a floor to ceiling headboard made this way.
Adaena says
Great job, Karen! I love that you used such colorful fabric and weren’t afraid to mix ‘n match colors. I too made a headboard from pieces of wood cut at the home improvement store–except after I purchased the lumber, I realized it would never fit in my little car. I always get excited about my homegoods and forget about transportation issues! Luckily, the folks at Lowe’s were kind enough to loan me some string to tie down my hatch.
Here’s the link to my headboard, if you want to see another photo example: http://www.flickr.com/photos/adaena/4043208038/in/set-72157622534743413/
sara says
Question for Karen!
Would you mind sharing the link to Etsy where you bought your pillows? I looooove them! :) Thanks!
Sonya says
Awesome! Very inspiring! Great timing because I’m currently hunting for the perfect fabric to make my own guest room headboard. The only thing I’m still trying to work out is how I’m going to attach the headboard securely to the wall or to the bed frame to keep it from coming loose if my guests want to lean back on it while reading in bed. Would love to see what Karen did for her headboard to hold it secure.
YoungHouseLove says
Hey Sonya,
We’re guessing that Karen used large nails or screws (with anchors) to hold her framed headboard up on the wall- just as we did in our tutorial. Here’s hoping she pops by with that info, but in the meantime you can follow the link at the bottom of the post to see how we hung our DIY headboard. Hope it helps!
xo,
s
Carol N. says
Love the amazing colors on the headboard as well as the pillows! I’m not as brave to mix my colors like that but it looks great. And love the min pin and his inquisitive ears!
Katie Lynn says
I’m just loving Karen’s bed, in general! It looks so simple and comfy … Like you wouldn’t be afraid to jump right into it and mess it up. But it’s beautiful at the same time. :) Fantastic!
jessica says
Great job! I love all the colors mixed together!!
Lemon says
To the poster who asked about hanging it – I used a door from Ikea’s As-Is section as a headboard. I just used a cleat hanger from the hardware store and some self-stick felt pads on the bottom corners to hang mine. Could probably use two cleats on something heavier. Worked like a charm.
christa says
it looks awesome! must say the pin pin is the icing on top of the cake though. i need to look on etsy, that fabric is great.
Laura@JourneyChic says
I’m not sure I have the confidence to mix patterns the way that Karen did – she did a great job! It’s colorful but cohesive at the same time.
Leah says
Your Headboard tutorial got me started on DIY and now I’m seeing potential projects everywhere.
I love my upholstered headboard, and I hung it on the wall using two picture hooks. I attached little frame loops to the headboard itself so they hang right on the hooks and the wall is protected.
Tiffany says
I LOVE the headboard but am not a fan of the mix of pillows. It’s a little busy for my tastes. Pin Pin is a cutir though.
Jessica says
The fabric of the pillow on the far right is from Amy Butler’s Daisy Chain collection for those of you wondering… I’ve been without a headboard for too long! I just may try this now. It looks great! I’ll send pictures if I end up making one. :)
YoungHouseLove says
Thanks for the fabric tip Jessica!
xo,
s
Emma says
Super stylish…two thumbs up!
Nichole says
I envy her eye for mixing color and pattern. I wish I could do that.
Delana says
I can’t wrap a present, so I probably couldn’t do this! LOL
daily decorator says
L.O.V.E.!! I especially admire Karen’s no fear of pattern! I have a self-made fabric headboard too and I wouldn’t trade it for anything!
-Tracy
Barb says
Swooning here in Texas… that fabric is to die for! And, so is the cute little canine bed decoration!
Great job!
Ashley @ Mutschler Family, Dallas Edition says
I love this! I am going to try my hand at making one too!
Kylee says
I absolutely love the fabric, but I hate to say that my eye immediately noticed that the fabric is not even at that top, which bugs an OCD type like me. When I made one I used a solid color to avoid this! ;)
krstn says
Cool! We did the same thing a few years ago but I picked out a really tame brown fabric. Think I can just pick out a new fabric and cover the old?
YoungHouseLove says
Definitely! Just pull it nice and taught right over the existing fabric and staple it securely. Hope it helps!
xo,
s
Sonya says
Lemon, thanks for the cleat hanger suggestion. Had never heard of a cleat hanger before, but that seems like a genius solution for hanging the headboard securely without having to worry that it will fall off of a nail or picture hanger. I was considering drilling holes though the bottom of the headboard and bolting it to the wall but sounds like the cleat may not cause as much damage to the wall. I’m going to give it a try at least!
Amanda says
Just had to give a shout out to my friend Karen! Trust me when I say the headboard is even MORE striking in person! She did a great job and I am so excited to see it mentioned on your awesome blog!
I couldn’t help myself and also blogged about it at:
http://lovepinkstilettos.com/
tammylee says
beautiful fabric on the headboard. but i am noticing the pattern is a little uneven at the top. i guess you have to be really careful when using fabric that has such a noticeable “line” in it
Karen says
For those who wondered about the fabrics…I used Patricia Bravo fabric, Amy Butler fabric and fabric by Joel Dewberry. There’s a great gal on Etsy that has designer fabrics for great prices…FabricFlair. Her fabrics are beautiful and her customer service can’t be beat!
And yes, I noticed the pattern drops a little at the top! I’m still happy with my headboard just the same :)
YoungHouseLove says
We think your headboard is perfect Karen! We wouldn’t change a thing. Thanks so much for sharing your amazingly inspiring pics and for popping by with that info.
xo,
s
Karen says
I love this…and that fabric is beautiful! Not sure if Karen is popping in here to answer more questions – how much fabric did you use, and what was the size of your frame? I am assuming it is a queen bed? You have inspired me!
Kendra says
Sherry,
What happened to the piece you wrote about the good finds at Target right now? I saw it and went to Target afterwards to look for some of the items, and came to look at your blog again and it was gone! (at least I couldn’t find it). I thought it was so neat to see you post some cool and decently priced items from local stores that everyone has in their area – it inspired me to go shopping!
Kendra
YoungHouseLove says
It’s still there! Just go to the bottom of our blog’s first page and click “next” to see the next 5 posts. Hope it helps!
xo,
s
Jane says
Hey, Karen’s my baby sister and I’m so proud of her. She deserves all the positive comments and attention. I think her headboard and pillows came out great.
Naturally, I’m a little jealous since I have a hard time even threading a needle. xoxo sister Jane
Jacci says
Shuh-eek :) Love it.
indigorchid says
I love, love, love the colors and the patterns! This is going straight into my inspiration folder!
Karen says
Hi, it’s me (Karen) again…
Just to answer the question regarding how much fabric I used. I only needed two yards to cover my frame. Be sure to check fabric size because some fabrics are wider than others. I used the width of the bed (a queen size), and just figured how tall I wanted the frame to come up. Mine hangs down lower than the mattress. I like it that way because it’s flush against the wall with the bed pushed up against it. Mine measures about 47 X 59, that’s with the batting and fabric attached. It hangs on just two regular nails. It’s pretty light actually.
Hope that helps!
YoungHouseLove says
Thanks for stopping in with more info Karen!
xo,
s
designer.finds.addict says
What a great combination of fabrics…Very cute :)
Sandy says
Hey Karen,
The look is so you. Quite a decorative touch. You are so creative. The patterns are bold and so colorful. I’m not that creative with fabrics, so glad there are people out there that are. Everything is great even our little critter!
Sandy
agneta says
Your blog ….. it’s amazing and soooo inspiring. Nice to find you!
A small footprint from Agneta & Sweden
Ps. I have an ongoing jewelry contest on my blog. Welcome! Ds
Tiffany says
Looks great, I love the color combo.
Amanda W. says
Lovin’ this headboard and pillows! Is there any way I could find out the specific Etsy shop she got the fabric from? I am wanting to cover the cushion on a chair I am painting! Thanks!! :)
YoungHouseLove says
Hey Amanda,
Scroll up for that info. Karen actually dropped in a few times with lots of details. Hope it helps!
xo,
s
Roeshel says
I love pretty designer fabric and this is a great DIY project! LOVE it! Super job, Karen!