You guys never cease to amaze us. And Cassity’s project is a perfect example. She and her husband needed a headboard, didn’t want to pay for one, had some scrap cabinet doors hanging around and… well, I’ll let her explain the rest:
My husband and I love to remodel too! Forget regular hobbies, let’s rip out a wall together (so romantic!). I wanted to send you a project that we recently finished. We haven’t had a headboard for years, and couldn’t swallow the going price for one.
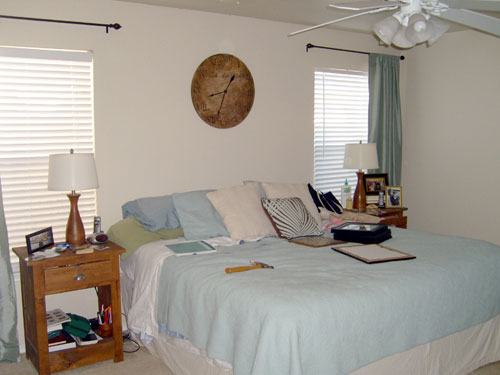
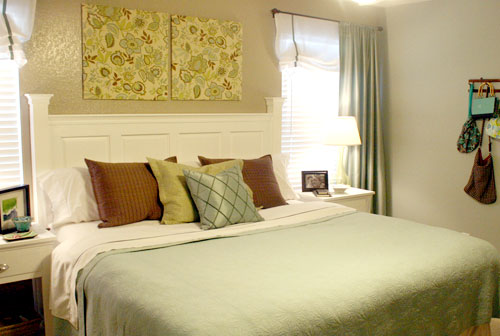
So I finally decided just to build one. Now I have no idea why we waited so long! We used mostly recycled parts – namely some kitchen cabinet doors. That’s right: kitchen cabinet doors. They are pre-made raised panels, which removes the need for expensive router bits and table saws.
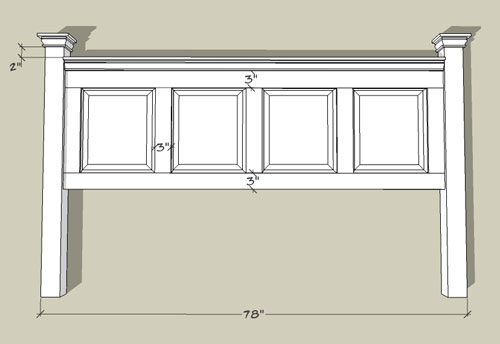
I’ve included a full tutorial on my blog Remodelaholic for anyone who wants to try it for themselves.
It really was pretty simple and the payoff was not having to spend a ton for the headboard that we had always wanted. Thanks for the fun! -Cassity.
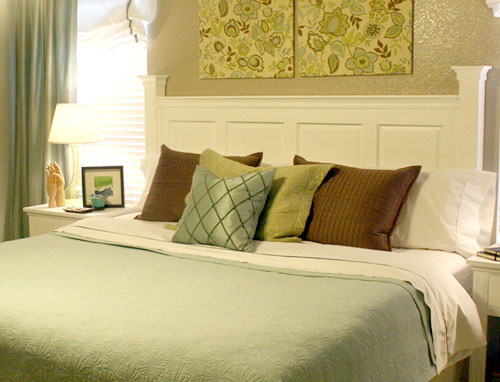
Can you guys believe it? Genius! It looks so polished that it’s easy to forget that those panels were once cabinet doors. And a huge thank you goes out to Cassity for providing such a detailed step-by-step tutorial for everyone. Hopefully some other headboard-needing folks will consider tackling it too- maybe even this weekend. Happy building everyone!

Patti says
This is an inspiring transformation and I love it! The hands on the bedside table … not so much :-D
Susan says
Wow! That is unbelievable! Thanks for sharing that.
Becky@OrganizingMadeFun says
That is really amazing…so creative! Sort of, why didn’t I think of that?
Faith says
I love the headboard. I love the painted beside tables. I love the window treatments. I can’t wait to start on my own bedroom!
Miss Lindsey says
Wow, it looks so professional and I’d have never guessed that it was made with cabinets. Great job!
Christine says
Genius idea!! Definitely going to check out the tutorial.
Loren says
Oh super sweet! Great transformation.
I love the ‘bag rack’ on the wall and the ‘holding hands’ on the nightstand! They are so sweet. Are those the articulated modeling hands you can buy to help you learn to draw?
suzie dyer says
It looks great!! Coincidentally, I just made a wall hanging for my powder room with the exact same fabric as the ones above the bed!!
Kita says
I have a headboard that’s very similar to this one! Love the remodel!!
Diane says
Wow – beautiful!! The entire room is just gorgeous. I would be interested in finding out where the white roman shades came from – love them!
Caroline @ youngDCliving says
This looks great! Even the bedside tables look so fresh and cute when painted. Nice work!
Mandy Ford says
What a genius idea and I really love the color scheme.
Lauren says
Really? That didn’t cost a billion dollars from Pottery Barn?
Nicole says
That’s beautiful! I think its funny how the B4 picture includes a hammer on the bed to make the transformation really obvious. But Cassity’s kitchen cabinets to headboard project is perfect! :)
Kimberly says
WOW! Nice way to recycle! It is so creative! I appreciate the instructions because I have always wanted a wood headboard myself but I don’t want to go out and buy it!
Alice says
That looks fabulous! And the bedside tables look great painted white also!
Tia says
One of my favorite redesigns! Amazing work for very little money!
Emily says
love the headboard.
@patti Maybe if they were white they would be…more inspirational?
Jenny M says
Wow! I so don’t get it but that’s great because it doesn’t even look like cabinet doors! I need to check out the tutorial and figure out how this all went down. Well done!
– Jenny M
Jocelyn Stott says
Kitchen cabinet doors! I love it. So many creative lovelies out there!
maria says
wow that is simply amazing!!!
Erika says
So pretty! Of course the other renovations make it look even better :)
I’ll have to check out the step by step tutorial.
liz @ bontempsbeignet says
WOW! Now I wish we would’ve saved our old nasty cabinet doors when we did our kitchen reno : /
Handy Man, Crafty Woman says
Great job! I love looking at before & after room makeover photos.
Michelle says
Oh my gosh I LOVE IT. And it’s so customizable too– for instance, I would paint the inner trim a similar sort of aqua-green color as the bedding and curtains. And it looks so nice classy and white, too. Love love love.
Sara says
Wow! That’s one of the craftiest DIYs I’ve ever seen!
Does anyone know where to find the fabric for the wall hangings above the bed?? I love it!
YoungHouseLove says
Glad you’re all loving this makeover as much as we are! Here’s hoping Cassity stops in to answer your questions soon!
xo,
s
Lisa in Seattle says
I am gaping here, this is such a lovely room! And the pictures are so well styled that it really does look like something from a magazine. (In a good way.) I’ll be spending lunch hour reading through their whole blog.
LOL @ Lauren re: Pottery Barn. That’s what I thought too!
Cordia says
Nice! Love the colors too! What is the wall color?
Amy says
I LOVE this! Love the color scheme, adore the headboard…yum all around! I think I could totally handle a headboard like that!
Wendy says
I am so impressed. That looks like just like the $1,000+ versions sold in Restoration Hardware and Pottery Barn. Great idea!
Jennifer says
LOVE the art above the headboard! Everything looks so crisp and fresh with the white paint, too. :) Great job!
Erin @ Two Story Cottage says
I LOVE the overall look! Beautiful room.
Alisha says
Holy Smokes!! That is absolutely amazing!!! =) Looks fantastic!
Kevin M says
Very cool idea. Neat blog too.
kelly says
Holy crud! It looks sooooo gooooood!!
Laura (youngDCliving) says
This is incredible! You guys are so creative, I love all the color combinations and fabric canvas artwork above the headboard. Great job!
Cassity @ Remodelaholic says
WAHOO! I feel SO famous and am absolutely ecstatic about being on Young House Love! I will look back and answer questions soon, I just barely got on the computer right now for the first time today! And had to thank you like crazy first! Yea!
pam says
awesome!! the before/after had my jaw drop. just gorgeous!
Pam in NC says
Dang! I always wanted to do that with an old door – never ever considered using cabinet doors! Standing ovation for this one! And look – you painted your adorable nightstands, too. Love it!
Cassity @ Remodelaholic says
To answer a few questions-
Loren- Yes those are model hands for drawing or sculpting, I have a collection of hand sculptures, maybe strange, but I love them.
Diane – I made the Roman shades, I have a Tutorial Here.
Sara- I got the fabric from Joann Fabrics.
Cordia- Technically the wall color is a mis-mixed paint and it was a custom blend, so I can’t be sure if they added any extra colors! Sorry not to have the color.
Hope that helps, I’ll check back for more questions soon!
Alicia (Atypical Type A) says
Holy flip!
Great job with the headboard but the whole room is a stunner, looks like you have a similar aesthetic to Sherry & John.
Amanda @ longroadset says
That’s really nice. My fiance and I are going back and forth between making an upholstered headboard, or something hand crafted like this. I think the headboard you made is absolutely gorgeous. I bet there are people who have spend hundred or possibly even thousands to get something this nice. All I can say is KUDOS for being so rad and being so crafty.
Lisa says
So inspiring! This is the motivation I needed to finally put together a headboard for my bed.
Jill Stigs says
Whoa…..that headboard turned out fabulous. I also like the other changes made, painting the bedside tables was the perfect thing to do. Painting the walls warmer and adding the roman shades really dial it up a few notches. Well done…….thanks for sharing!
Nina says
super cute and professional looking! Personally I love the hands on the night stand – they make me think of the two of you working together to remodel. :D
Danielle says
Love it!! I don’t have any cabinet doors, but I do have a REAL door after making by bathroom closet an open closet (which I love!). I think I will try this out with my door!
Angie says
Love the room and the soft colors! What did you put the fabric over the headboard on? Did you make a frame? And where did the comforter come from? I like the non-polyester so it’s not so hot to sleep under!
CommaHappy says
The concept sounded so strange, but it looks awesome. Great job!
staci edwards says
What a great project! Thanks for sharing!
hi-d says
So gorgeous! I love this look…hmmm…I’m going to have to show my husband this project. So cool!