Coming off of the heels of our own adventures in stencil land, we just had to share this note from Ginny who stenciled her dining nook earlier this year. Methinks she had a clawed hand of her own going on after she finished (just like my lady wife). Here’s what Ginny had to say about her dining area makeover:
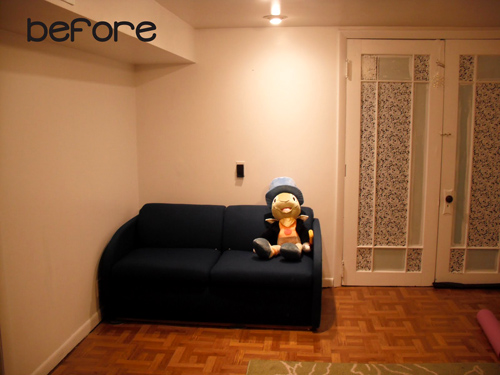
I wanted to create a dining corner in my living room. Well, although I bought my table, finally got the chairs I wanted, and tried to dress it up, it still didn’t feel like a dining room to me. It was just this table in the corner of the room. Then it hit me like a ton of bricks. I was missing COLOR. I wanted the color to match my living room so I brought in some green to match the carpet.
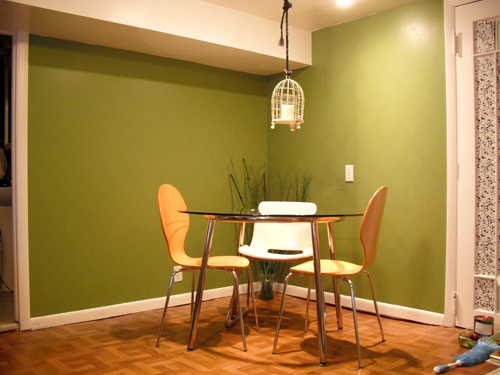
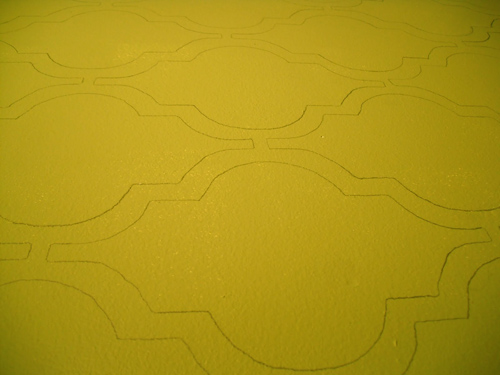
Then I saw this post that inspired me. So I went to her website to see what she did in full detail and she actually got the idea from this website. This is why I love bloggers – ideas go from page to page to page! So I cut out the template, traced it on the wall… which took 4.5 hours. Yes, my hands were hurting the next day. But then I also had to paint the lines, which took even longer :(
Now I’m absolutely positively head over heels in love with my dining room! -Ginny
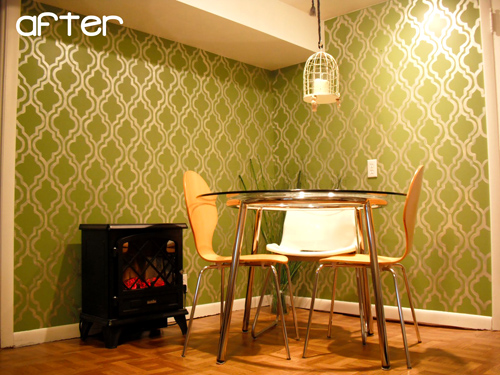
Thanks so much for sharing Ginny! We really love how the bold color and pattern made a statement out of an otherwise ordinary corner. You can read more details about her project here. Anyone else out there inspired to use a similar stencil or color palette in their dining space (or beyond)? And hopefully Ginny’s hand recovered eventually! Sherry’s are finally back to normal. But I’m not about to ask for a back rub just yet. Don’t wanna push my luck…
Got your own awesome before & after project? Send your story, pics, and related links to submission@younghouselove.com to be considered for a possible Reader Redesign feature. You know we love any and all design eye candy!

Jill says
Wow! Amazing! Man… this makes me want to rub some Ben Gay on my hands… haha (That means my hands are hurting for you, Ginny!)
linda says
WOW! very dramatic! i love it!
Donna says
Holy wow! That looks like wallpaper! Nicely done!
heather s. says
I printed the same stencil eons ago to use in the living room but then I decided that since you have to trace the pattern and THEN paint it that it wasn’t worth it to me. :)
Looks great!
Kimberly says
Wow, that looks amazing! Way to go Ginny!
Kacie says
We are almost done with our kitchen remodel! I can’t wait to submit it!
Kacie
http://www.acollectionofpassions.com/
Stefanie W. says
Can’t believe how nice that looks! I definitely have been thinking of stenciling below the chair rail (or above?) in our dining alcove, but I haven’t really searched for a pattern…but I think that one is something even the hubs can agree on!
Stephanie says
Gorgeous! I wish I had the talent or the stamina for something like that!
Wendy Tomblin says
Love, love, love that wall! I think I was born without the bold gene.
Whitney says
Looks great! Ginny, your floors are coming away from the baseboard. I have the same problem and wonder if you’ve looked into solutions??
Erika says
That looks fantastic! Good work, Ginny!
Jessica says
Love it! I think this technique would work perfectly for a bedroom accent wall. Pinning now!
Glad Reader Redesigns are back. :)
Nicole says
Gorgeous!!! I love love love it. Thank you!
Sara says
I absolutely adore this stencil! I headed over to the website to save the link and I’m going to use it for tackling a rug painting project this weekend! I was just going to do stripes or a basic chevron print – but this will give that little extra pop that I’m looking for. Thanks for sharing!
kari says
I am in the process of doing this same stencil in my bathroom right now! In fact I just stopped for the evening so I wouldn’t get claw hands. It is relaxing and fun if you like this kind of thing but also very time consuming. I’ve done one wall and I’m wondering if I should leave it as an accent wall or keep on working to finish the entire room. I can’t believe Emily on Emily Jones Design did her entire office! http://jonesdesigncompany.com/decorate/painted-wallpaper-a-tutorial/ Hats off to her. I did the same colors as Emily since my bathroom was already a beige neutral and I love the cream stencil on top!
YoungHouseLove says
I know, isn’t it amazing that she did that whole room!? Gorgeous!
xo,
s
kristen f davis says
i love you guys. i am certainly no genius, but i appreciate the shout out :)
YoungHouseLove says
Haha, don’t be shy. You’re a total genius. I’m totally sure of that.
xo,
s
Nicole says
I definitely plan on doing this! I’ve got white IKEA curtains that I’m dying to stencil on. I’m thinking grellow – I’m planning on having soft grey walls, so seeing as your grellow worked so well with grey, I’m hoping for the same.
beth in dc says
I meant to ask this with the post on the kitchen floor. I apologize if you’ve already answered but: I love the cork. You have so many floors, thin plank, wide plank, parquet… are you going to leave the textures and stain them all dark, or replace parquet?
YoungHouseLove says
Yup, we love to use what we have, so we’ll just refinish them in the same mocha tone as the cork for a seamless look down the line!
xo,
s
Ann @ The Domestic Domicile says
This is a great alternative to holding the stencil up! I love the transformation!
Erin @ One Project at a Time says
I just stenciled and painted this rug, which took a lot of time, but was totally worth it for a $40 total modern, geometric rug! http://oneprojectatatime.blogspot.com/2011/10/177-cutting-rug.html
melody says
I love that pattern! It looks great with those colors. That comment about the back rub cracked me up!
Jen says
Love this! I also love the Reader Redesign feature. It’s just as awesome as your new office chairs!
I’m in the process of saving for my first house and would love to do this in a bathroom or entry way. I guess it depends on what house I buy!
Molly says
following you while on a work trip to Vienna Austria. Look forward to your posts every day! :)
heyruthie says
SOOOOOOOOOOOOOOOOOOO happy to see reader redesigns back. I’ve been a “follower” for several years, and in retrospect, one of the things I fell in love with about y’all way back when, was the mix of different “before and after eye candy” that you had: the highlights being, A) your own “old” house B) reader redesigns and C) your comissioned mood boards that included “before” pics–especially when they combined with an “after” later in a mood-board inspired reader redesign (of which there were several!) And (don’t ask me why) the “house crashing” was never as cool as those “top 3” faves about your site, for me.
Since moving to your new house, there’s been a lot more about your own space, which I still *love* but I’ve missed other people’s “before and afters.” thanks for getting a little more of that back in to the blog ;-)
Paige says
I literally gasped out loud. That is AMAZING.
Adding it to Pinterest right now like a true addict.
Amanda says
Wowza! She did an amazing job! Definitely inspiring stuff!
Cali says
gorgeous!! looks so time consuming but so worth it!
Melissa says
Stunning. Looks awesome!!!!!
Cherry says
I love this trellis style design. I can’t believe it was hand painted. Fab!
Stephanie says
I love that you guys are doing reader redesigns again. Adds a little variety to the blog in a big way!
I’d love to do the pattern with the same base paint color in a high-gloss for a more subtle effect. Great job, Ginny!
Laura D. says
They look great! I love the green. Total transformation. Can’t wait to see the kitchen transformation too!
Laura D. says
I realized I commented on the wrong post. I love the green chairs. But I also love the green dining nook makeover. Green is the new black.
Heather {The Lovely Cupboard} says
I used the same template from that website for my dining room! So cool to see it in green and with such fresh, modern furniture.
http://www.thelovelycupboard.com/2011/07/diy-stenciled-wallpaper.html
YoungHouseLove says
LOVE IT!
xo,
s
Jessi says
I used that exact same set of curtains as inspiration for my project a while back. I ended up creating a smaller template of that (which Ballard calls firenze, other places call trellis) as well as a quatrefoil template in this post:
http://bellachampion.blogspot.com/2011/04/secret-project-reveal.html
YoungHouseLove says
Wow- so pretty!
xo,
s
Brittnee says
Wow this is a great redesign! I love the stencil! I think though I would rather buy a stencil and just paint it in instead of stenciling. Hopefully Ginny’s hand is okay.
Linda says
We have a similar green for our dining room. I would love to do a stenciled wall somewhere in our house but all our walls are textured :o(
Destiny says
Wow! That is a glamour DO!
Megan says
Wow, so awesome!! I wish I was brave enough to try something like that!
Steph says
Can I just say how happy I am reader redesigns are back?! This looks so freaking amazing.
Chrissie says
I cannot believe how much work that was for something that looks so effortless! I think my hands are too shaky for that kind of stencilling =( The result is AMAZING though, so totally worth it!
Elizabeth says
I am so impressed by the steady hands of these painters! I could never do that freehand – i would HAVE to use a stencil — well done and so pretty!
John@Our Home From Scratch says
Wow, that’s beautiful! Nice effort!
Erin says
I had to reread the part about her hand painting the stencil. Holy moly that takes patience and dedication! I took the easy route and used an all-over wall stencil by Cutting Edge Stencils. Still not a walk in the park, but feasible for a wiggle worm like myself.
Link to my results:
http://wearerandalls.com/2011/08/24/and-were-back/
YoungHouseLove says
Gorgeous!!
xo,
s
SpringFever says
Just stared reading your blog. I love it! Very inspirational!
I loved the stencil/canvass idea mentioned. I rent and don’t want to ruin the walls but I also want some pops of color and texture. I will be doing this for sure!
I do have a question for you experts though: My dining room is wall to wall + Ceiling POPCORN WALLS!! EEEEEK! I can’t stand it! I am going to try the canvasses, in there but was wondering if you had any other ideas to make this room less 1950’s-1980’s… help. :(
YoungHouseLove says
Maybe try hanging some curtains if you’re allowed? They will draw the eyes away from the ceiling. Then maybe add a fun runner and some other art along with the canvases? That should be awesome!
xo,
s
SpringFever says
Thanks! I have long 2 tone curtains hanging from a big picture window now so that helps a little. I’ll see what I can come up with for the other walls. And definitely getting a runner. :)
Libby says
that is gorgeous!! wow! it makes my hands and back hurt just looking at it though : / a big oak table or a big white table would look amazing in there!
Heather S says
Nice transformation! Thanks for sharing her room. It’s fun to see what creative minds come up with!
Sherry, The office you stenciled looks so amazing. I have wanted to paint floors for so long, but your stenciled wall has inspired me to paint & stencil! I want to rip up the carpet in the family room, paint the concrete floor and use an allover wall stencil on the floor. I’m looking at this damask: http://www.royaldesignstudio.com/shop_stencils_detail.php?id=1668 I have grey slate colored tiles in a “runway” from the kitchen out to the garage. So I’m thinking of painting it nearly black then a shade of grey.
But, anyways, when I googled painted concrete floors, for any tips, I came across this picture, that looks like you. Is it? http://doubled8.com/painted-cement-floors/
YoungHouseLove says
Ugh! Yes- they borrowed it from this post: https://www.younghouselove.com/2008/08/how-to-stain-a-concrete-floor/
xo,
s
Cecelia says
I don’t know where anyone gets the energy to stencil like that, but it’s wonderful.
Laura says
I love it! It´s so nice and that colour is perfect!
Ginny Art says
I’m glad you guys liked my dining room :)
The paint color is a Valspar color called “Garden of Paradise” Signature Interior Satin Base 4.
I used 1.5 bottles of the little metallic bottles for the lines.
YoungHouseLove says
Thanks so much for the info Ginny!
xo,
s