When Amy sent over her $100 backsplash makeover we were so inspired and just had to share. Here’s her letter:
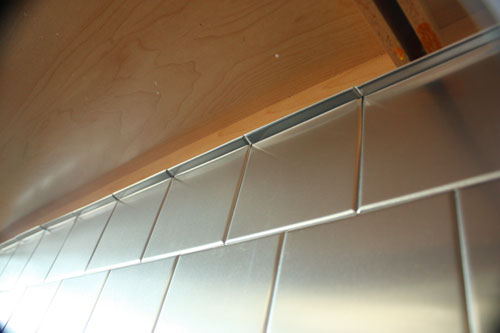
I whipped this out in about five hours and am very excited about the results! I bought nine packages of these light, thin stainless wall tiles. The tiles include double-stick foam squares for hanging, so there is no messy tile work. Some reviewers recommended Liquid Nails, but I was worried about making corrections if thing didn’t line up properly. I can go back if there is a problem, but they feel very secure! You can cut these tiles with a pair of scissors and even bend the tiles! I snipped a cut on each side and bent them around a ruler to make a 90 degree angle for corners and to cut down the size on my top row. It looks fantastic, and now I don’t have to trim around an unfinished edge. One thing to look out for – here is a slight grain to the tiles and you will see a reflection difference if you don’t hang them all in the same direction. This was one of my easiest home projects ever! The entire 27 square feet of tile cost me $94.77 (with free shipping!) and I also bought new stainless switchplates to match, so my total came to about $110.00. Hope you enjoy! You’ve inspired a lot of projects in my house, but this is my favorite so far! Thank you! -Amy
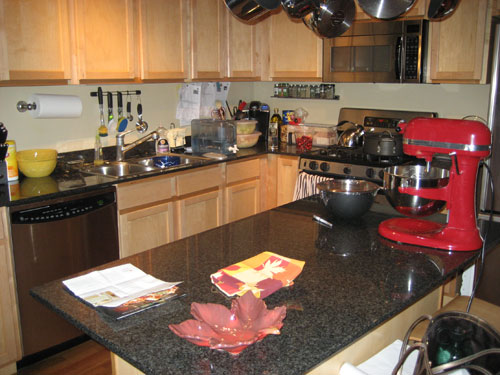
Here’s the backsplash before the amazing (and amazingly priced) stainless tile makeover:
And here’s the whole shebang after Amy stepped back to admire the finished product:
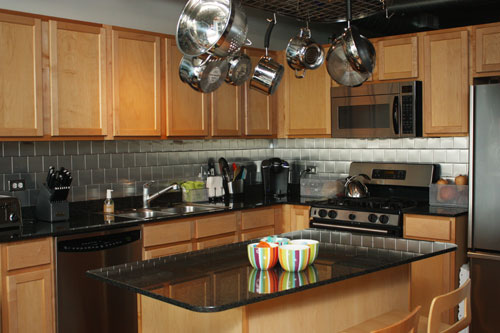
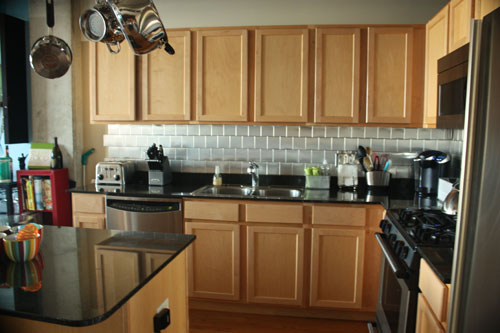
Don’t you love how simple yet sleek that is? We’re excited to hear that it’s a quick fix for anyone (even renters!) who want to upgrade their kitchen and hide dated tile without breaking the bank. Thanks so much for sending the before and after pics our way Amy! What a lovely view you now have when you’re whipping up spaghetti.

Jennifer says
Very cool. Really makes the stainless steel appliances pop.
I am planning to use white subway tiles for my backsplash. The only advice I’ve heard is to use dark grout so the white tiles pop more. That one never occured to me so I was wondering if there’s any other advice out there. I’ve never done this before so any little tibbit helps.
Thanks!
Amy Y. says
Love this. Looks very easy to clean also. Great upgrade. Thanks for sharing!
Dana says
Wow! I’ve been thinking of something similar for my laundry room and this is great! Mind if I ask where Amy got her tiles from? Thanks for featuring such a practical and inexpensive redo.
YoungHouseLove says
Hey Dana,
Amy linked to the exact tiles that she purchased in her letter (from Amazon). Hope it helps!
xo,
s
Tiffany T. says
I think subway tile is classic and always a good choice, plus it’s easy on the wallet. You should go to the how to section of YHL. They have it there I’m sure!
Abby says
This is awesome! What an affordable way to do backsplash! Then you can always change it out for tile once you have the funds. I’m definitely going to look into this for our house. We have a small kitchen so it wouldn’t take much $$!
Nicole B. says
WOW! Thanks for sharing! We are renting right now and the wall behind the stove is gross from previous renters. I want to put something up that can cover the nasty paint with out spending a ton of money! This may just do the trick!
Heather @ Brown Brick House says
Wow. What a difference! That looks great!
Amanda G says
This looks fantastic. I never would have guessed they were just stuck on with foam tape. Brilliant!
@Jennifer – My husband and I just finished tiling our shower with white subway tile and we used black grout. It was the best decision we ever made! It looks amazing and really helps the layout of the tiles pop. We are almost done with it and I hope to share after pics with YHL once its complete.
Amy says
I’m so excited to see my makeover posted! I don’t have a blog, but I put more pictures with a few explanations here!
http://amyprojects.shutterfly.com/
It has been four months and my tiles haven’t budged – the foam pads are working great! This might not be great news for renters, though. I’m pretty sure ripping a tile off the wall would do some (repairable) damage.
Thanks for the positive comments!
YoungHouseLove says
Thanks for adding that link to the mix Amy! And of course we’re so glad everyone is digging your amazingly affordable kitchen makeover as much as we are!
xo,
s
Jenny @ Words On Wendhurst says
Wow, that is a really interesting look! I’m assuming they are very easy to clean and care for, so that is really cool as well.
Megean says
Very cool! I’ve been looking for some easy ways to update my kitchen (and my fab laminate backplash). I wonder if they come in different finishes…
Jessica @ How Sweet says
I love that! So unique!
Allison says
I love how you can see the tile reflected in the countertop on the island! So cool! Great job!
Stefanie says
Wow! What a difference!
Amy V says
WOW! That looks so amazing, especially with the granite countertops! How creative- great job!
Carmen (Country Mouse) says
Wow! This is fantastic! Nice job!
Jacquelin Hicks says
HUGE difference! Looks great.
Mustang Sally says
In response to Jennifer’s question about dark grout for white subway tiles: If it were me, I’d go white grout for a seamless, unified look. Dark grout is going to accentuate the lines much more, so it might depend on what else you have going on in your kitchen. There is also colored grout, which can be fun.
Love, love, love these tiles. I wonder if they can be placed over existing tiles?
YoungHouseLove says
Mustang Sally- We think they definitely can be placed over dated existing tiles, but to keep them secure it might take some Liquid Nails (as Amy mentions in her letter) as opposed to just adhesive squares since tile is a slicker surface. Hope it helps!
Heather- That’s a tough situation you have on your hands. We would actually suggest going to your local hardware store and asking them what sort of tile or other materials can stand up to the heat (as opposed to the wooden piece which isn’t working very well). Hopefully they’ll have some heat-resistant ideas!
xo,
s
Carole says
wow, that looks amazing! Thanks for the link to the pictures–you’ve done some other fun projects that I really liked, too (the fabric covered cork tiles look great!)
The red bookshelf and colorful bowls caught my eye in the ‘after’ pics–I bet red accents (like your mixer) would really pop with your new backsplash and dark countertops!
FrankiJo Tran says
I have used these before and they are awesome! They have two different sheens depending on what way you turned them, so we alternated the sheens to give it a little more depth. They are super easy to clean too. They look great in her kitchen!
Heather says
Well that’s pretty nifty! I’ve been trying to figure out what to do about a layout flaw in our very small kitchen. The stove is right next to the fridge…both have cabinets above and there’s a piece of wood that matches the cabinets that runs floor to ceiling in between the two appliances and connects the two sets of cabinets. I can’t use the two burners on our coil electric stove at all because the heat burns the piece of wood. I’m assuming even if the wood wasn’t there, the heat would do some kind of damage to the fridge since they are so close. There isn’t another layout option. So, I’ve been thinking about tiling a backsplash behind the stove that wraps onto the piece of wood. Do you think these adhesive tiles (or another kind of adhesive tile) would stand up to the heat enough to be a safe solution? Would you recommend traditional tiling instead? Any advice would be much appreciated!
Keeley says
I love it and I’d do it, but like Megan, I have utensil holders and spice racks attached to the backsplash area. I wonder where she’ll store these items now? I wouldn’t want anything to distract the eye from those beautiful stainless tiles.
Chelsea says
Wow! That looks wonderful! The other kinds of stick-up stainless faux backsplash tiles that I’ve seen at Lowe’s and Home Depot I havn’t been too crazy about – but I really like this one! It looks sleek and clean, and really adds a nice feel to the kitchen. Awesome job!
Jill Stigs says
WOW—Very cool indeed! Looks fantastic, wish I could do it.
I am a renter and used a cheap flimsy backerboard and used 4 small nails on each corner and stuck vinyl slate looking tiles onto it. Just above my stove though.
http://www.flickr.com/photos/29996837@N08/4020438742/
Becky @ TheCodyHouse says
What a big difference that update made! Love it!
Claudie says
Oh my goodness, I love this! I have been looking for something like this for quite some time. The house we bought currently has a painted backsplash that I hate, but before we do anything to it, we have to paint the cabinets and install a new countertop (can we say laminate made to look like butcherblock, anyone?) These tiles are great and Amy did an excellent job!
Kim at Yellow Brick Home says
Very sleek. We’re in the market for a tile backsplash (one of our next bigger projects) and this may be something to look into!
Thank you for sharing.
Christine says
Very clever! And it turned out really well.
Amy says
I have a spice rack and a paper towel holder that I haven’t put back up yet, but I plan to. It would actually be very easy! I have a spare box of tiles just in case, and you can easily take down just one tile to make changes.
I think you could easily pre-drill holes through a tile, or you could position your wall attachments between two tiles and use scissors to cut a section out, the same way I cut out sections for my electrical sockets.
If you tried to drill through while it was on the wall, I suspect it would bend the tile. I don’t mean to sound like these tiles are flimsy – they are very strong and have held their shape well, but they’re just thin enough to bend and cut when you need to! Fortunately they come down easily – another benefit to no-grout tiles!
Amazon has reviews from people who used grout, but for me this was easier to install and maintain. Window cleaner usually does the trick, even on grease. Putting these on a backer board would work very well, I think!
YoungHouseLove says
Hey Amy,
Thanks for stopping in with all that extra info! You’re the best.
xo,
s
Kjirsti says
Gotta say, when I read the description I assumed it would look sort of cheap and thrown together. Big surprise! I love it. Great work! I’ll be looking into these myself.
Danielle@Newlyweds Paradise says
LOVES it! Gives the room an industrial feel. I have also seen this tile in smaller sizes.
amy says
Yes, they are hollow-backed so they could probably act as a faceplate for existing tile if it was the same size!
Sherri says
I like the look, but I find it too dark with the wood cabinets.
Christine says
My sister has similar tiles in her kitchen (although hers are the “vintage” sort, original to the house). She likes being able to use magnets to hold up a recipe she’s using right near the stove. Handy. And other accessories can be put up with magnets wherever you need them (spice rack, paper towel holder, etc.)
dansem says
Nice… I was thinking of making a plexi glass backsplash, one i can use to stick recipes and such between it and the wall. This, however sounds much-much simpler to install, and looks great, too. Silly question: would magnets stick on these tiles???
YoungHouseLove says
Hey Dansem,
If you scroll up to the comment above yours you’ll see that someone else with similar tiles uses them to hold magnets. Awesome idea!
xo,
s
Alex says
How big are the tiles? I am trying to estimate how many I need to order. They look great!!
YoungHouseLove says
Hey Alex,
Just follow the link to the tiles that Amy provided in her letter (they’re from Amazon) for that info!
xo,
s
Karrie says
That’s such a great before and after. And an excellent reminder that it doesn’t take much money to transform a space (something that I need to constantly remind myself of). Great job, Amy!
amy says
Just tested – they are NOT magnetic!!!
YoungHouseLove says
Good to know Amy! Thanks!
xo,
s
Amanda says
I like this! I too had seen them at Lowe’s but I think those ones there are plastic. If you didn’t want to do the whole backsplash I think these would go great behind a stove.
Katrina says
What a great idea! It really punches up the style of the kitchen a whole lot!! The shiney tiles against the wood looks amazing, and I can’t believe the price
Cindy @ The Flipping Couple says
Oh my word, I LOVE IT! What a great idea, and I especially love the grout-free approach (grout and I aren’t exactly on speaking terms). I wondered about cleaning them, thanks for answering that Amy!!
Jennypenny says
Wow! This made a huge difference in the look of her kitchen awesome! This maybe just the kick I need to finally do my backsplash, knowing I can change the look of my kitchen so much by just adding a backsplash.
Jessica Zee says
Thank you for sharing this! I’ve been needing a quick easy wall makeover for a weird spot in my wall (there was an air conditioner there many years ago, and when they took it out, the people who repaired the wall didn’t do such a good job…). Since I’m planning on putting in doors there, I hadn’t wanted to spend the money to have it fixed, but it bugs me. These tiles look like they’d be perfect, plus they’ll be “reusable” when I do have the doors put in.
dansem says
Thanks guys! And sorry for asking over something that had just been answered… Looks like Christine and I were typing away at the same time, so I didn’t get to read her post until it was too late!
YoungHouseLove says
No worries- we figured that’s what happened! We also hope you saw when Amy dropped in and mentioned that hers didn’t hold magnets. I guess it depends on the thickness of the tiles. Hope it helps!
xo,
s
Mike Vigneau says
I Love it!! Much cheaper than the 18×18″ tiles they sell at the Big Box Store…and looks like real tile.
I love how you can bend them at 90 degrees too…makes it seamless!!
Great job.
Handy Man, Crafty Woman says
wow, this looks great! I keep thinking of putting up tiles in our kitchen backsplash area…
Christine says
What an amazing transformation. I love your site and always get so many ideas from it. Thanks again!
Pam says
I like it but I think its a bit much on both walls. Bc of the scale of the space, it might have had more effect if only on one wall.
Sherrie says
Wow, I really like this look. It’s great if you’re on the cheap, too. The copper catches my eye, although the plain look (as in not as “fancy” as tin type ceiling tile) might look too industrial for copper though.
Christa M says
Amy did a great job and the tiles look awesome. I am definitely considering this for my apartment. I LOVE those colorful bowls on the island…Amy, if you’re reading, can you tell us where you got those from please!?!