When Jessica sent us her before and after kitchen photos we couldn’t believe she and her hubby stretched their $400 budget so far. Here’s her letter:
I’m always inspired by what I see going on at your pad! My husband Josh and I recently took on a cheap-o kitchen makeover and found that $400 goes a very long way toward bringing an 80’s kitchen into 2010. That budget covered paint, an electric sander, a jig saw, hardware, primer, Liquid Nails, “real” nails, and beadboard- which is all it took to really transform the space. The “before” picture was from before we moved in, so please excuse the terrible light fixture and furniture. We really hated the fake wood paneling under the bar and around the sides of the cabinets, so we covered it with beadboard that we then painted white. It was easy to install (especially since we had the wood cut at the store & borrowed a tack gun) and it’s definitely our favorite part of the entire makeover. As for our paint sources, the green is Benjamin Moore’s Mountain Lane and the white is Sherwin William’s West Highland White. Oh and there’s more info about the whole kitchen redo on our blog. Our next step is a nursery (we’re adopting a baby from Russia) and I can’t wait to see how yours turns out! I’m sure I’ll get some great ideas. Thanks for all you do! -Jessica (& Josh)
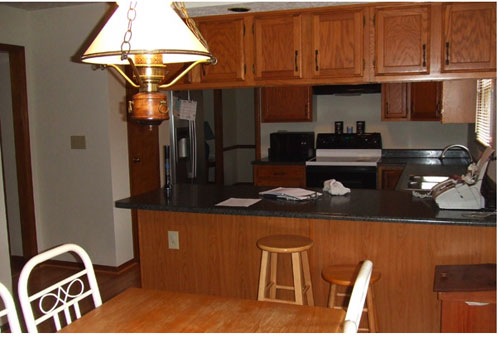
Here’s their kitchen before the big overhaul:
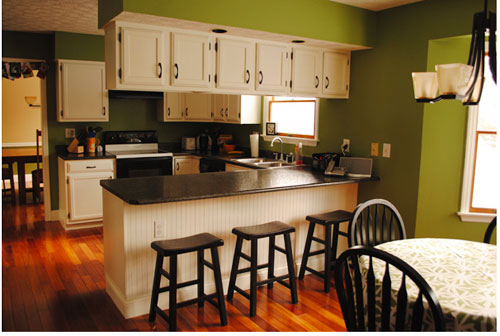
And here’s the same space after just $400 worth of upgrades:
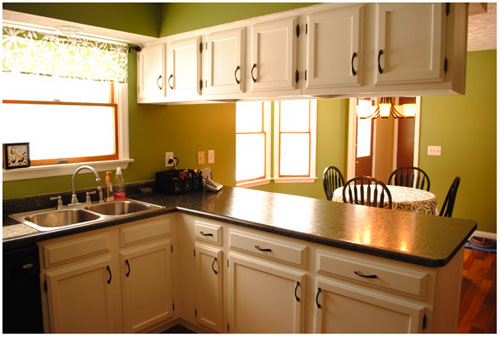
Isn’t that amazing? We love Jessica and Josh’s infectious DIY spirit and we totally appreciate that they weren’t afraid to use some bold color and a little creativity (in the form of beadboard and paint for those cabinets) to cover up the things that they didn’t like and draw attention to the features that they wanted to highlight. What do you guys think? Are you itching to paint your walls a bold color, overhaul your cabinets or tack up some beadboard? We definitely love that not every kitchen makeover calls for several thousand dollars of work and tons of hired help. Inspiring!
Psst- Looking to paint your cabinets like Jessica and Josh did above? Here’s a quick and easy tutorial to help you get ‘er done.

Barb says
The beadboard is a really good idea and it looks amazing, like a professional did it!
The Starr Family says
Absolutely impressive… and just plain in love with that green! Thanks for sharing!
Erica Stinziani says
What kind of paint did you use on your cabinets and how is it holding up??? I’m asking b/c this past summer I painted my cabinets with a Benjamin Moore acrylic and it is cracking! It almost looks like stress cracks. It was a wet June so I don’t know if there was moisture in the wood or what. Thanks! They look awesome.
Jennifer says
That shade of green is absolutely gorgeous! paired with the crisp white, it is a match made in heaven!!!!
Meg says
LOVE IT! The green is fantastic!
Elena @ the white picket fence says
That is one fantastic makeover! How inspiring!!
Miranda says
OMG I LOVE that green so much! The white looks gorgeous with the green. Loving the beadboard!
We have ugly brown beadboard in our basement den and I want to paint it white SO bad. My fiance is totally against it. He says “white is too girly”. Um, someone help me convince him! LOL
EvaBabeDesigns says
The kitchen remodel turned out really nice & I’m sure they’ll get more than 100% return if they ever decide to sell. We did the same thing on our kitchen…mostly paint and some hardware updates + new countertop + sink & faucet. It’s amazing to see the before & after and to know that it was mostly elbow grease!! ;)
Ruth says
It looks great! And like more was spent
Michelle says
Your kitchen looks amazing! It looks custom, as opposed to a $400 update. You had great ideas and made very smart choices.
Roeshel says
What a great update! I can’t believe the budget. Great job Jessica and Josh!
Natalie says
This kitchen is gorgeous! They really did a fantastic job, especially on a budget.
Be sure to enter my first ever GIVEAWAY! :)
Dana @ House*Tweaking says
Oooooh, I’m a big fan of painting orangey-oak cabinets! Great job Jessica! It makes such a difference on quite a small budget.
Youngsters, I’m sure your site has left many an orangey-oak cabinet fearing for its life! I know ours were…and rightfully so. We did the same as Jessica and painted them white. Take a look if you wanna:
http://www.housetweaking.com/2010/01/21/we-painted-the-kitchen-cabinets-white/
Erin says
Amazing job! I really love this kitchen and the way this couple took a dated kitchen and totally updated it on their own. Well done!
Paula M. says
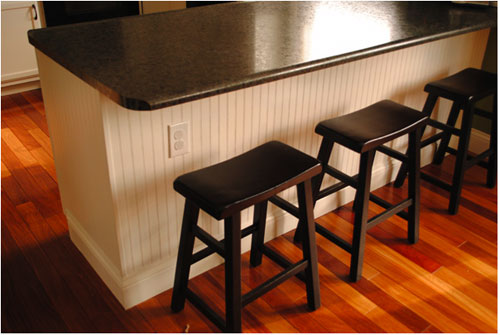
Love the idea of using beadboard for the island the way they did!
Great job on refinishing the cabinets and changing the entire look of the space — and for so little money, amazing!!
It just proves once again that people don’t always need to spring for a big-bucks overhaul or an expensive cabinet refacing. Try paint first, and go from there —
Amy E. says
LOVE how those cabinets brightened up the entire space! how awesome is that! i like the new light fixture in the dining area and the new window covering above the sink as well.
Amanda says
Oh wow. I love seeing this type of thing- no use getting new cabinets when you can just brighten them up! I too love the beadboard, and those stools. Very nice!
Jessica says
Hi, All! Jessica here (the one with the green kitchen)
To answer some of your quesitons:
We were NOT afraid to paint the cabinets, because we really disliked them from the get-go. Orangey oak isn’t our favorite look. Plus, they’re not super well-made or expensive to begin with, so we figured we didn’t have much to lose if they didn’t turn out.
We used Sherwin Williams’ Interior Acrylic Latex paint in Semi Gloss (color = West Highland White). We also sanded and primed prior to painting. We haven’t seen a summer with the new kitchen yet, so we’re hoping that the paint holds up well.
The cabinets above the bar are kind of small, yes! But we can actually fit our big Kitchenaid mixer up there in one of the cupboards. The doors on both sides are nice for two reasons. One, you don’t get stuck with an ugly back-of-cupboard look. Two, we can get at things from both sides. We keep both dog food and paper products up there, and it is great to be able to reach both of those things from the eating nook.
I’ve had many questions on my blog or over email asking for further details on our painting process, so I’m planning on doing a blog post (on my own blog – http://www.joshandjessicabrown.blogspot.com) soon that covers all of that. Prepping, sanding, painting, type of brush/roller, number of coats, etc.
Another way we saved money during this process was to spray paint our hinges – see this if you’re interested: http://joshandjessicabrown.blogspot.com/2010/01/little-diy-tip.html
YoungHouseLove says
Thanks for dropping in with that info Jessica! We’re so glad everyone’s digging your amazingly affordable kitchen makeover as much as we are.
xo,
s
Jamie says
My favourite part is how the white cabinets really draw attention to that rich-coloured floor. Nice!
Joseph says
Well, to each his own, I suppose, but I do not think saving money on kitchen remodeling in this manner really saves as much as it seems to at first blush. Nor does it actually do the job. You can re-paint kitchen cabinets, and someone like myself (I’m a cabinetmaker) can surely do a good job at it. But, in the end, all you’ll have is old cabinets with a fresh coat of paint. Re-facing cabinets is another option, but a person I know who has done this from time to time for clients describes it as “putting new crap on the old crap.”
A woman I know first went out and got new countertops for her kitchen. Cheap stone of some sort. Cost her four thousand. Then she had her cabinets re-faced and spent another nine thousand. She now has a “re-modeled” kitchen that is not re-modeled at all, for which she has spent thirteen thousand dollars. For just a little more she could have gutted the kitchen and done the job right—up to, and including, new appliances. Instead she has spent quite a bit of money to end up with a kitchen not much better than the one she started with.
You get what you pay for. Always. I understand budgets. I have one myself. But if the tool I should have costs a thousand, and all I have is five hundred, I would rather just hang on to my five hundred until I have another five hundred, so I can get a good tool. That junk comes back to haunt you, in tool purchases and home remodelings.
You are in kitchens and bathrooms every day of your life. If you are going to go to the mess and expense of a remodeling, why not get the very best you can?
Abby says
Wow! The kitchen looks great! What a difference paint (and hard work) can make! I went to their blog and noticed that they live in Ohio…I think they might live in my neighborhood!
K says
I LOVE the finished product! I’m a sucker for white cabinets – we just bought a brand-new home with oak cabinets, so I don’t think I can convince my husband that we should paint them white just yet.. maybe in a couple of years.
What I really love though, this the bead board. I’m completely inspired to put up a half-wall of it in our powder room!
LOVE the blog – keep up the GREAT work!
Jackie says
I love the transformation. I can’t believe they only spent $400 – it looks totally different.
Kristi W. @ Life at the Chateau Whitman says
Wow, it looks great! Nice job, Jessica and Josh. :)
Tiffany says
I heart this color combo, too bad hubby and the cat keep vetoing it. Maybe I can add splashes of this color and he won’t notice.
Laura says
I absolutely love everything about your kitchen but I am particularly interested in the curtains! Can you share with me where you got them? I would love to get some red or orange ones for my kitchen!!
This is my favorite new website!!
YoungHouseLove says
Here’s hoping Jessica and Josh stop in with that info for you soon!
xo,
s
Jessica says
The curtain over the kitchen sink is something I actually made. Last summer I saw a duvet cover at West Elm on clearance and picked it up – even though I really dislike duvet covers! And then I just cut off a bit and made a very simple curtain. I also made a simple tablecloth from the same material, and would like to try pillows (for the couch in the next room) next. Duvet covers come with lots of material, go figure.
Elle says
I just discovered your blog and have been SO inspired! We remodeled our first home as well (and apparently did a good job since it sold in a week for our asking price), but now we’re doubling our size since our family has more than doubled. It’s a funky 1967 mod house, but boy, it’s decorated atrociously (lime-green kitchen countertops with hot pink cabinets and matching wallpaper, just for a start!) The project I’m most excited about is our school room, as I will start home schooling my oldest this fall – Yay!
Your blog has inspired me on ways to chronicle our own remodel just for fun, as well as offering beautiful design how-tos. Just one question: once you’re done with your house, how long before you think you’ll be itching to redo some things again? Is the design-bug for one’s own home ever satisfied?
YoungHouseLove says
Hey Elle,
We always joke that we’ll never be done- because our needs and our family are always evolving (and we love a project!). We wouldn’t have it any other way!
xo,
s
Sarah says
Too funny I have that same “lantern” lamp as in your before pictures… I need mine removed! Love your kitchen!
Heather says
painted my kitchen the same color last year…still in love.
Kim says
Very inspiring! I love the bar stools. Did the $400 include new light fixture, dining chairs and barstools? If so, that’s pretty good.
YoungHouseLove says
I believe it does! Feel free to scroll back through the comments or click over to Jessica & Josh’s blog for more info.
xo,
s
Diane L. says
That is a VERY inspiring and thrifty makeover! I’m dying to paint my oak cabinets but my husband doesn’t want that at all. Currently the kictchen has the orangey oak cabinets, fuax brick backsplashes:(, and bright yellow paint, which equals a BRASH, wince-inducing effect.
My question: how can I freshen up this kitchen w/out painting the cabinets? I’m thinking of painting the faux brick and off-white, and painting the walls a warm neutral, like putty. Should I just CLEAN the cabinets (just switched out the hardware to nickel…)
If ANYONE has advice, I’d be most appriciative!
Thanks, and happy labor day!
YoungHouseLove says
Sure! That sounds lovely. Making those changes and cleaning or even oiling those cabs (with Murphy’s Oil Soap) should look great! Good luck!
xo,
s