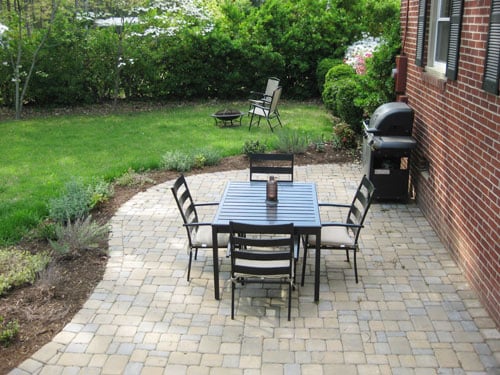
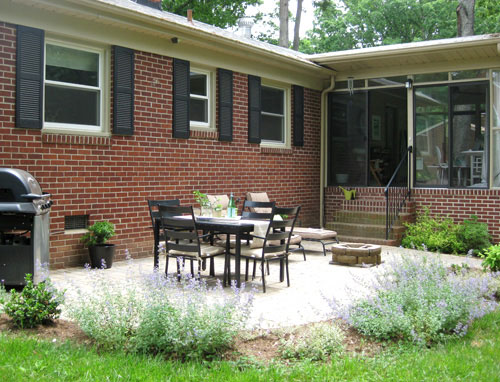
So did you guys think we spent the long weekend relaxing and eating burgers? Do you know us at all? Ok, so we did do our fair share of grillin’ out, but we also found the time to transform the back patio. Yep, we mentioned that we longed for a welcoming and functional outdoor room to grill stuff up, chillax with a good book (or glossy shelter mag) and whip up some melty s’mores… and we just couldn’t wait one minute longer to make our backyard dream a ready-for-summer reality. Here’s what our back patio looked like before Memorial Day weekend- all lonely except for an old Target table and chair set purchased about two years ago.
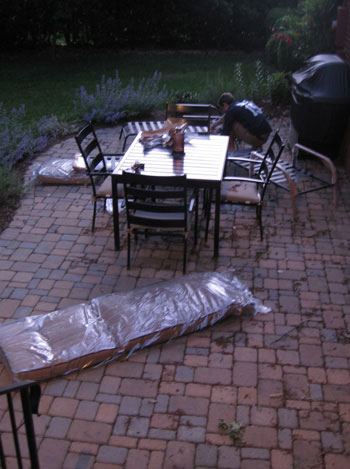
And here’s what it looked like Saturday morning after a bit of assembling, potting, and even a quick fire-pit-building project. We happily got ‘er done in a few hours so we had the rest of the long weekend to enjoy our newest room. Here’s how it all went down.

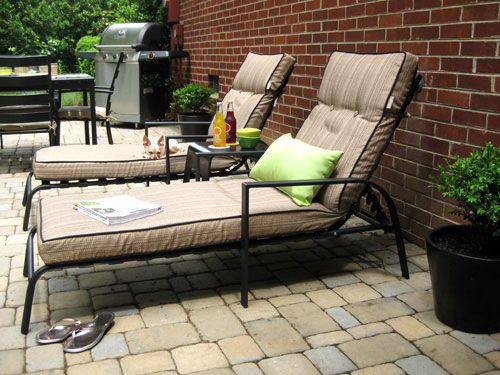
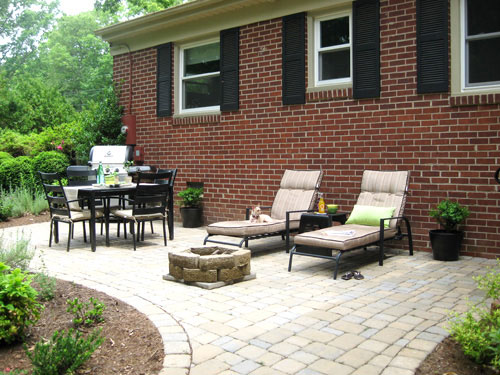
We actually ordered these two Walmart lounge chairs (which appear to be sold out now) a few months back with birthday money from our families. We were dying for a place to read, watch Burger run around, and maybe even do some outdoor blog stuff (and a friend with two lounge chairs totally inspired us to take the plunge). But although they were sadly on backorder for what seemed like forever, these matching loungers ended up being well worth the wait (and their $277 price tag for two). In fact we were so excited about finally getting our mitts on them that John assembled ’em on Friday night at dusk- because neither of us could bear to wait another minute to enjoy them.
You think I’m kidding. Here I am taking one out for a spin that evening. In the dark. Yeah, we’re nerds.

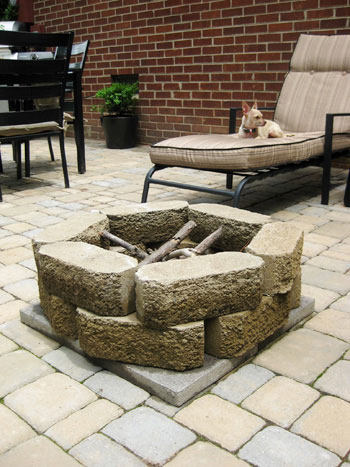
And of course we’re loving our little firepit that we made by stacking some heat-resistant pavers far enough away from the house and any low trees to be safe.
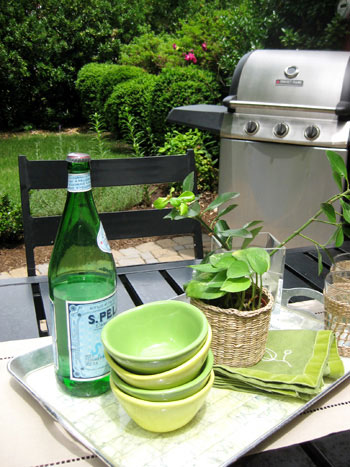
We also brought in two simple black planters that we purchased at Ikea a few months back and popped some $6 boxwoods in ’em for a bit more life and color on our newly spruced patio. You’ll also notice the green lumbar pillow (stolen from our porch makeover) on our lounge chair. We liked the pop of hue so much that we’re thinking about bringing home two more for our lounge chairs so this little green guy can go back to his former home on the front porch.
We already had our big-ish stainless steel grill (we actually purchased it for our backyard wedding where our dads grilled up grub for our guests) – but we found that we rarely used it since… probably because the rest of the patio left much to be desired. As a testiment to our new makeover, we’ve grilled up at least four meals in the past three days so we’re extremely excited to be using it instead of spending years keeping it covered and never even cracking it open.
Here’s another view of the brand-spankin-new set-up. We love that there’s more than enough room to move around and that we were able to create a few different functions in one not-that-huge area. Making a space multitask is definitely one of our favorite ways to force ourselves to use it more frequently (it’s why we moved our dining area into our hardly-ever-used living room and now we’re in there all the time).
Of course Burger loves the new set up and has already claimed both lounge chairs as his (he switches chairs every twenty minutes or so for good measure).
But every once in a while John and I actually get to steal them back and enjoy our lovely backyard with a book on our lap and an ice cold beverage on the “new” side table (an old Ikea stool in the garage got a coat of black exterior paint and a topcoat of outdoor poly). Life is good when you have the perfect little spot to drop a drink, a book or a snack.

And if you’re Burger, life is pretty good no matter where you are or what you’re doing… but it’s especially fabulous on those new lounge chairs. At least that’s the story his eyes are telling in this photo.

And speaking of the good life, we even got a chance to take our fire pit out for a spin yesterday night when we whipped up a few s’mores after a yummy dinner courtesy of – you guessed it- the grill.
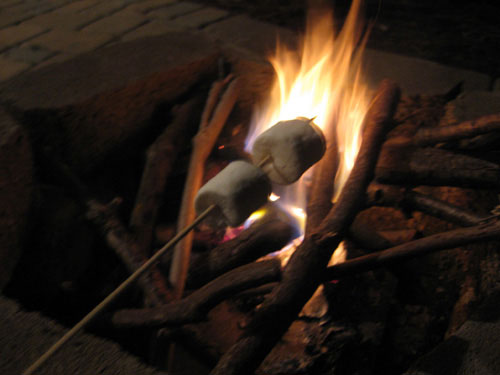
Is there anything better than a scorched marshmallow smooshed onto a hunk of chocolate and sandwiched in a honey graham cracker? I think not.
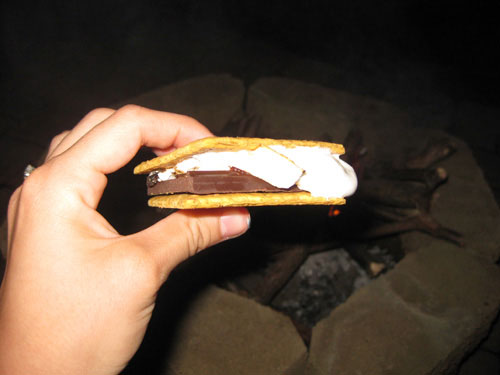
And apparently I’m not alone in that sentiment. Here’s John loving his s’more to the max (as Burger lurks in the shadows).

And since we know you guys are figure-heads, here’s our fun little budget breakdown. Since our patio was a lot bigger than our front porch we figured it would run us well over $500 for the whole shebang, but we’re super excited to report that we did it on a whole lot less (especially since the money that went towards the lounge chairs was a b-day gift from both of our families).
- Lounge chair set: $277
- Two black Ikea planters: $30
- Two boxwoods for the planters: $12
- Side table: repurposed Ikea stool (aka: free, but it was only $19 originally)
- Grand Total: $319.00
So what did you guys do for your long weekend? Did you tackle any house projects? Did you flee your casa in an attempt to forget all the things on your to do list? Did you get to enjoy the miracle that is a s’more? Do tell.

Lynn says
Love your detailed makeover posts. We’re still trying to decide what to do with the patio in our new house, which is basically a blank slate. At this point, we’ve briefly considered everything from a grill, table and chairs, umbrella set-up to a glider, swing, hammock… we’ll decide one of these days.
Juliet Robinson says
I love that you posted all the details and pictures galore! We have a teak patio table and chairs and I had been looking to find something that would “go” along with them but everything is so expensive! Your post inspired me to check out walmart.com and I actually found two loungers (not teak, but I love them all the same) that I think are perfect. Ordered them and had them shipped yesterday, can’t wait! I never would have thought to look at walmart, so thanks for that idea!
Here’s what I ordered – the “Terrace Resin Wicker Chaise Loungers”
http://i.walmartimages.com/i/p/04/89/70/13/94/0489701394031_500X500.jpg
YoungHouseLove says
Hey Juliet,
I love the cheerful yellow cushions! Great find. Happy lounging…
xo,
Sherry
Kristin says
Oh my goodness; I did not know you could make a fire pit so easily! Wow! I want to do it! Thanks for the great idea!
By the way, I totally would have done the same as you and tried out new furniture in the dark. Too funny! :)
tammylee says
nothing on such a grand scale but we finally planted some perennials found @ Lowe’s for $2.00 each. (the 5″ pots are cheap and they seem to be putting out different ones every week)
Lily (acharmedwife) says
I can’t believe I haven’t discovered your blog before this! Where have I been? Love the patio reno — we spent Mem Day weekend installing wainscoting in our apartment’s hallway. I don’t think our downstairs neighbors were too pleased about the sawdust that kept blowing off our terrace onto their barbecue. Holidays are for projects, people.
Melissa Miller says
The outdoor makeover looks so nice.
I really enjoy reading your inspiring blog!
It’s my first time commenting.
Have a wonderful weekend.
~Melissa :)
rebecca says
When it rains, do the ashes and soot from the fire pit leak all over your patio? We have the exact same patio pavers and would love to do a fire pit like yours, but for some reason I envision a lot of sooty run off after the rain. I’d love to hear how yours is working.
YoungHouseLove says
Hey Rebecca,
We’ve been making s’mores at least twice a week for the past two weeks and between that it’s been raining cats and dogs but the soot is either staying in the pit or dissolving in the rain because there’s nary an ash to be seen outside of it. We initially worried about the exact scenario you’ve described but we’ve used it so often and it has rained so frequently that we’re confident that once ash is dry and it rains it either completely dissolves or stays put right where it is. No stains or dark deposits to speak of. Hope it helps!
xo,
Sherry
lisa says
love the makeover – but I’m curious about the patio itself. Did you put it in? We are thinking of doing a paver patio and I was wondering if you have any tips…
YoungHouseLove says
Lisa- Just a few weeks before our backyard wedding we decided the old patio was a safety hazard and it would be too stressful to try to DIY something with such a tight schedule (and so much wedding work to do – we even catered it ourselves!). So we opted to use some wedding-present money towards replacing it. After a bunch of estimates we found someone who would demo the entire original patio, haul it away, level the ground, lay the new patio with cobblestone pavers (with custom-cut curves and a walkway to our back gate) and finish in TWO AMAZING DAYS! It ran us around $2300 but it was totally worth it for the stress-free installation (which we definitely needed right before our big day) and we’re sure you could get it for even cheaper these days now that times are tough. Hope it helps!
Sue- Cool beans about putting it on your blog. We’d love a link!
xo,
Sherry
sue@solsticehome says
love the patio renovation..esp the fire pit..right now we have a metal one which has to be kept covered…think that one will have to be for the beach fires…a stone fire pit works for me! would love to put this on my blog if thats ok?
Jessica says
How cute! I can’t wait to make a fire pit on our patio now! We were probably going to drop over $200 on one of those fancy ones…but why?! Also, and this is just an FYI — I can’t tell from the photo for sure, but your grill looks exactly like one I got for my husband for his birthday that ended up being recalled because of potentially explosive propane hose or something. We ended up taking it back to Lowes (or Home Depot…can’t remember) and they refunded the price. We had been grilling on it for awhile….but still. You don’t want to blow up….um…ever. It’s worth checking out. :)
YoungHouseLove says
Hey Jessica,
Thanks for the info! We actually got the grill in early 2007 but we’ll definitely check it out! Thanks!
xo,
s
Update: The recall is for a bunch of Perfect Flame 4-Burner grills (ours is a 3-burner) so anyone with a 4-Burner Perfect Flame grill should check things out and might need to take theirs back to Lowe’s for a full refund!
Rachel says
This is such a great idea! I love how the low cost of the fire pit means you could set one up last minute just about anywhere! I’ll be linking.
Michelle says
I just discovered your site a week or so ago and I LOVE it! We too have an old house and this is the perfect source of inspiration. I plan to surprise my husband this weekend with a replica of your firepit in our yard for Father’s Day. It’s perfect!
Christie says
I love this backyard patio – so lovely!
Your fire pit is genius.
And I LOVE s’mores, but have you tried them backwards yet??
That is, chocolate graham crackers and a white chocolate bar inside. Do try it! :)
Mike Paget says
Cool, i want some of those smores!
Heather M says
This doesn’t have anything to do with DIY (or maybe it does…), but my new favorite this when making s’mores is to use CHOCOLATE FROSTING instead of chocolate bars. It will blow your mind! BTW, the patio looks awesome :)
YoungHouseLove says
Thanks for the tip! We’ll have to try it!
xo,
s
Lee says
Wow! Thanks for the DIY fire pit idea. This would be much cheaper than buying one…well, they might be on sale now, but I think we have all the material to make one.
panyizsuzsi says
Hi!
I have the same kind of patio cobblestone. Tha only thing I would like to ask is how do you keep it weed-free?
YoungHouseLove says
We do our best to avoid pesticides (especially since we have a tiny pup who loves to play out there) so we do all the weeding by hand. Luckily it’s not very much (just pulling up a dandelion here or there). And we let moss grow (if it happens to pop up) because we think it’s charming. Hope it helps!
xo,
s
panyizsuzsi says
Thanks Sherry!
I love moss, I think that looks great, but we have rarhet a lot weed, that I remove with hand, too. Anyway, I stil love this patio and thanks for the help!
Zsuzsi from Hungary
Christina says
Hi Sherry!
My fiance and I recently purchased our first house in the Richmond area, and we would LOVE to add a patio. Would you be willing to share the name of the company who installed yours? I couldn’t find it mentioned in any of the comments above….
YoungHouseLove says
We wish we could provide that info for you, but even though we have nearly every receipt from every hired hand that ever touched Casa Petersik somehow we misplaced that slip of paper and can’t remember the company name. We did find them though the Yellow Pages and got four estimates (theirs was the best and they had some great layout ideas so it was win-win). We just recommend getting a few options and seeing which company works best for you. Sorry we can’t be of more help!
xo,
s
Julia says
Hi, I love the cobblestone patio in your backyard. I want to do something similar to our yard. I read in one of the comments that you hired someone to do this before the wedding. Can you share how much it cost and how it long it took a professional? Would love to get a ballpark. Thanks so much!
YoungHouseLove says
It took a crew of two to three guys two full days of leveling, laying, cutting (since we wanted a curved edge) and tamping/sanding and the fee (including the cobblestone pavers and other materials) was around $2500. That also included a path that connected the patio to our driveway and they did it so quickly with such little notice that it was money well spent. Although these days with the economy as it is, you could probably talk someone waaaay down. Hope it helps!
xo,
s
Kerry says
Hey guys! As I’m browsing through some of your projects, I stumbled upon this and your backyard is super charming. I love the fire pit–It looks so simple and easy to do! I’m wondering if you just placed the edgers on top of each other or if you had some type of adhesive to hold them in place. If not, did they hold their place fairly well throughout your time there? Just curious! :)
YoungHouseLove says
No adhesive was used and they stayed in place for the entire time we had it there. They weigh a ton so they pretty much hold themselves down. Even if you tripped and fell into it, they probably wouldn’t move at all (but that would hurt, so I don’t recommend it).
xo,
s
Jenny says
Gorgeous! Do you happen to know what type of stone was used in the patio itself and how easy/hard it would be to build a
Patio like that? Thanks!
YoungHouseLove says
It was called “cobblestone paver, basic” in the brochure and it was a two man two day job. You can definitely find a DIY patio tutorial online thanks to a quick google search. Hope it helps!
xo,
s
Angelica says
Hi, I stumbled upon your blog (again) looking at home and garden photos :) I happened to notice your lovely patio and am wondering what brand, style, and color pavers yours are. We are planning to do some hardscaping this season and are torn between some choices and this look is really what I’m going for. Btw, love your blog :) Hope you keep going with it!
Angelica says
haha…it helps when you read all of the comments before posting your own! I see that they are a basic cobblestone paver, but do you know what brand and color they are?
YoungHouseLove says
Not sure what brand they are (the patio guy didn’t give us a choice of brand, just color). As for the color, they’re not the grayest ones they had (they had some brown in them) but they also weren’t devoid of gray. I’d call them gray-brown because there was a browner paver option and a grayer one that was a bit darker and not as warm and faded looking. Hope it helps!
xo,
s
Deb says
Your website is amazing.I especially love the before and after pictures. The step by step photos are so helpful. I’m very impressed.
We just got a lot of free slate rock from my sister-in-law when she retired her fish pond. Trying to decide what to do with it. Thinking either a small patio area – refering to the walkway pictures you have – or maybe a stacked rock fountain. Would love to see pictures of slate rock fountains – I only found one so far.
Keep up all that excellent hard work.
xoxo
Greg says
Our old firepit had rusted out. So we ran across yours built with pavers and landscape edgers. We built it in just a few minutes and used it that night. It works great!. Looks better and should be more durable than the old one. Thanks!!
Jess says
I love your firepit. We have a paver patio that’s very similar to yours in color and layout and we would love to build a firepit like yours. Do you happen to have a post about how you built it? I’ve searched through your archives and I can’t seem to find a post about the firepit, specfically. Any guidance would be appreciated! Love your blog! Thanks!
YoungHouseLove says
We used pavers from a home and garden center- just do some research and ask around to find stone that can handle heat without cracking or exploding (danger!). Hope it helps!
xo,
s
Karen Howard says
Hi. I like your Patio makeover. Cute Pooch too.I plan to come back & browse around again soon.
Shannon says
Hey – how are the chaise lounges holding up for you? I am looking to buy what I THINK is the same set at Walmart – http://www.walmart.com/ip/Braddock-Heights-Woven-Chaise-Lounge-Set-of-2/10783752 – if not the same then very similar….just curious how they have stood the test of time! Not sure if you check old posts for comments!
YoungHouseLove says
They held up great until we yard saled them when we moved! Once we had a baby we never used them anymore- no more lounging for us. Haha. But they were great!
xo,
s
Shannon says
Thanks for the response! I am going to pull the trigger and order them! Thanks so much!
YoungHouseLove says
Good luck!
xo,
s
Errika says
Ok, love your patio makeover, especially the fire pit. Where do I find the instructions on how to make it?
Thanks!
YoungHouseLove says
Somehow they got unlinked or something (archive stuff gets screwy sometimes) but we basically got pavers from Home Depot and used a large base paver on the bottom (so we wouldn’t get a soot stained patio). I bet you can google around for better directions and photos if you search “paver patio”!
xo
s
Kylie Helm says
Hi there!
I know this is a very old post, but I knew you’d have some awesome backyard overhauls from your first home! Did you DIY your cobblestone?! (obsessed!) I’d love to do that in our backyard but we don’t want to break the bank!
Thanks for your help!
Kylie
YoungHouseLove says
We DIYed the cobblestone patio at our second house, so here’s that post for ya: https://www.younghouselove.com/2011/05/pati-oh-thank-goodness-its-done/
xo
s