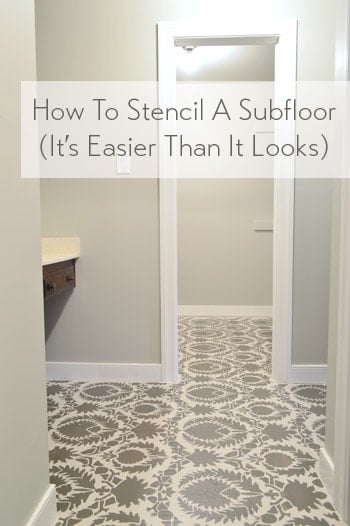
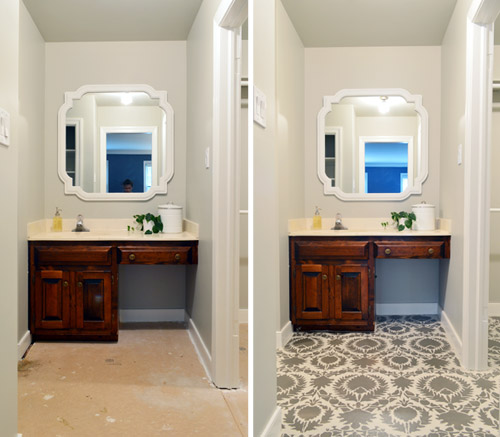
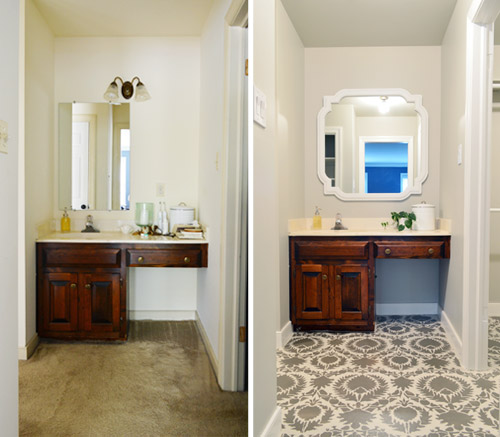
We did it! We stenciled our bathroom and closet floor and it looks awesome. So worth the effort. And so much better than the carpet that was there before.
Remember when the floor in our closet and vanity area looked like this?

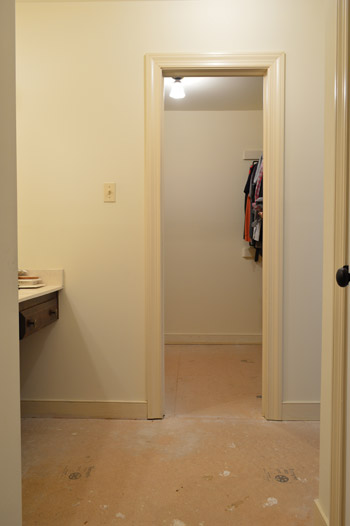
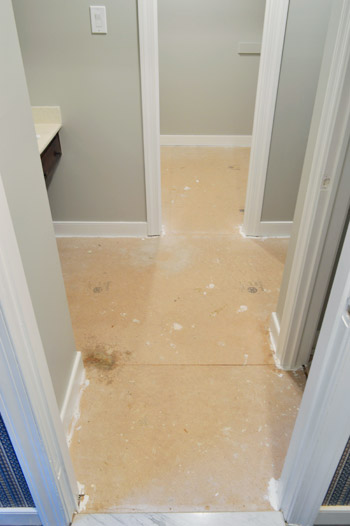
And then we ripped up the carpet to reveal the subfloor and they looked like this?
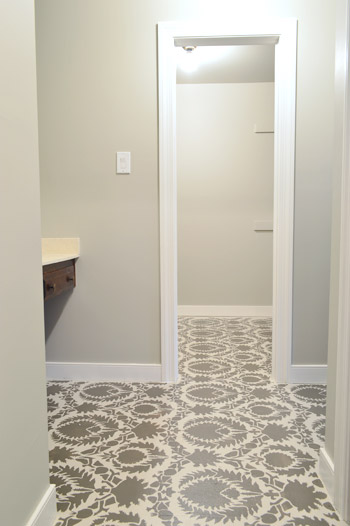
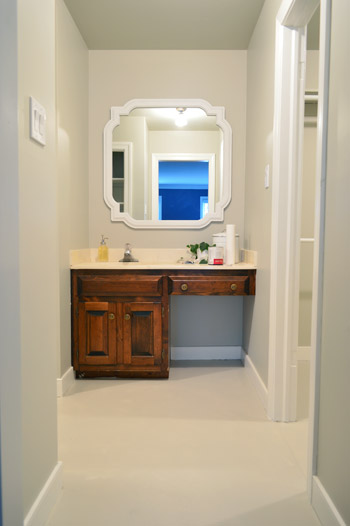
Well, five hours and $24 later, it looks like this!
Our actual bathroom has tile (where the shower/tub/toilet are), but this is a separate vanity area along with an adjoining closet – which both had old carpet that we couldn’t live with for one more day. So we yanked it up and decided to have some fun with the subfloor until we’re ready for a full scale renovation down the line (eventually we’d love to knock down the wall that divides the vanity from the rest of the bathroom and retile/renovate them so they’re one big spacious bathroom).
We briefly debated peel and stick floor tiles or buying a large seagrass rug and cutting it to lay it wall-to-wall in both spaces for this interim step, but we decided that a stenciled and sealed floor (possibly with a few area rugs) will serve us well in the short term without being a whole lot of money/effort that we’ll later end up undoing.
And since our future tiling plans will require us to rip this stuff up and put backer board in its place anyway (you can’t tile over particle board since it’s not a secure base) there’s no harm in slapping some paint on it in the meantime.
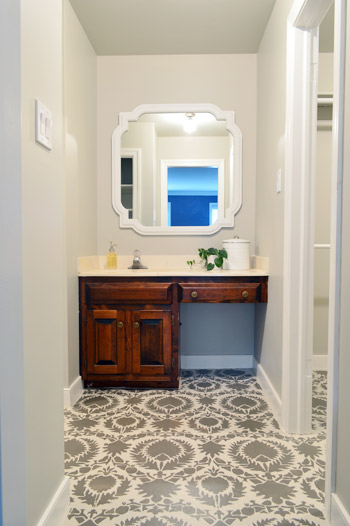
My favorite thing about temporary (and affordable!) afternoon updates like this are that you can have a little fun and do something a little bolder than you might do if you were selecting something more permanent (like tiling a floor that you’ll have to live with for a few decades). Oh and don’t mind that vanity, we’re going to either stain it a deep ebony or charcoal tone or paint it a subdued dark color, so it should fit in a lot better with the rest of the tones in the space.
But let’s rewind a little bit (back to when the floors looked like this) and tell you about the process and some of the things we learned along the way.
To prep our subfloor, which is particle board (a very smooth and almost chalky surface) we used wood filler to make the seams between the different particle boards sheets less obvious. There were only three so it went pretty fast. Once dry, we sanded them down. It wasn’t perfect, but it was better.
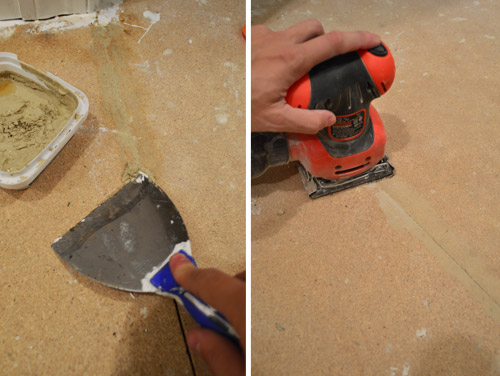
Then we primed it all with Aqualock water based primer (it was low-VOC but not no-VOC so John got that step done while I was outside playing with Clara). The purpose of the primer was to help the paint grab on for the long haul and block any stains/bleed-through that might occur from painting over such a porous surface like particle board.
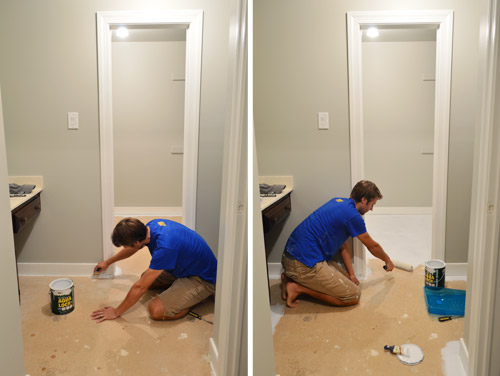
For paint, we grabbed two $12 quarts of semi-gloss paint in the new no-VOC Olympic Icon line, matched to two Benjamin Moore colors: Revere Pewter for our base (same as the wall) and Gargoyle (for the darker stencil pattern). For the last few years we’ve mostly stuck with Benjamin Moore paints, but for temporary upgrades it’s nice to save a little money since we’ll be ripping out this floor in a few years and tiling anyway. We didn’t use an outdoor porch and floor paint (as you usually would in this scenario) because they’re all pretty fumey (usually oil-based) we wanted something no-VOC (this one’s for you, fetus) – but we think the combination of a good primer, some semi-gloss paint, and a nice thick coat of sealer will keep them in good shape for the next few years. We’ll definitely report back with photos over time to share how the floor wears.

With the primer dry, we could apply two coats of the base color. Since this was a no-VOC step, I could cut in while John rolled the rest (we just had to be mindful to paint ourselves out of the space). You can see from the picture below that the color matched Revere Pewter on the floor didn’t really turn out to match the real RP color on the walls as we planned (that’s always the risk that you take when you color match one brand to another), but it was still in the same color family, so we didn’t mind. We’re going for some pretty high contrast interest on the floor, but we thought it would stay sophisticated if we kept the palette sort of subdued (especially with a bold navy-ish tone in the bedroom along with a colorful rug/headboard/pillows/etc) so we were just glad they didn’t clash and still felt like they went together, even if they didn’t match perfectly.
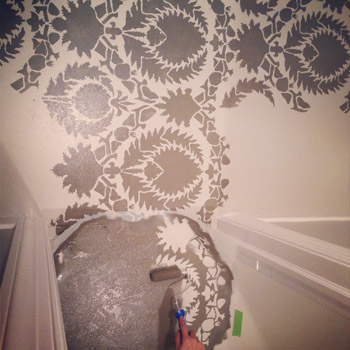
Stenciling the floor is SO MUCH EASIER if you have two people on hand to tag team it. I did the office stencil project alone for the most part, and it took forever and I used a method I’d never use again (more on that in a minute) but this time around we both tackled it and it was a much simpler task. Oh and stenciling a floor is even easier than stenciling a wall since you’re not fighting gravity (a few pieces of painter’s tape hold it in place and then you can roll it without worrying it’ll slip down the wall like it might on a vertical surface).
If you’d like to see the rolling in action – with a few live-action tips in the mix – we made this video while applying another stencil to the wall for a book project back in 2011.
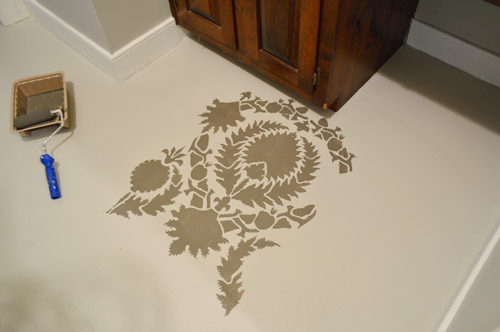
Since you usually want your pattern centered in the room, we started our first stencil to be right in the middle of the vanity. Here you can see what a single repeat of the pattern looks like. It’s the Suzani Silk Road stencil from Royal Design Studios. It’s $49, but we had actually ordered it back in 2011 to use for our book (but that project ended up getting cut), so we just had it sitting under the bed in our guest room for a few years, waiting to be used.
But back to that much easier stenciling method that I mentioned before. We learned back when we were shooting that wall-stenciling project for our book that applying a small amount of paint with a foam roller (not too much, or it’ll get gummy/bleedy) results in just as clean of a line as dabbing everything on by hand, which I did when I stenciled the office, and ended up with claw hands and lost 14 hours of my life. This entire thing only took us 5 hours and was SO MUCH EASIER thanks to a small foam roller with a nice thin application of paint. Hallelujah!
Once again, when using a large stencil like this, it’s so much easier with two people. Each stencil has registration marks around the outside that you line up with the previous stencil so you know where to place it, and if you have someone on hand to help you line up the registration marks and slowly lower it down onto the floor (especially when they’re large) you should have a lot less of an issue with smudging, which can happen if you place it and then slide it around to match the registration marks instead of using four hands to slowly lower it into the right place off the bat (one hand for each corner just seems to work best).
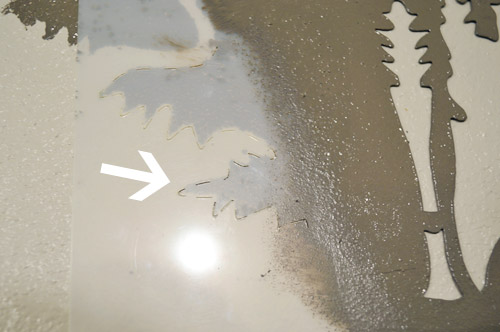
This room’s biggest challenge was that so many walls and corners meant lots of partial stencils, which meant lots of stencil bending (it’s made from flexible plastic that bends, but doesn’t crease, easily) and smooshing the roller into tight spots. We kept some spare cardboard handy (i.e. cereal boxes) to protect the wall from getting paint on it when we had to bend the stencil and it would have rested against the baseboard/wall. Between each placement of the stencil, John also held it up with two fingers with the back facing me and I used a folded paper towel to dab off any excess paint on the back so that the next time we placed it no leftover paint was lingering on the back (this can result in sort of a ghosted double outline, so the quick wipe down between each placement really seems worth the time).
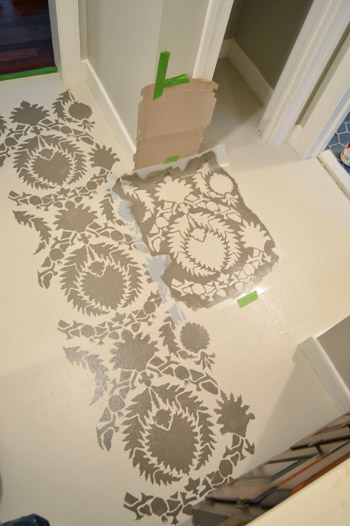
When doing a floor you also have to consider your exit route. In a typical square space this is pretty easy to figure out, but there was no logical way for us to both keep an exit clear and be sure we were keeping our pattern straight/centered (we wanted to start in the middle of the vanity and work out from there, so we couldn’t start in the corner of the closet and stencil our way out because things wouldn’t have been centered on the vanity). For that reason, we decided up front that it would be easiest to paint across two days in smaller installments. We did as much as we could easily access the first day, then let those areas dry so we could stand on them to complete some remaining spots. Picture it sort of like a checkerboard… you can do a row, leave a row clear, and do as much of the other row that attaches to something else you have already done as you can – and then walk out using the clear row. The next day, just go back and fill in those missing areas when the surrounding rows are dry so you can stand on them.
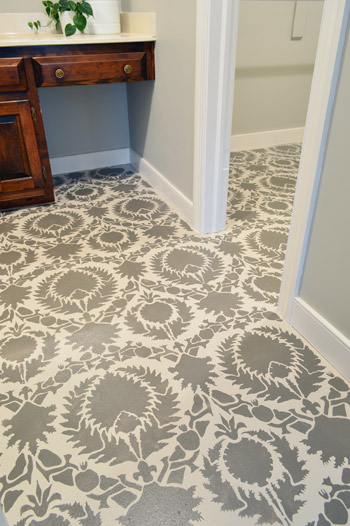
After all of the stenciling was done, I used a small craft brush to get into the spots that needed some filling in. Initially I thought I’d touch up the entire perimeter by hand with paint to make it look flush to the wall (the rolling left about a 1/2″ gap)…
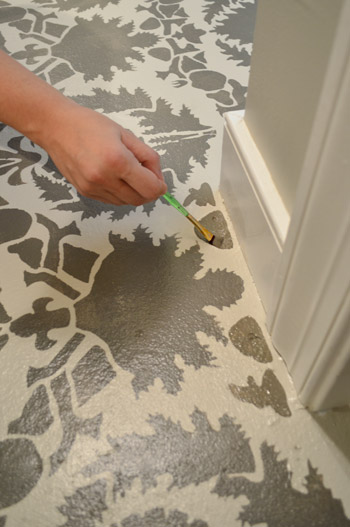
… but after stepping back we realized the small gap was so consistent around the room that it almost looked like an intentional border. So rather than risk making it look worse with my by-hand touch ups, we opted to keep it that way. You can see the slight border around the baseboard in the bottom right of this picture:
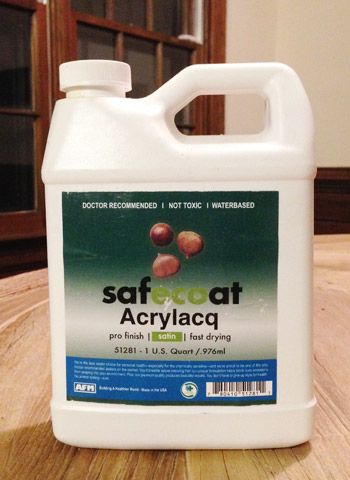
As our final sealing step, we plan to use SafeCoat Acrylacq (a non-toxic poly that we have loved since my pregnancy with Clara) to seal it to give it even more added protection. So we hope to get that done and report back on how it goes as well as finishing up a few more things in there.
So far even unsealed it has been holding up well for the last few days, and we’re SO much happier to see it when we walk in there to get dressed than we were to stand on that old carpet. And of course we’re psyched to watch our list dwindle down to just two bullets in here (which means I get to do a budget breakdown soon – yeah boyyyy).
remove the carpetpaint and hang a larger window-like mirror(more on both of those steps here)paint the trimpaint the walls and ceilingreplace all of the outlets/light switches(more on all three of those steps here)stencil the floors- seal the floors and add some better storage solutions to the closet
- paint or stain the vanity, add new hardware to it, and add some built-in shelves to make the empty space under the counter on the right side more functional
Is anyone else stenciling the walls? How about a ceiling or a floor? Or furniture? Do you use a small foam roller or the claw method that I outlined here (for the love of wrist sustainability, USE A ROLLER!).
Psst- Wanna know where we got something in our house? Just click on this button:


Kaesey says
Holy moly, that’s a change! Great job on the stenciling. =) I haven’t dared try that. Still in strip-the-wallpaper-and-throw-on-the-paint mode! =)
Natalie says
So gorgeous, I love it!!
Anna Ammann says
It looks soooo pretty! Great idea! :)
CARRIE says
I just stenciled my daughter’s room and I used a roller. It was much easier, but I had to clean up a lot of bleeds with a small detail brush after the fact. It was a lot easier this way than using a traditional stencil brush and like you said exhausting my hand.
Jennifer says
It looks amazing! I completely understand the need to rip up old carpet and live on a subfloor instead. I’ve suggested this many times to people asking me for advice about their gross carpet they can’t afford to replace and I always get a weird sideways look, lol. I can refer them here for a visual now! See, I’m not crazy!
Julianne says
How beautiful! I would be tempted to leave the floor as is! It’s like a Picasso for the floor. Major improvement. :0)
Brenda says
When I scrolled down, you got a big out loud OOOHHHHHHH! It looks unbelievable, so jealous!
Terri says
We have wood under our carpet don’t think oak but think stenciling woul work one it. It’s a old house. Wonder do you think I would have to fill in between the strips of wood. Love the floor. Terri
Kelly Lightbeam says
This turned out beautifully! I also like how the tone of the base color on the floor ties into the color of the vanity top. Great job, as always!
Laura says
Wow… Just wow. Beautiful, fun, unique!
Jess says
I know this is just your temporary solution… But I LOVE it! Gorgeous – and what a major upgrade!
Minnie says
This looks great! I wouldn’t mind living with that for a while.
Kate C says
This is amazing! I can not get over how incredible it looks. But now you make me really, really want to tear out my carpet too. You see, we have the same closet/vanity area/shower & toilet area that you do. It’s an awkward space to decorate. We also have walls that I painted a very similar grey. But what do I have that you don’t? Thick, plush, hunter green carpet! Bet you’re jealous now, huh? Yeah, I know, it’s ok.
But seriously, if it weren’t for the fact that the entire room is the same carpet, and we can’t afford other flooring right now, I would be on this in a heart beat. So instead I’ll just drool over yours, ok?
Megan says
Ok that is BEAUTIFUL guys! Way. To. Go!!! I honestly didn’t know what to expect when I read you were planning on doing this, but my jaw dropped to the floor at first glance. I’m completely shocked on how much I love it. Wish I had a room to stencil. Bravo!!
Nicole says
An amazing job guys. What a transformation. I am inspired now to do our concrete verandah in our ‘temporary’ residence as we look to build our new home. I am afraid I am guilty of avoiding such projects on the basis that its just temporary. Thanks. Nicole xx
Shannon [Our Home Notebook] says
Such a great in the meantime solution! It turned out so well.
Shelley @ Green Eggs and Hamlet says
Wow, the stenciled floor looks amazing, love it! It’s like a beautiful, high-end rug but in easy to care for subfloor. :)
Angel says
Ditto to almost everyone else – WOW!!!
Suh a happy and gorgeous floor! You guys, man, it’s so fun to read your blog and see some of the awesome things you think of and accomplish.
Debby says
Me encanta! I love it!
neree says
Since the demise of Google Reader, I have been using Flipboard…fyi: your posts update a day or so late on that platform (right now Clara’s twinkle lights shows as the most recent post)… which I don’t notice with the other blogs. I’d love it if yours updated in real(er) time, too. Thought I’d give you a heads up in case you want to address the issue. I DO visit your site directly now! -Can’t go without your ideas and positivity for too long!
YoungHouseLove says
I’m so sorry about that Neree! I wonder why it would be so behind! Will have to email your comment to John to see if he thinks he can get to the bottom of it. Thanks so much for the tip!
xo
s
Katie says
Hey, so I was wondering… How come you didn’t remove the side sink piece things(I’m very articulate, yes?) from the walls like you did in the downstairs bathroom?
YoungHouseLove says
I wish we could have! In this room the back part is connected to the sinktop (it’s one curved piece if that makes sense, instead of an added slab on top along the wall that you can pop off).
xo
s
Juliet says
At first I thought it was another photoshop rendering…then I was actually said “Holy Mackerel” out loud. Looks so good!!!
Stacy says
That looks freakin’ awesome!!!
Autumn Beach says
Oh my holy SWEETNESS!! I LOVE it!!
maryam says
love this. looks amazing! and so cheap! i have a concrete floor in my basement laundry space. previous owners painted it red but i’m trying to make the whole area (it’s large with one side having old 1950’s cabinets from a previous kitchen remodel) look more cohesive and pretty since I end up spending so much time down there with 7 people in the house. do you have an stencil recommendations that might work? how well do these hold up to occasional water? i was thinking of doing a stick down laminate flooring but again wasn’t sure how well it would deal w/ spills etc and occasional drips from a pipe.
YoungHouseLove says
I think painted concrete is the best for water! Just use a porch and floor paint and it’s actually meant to hold up to rain outside so it should be great! As for stencil recommendations, we have ordered a few from Royal Design Studios over the years and have been really happy with them. They’re not cheap but they’re huge and a great quality (and we like the patterns) so they’re worth it to us!
xo
s
Rebecca says
Ah-mazing!!!! Love, love, love!!!
Natalie says
You guys are so brave!
Maria C. says
It’s awesome! Just by adding a bit of paint and a cute pattern it made such a change to the room! I think the before and after photo of this “room” would have been enough to answer the ‘is phases 1 projects a waste of time and money’? . Surely it is not, it increases happiness and loveliness until big changes can be done.
Nicole Ford says
Sherry & John,
GORGEOUS…just beautiful! I haven’t even read Monday’s blog- still catching up from the weekend. But when I checked in this morning and saw these pictures I had to express how unbelievable it looks. I really have no words. Fantastic job, can’t wait to see what else you guys have up your sleeve for the house. My husband and I love reading your blog and it has inspired us over and over to fix up and decorate our home as well.
Thank you!
Nicole & Vern
YoungHouseLove says
Thanks so much Nicole! Everyone has been so sweet about this project and we’re so glad it turned out so well!
xo
s
Patricia says
BTW, you CAN tile over wood subflooring, just put down schluter ditra (avail at any home improvement center)and lay the tile. The only caution would be if your wood subfloor has give to it. Any flex and the tiles will crack.
YoungHouseLove says
Thanks Patricia! That must be like Elastilon (what we used to make our floors work with hardwood even though we couldn’t nail into them). We’ll have to price it out to see if it’s worth it (or if we should just rip out the plywood and use cement board.
xo
s
Kathleen says
Wow ! Love how the stencil pattern and colors brighten the area. Looks great !
m @ random musings says
looks awesome! One question – does the paint/clearcoat interfere with the mortar used for setting the cement backerboard bonding correctly?
YoungHouseLove says
You wouldn’t want to paint a cement slab if you were going to tile right over it (in that case you don’t need backerboard, and you couldn’t use thinset over painted concrete like you could over unpainted (it messes with the bond). I believe painted plywood is fine if you screw backerboard into it and tile that, so it’s just in the case of particle board, which isn’t a secure base to screw cement board into (it’s also why we couldn’t nail hardwoods into it and had to use elastilon) that you need to remove it before adding cement board – and in that case whether you paint it or not doesn’t make a difference since you’ll be removing it before tiling.
xo
s
VICKI says
I am coming to the party as Johnny-come-lately, but just wondered (without reading the 400+ other posts) if you considered planning the pattern to see if using a border–maybe in an even darker gray all around the two areas or maybe just where the basin is in the most visible space…so that you didn’t need to have so many partial stencil motifs?
I know when I had a kitchen redone the tile guy was very emphatic that he needed to plan the backsplash design and the area behind the stove which had more elaborate pattern using some different tiles to avoid needless cuts and wasting tile…
I would imagine this is similar except not so expensive…
I know adding a painted border might have resulted in a look that was more confining since it could have reduced the visual space of the area but if it would have saved time and tedious effort maybe it would have been acceptable compromise since this is vaguely temporary effect after all.
YoungHouseLove says
That would have been really cool! I think it might lend itself to a more square space since I’m not sure how a thicker and darker (more defined) border would look with all the irregular angles in the vanity area (the door is off centered and there’s a linen closet jutting into the room that you can’t see, etc) so we worried a border might just emphisize the strange floor shape, but in a square room it would look so pretty – like an inlaid floor or something!
xo
s
Vicki C says
Comment about the blog in general–not this specific story.
Is there any way to transition from comment page to comment page w/o having to scroll all the way thorough the story however long or short it might be?
By the time I get to read the daily blog, there are usually 100’s of comments. I can go to the last comment on the next page easily–but finding the FIRST comment means powering down the story itself…
There are some websites where you don’t need to do that–
the comments are tied to each other vs the story so you can go from page to page of comments more easily.
I guess that sounds like a curmudgeon’s whine…but it is really the only negative I find about your website…
YoungHouseLove says
I know what you mean Vicki! We have tried other comment plug-ins but they crash our site or slow it down so much that they’re less affective. This one moves quickly and allows comments to thread and highlights author comments which all seem helpful, but there is that scrolling thing that’s annoying (we completely agree) but so far no one has created one that works well for our site without slowing/crashing that avoids the scrolling thing. We’re always looking out for new things though, so maybe one will come along soon! They do tend to update them a lot!
xo
s
Katherine says
Amazing! I had not anticipated that looking quite so awesome. It changes the whole room.
KyCat says
Love it! What a great job! I totally agree with your thinking about a temporary space. What great freedom to be a little more bold or wild then you feel you can be with something you’ll have for 50 years!
Hanna Cage says
Looks amazing. Seriously amazing.
Pam the Goatherd says
Love it! And thanks for the tip about rolling rather than brushing. I’m planning on doing some stenciling with a giant stencil on the walls of my sewing room. Rolling sounds so much easier than trying to dab with a brush!
Rosemary says
This is far and away the best DIY project I have ever seen – I think it is so clever, creative, artistic and just plain wonderful! Thanks for the inspiration; you give me courage to try some ideas that I sometimes am too timid to do.
Kate says
Looks great!
I wouldn’t have picked out a stencil like that in a million years, but after seeing it on your floor I like it a lot.
Now I wanna go and stencil something. Ha!
Jill says
Dang! That is bangin, yall!!!!
I want to stencil something so bad but I am just not patient enough. The older I get, the more I feel like I’m channeling my Dad when it comes to DIY. I love to tinker and get excited about a project, research it so I know how to execute it well, but half way through I’m just ready to be DONE and start to slack in my craftsmanship. Sigh. Am I alone in this?
Also- I just discovered the ICON paint myself because I didn’t want to pay for the crazy expensive Valspar Signature (a quart is $18 and I was doing a very small project with it). Anyways, the guy at Lowes warned me the color would not come out the same as the sample card………. and he was right. Womp Womp. HOWEVER, I did not even notice that it was no VOC til I read this post and now that I think of it, there was very little odor to it when I used it over the weekend.
I am so glad you stenciled it and did not do peel & stick… and hope you will keep it- We just did peel and stick tile in our kitchen. What a great look but WHAT A PAIN. My friend that installs flooring did it for us and he used extra adhesive, a heat gun, and lots of other tricks but we still have some seems popping up. He said if we ever decide to change it, it will be a BEAR to tear up and will prob just have to pull up the subfloor. Yay… but ya know what? It is better than what we had before. So oh well.
YoungHouseLove says
Oh man I can’t believe it’s still popping up in some places! Sounds like a real improvement though, so I hope it ends up being awesome for ya.
xo
s
Kelly @ Corner of Main says
It looks so pretty!! I liked your post about making mini improvements like this. I totally agree! Small changes can make such a difference until you are ready to make big ones =)
Marelis Q says
aMAZING!! I love it :) what did Clara think?? You may not want to go with “boring” tile after this! I wouldn’t ;)
YoungHouseLove says
She likes it. She has been putting funny things on the dark part (like doll shoes) and saying they’re jumping so they don’t fall in the water (the lighter part).
xo
s
Nakita D says
AMAZING ! Ikeep telling my hubs he is going to come home one day & I will have ripped out nasty carpet and painted the subfloors!!! Thank you for posting!!
Sassafras says
Spectacular!!!! Ta-Da!!!!! I too thought of Genevieve Gorder tile.
Wondering…do you have plans to ever put crown molding up in there once you take down the walls and rework the space?
YoungHouseLove says
Yes, we’re pretty much addicted to crown molding! Haha!
xo
s
Lindsey says
I stenciled my master bedroom wall with polka dots in different shades of gray (not fifty). I love the result but if I would have known how much work and time were going to go into it I probably would have chickened out.
Stacy says
LOVE IT!
Angela W says
I love it!
Megan says
I wouldn’t change a thing about the floor! I love love love this! I love your blog! Thanks so much for all of your hard work, i know I appreciate all of it.
lesley says
Looks amazing!!!!! can u tell me the name of the paint colour used on the walls?
YoungHouseLove says
It’s Revere Pewter by Benjamin Moore. Hope it helps!
xo
s