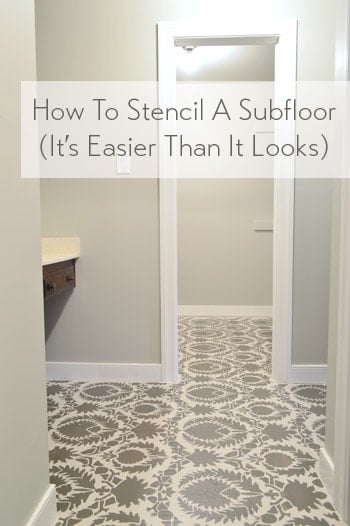
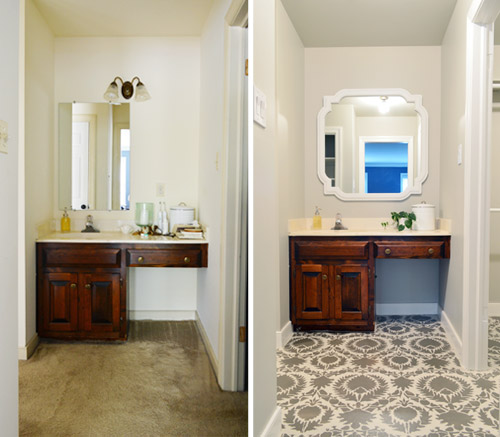
We did it! We stenciled our bathroom and closet floor and it looks awesome. So worth the effort. And so much better than the carpet that was there before.
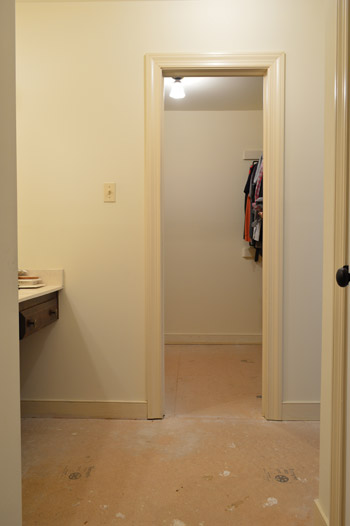
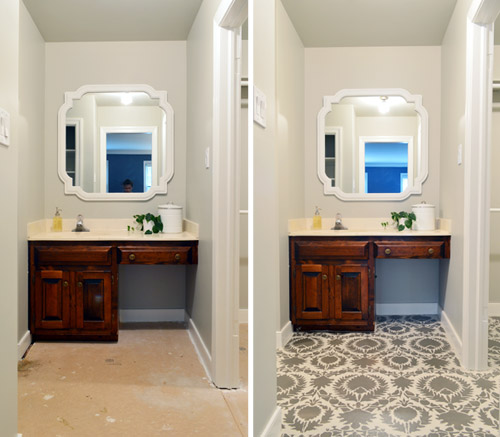
Remember when the floor in our closet and vanity area looked like this?

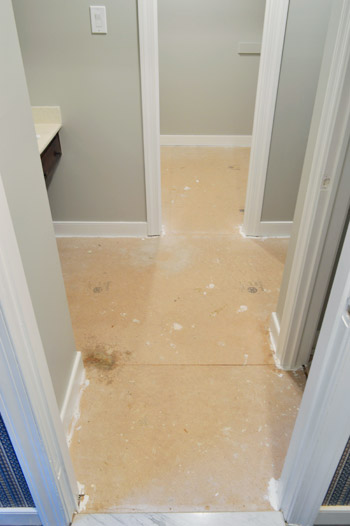
And then we ripped up the carpet to reveal the subfloor and they looked like this?
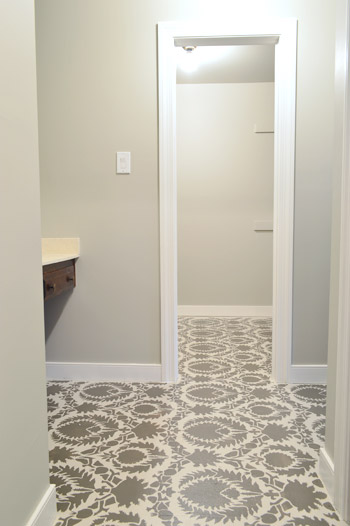
Well, five hours and $24 later, it looks like this!
Our actual bathroom has tile (where the shower/tub/toilet are), but this is a separate vanity area along with an adjoining closet – which both had old carpet that we couldn’t live with for one more day. So we yanked it up and decided to have some fun with the subfloor until we’re ready for a full scale renovation down the line (eventually we’d love to knock down the wall that divides the vanity from the rest of the bathroom and retile/renovate them so they’re one big spacious bathroom).
We briefly debated peel and stick floor tiles or buying a large seagrass rug and cutting it to lay it wall-to-wall in both spaces for this interim step, but we decided that a stenciled and sealed floor (possibly with a few area rugs) will serve us well in the short term without being a whole lot of money/effort that we’ll later end up undoing.
And since our future tiling plans will require us to rip this stuff up and put backer board in its place anyway (you can’t tile over particle board since it’s not a secure base) there’s no harm in slapping some paint on it in the meantime.
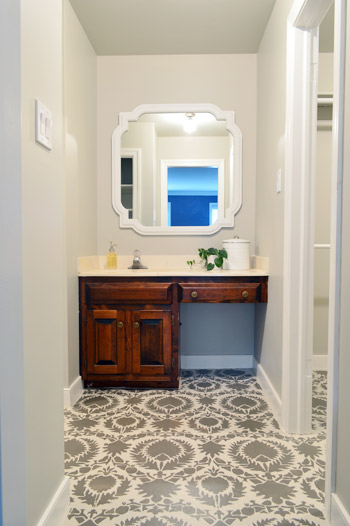
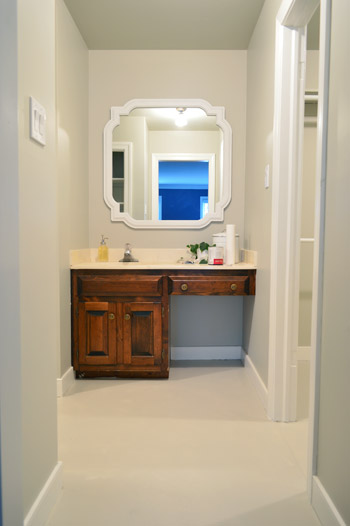
My favorite thing about temporary (and affordable!) afternoon updates like this are that you can have a little fun and do something a little bolder than you might do if you were selecting something more permanent (like tiling a floor that you’ll have to live with for a few decades). Oh and don’t mind that vanity, we’re going to either stain it a deep ebony or charcoal tone or paint it a subdued dark color, so it should fit in a lot better with the rest of the tones in the space.
But let’s rewind a little bit (back to when the floors looked like this) and tell you about the process and some of the things we learned along the way.
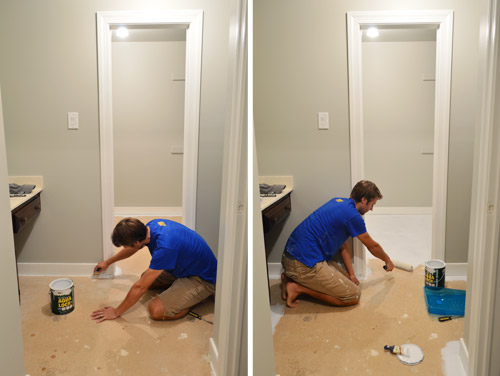
To prep our subfloor, which is particle board (a very smooth and almost chalky surface) we used wood filler to make the seams between the different particle boards sheets less obvious. There were only three so it went pretty fast. Once dry, we sanded them down. It wasn’t perfect, but it was better.
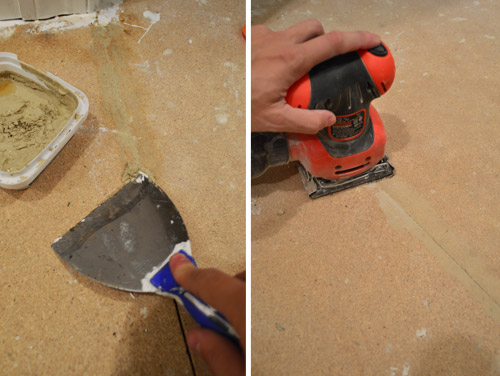
Then we primed it all with Aqualock water based primer (it was low-VOC but not no-VOC so John got that step done while I was outside playing with Clara). The purpose of the primer was to help the paint grab on for the long haul and block any stains/bleed-through that might occur from painting over such a porous surface like particle board.
For paint, we grabbed two $12 quarts of semi-gloss paint in the new no-VOC Olympic Icon line, matched to two Benjamin Moore colors: Revere Pewter for our base (same as the wall) and Gargoyle (for the darker stencil pattern). For the last few years we’ve mostly stuck with Benjamin Moore paints, but for temporary upgrades it’s nice to save a little money since we’ll be ripping out this floor in a few years and tiling anyway. We didn’t use an outdoor porch and floor paint (as you usually would in this scenario) because they’re all pretty fumey (usually oil-based) we wanted something no-VOC (this one’s for you, fetus) – but we think the combination of a good primer, some semi-gloss paint, and a nice thick coat of sealer will keep them in good shape for the next few years. We’ll definitely report back with photos over time to share how the floor wears.

With the primer dry, we could apply two coats of the base color. Since this was a no-VOC step, I could cut in while John rolled the rest (we just had to be mindful to paint ourselves out of the space). You can see from the picture below that the color matched Revere Pewter on the floor didn’t really turn out to match the real RP color on the walls as we planned (that’s always the risk that you take when you color match one brand to another), but it was still in the same color family, so we didn’t mind. We’re going for some pretty high contrast interest on the floor, but we thought it would stay sophisticated if we kept the palette sort of subdued (especially with a bold navy-ish tone in the bedroom along with a colorful rug/headboard/pillows/etc) so we were just glad they didn’t clash and still felt like they went together, even if they didn’t match perfectly.
Stenciling the floor is SO MUCH EASIER if you have two people on hand to tag team it. I did the office stencil project alone for the most part, and it took forever and I used a method I’d never use again (more on that in a minute) but this time around we both tackled it and it was a much simpler task. Oh and stenciling a floor is even easier than stenciling a wall since you’re not fighting gravity (a few pieces of painter’s tape hold it in place and then you can roll it without worrying it’ll slip down the wall like it might on a vertical surface).
If you’d like to see the rolling in action – with a few live-action tips in the mix – we made this video while applying another stencil to the wall for a book project back in 2011.
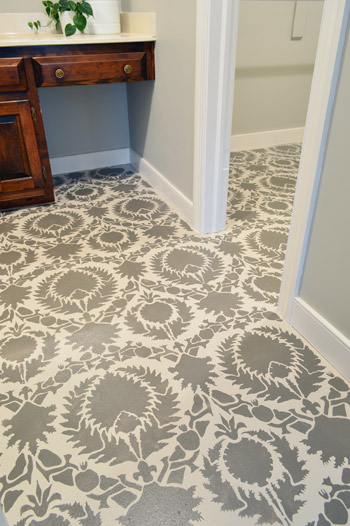
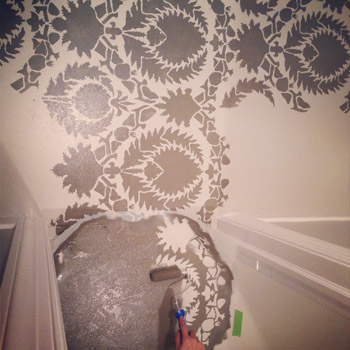
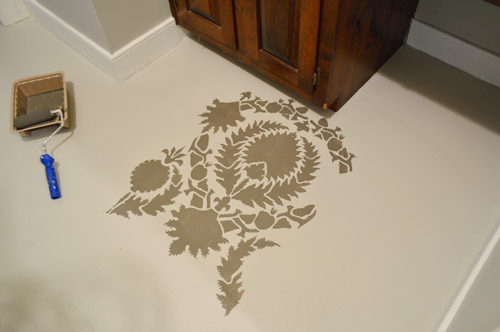
Since you usually want your pattern centered in the room, we started our first stencil to be right in the middle of the vanity. Here you can see what a single repeat of the pattern looks like. It’s the Suzani Silk Road stencil from Royal Design Studios. It’s $49, but we had actually ordered it back in 2011 to use for our book (but that project ended up getting cut), so we just had it sitting under the bed in our guest room for a few years, waiting to be used.
But back to that much easier stenciling method that I mentioned before. We learned back when we were shooting that wall-stenciling project for our book that applying a small amount of paint with a foam roller (not too much, or it’ll get gummy/bleedy) results in just as clean of a line as dabbing everything on by hand, which I did when I stenciled the office, and ended up with claw hands and lost 14 hours of my life. This entire thing only took us 5 hours and was SO MUCH EASIER thanks to a small foam roller with a nice thin application of paint. Hallelujah!
Once again, when using a large stencil like this, it’s so much easier with two people. Each stencil has registration marks around the outside that you line up with the previous stencil so you know where to place it, and if you have someone on hand to help you line up the registration marks and slowly lower it down onto the floor (especially when they’re large) you should have a lot less of an issue with smudging, which can happen if you place it and then slide it around to match the registration marks instead of using four hands to slowly lower it into the right place off the bat (one hand for each corner just seems to work best).
This room’s biggest challenge was that so many walls and corners meant lots of partial stencils, which meant lots of stencil bending (it’s made from flexible plastic that bends, but doesn’t crease, easily) and smooshing the roller into tight spots. We kept some spare cardboard handy (i.e. cereal boxes) to protect the wall from getting paint on it when we had to bend the stencil and it would have rested against the baseboard/wall. Between each placement of the stencil, John also held it up with two fingers with the back facing me and I used a folded paper towel to dab off any excess paint on the back so that the next time we placed it no leftover paint was lingering on the back (this can result in sort of a ghosted double outline, so the quick wipe down between each placement really seems worth the time).
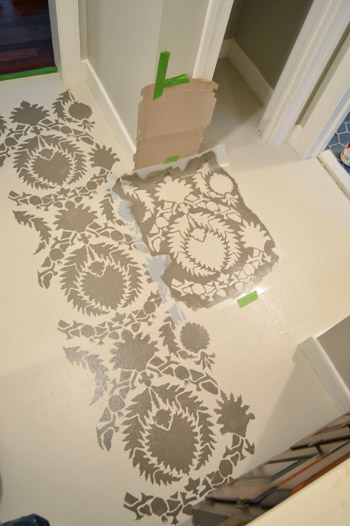
When doing a floor you also have to consider your exit route. In a typical square space this is pretty easy to figure out, but there was no logical way for us to both keep an exit clear and be sure we were keeping our pattern straight/centered (we wanted to start in the middle of the vanity and work out from there, so we couldn’t start in the corner of the closet and stencil our way out because things wouldn’t have been centered on the vanity). For that reason, we decided up front that it would be easiest to paint across two days in smaller installments. We did as much as we could easily access the first day, then let those areas dry so we could stand on them to complete some remaining spots. Picture it sort of like a checkerboard… you can do a row, leave a row clear, and do as much of the other row that attaches to something else you have already done as you can – and then walk out using the clear row. The next day, just go back and fill in those missing areas when the surrounding rows are dry so you can stand on them.
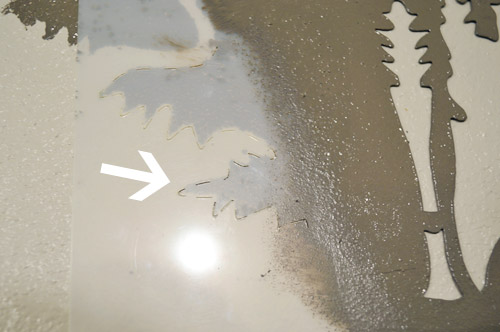
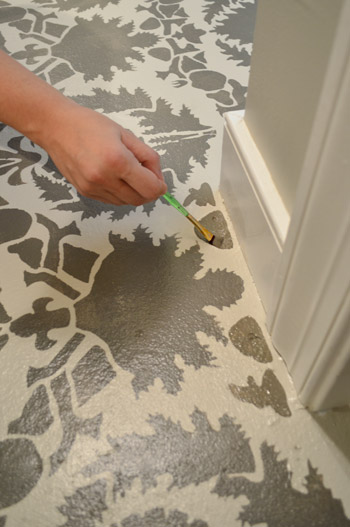
After all of the stenciling was done, I used a small craft brush to get into the spots that needed some filling in. Initially I thought I’d touch up the entire perimeter by hand with paint to make it look flush to the wall (the rolling left about a 1/2″ gap)…
… but after stepping back we realized the small gap was so consistent around the room that it almost looked like an intentional border. So rather than risk making it look worse with my by-hand touch ups, we opted to keep it that way. You can see the slight border around the baseboard in the bottom right of this picture:
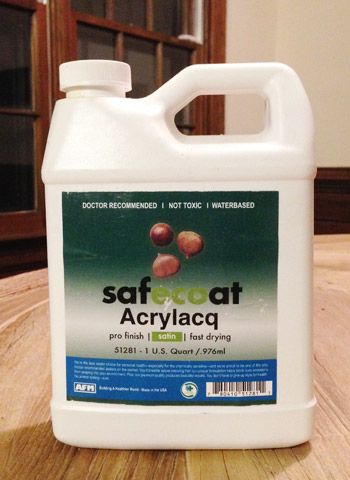
As our final sealing step, we plan to use SafeCoat Acrylacq (a non-toxic poly that we have loved since my pregnancy with Clara) to seal it to give it even more added protection. So we hope to get that done and report back on how it goes as well as finishing up a few more things in there.
So far even unsealed it has been holding up well for the last few days, and we’re SO much happier to see it when we walk in there to get dressed than we were to stand on that old carpet. And of course we’re psyched to watch our list dwindle down to just two bullets in here (which means I get to do a budget breakdown soon – yeah boyyyy).
remove the carpetpaint and hang a larger window-like mirror(more on both of those steps here)paint the trimpaint the walls and ceilingreplace all of the outlets/light switches(more on all three of those steps here)stencil the floors- seal the floors and add some better storage solutions to the closet
- paint or stain the vanity, add new hardware to it, and add some built-in shelves to make the empty space under the counter on the right side more functional
Is anyone else stenciling the walls? How about a ceiling or a floor? Or furniture? Do you use a small foam roller or the claw method that I outlined here (for the love of wrist sustainability, USE A ROLLER!).
Psst- Wanna know where we got something in our house? Just click on this button:


Melanie says
Wow. What a transformation! This looks good enough to leave all the time. One of my favorites from you all, hands down!
Bonnie says
Wow, this looks incredible!!!
I used a foam roller last time I stenciled, and while it was super quick, I still had some paint bleed around the edges.
YoungHouseLove says
Hmm, did you wipe down the back before placing the stencil each time? That really seemed to keep things clean. Also applying a thin thin thin coat of paint (you almost don’t think it’s full coverage but when you lift the stencil up it’s clear and fully filled in) can help!
xo
s
Jocelyn says
Awesome transformation!
Heather says
Wondering how you closed up the gaps under the door jambs. We tore out our carpets and will replace with luxury vinyl, but can’t figure out a good solution for the gaps.
YoungHouseLove says
Maybe try some wood transition pieces? They sell them at Home Depot and Lowe’s as well as places like Lumber Liquidators!
xo
s
Becky says
This looks amazing! I so agree with the temporary renovation idea. We have spent way too much money on renovations that we didn’t totally love because we did them too early on. (Hmmm, hint in this post?)
Nicole says
What a wonderful idea! I’m wondering if I could pull this off with the cement floor in our basement! Maybe with a more Moroccan pattern though instead? I’m mentally having a hard time with the idea of spending, like fifty bucks on a stencil though -_-. Woe is meeeee! Do you know of any stencil companies that sell discounted or wholesale price stencils for us UBER frugal mamas? Or am I better off spending the money in the long run?
YoungHouseLove says
I would check out etsy and even ebay to see what you can find. I agree they’re steep, but they’re HUGE (you can pay less for smaller ones, but they can take you twice as long and not have as much impact as the larger ones). In the end, most floor makeovers are $200+ (even for peel and stick tile in such a large space like a basement, and it can get super expensive for carpeting or hardwoods or tile) so floor paint + a stencil will still get you in the under $90 range I think!
xo
s
Vy says
Wow this is GENIUS! Looks AWESOME!
Clare says
WOW!
I just said that out loud in my office (luckily everyone else has gone home). I have been following you for a few months now and LOVE your blog.
This makeover has really sold me on “temporary” make-overs, which my husband is anti because he thinks a job shouldn’t be half-done – there’s nothing half-done or botched about this one!
Melanie says
WOW!
Nicole says
Looks great!! I love the bold pattern..
I just painted my kitchen cabinets in the Revere Pewter but it came out more green than greige. :( Whomp Whomp..not good. It took me 5 days to sand and paint and I hate it. I wish that it had the more gray tone that your floors have! Back to the drawing board I go.
YoungHouseLove says
Oh no! I’m so sorry Nicole. That sounds very sucky indeed. So weird that it went green! It’s such a different color in so many different spaces!
xo
s
Sarah Steele says
Unbelievable! – that’s all I have to say. I’m just floored (ha ha) with how well it turned out!
caroline [the diy nurse] says
Can I just say that none of my ‘phase 1’s’ have never looked this good! lol. I love it!
Tirsa says
Oh wow, this is lovely! Love the impact it has on the space. I can’t bear to think you will be getting rid of this sown the road. It’s too nice to destroy. :) Great job!
Beks says
That looks so chic!
Martha says
SERIOUS LOVE. That’s awesomely awesome.
Rachel says
Claw hands and 14 hours of your life hahaha that is great! You put into words something I thought only happened to me lol. Love the floor :-)
Ashley says
Wow! That looks pretty darn good for sub floor! I was kind of skeptical about it but I looks like it turned out awesome!
Karly says
That looks amazing!
Isabel says
LOVE IT! Can’t wait to stencil my dining room. Thanks for the tips too! I was going to follow the directions you outlined in your post about stenciling the office in the old house, but I will definitely go the foam roller route instead.
Jenn R. says
Love, Love, Love it!!!! I wouldn’t want to tile it, but I guess in a few years you will be tired of it.
Erin says
ewe weee I like! I know you plan on changing up the vanity but I really like the contrast the wood adds to the room. The stencil reminds me of a bold moroccan tile. LOVE it.
http://erinstaussdesign.co/
Emily says
what kind of wood filler did you use? The last stuff I used was crazy toxic and made me sick for half a day afterwards! I’ve been afraid of the stuff ever since!
YoungHouseLove says
Oh yeah some of it’s SUPER stinky! John used Elmer’s Pro Bond Wood Filler which comes in one of those shallow square tubs, and once it was dry and sanded it had no odor in there at all. We have found that the deeper cup-like tubs seem to be more fumey (we once grabbed that by mistake and threw it away because it was so nasty).
xo
s
Nikki says
What do you tile over if you can’t put cement board over plywood?
YoungHouseLove says
You pop up the subfloor and add cement board in it’s place. Although I think you might be able to put cement board over plywood, so it might just be particle board (what we have) that’s unstable.
xo
s
Liz says
LOVE, LOVE, LOVE!!!!!
Ana Silva says
I looks fabulous!
chrissie says
I kinda like the wood the vanity as it is! With some new hardware and countertop.. it would look really nice. its pretty :)
FRECKLES CHICK says
LOVE it!!!! Looks like luxe fancy tile or something! Just imagine a statement light above, too. Aw yeah. *high fives*
YoungHouseLove says
Haha, and I’m high fiving the air now. It’s like you’re here.
xo
s
Catherine says
That looks fantastic! What a great impact for so little money.
Amy T says
is there a problem with comments disappearing? It says there are 4 pages, but then when I click through them there are only a few comments on page 3 and page 4 disappears. And i cant find my comment from about an hour ago. I was asking if you had thought about removing the little back splashes on the vanity to help minimize it’s yellow effect.
YoungHouseLove says
Sorry about that! Not sure if they’re acting wonky or something (anyone else have an issue with comments?). It’s on page 3 right here for ya: https://www.younghouselove.com/2013/10/operation-stencil-the-subfloor/comment-page-3/#comment-1644566
xo
s
Amy T says
That was weird but it looks right now! Thanks for the reply :)
Tara says
I love it! And honestly, I think the slightly lighter base color on the floor looks better than if it was a perfect match to the wall. It looks more cohesive instead of matchy “the floor and walls are the same color” ish…if that makes sense. Wish I could paint my floors (darn apartment!) I wanted to stencil in my parents guest bedroom, which we’re currently remodeling, but they’re pretty traditional and I figured convincing them to do a deep, dark blue accent wall was out-there enough!
Stephanie says
You guys! It looks AMAZING!! Can you believe how much that ‘little’ change completely transformed that space?! SO cool!
Annie says
That is beautiful! You have to keep us updated on how it handles wear and tear. I personally think you can do more things like this to floors than you think you can. This summer I painted a really old, ugly hexagonal tile floor all white. I primed first and it looks amazing. It’s in a bathroom and it completely transformed the room. And since I’ll eventually renovate in there it doesn’t have to last forever. Though it’s holding up great!
YoungHouseLove says
I can’t believe that’s holding up! Awesome to hear that! You didn’t sand or anything, just primed? So interesting! I bet some sort of matte-tile (or really old worn down tile) would take paint better than something super glossy.
xo
s
Annie says
The tile was definitely worn down. I used two coats of primer and gave it lots of drying time.
I had been following Leslie at “My Old Country House” as she was painting her vinyl kitchen floor. I asked her if she thought it would work on tile and her response was, “It probably won’t hurt it. What have you go to lose?” :)
YoungHouseLove says
She’s a wise lady!
xo
s
Stephanie says
Long time lurker first time poster because OMG, the floor may be the most fabulous thing I have ever seen. Ever. Super jealous that you get to see that every day. I now want to stencil my entire house.
YoungHouseLove says
Aw thanks Stephanie!
xo
s
Michele from IL says
Looks FANTASTIC!!!
Mary says
Looks amazing! And–maybe it’s just the photo itself–I don’t think the vanity is all that bad. The dark wood grain looks very rich against the white mirror and the new floors. Of course, I can imagine that it is gross-er in real life….!
Julia says
OMG, that looks AMAZING!
Do you think this could work outside? I think the balcony of my apartment would look great with something like this…
YoungHouseLove says
Definitely! Just use porch and floor paint (we painted stripes on our porch, which got wet, and also painted the floor of our sunroom which we walked through in the rain with wet feet).
xo
s
Miranda says
Oh my word! That looks amazing!! And I am currently obsessed with Revere Pewter (my in-laws used it in their place and I’m trying to work it into our home as well…one room is done). I can’t believe how different and how much brighter your closet/ensuite looks!
Heather S. says
Interesting. I’d love to see a picture of the closet from the bedroom – meaning you can see the bedroom floor next to the stenciled closet floor. It seems quite busy to me but maybe it works with the room as a whole.
YoungHouseLove says
We’ll definitely share more pics from lots of angles once the bedroom makes sense again (everything from the closet is smashed into the bedroom for now since we still have to seal the floors). We also owe you guys a video tour so you can see how all the rooms flow together “in person.”
xo
s
Paula says
Aw man, I stenciled a wall and my husband tried to convince me a foam roller would be easier and I was all “Young House Love used this foam brush thingy, and they know best” — I even have the book, I just obviously hadn’t read that section carefully! Ah well, next time =) (I’m also not going to tell him about this, I don’t need to hear “I told you so” right now)
YoungHouseLove says
Haha, so sorry Paula! Yeah it was sort of a life-changing discovery. At least an arm saving one…
xo
s
Kimberly says
WOW!!!!!!! I could fill this whole comment section with exclamation points, but I’ll save your eyes from that. It looks incredible and I’m sure will be so much better until you are at the place of a full renovation. I have been painting a dining table and followed your tutorial from when you painted your pedestal table – thank you for that!
Jess says
Amazing transformation, guys. The stencil pattern looks stunning on the floor! Must be so nice to have that old carpet out of there.
Gretchen Brown says
Wow! It is absolutely BEAUTIFUL!!! I wish I had done this instead of putting down vinyl in my bathroom as a temporary solution. This is so much prettier! Good job, Petersiks! =)
Rebecca | the lil house that could says
Looks great, though now I wish it was a more permanent surface! I vote navy for the vanity :)
Sayward says
I just raised the roof for you guys (lowered the floor?)It. Looks. Awesome.
I’ll repay your Clara Conversations with yesterday’s Boyfriend Conversation
Boyfriend: Wait, that blog you love has a BOOK?
Me: Of course.
Boyfriend: And you keep it next to your bed…
Me: *in a loving whisper* They’re my best friends.
YoungHouseLove says
Hahahahahah! We are. Don’t you forget it Sayward!
xo
s
Sarah A says
Question about staining your vanity a darker color – do you have to get rid of all the existing stain by sanding, or can you rough it up and stain over it? I ask because, inspired by you, this summer I sanded down my entire dining room table (6o-year-old set from Grandma, stained cherry, very worn and chipped), and stained it a dark color. It looks amazing! But now I have the mismatched china cabinet and chairs, with all their daunting curves that I could never sand down to clean wood. Could I just wipe with deglosser and use the new, darker stain over the existing cherry color, or do I have to get off all the original first?
YoungHouseLove says
We’d have to rough it up to get through the sealer and then if we’re going darker it can seep into the wood, but if you want to go lighter you have to go all the way down to bare wood. Good luck!
xo
s
Lexi says
WOW this came out amazing! Now I’m all frustrated that the people we bought our house from in May put in blah tile before selling – I love your temporary floor much more.
Ann says
Looks great! I’m thinking about painting our basement floor and am wondering–how do you clean a painted wood floor? I’m guessing you have no shoes in this bathroom, but did you have an issues with shoes in the sunroom of your first house?
Thanks!
YoungHouseLove says
Just a swiffer works or mild soap and water like how you clean hardwoods (Dr Bronners or Mrs Meyers are our favorites).
xo
s
Leigh says
This looks AMAZING!!! You have totally inspired me to do this to my laundry room floor. Honestly – I love it! Thank you guys for being so creative and motivating me to tackle things like this. I have 4 kids under 3 years, and all I want to do in my free time (which should really read as my Homeland watching/wine drinking/reading/cleaning/anything resembling fun time) is to rip up some carpet and paint a floor. Good on ya!! Thanks for lighting my fire..haha!
YoungHouseLove says
Haha, good luck Leigh!
xo
s
Chez says
Looks so great! I stenciled a wall and also learned that a foam roller goes SO much faster (and looks just as good) than doing it by hand with a brush. I think I’m going to stencil our stairs so am interested in using the SafeCoat Acrylacq. Do you use a brush or roller to apply it? Do you apply it at 100% strength or dilute it somehow? I’ve never used a sealer before. Thanks so much!
YoungHouseLove says
We’ll use it at 100% and probably spread it with a foam roller. The key is super even thin coats and waiting the recommended drying time between coats to be sure it doesn’t stay tacky (that happens if you go too heavy or do them too close together).
xo
s
Koliti says
“Sherry’s Reverie Revelry” – it’s a party (except without all the heavy drinking!). Note: it makes a big difference when you add the “i”.
Beautiful vision and awesome execution.
BAM! Interim floor in the house.
YoungHouseLove says
Haha!
xo
s