Let’s see… when we last left off on Monday, our open shelves had been primed in preparation for their big hanging debut.
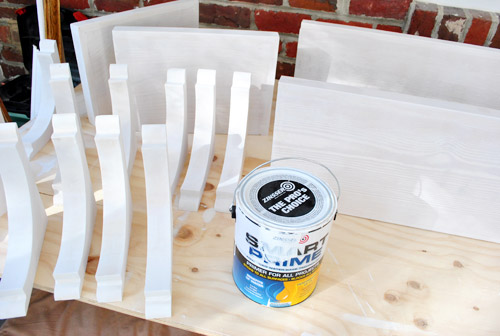
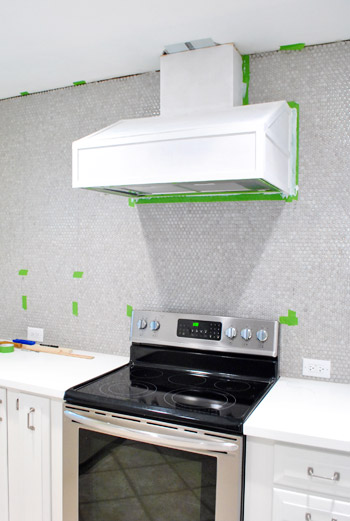
While we had the primer out we went ahead and slapped a coat on the hood cover too (using a 2″ angled brush in the cracks followed by a small foam roller to smooth everything out). Things were instantly looking less wood-sy on that wall.
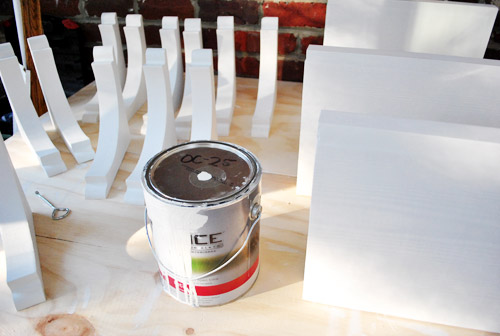
Once the primer dried on both – we used Zinsser Smart Prime which is low-VOC and was recommended by a few pro cabinet painters that we know – out came the same high-durability paint that we used on our cabinets (yes, there’s still plenty left!) and we gave the brackets, shelves, and the hood a couple of coats. Two thin and even ones over one coat of primer did the trick. We also applied those with a 2″ angled brush followed by a small foam roller to keep things smooth and even. Oh and the paint is Benjamin Moore Advance paint in Cloud Cover, bee-tee-dubs (which many pros use to paint the inside of their clients’ cabinets along with the outside, so it should stand up really well to everyday use once it’s nice an cured up).
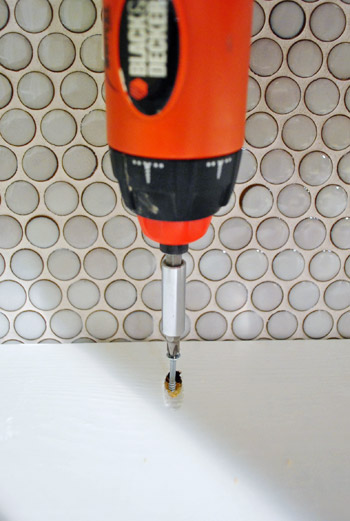
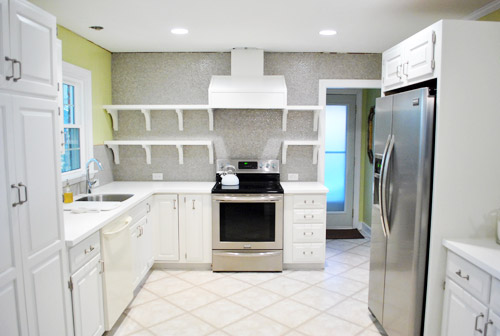
But the exciting stuff really started to happen when we finally got to the point of ACTUALLY PUTTING STUFF ON THE WALL. Yowza. Sorry for the caps. I said we were excited, right? Excited might be an understatement actually. Luckily, since we had already drilled all of our screws into the wall, the hanging step was pretty easy. Up went the brackets on the short side…
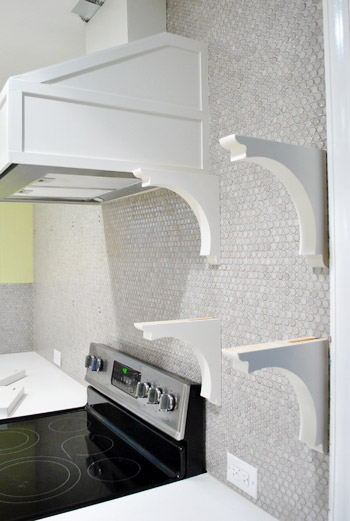
…followed moments later by the shelves themselves. Can I get an “Ooooh”? How about and “Ahhhhh”?

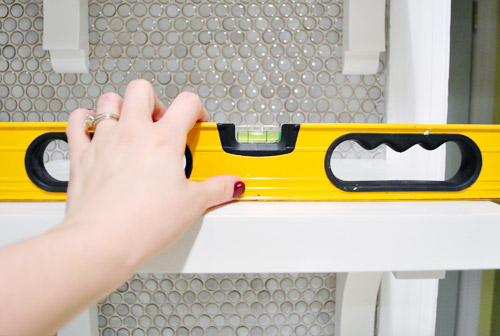
Don’t worry, we weren’t gonna just let them sit there unsecured. We just had some other things to do first – like making sure everything was still level. It was. Phew.
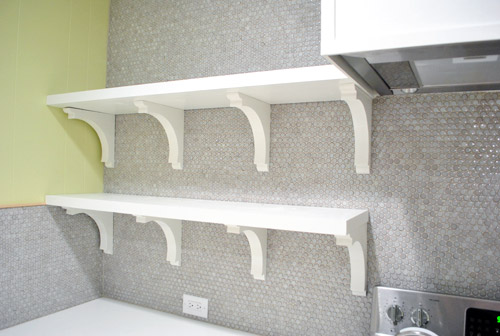
So then we put everything up on the long side of the wall.
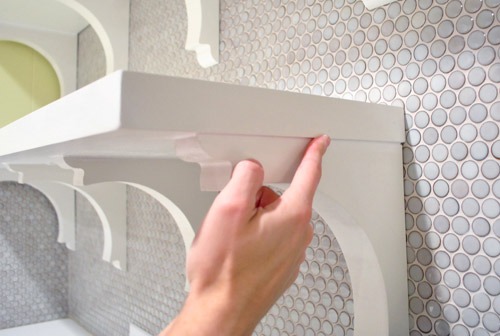
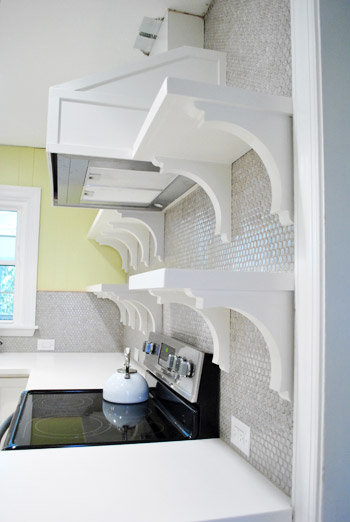
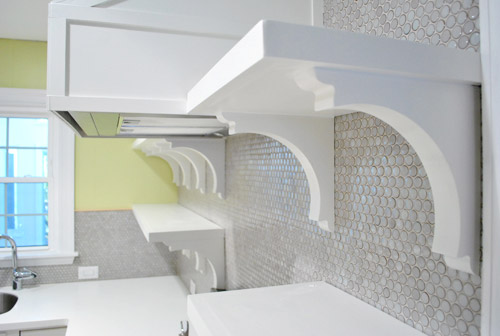
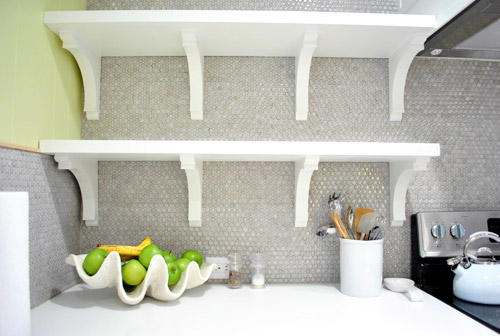
We had mentioned in the previous post that we had originally planned to screw the shelves into the wall (we even made some pocket holes in preparation for this step). Well, after feeling how solid the brackets felt (more on that here) and not really wanting to put 12 more cringe-inducing holes in our tile – we opted to just use those pocket holes as a spot to screw the shelves firmly into the brackets (so the screw actually went straight down, not at the angle of the pocket hole). In hindsight, we definitely could’ve skipped the pocket hole step, but at least now the screw will be hidden in a spot that we can easily caulk over.
Speaking of caulk, that was our next step after everything was drilled together. Since there were some dark seams where the shelves met the brackets, we just ran a thin bead of white paintable caulk along the top of each bracket and smoothed it with our finger to make the shelves and brackets look more like one unit. Tedious? A smidge. Worth it? Totally. Then of course we painted over it so everything matched.
And with that folks, we were done! Except for more waiting. Booooo.
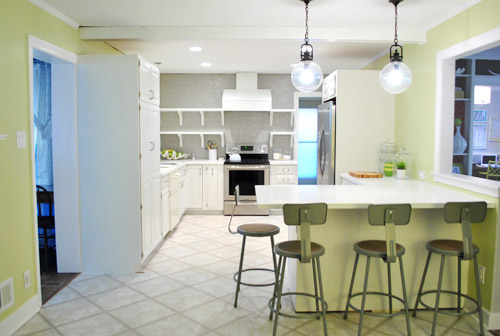
As eager as we are to immediately fill them with plates and bowls and cups, we resisted that urge in order to let all of the paint cure a little bit longer – just because we caulked those screw holes and around the edges which called for some touch up paint. We definitely don’t want to jump the “fully cured” gun (which could result in a bunch of dents and dings in our shelves during their first few days of use). So for now we’ll just have to enjoy these empty “after” shots thanks to following the full curing time on the paint can’s directions. But tomorrow – oh baby, it’s on. Sherry’s even planning to shoot a little time lapse video of the process of loading them up.
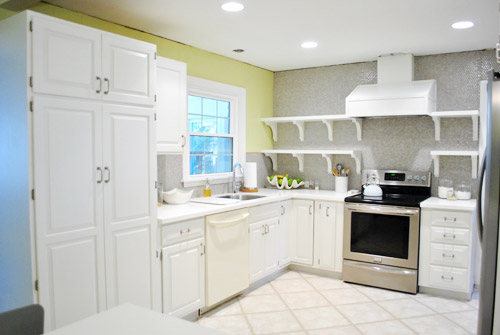
Oh and of course we still have to add crown molding to the ceiling to finish things off and make the top of the hood a lot more seamless. But slowly it’s all feeling a lot closer to “done” than “just started” – especially now that the hood is painted too (never mind the fact that we still have some patch work to do on the ceiling along with that aforementioned crown molding).
We’re really happy with how the brackets turned out, so we haven’t thought twice about our decision not to do true floating shelves. We think these are really charming – and they’re super stable so Sherry could probably hang off of them if she wanted. Instead she wants to fill them with ceramic animals. Same difference.
It’s nice that there’s still plenty of room to load them up and make them really functional, even with the brackets (no, they will not actually end up full of ceramic animals- not on my watch). Our shelves are deep enough for our 12″ dinner plates and the brackets are 15″ apart so we should have lots o’ room to put everyday stuff up there – which we hear from other open-shelf-having folks works really well, since it’s used often enough not to get dusty).
And even though it was a bit weird at first to see our wall of penny tile suddenly broken up by these bright white lines, it’s cool to see the thing we’ve always envisioned come that much closer to being a reality.
So we should have pics (and a video) of the shelves all filled for you tomorrow. Until then, we’ll leave you with this slightly-closer-to-after shot of the room. We’re definitely getting there. And we’re counting down the seconds to Operation Cork My Floor (along with adding that crown molding, patching the ceiling, adding a pendant over the sink, covering the base of the peninsula with some decorative wood planks, hanging some art to the right of the fridge, do something to the side of the pantry, etc).
We feel especially giddy when we look at old photos of the room back when it looked like this:
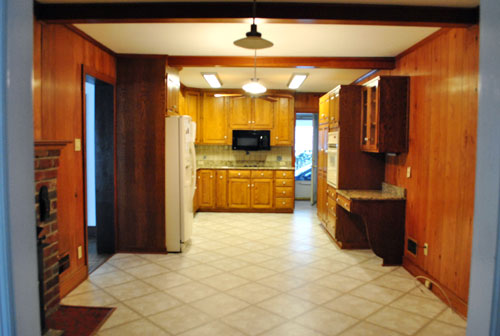
We can hardly picture that old room anymore. Isn’t it funny how quickly your brain replaces things? It’s so crazy that we lived with the room just like that for over six months before even painting the paneling. But once we finally got the ball rolling… well, it’s still rolling. Haha. Is anyone else in the home stretch of one of their home projects? Though I probably should knock on wood when I say that, since it sounds like a sure way to jinx myself into some last-minute wrench in the plan (he says as he gets up to literally go knock on wood while crossing his fingers and eyes).
If you’re interested in more ideas for adding shelving or vertical storage, this post has a bunch of DIY shelving projects and ideas for you.

Jill says
Sherry, try popping a few old pennies in the bottom of your vase. The more corroded and green, the better. No idea why, but it’ll make your tulips stand straight up!
YoungHouseLove says
Love that tip!
xo
s
Theresa says
John and Sherry,
It looks fantastic!!
I’m a new reader of your blog, and you 2 are truly inspirational to me!!
Question for you: your lights over the penninsula, do they have a dimmer? Just wondering if they are “glare-y” (is that a word??)
The shelves are awesome!! Congrats on a job well done (so far!)
YoungHouseLove says
Yes, we put them on a dimmer but have them at full blast most of the time!
xo,
s
Debbie says
for me (& me alone) they are a little too symmetrical. i think i wouldve put a third shelf on the long side to break it up a bit & placed items up there that dont get used as much.
YoungHouseLove says
Always another way to go for sure! We can definitely appreciate that there are lots of ways different folks would attack this wall!
xo,
s
Katie Vlietstra says
this is just amazing. The before and the almost-complete after photos are just remarkable!!
candace says
The new shelves look awesome!! Can’t wait to see Sherry work her shelf populating magic!!
Marie says
Wow, it looks awesome!!! The kitchen is so much brighter! BTW, I love your fruit bowl; where did you guys find that?
YoungHouseLove says
That’s a faux clam shell from ZGallerie. Hope it helps!
xo,
s
Jessica says
I almost hyperventilated when I saw the after shots. It looks SO great! I desperately want to rip out all of my cabinets now and get started. My husband cringes every time I start a sentence with, “Today on Young House Love they posted…” Haha! Keep up the good work!
YoungHouseLove says
Aw thanks Jessica! I was totally hyperventilating and happy-dancing too!
xo,
s
Aimee says
I think it would be cool to paint the side of the pantry with chalk board paint and maybe even put a thin frame around it. I bet Clara would love it. I love kitchens that have large chalk board areas like that.
YoungHouseLove says
Oh yeah that would be so much fun!
xo,
s
Dina says
Looks great, Sherry and John! This reminds me of a problem that’s been bugging me for a while and I wanted to ask you about… how do you find wood at Home Depot or Lowes that is not warped? Every time I try to build something I try to hunt down a “good” piece, but they all seem to have a bend to them (ranging from mild to horrible)… especially with something a little bigger like 1×12’s this is super annoying because I can’t get them to sit flat. I even went to a “nicer” local lumber yard and had the same problem! Do you have a secret to finding good pieces?
YoungHouseLove says
We usually lay it on the ground to make sure it’s not warped and for every four pieces that are, one is perfect! Hope it helps.
xo,
s
Sarah- Nadine says
Absolutely LOVE IT. Makes me want to renovate my kitchen ASAP. Amazing how it worked out in the end without having to totally gut it.
Nice work, well done!
Katy says
LOVE!!
John@Our Home From Scratch says
In the words of the colonel.. “I love it when a plan comes together.” Looks brilliant!
YoungHouseLove says
Aw thanks John!
xo,
s
Katy says
What I mean to say was…LOVE!! I’ve really enjoyed watching the progress on your kitchen in “real time.” The (almost) finished product makes my heart go pitter patter :)
YoungHouseLove says
Haha, thanks Katy!
xo,
s
Meredith says
Ohhhhh man, the shelves look amazing! I actually really like the brackets, and I’m sure it’ll be nice not to worry every day if your dishes will come crashing down in the middle of the night :-)
I can’t express how excited I am for you to put your cork down! Let me tell you game.changer. This is the cork we’re putting down with our new white shaker-style cabinets: http://bit.ly/xfXYyA. Hopefully they’ll be finished with the installation when I get home from work today!
YoungHouseLove says
So exciting! Be sure to tell us how it goes! We can’t wait!
xo,
s
angie k says
yay! Looks so good! Can’t wait to see stuff on the shelves! Right now it looks like you can even go three shelves on the wall – the top lining up with the top part of the built range hood. But…it’s going to look totally different with stuff on there! Especially if you have displays with some height. And add crown molding and all the rest.
So admiring your dedication to this project despite the book chaos! You guys rock!!!
Jessica says
Woooowzaah! When ya’ll picked out all your materials I could not envision it coming together as well as it has. It looks ammazing! And once the dark floors go in, it be the stage on which the kitchen can look its best :). Adding the wood paneling to the peninsula is going to be awesome. I think the rustic mixed in with the modern crisp look of the rest of the kitchen is brilliant. I can’t wait to be invited over for dinner.. ;) haha.
YoungHouseLove says
Aw thanks Jessica! Come on over! Haha.
xo,
s
Kim Adams says
Everything looks great!
An idea for the side of the pantry. How about painting it with chalkboard paint so Clara can draw on it. Then frame it out with some white molding. Just an idea. I think it looks great how it is as well.
YoungHouseLove says
Oh yes, definitely a possibility!
xo
s
Mary says
When I paint furniture, I have to apply a couple coats of poly to keep it from being sticky. Did your paint not require a coat of polyurethane for the shelves? I’m worried your dishes may stick to your new open shelves.
YoungHouseLove says
Thankfully the method for cabinets that most pros recommend is sealer free- just great primer and super durable paint formulated for cabinets. It’s super scrubbable and durable.
xo,
s
Molly says
John and Sherry,
I’ve been meaning to tell you for a long time (possibly years?) that you remind so much of Pam and Jim on The Office. I’m not exactly sure why, but your fun relationship dynamic has something to do with it. Has anyone ever told you that before?
YoungHouseLove says
Haha- yes, people have actually said that to us. The funniest one was when they were getting married on the show people said they should get married in our backyard. That would have been amazing.
xo,
s
Jade Payne says
Have you guys ever thought about painting the side of your pantry with magnetic paint, then covering it with chalkboard paint for C-bear to draw on? Our boys love our chalkboard painted wall (from floor to ceiling) and since I was an art major, I love drawing messages out and stories and quotes of the day.
It’s something artistic, but not too busy, and easy to clean.
Just a thought. I’m loving loving loving everything about this magical room. You guys! I feel so giddy for yall!
YoungHouseLove says
Oh yes, that’s definitely one possibility! Can’t wait to see where we end up!
xo,
s
Leah says
Have a question about the science stools. You mentioned in another post that you put Clara’s booster seat on them. We’re thinking of getting rid of our space saver high chairs which attach to our regular kitchen chairs and move our twins to sit at our bar. I’m wondering what kind of booster seat fit on those chairs. Since the seats are round, I think our space saver chairs would be way too big. Love the kitchen…really amazing job!
YoungHouseLove says
We’re still using the same booster seat as before. It does have a square base, but is small enough that it barely hangs over the back edge of the round seat (and is plenty sturdy). Here’s the link to it on Target if you want to check it out: http://www.target.com/p/Healthy-Care-Dlx-Booster/-/A-11037106?ref=tgt_adv_XSG10001&AFID=Google_PLA_df&LNM=|11037106&CPNG=baby&ci_sku=11037106&ci_gpa=pla&ci_kw=
-John
Barb says
What a HUGE difference from the original kitchen. Good job! Can’t wait to see the totally completed look. You two make a great little team!
Bethany says
When I saw the finished shelves – you should have seen the look on my face. It feels like MY kitchen is getting a makeover, my face totally lit up like a kid on Christmas morning and I said out loud (softly, as I am at work..) “Oh, I looooove it…” lol! Seriously, it looks fantastic.
DJ Bizness Cash’yall.
The Mrs @ Success Along the Weigh says
Yay! They look beautiful and the brackets give a charm that floating shelves wouldn’t have. I can’t wait to see them all loaded up with stuff!
We’re in the middle of multiple projects and are starting to develop that twitch that makes you say “WHY did I do this?” but you know in the end you might forget the cringeworthy stuff you’re going through now. It does get better, right?
Sharon says
You guys never cease to amaze me with your craftiness and vision. Fantastic job :) I look forward to seeing the full on after with that beautiful cork floor!
Lauren says
The shelves look great! I am excited to see what you do with the side of the pantry – I think it would be the perfect space to paint with chalkboard paint for messages and (another) place for Clara to draw (although it could get pretty dark combined with the cork floors).
Amie says
I know you two are busy with book stuff, and other life things, but gosh darnit, I miss your two posts a day.
Will you be going back to posting as per usual when the chaos that is book is finished?
For now, I will be looking at archives and YHLife.
YoungHouseLove says
We actually haven’t changed our posting schedule, Amie. We’ve done one post on Wednesday for the last year or so (we try to use it as a getting-projects-done-day). I’m not sure if that’s good news or bad news for you perspective, but you can rest easy now wondering if we’ll get back to normal. :)
-John
Maggie Rose says
Can’t WAIT for the floors to be in now because they will be such a dramatic change! The shelves are looking awesome – I’m a serial rearranger of all horizontal surfaces in our apartment so I can’t wait to see Sherry’s video and see some color up there!
Melissa says
This is looking fantastic! You’ll just love the open shelves; I like the easy access they provide and that it makes the kitchen feel bigger.
We’re in the home stretch of a bathroom remodel. We took it all the way to the studs back in August and it’s taken far longer than I expected. Can’t wait to have an upstairs toilet in the house again! :)
DanielleR says
I’m not gonna lie, when you guys first did the penny tile all over the wall I couldn’t quite see the vision, then when you added the hood the wall looked really big and weird with all the penny tile and the tiny hood over the stove, I was like I wonder if they’re gonna leave the wall like that? All empty? THEN THIS … WOW! So freakin’ cute! I love the shelves, it adds so much character and personality to that wall. Really ties everything together, now I understand! :) Can’t wait to see the decor! *Shakes head in shame and vows NEVER to doubt $herdog again lol*
Melissa says
My eyes did that “awooga!” thing that happens in cartoons. It looks GREAT. Love seeing the before and after pictures. I’ll come over and cook anytime in that kitchen! I can’t wait to see all the stuff on the shelves.
YoungHouseLove says
LOL. Definitely incorporating an “Awooga” in a future post. Love it.
-John
Brooke says
What if you chalkboard painted the side of the pantry and use it as a message board? (sorry if somebody already suggested that)
YoungHouseLove says
Always a possibility!
xo,
s
Kristi says
Just as I thought – they look awesome! These shelves are going to be a great way to add personality, color and LIFE into your kitchen! (I mean that in the best way – because I mean, you have made and created every tiny little piece of your kitchen yourselves so it is wicked personal – but with the additional items on the shelves will just complete the room!)
I do have a VERY important question that came to me while trying to fall asleep last night. What are you going to do about the flooring in the laundry room!! I got SO excited to find out – and don’t recall if you have touched on it yet. Will you continue the cork from the kitchen into there? Or will you leave it alone?
Looks beautiful guys! Those before and after pics are mind blowing! :-)
YoungHouseLove says
Yep, it’ll get the cork from the kitchen in there too!
-John
Jenna says
Yay! Lookin’ good! Can’t wait to see Sherry work her magic.
Amanda Nowak says
We replaced some tiny pictures in our hallway with one giganormous one, {personalized with our song lyrics} and every time I’ve seen it today it’s like, “Whoa! When did that piece of gorgeous get there??”. :) By the weekend, I’m sure my brain will have completely forgotten the old look! :)
http://ahelpmeetforhim.blogspot.com/2012/02/diy-song-lyric-art.html
YoungHouseLove says
Such a cool project! I love it!
xo,
s
angel p says
Love it. On the side of the pantry it would be fun to put up a large corkboard of sorts for all of Clara’s artwork. I’ve seen some really neat ideas on Pinterest that are used in playrooms but I don’t see why it wouldn’t work on that area as well. You could make it look interesting and fun.
Robin O says
Yay!! The shelves look wonderful!!! Congrats guys… another step closer!
Maggie says
…and now I want open shelves in my kitchen, too bad I rent! It looks great guys!
kalibrooke says
Looks amazing…but, it’s feeling a bit like ‘white overload’ at the moment to me. When those rich floors are in, boy, that place is going to pop!
Linda @ Home is Where My Heart is says
It is absolutely beautiful! Great job guys! You’re getting me excited about our kitchen redo. The kind of excited where you can’t sleep and you stare at your inspiration picture for hours! Thanks for sharing! ~Linda
Lauren says
Strangely excited to see the shelves filled up. The transformation looks ammmaazzinnng so far. Growing up, our kitchen was the happiest, most frequented room in the house (still is when I go visit my folks) and I’m so stoked for you guys to have the kitchen of your dreams! Yay!
Christine says
When you mentioned wanting to do something to the side of the pantry, all I could think was, “Man, my kids would go hog wild with something like that.” Maybe chalkboard or magnetic paint for Clara? You could even frame out the bottom with trim so it was like a picture frame at her level, then hang something else above it. It would actually be really funny to have a tiny frame down by the floor for Burger, too. Ha.
YoungHouseLove says
Oh yes, we can’t wait to see how the cork floors look and then we’ll make the call!
xo,
s
jbhat says
I am so impressed with what you have done so far and how you have gone about achieving your vision. The shelves and brackets are simply amazing, and I’m so happy for you that they are finally up/done. The entire room is making me feel ridiculously happy, ESPECIALLY when I see the kitchen in its previous state. And I don’t even live there! You must be feeling incredibly proud of yourselves.
jbhat
Kasey M. says
I’m not working on anything as ambitous as a kitchen, but I did just decide to crochet every project in Sue Whiting’s “The Crochet Bible.” I started on a basket weave jacket for a toddler on Monday. I’ve got a postgoing up on my blog (buttonwoodcottage.blogspot.com) tonight at 8:00. I’m super excited every time I finish a row. I can’t imagine how excited you two are every time you finish part of this kitchen renovation.
PS love that you caulked the shelves and did touch up paint! They are so seamless!
YoungHouseLove says
That sounds like so much fun! Send pics!
xo,
s
Melissa says
First of all, “ooh” and “ahh”. Congrats on beautiful shelves!
I’m wondering if you ever stay in touch with the previous owner of your home (either your last home or this one) so that they can see the drastic changes (read: improvements) you’ve made over time? Not sure if it would be a good idea, though. It might make them sad to see that they were living in such ugliness for so long! :)
Again, congrats on another step toward your dream kitchen!
YoungHouseLove says
We are intermittently in touch with them via Facebook. They’re so cute about seeming to love seeing all the changes “without having to break a sweat” – they’re so funny.
xo,
s
Kathy says
I’m house-building, they just got my backsplash up too, can’t wait for the appliances to go in!
http://gatescustomhomebyjimmyjacobs.shutterfly.com/pictures/717#690
YoungHouseLove says
Gorgeous!
xo,
s
Krista B says
Oh my goodness it looks fabulous! Congrats!!!
Where is that AMAZING fruit dish from? I can’t get enough of it!
YoungHouseLove says
Thanks! It’s a faux clam shell from ZGallerie – hope it helps!
xo,
s
Leslie says
Those shelves are absolutely incredible! I can’t believe how amazing they turned out. :)
YoungHouseLove says
Aw thanks Leslie!
xo,
s
LARY says
How exciting! Yeyyyy!!! Can’t wait to see them all populated :)
Jenny says
Hey, looking good! It is amazing how different (and much better) it looks