Let’s see… when we last left off on Monday, our open shelves had been primed in preparation for their big hanging debut.
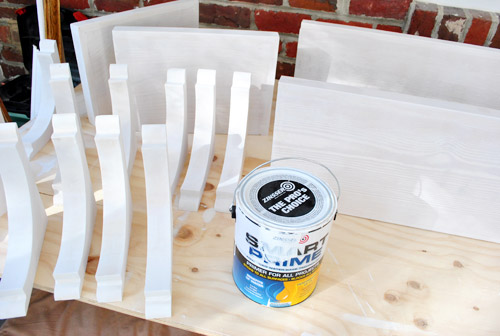
While we had the primer out we went ahead and slapped a coat on the hood cover too (using a 2″ angled brush in the cracks followed by a small foam roller to smooth everything out). Things were instantly looking less wood-sy on that wall.
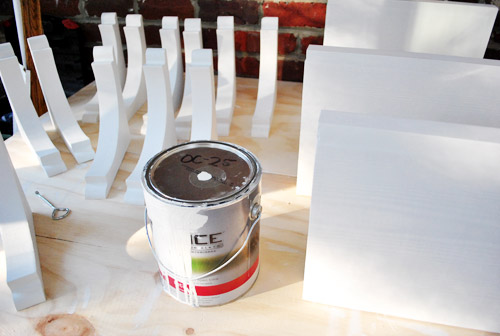
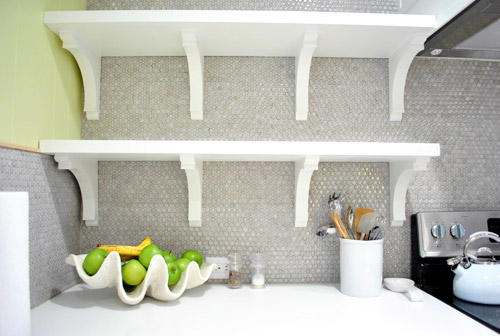
Once the primer dried on both – we used Zinsser Smart Prime which is low-VOC and was recommended by a few pro cabinet painters that we know – out came the same high-durability paint that we used on our cabinets (yes, there’s still plenty left!) and we gave the brackets, shelves, and the hood a couple of coats. Two thin and even ones over one coat of primer did the trick. We also applied those with a 2″ angled brush followed by a small foam roller to keep things smooth and even. Oh and the paint is Benjamin Moore Advance paint in Cloud Cover, bee-tee-dubs (which many pros use to paint the inside of their clients’ cabinets along with the outside, so it should stand up really well to everyday use once it’s nice an cured up).
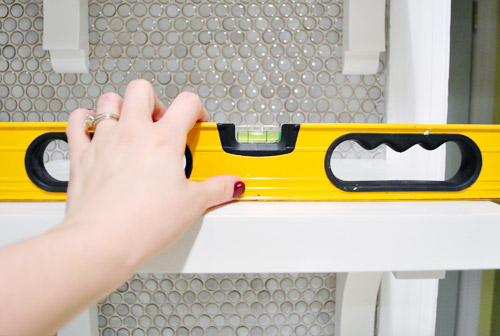
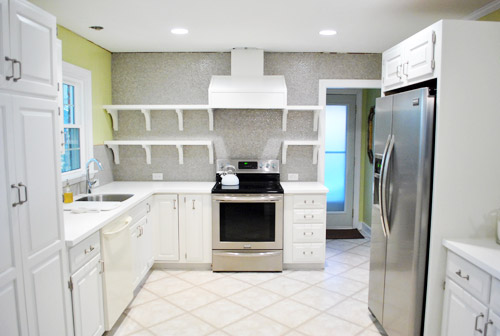
But the exciting stuff really started to happen when we finally got to the point of ACTUALLY PUTTING STUFF ON THE WALL. Yowza. Sorry for the caps. I said we were excited, right? Excited might be an understatement actually. Luckily, since we had already drilled all of our screws into the wall, the hanging step was pretty easy. Up went the brackets on the short side…
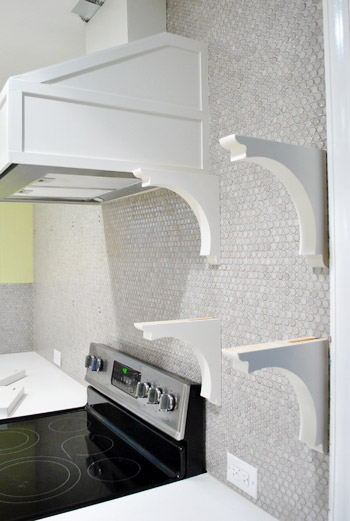
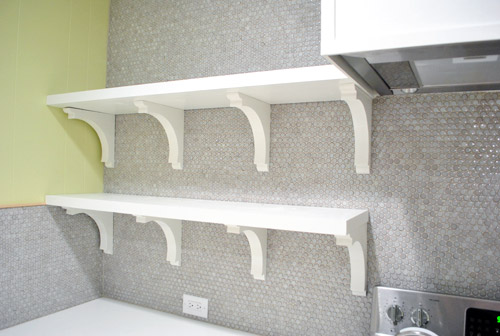
…followed moments later by the shelves themselves. Can I get an “Ooooh”? How about and “Ahhhhh”?

Don’t worry, we weren’t gonna just let them sit there unsecured. We just had some other things to do first – like making sure everything was still level. It was. Phew.
So then we put everything up on the long side of the wall.
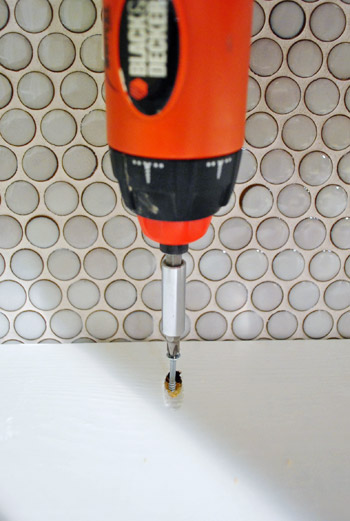
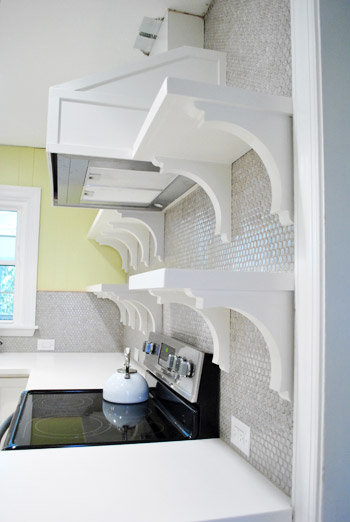
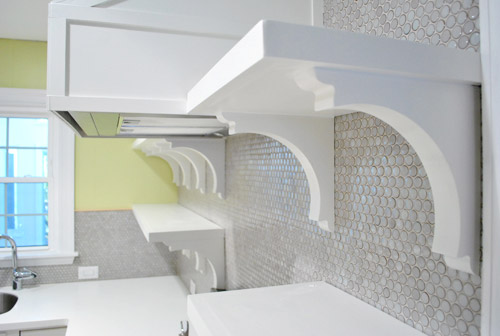
We had mentioned in the previous post that we had originally planned to screw the shelves into the wall (we even made some pocket holes in preparation for this step). Well, after feeling how solid the brackets felt (more on that here) and not really wanting to put 12 more cringe-inducing holes in our tile – we opted to just use those pocket holes as a spot to screw the shelves firmly into the brackets (so the screw actually went straight down, not at the angle of the pocket hole). In hindsight, we definitely could’ve skipped the pocket hole step, but at least now the screw will be hidden in a spot that we can easily caulk over.
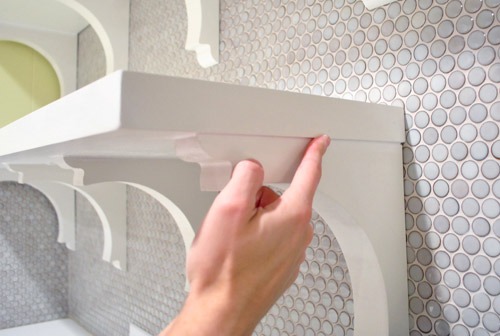
Speaking of caulk, that was our next step after everything was drilled together. Since there were some dark seams where the shelves met the brackets, we just ran a thin bead of white paintable caulk along the top of each bracket and smoothed it with our finger to make the shelves and brackets look more like one unit. Tedious? A smidge. Worth it? Totally. Then of course we painted over it so everything matched.
And with that folks, we were done! Except for more waiting. Booooo.
As eager as we are to immediately fill them with plates and bowls and cups, we resisted that urge in order to let all of the paint cure a little bit longer – just because we caulked those screw holes and around the edges which called for some touch up paint. We definitely don’t want to jump the “fully cured” gun (which could result in a bunch of dents and dings in our shelves during their first few days of use). So for now we’ll just have to enjoy these empty “after” shots thanks to following the full curing time on the paint can’s directions. But tomorrow – oh baby, it’s on. Sherry’s even planning to shoot a little time lapse video of the process of loading them up.
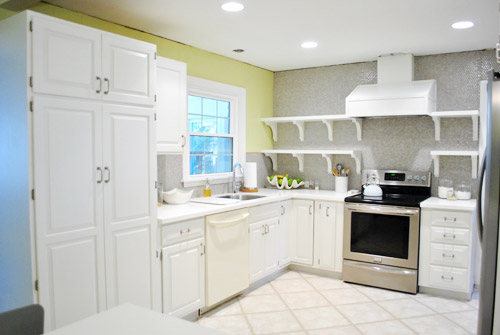
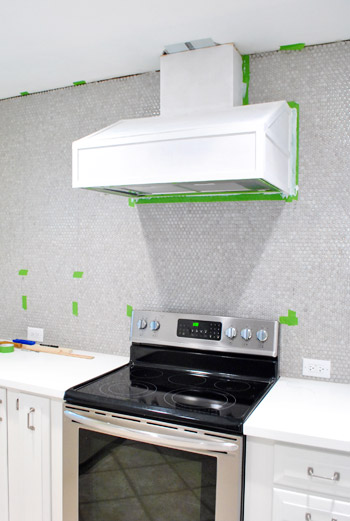
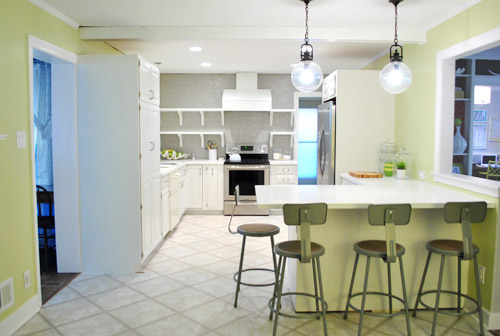
Oh and of course we still have to add crown molding to the ceiling to finish things off and make the top of the hood a lot more seamless. But slowly it’s all feeling a lot closer to “done” than “just started” – especially now that the hood is painted too (never mind the fact that we still have some patch work to do on the ceiling along with that aforementioned crown molding).
We’re really happy with how the brackets turned out, so we haven’t thought twice about our decision not to do true floating shelves. We think these are really charming – and they’re super stable so Sherry could probably hang off of them if she wanted. Instead she wants to fill them with ceramic animals. Same difference.
It’s nice that there’s still plenty of room to load them up and make them really functional, even with the brackets (no, they will not actually end up full of ceramic animals- not on my watch). Our shelves are deep enough for our 12″ dinner plates and the brackets are 15″ apart so we should have lots o’ room to put everyday stuff up there – which we hear from other open-shelf-having folks works really well, since it’s used often enough not to get dusty).
And even though it was a bit weird at first to see our wall of penny tile suddenly broken up by these bright white lines, it’s cool to see the thing we’ve always envisioned come that much closer to being a reality.
So we should have pics (and a video) of the shelves all filled for you tomorrow. Until then, we’ll leave you with this slightly-closer-to-after shot of the room. We’re definitely getting there. And we’re counting down the seconds to Operation Cork My Floor (along with adding that crown molding, patching the ceiling, adding a pendant over the sink, covering the base of the peninsula with some decorative wood planks, hanging some art to the right of the fridge, do something to the side of the pantry, etc).
We feel especially giddy when we look at old photos of the room back when it looked like this:
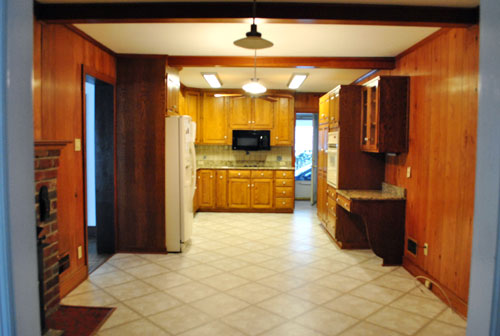
We can hardly picture that old room anymore. Isn’t it funny how quickly your brain replaces things? It’s so crazy that we lived with the room just like that for over six months before even painting the paneling. But once we finally got the ball rolling… well, it’s still rolling. Haha. Is anyone else in the home stretch of one of their home projects? Though I probably should knock on wood when I say that, since it sounds like a sure way to jinx myself into some last-minute wrench in the plan (he says as he gets up to literally go knock on wood while crossing his fingers and eyes).
If you’re interested in more ideas for adding shelving or vertical storage, this post has a bunch of DIY shelving projects and ideas for you.

Lynn says
Hi, I’ve been keeping up with your kitchen remodel and you have been doing a terrific job revitalizing it. However, I have to be honest: the shelves aren’t working as well as they should be visually. They are coming off as very ‘clunky/chunky.’ The braces are way to big for the space, and having the width of the braces almost the same as the shelf itself is sort of an eyesore because everything is just so thick; nothing disappears or is out of the way, you’ve just got these massive white braces and shelves. Plus if you are working to put things on the shelves, especially tall items, those big braces are going to get in the way. I know you decided against hidden shelves, but the kitchen is one of those places, especially near the stove and cooktop, that you want to limit the surface area (and it’s white surface area at that) to any airborne ‘cooking particles,’ grease, etc.
Anyways, just my two cents. I am in no way trying to suggest that you should go super minimalist so that it feels ‘cold,’ but merely say that the braces, as thick as they are, should be much smaller when you are looking at the kitchen as a whole. Good luck with everything and keep it up!
YoungHouseLove says
Thanks for the thoughts Lynn! Choices like brackets are definitely some of those personal preference things and we’re sure once we have everything loaded up on the shelves they’ll make lots of sense- hopefully it’ll better capture the scale for you (there’s so much room between each shelf and between each bracket for huge things like large stacks of 12″ plates). We are so in love but we can definitely recognize all of our choices aren’t for everyone! Hope it helps!
xo,
s
Lindsey Rivir says
Looks good! Will you be adding crown molding to the tops of the cabinets for a more finished look? What about a valance on the window? I like the brackets holding the shelves too, I think I like it better than the floating shelves.
YoungHouseLove says
We held up molding around those few upper cabinets and it looked odd so we’re opting to keep them nice and clean but will be adding crown all around the ceiling and with the beams overhead we think that’ll be great! We’ll have to see where we end up!
xo,
s
Deanna Divino says
Awesome Sherry, thanks! I just needed someones opinion on it! It seemed like they’d be “overhead” anyhow!
Susan (Between Naps on the Porch) says
You guys don’t need any ideas but I’ll just throw this out there in case you like it. I was just thinking how the side of the big pantry might make a fabulous chalk board. Miss Clara would have so much fun drawing on the lower half while Sherry keeps track of this week’s grocery list on the top part. :)
YoungHouseLove says
Oh yes, we’d love to do something fun with that!
xo,
s
{plum} says
I have found a final coat of polyurethane (gloss!) makes any painted surface indestructible and kid proof.
what a change of space, you must be very proud! well done.
best – d.
post script: don’t forget, shoulders back.
Tamisha says
Wow, looks fantastic! You guys have done a great job.
Did I spy a beige-y mushroom color on the back of the bookshelves in the dining room????
YoungHouseLove says
Nope, haha, nothing to see there. That’s book stuff (which is everywhere and so hard to shoot around- haha). Shhh- don’t look!
xo,
s
Hannah says
OMG, I totally thought I saw that too! In like every picture now I try to look for things that are different that might be book stuff. Haha, we’re such rebels :)
YoungHouseLove says
You guys are too smart for us. We think “no one will notice that” and then multiple people do. Haha.
xo,
s
Dana says
John you’re hilarious! Love this line…
We think these are really charming – and they’re super stable so Sherry could probably hang off of them if she wanted. Instead she wants to fill them with ceramic animals. Same difference.
I’m still laughing!
JanelleD says
Ou, I can’t wait to see them with stuff on them!! Just curious, did you put 4 brackets on each shelf on the left for extra support or for added prettiness? :)
YoungHouseLove says
We wanted them all to be equally spaced on both sides and it worked with our studs so after looking at it a few ways we went with this.
xo,
s
heather s. says
I really, really wanted to love them but sadly I can’t say that I do. I think floating shelves would have looked cleaner – the brackets (which I love and am considering for a single shelf in my own home) seem like too much when there are so many together, especially in the picture with things on the counter top below the shelves. I’m hoping my mind will change once you fill them with gorgeous dishes/accessories since fun dishes always makes everything prettier.
YoungHouseLove says
Aw no worries Heather! It’s definitely going to be a game changer when they’re all loaded up and with the cork floors it’ll change again! We definitely know that things like this are personal preference, so after holding up fewer brackets (three on the left side) we opted for four since it looked best to us! Definitely one of those personal calls though!
xo,
s
Nikki says
I agree, unfortunately. But please don’t take it the wrong way — I really do love your blog and many of the things you’ve done to your home.
It’s just for some reason, the shelves and brackets take away from the cool floating effect of your beautiful range hood and seem to cover up so much of the lovely penny tile. I’m definitely hoping it will all work out well once the shelves are filled.
Caitie says
It looks absolutely stunning!!!! I am in loveeee with the shelves!!! Great job guys! You never cease to amaze me! :)
Ted says
Oooh, shiny! White cabinets are not my style, but you’ve done a fantastic job with yours.
Here’s an odd request. In the past, you’ve mentioned that the window over the sink would be more balanced once you had the open shelves put up. Can you take a straight-on shot of the wall behind the sink from near the fridge so that we can see how that wall balances out? The angled photo in the middle gives an idea, but the perspective angle masks how balanced it turned out.
Great job, guys!
YoungHouseLove says
Oh yes, it’s on the list! Haha.
xo,
s
Meghan says
LOOKS GREAT! I have a request….can we get one picture of the point of view facing the window over the sink?? I think you had ALL of us just waiting on the edge of our seat to see the evened out spacing between the shelving on one side at the cabinet on the other! Can’t believe it’s the same kitchen!!
YoungHouseLove says
Yes! Asap!
xo,
s
Stephanie says
I LOVE THE SHELVES, guys! Can’t wait to see them all loaded up with Sherry’s pretties.
And, I don’t mean to rain on your parade at all because I think your kitchen is divine and I LOOOOOVE it, but something about the hood box thing-a-ma-jig looks wonky to me. I don’t know if it’s just because it’s far away and I can’t see the lines and design in it… It just kinda looks blah and washed out. I don’t know. I’m reserving judgment until I see the final product. I always love the end result with you guys, and I TOTALLY know that nothing is ever “done.” So… I guess, ignore my comment. Except the “I love the shelves” part.
Sue says
Hi! Things are looking great! Just curious … was it necessary to use four brackets on the longer shelves for extra support?
YoungHouseLove says
We wanted to put the brackets into as many studs as possible, so by putting 4 brackets in we were able to get the extra support of the two studs in the middle of that wall.
-John
Colleen C says
Looks BEAUTIFUL!
Would you ever paint the molding on the beautifully hand crafted oven hood? Maybe it looks different in real life but in photos you can’t really tell that there is molding on the hood. Maybe a beautiful silver/grey to match the tile? Or a fun pop of color?! You can always paint it back to white if you don’t like it! :)
Just a suggestions, feel free to ignore!
keepitneat says
Hi! We live in a 156+ year old , 1,100 square foot row home in Philadelphia, which means one thing: basement kitchen (blech). Thanks to an extremely scratched plexiglass skylight awkwardly angled up to our “yard” (a 15′ x 5′ area boxed in and completely concrete), we have a little natural light but it’s generally just so dark down there! Thinking our darker wood cabinets aren’t helping any either, would love to paint them white to see if it helps. Was hoping to get your tutelage on this, but can’t find the original post on priming/painting the cabinets – can you point us in the right direction? Thanks!
YoungHouseLove says
Here ya go! https://www.younghouselove.com/2012/01/how-to-paint-your-cabinets-aka-hallelujah/
-John
Courtney says
What. A. Difference! Ohmygoodness! Seriously though, the open shelving really brought things together and I cannot wait to see the cork floors and crown molding installed.
Where do you think Sir Aubergine will end up?
YoungHouseLove says
Time will tell!
-John
laura says
Ahhhh….so bright and cheery! I would never have thought of open shelving, but you’ve sold me. It’s beautiful!
I can’t wait for operation cork to see if you love yours as much as I love mine!
Laura
Erica says
I was very nervous for you when you were drilling into your pretty penny tile (like, scary movie, “Don’t go down in the basement!” nervous), so it’s incredibly relieving to see those shelves all straight and perfect. They look fabulous and I think breaking up the penny tile makes it even more beautiful. Can’t wait to see them full of stuff.
Susan (Between Naps on the Porch) says
Oh, I just realized that’s not the pantry but it’s the side of the refrigerator cabinet that I was eyeing for a some chalk board paint. :)
Cathy says
Looks gorgeous! Wow. Great job you guys!!
Ashley @ Josh & Ashley's World says
Wow! You guys have come such a long way and it looks so fabulous! Congrats on your kitchen!
Morgan says
Looking awesome! I love the brackets! LOVE.
I didn’t realize they were going to be so close together though – are you worried that the brackets from the higher shelves are going to get in the way of stacking things on the lower ones? Or is there enough room horizontally between brackets that it won’t be an issue?
Again – I love it. You guys are such an inspiration.
YoungHouseLove says
We thought about that, and fortunately there’s about 14 inches between each bracket (and they don’t really stick out that much given their arch shape) so there’s plenty of room to stack things.
-John
Bob says
Yikes. Sorry to say, but that doesn’t work at all visually. The shelves are super blocky and that doesn’t jive with the decorative brackets. The brackets dominate the view and are overkill. The focus seems to be on the structure and not the things on the structure. Hopefully when your stuff goes on the shelves, it will hide the brackets. I think you should have definitely done hidden supports. Would have been cleaner. Unfortunately, I’m afraid this spells bad news for the redesign.
Bob says
Still waiting for moderation even though posts before and after mine have been approved? I wasn’t snarky. Do you only allow positive feedback now?
YoungHouseLove says
Bob, we’re in the middle of photoshoot chaos! There are 10 people in our house and we’re double teaming comments when we can (one person works form the front and one person works from the back) so comments don’t always get approved in order- so sorry! Stay tuned!
xo,
s
YoungHouseLove says
No worries Bob- it’s completely a personal preference thing! We know 100 folks would redo our kitchen in 100 different ways but we lurve our shelves and can’t wait to load them up!
xo,
s
Bob says
By the way, using “personal preference kind of thing” all the time is just a crutch. You know that, right? There’s good design and bad design. In this case, you like bad design. It’s OK…
YoungHouseLove says
Maybe one man’s bad design is another man’s good design? What turns Bob on doesn’t always turn S & J on, and that’s ok. Heck, that’s the fun of it. To each his own, baby. So if these shelves = bad design to you… we’re totally cool with it!
xo,
s
Bob says
All of that is true, but the fact remains it IS bad design and it is up to us to see it. You might not see it. And that’s OK. But I think you need to realize that design is good, bad or somewhere in between. The shelves are bad. The range hood is good. The penny tile is OK. The pendant lights are bad. And so on…
Regardless, all of this is a huge improvement over what you started with and you are to be commended for that.
By the way, I’ll be in Richmond next week. Perhaps we can finally do the slumber party we talked about.
Kristin H. says
Curious as to why Bob reads if Bob does not like? Also curious as to why Bob would pay J&S to do this re-design if… waaaaait a second… it’s free for us to read? Get. Out.
Vanessa says
Looks great- love it. I cannot wait to see the floors next!
MaryBe says
The before and after is amazing. Please open a B & B so we can all come visit :D No?
Heather says
Now I like the hood.
operaglass says
I think it would look better if you used three brackets underneath the shelves on the left instead of four. In design, it often works better to group things or create a composition out of odd numbers. Remember the Rule of Three! Three brackets would also help to create a lighter, airier effect. At the moment it feels a bit overwrought.
Also, it might be worth reconsidering floating shelves as they may be better suited to the overall style of the kitchen. X
YoungHouseLove says
We wanted them all to be the same distance apart on both sides for balance, so after looking at them both ways (3 & 4) we went with four! Just wait til we load them up to see what you think!
xo,
s
Bob says
“Just wait til we load them up to see what you think!”
Perhaps you should take your own advice. :)
Mrs. Gotlib says
I’m a new visitor. What a great transformation.
Fabulous!
Luisa says
Looks great. Your vision is awesome.
Chalkboard pant on the side of the pantry wall?
YoungHouseLove says
Would love that!
xo,
s
Amy @ A New Old House says
The shelves look FANTASTIC! Can’t wait to see them in action!
Arlene says
I can’t wait to see the floors and the crown molding. It seems like there is so much extra space above the top shelf but I think the crown molding will really bring it down and make it look more even! Can’t wait! :)
Patti says
Eeeeeeeek this is looking so good! Can’t wait until you put the cork floors down!
Lauren Pinson says
I’ve been patiently waiting for this post! But I have one question, why are you choosing to load up the shelves before installing crown molding? It seems like it would be much easier to do the molding and clean up before loading up the shelves.
Look great guys!!!! Definitely inspiring my future kitchen years down the road!
YoungHouseLove says
Yes, that would make sense – I’m just impatient! Haha. And I’m sure readers will appreciate not having to wait for crown to go up and get caulked and painted before seeing stuff on the shelves!
xo,
s
Ally says
The shelves look awesome. Love the brackets. Can’t wait to see them full of plates and other various pretties. Take your time though, of course. Let that paint cure. And, those before and after pictures are BLOWING MY MIND! What a transformation.
Bibiana says
Your kitchen looks twice as big now!! BTW, every time I see your “wide” kitchen shots I think: This angle would be impossible to photograph before (when the old wall was still in). Amazing, huh?
Rebecca says
Looks great! Just wondering why you chose to run the shelves to join the hood instead of leaving a slight gap?
YoungHouseLove says
They meet, so there’s no slight gap. The brackets had to go where the studs are but the shelves all line up with the hood (and the top ones run up against it). Hope it helps!
xo,
s
LM says
You guys continue to amaze me with your DIY skills! The kitchen is looking amazing especially considering where you started!
A question for you with regards to your painted paneling. I know that you have no reservations with regards to painting outdated paneling but I was wondering if you would hesitate if the paneling was real wood and not that cheapo sheets of stuff that John was forced to buy recently :). We just bought a house that is FULL of real cherry wood paneling that goes halfway up the walls (to chair rail height). I think we should paint it all white to lighten up the house but my friends think that would be bonkers to ruin such nice and authentic wood. Any thoughts? Thanks!
YoungHouseLove says
I think it’s totally a personal preference thing! We love the look of it painted (real good wood or not) but know that some love the character and texture that it can bring when it’s left au naturel! Hope it helps.
xo,
s
Dawn Brown says
The middle beam in the kitchen I think would’ve looked great with the same gray you used in the family room. Just a thought…. Everything is coming along so amazing!!
Dawn Brown says
I mean all the dining room beams.
YoungHouseLove says
Always another possibility! Will have to wait for the floors to go down to see!
xo,
s
Hillary says
Love love LOVE this look. So fresh and, for lack of a better description, OPEN!
Ann L says
So good! Love the open shelving and disappointed I couldn’t ever use it in my house (cats + glassware = lots of headaches!)
One question I’ve been meaning to ask for what feels like months, but never did. WHAT is that dark spot over the beam (above your pantry). Is it a part of the beam that’s unpainted, is it a shadow, is the ceiling not 100% level and there’s a space between it and the beam? Now that I know it’s there, my eye gets drawn to it every.single.time you post a picture of the beautiful kitchen and it’s driving me bonkers! :)
Ann
YoungHouseLove says
It’s just a piece of missing trim (there used to be a cabinet there) and we need to replace it when we do the rest of the crown molding in the room.
-John
Lindsay says
Looking good!
Emma says
Congratulations! They look just marvelous :) Delicious in fact! I much prefer them to floating shelves as well.
Laura says
Congratulations you guys. It’s really starting to look so fabulous!!
Meredith says
The shelves are pretty! Have you thought about adding another row above these? I think it might bring some more visual interest and height on the wall. The top row might not be functional, if it’s too high to reach all of the time, but you could stage it. Just wondering if you’ve considered that, I think it might make a big impact.
YoungHouseLove says
We did work with a bunch of different tape layouts where shelves and brackets could go and liked this one best. Another shelf on top might have been too heavy and closed in and it would have been hard to access, so that’s why we went with this one!
xo,
s
SherriEakin says
I seriously had to resist the urge to scroll down immediately after the page loaded to see the last photo. But I was patient and read the whole post without peeking. It was not easy though! Looks spectacular – you guys rock! :)
Teresa @ wherelovemeetslife says
I beleive this maybe one of the best before/after reveals ever. That first pic of your kitchen vs. where it is now…not even finished…is amazing!!!
Sarah says
Can’t wait for you to accessorize those beauties!
Amanda / Bulldrogs and Bulldogs says
What a transformation!I rally love the details of the shelf brackets and the contrast of the grey hex tiles and the green paint! Wonderful choices for everything!
Claudie says
Love the shelves! I had a hard time taking my eyes off of the pictures, in fact. I did wonder about the beam. It seems like there’s a gap on the left side where it meets the ceiling. Is that just where paint needs to be touched up or are my eyes playing tricks on me?
YoungHouseLove says
We’ve got a piece of trim missing up there (there used to be a cabinet there) and we just need to do that when we add the crown around the rest of the room.
-John