Let’s see… when we last left off on Monday, our open shelves had been primed in preparation for their big hanging debut.
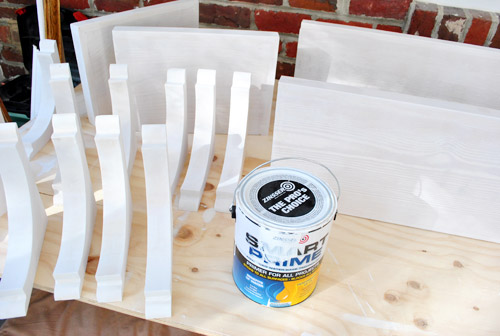
While we had the primer out we went ahead and slapped a coat on the hood cover too (using a 2″ angled brush in the cracks followed by a small foam roller to smooth everything out). Things were instantly looking less wood-sy on that wall.
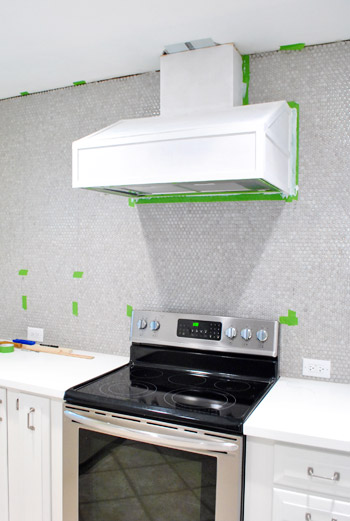
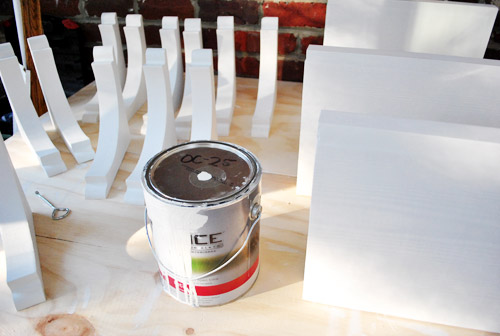
Once the primer dried on both – we used Zinsser Smart Prime which is low-VOC and was recommended by a few pro cabinet painters that we know – out came the same high-durability paint that we used on our cabinets (yes, there’s still plenty left!) and we gave the brackets, shelves, and the hood a couple of coats. Two thin and even ones over one coat of primer did the trick. We also applied those with a 2″ angled brush followed by a small foam roller to keep things smooth and even. Oh and the paint is Benjamin Moore Advance paint in Cloud Cover, bee-tee-dubs (which many pros use to paint the inside of their clients’ cabinets along with the outside, so it should stand up really well to everyday use once it’s nice an cured up).
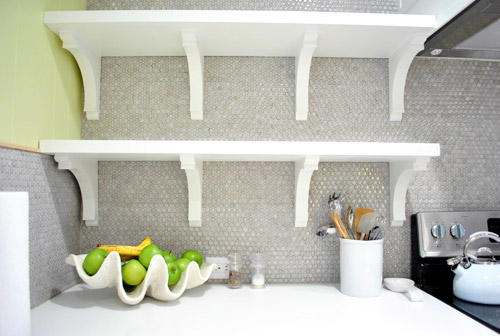
But the exciting stuff really started to happen when we finally got to the point of ACTUALLY PUTTING STUFF ON THE WALL. Yowza. Sorry for the caps. I said we were excited, right? Excited might be an understatement actually. Luckily, since we had already drilled all of our screws into the wall, the hanging step was pretty easy. Up went the brackets on the short side…
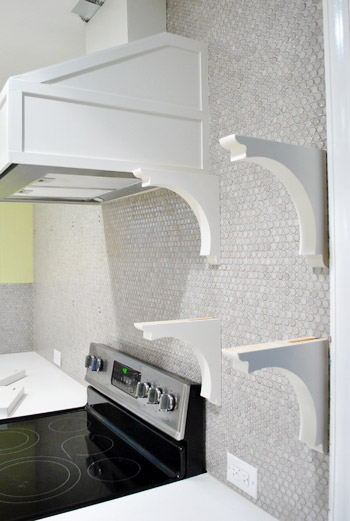
…followed moments later by the shelves themselves. Can I get an “Ooooh”? How about and “Ahhhhh”?

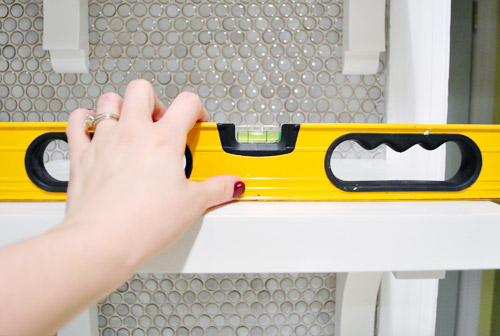
Don’t worry, we weren’t gonna just let them sit there unsecured. We just had some other things to do first – like making sure everything was still level. It was. Phew.
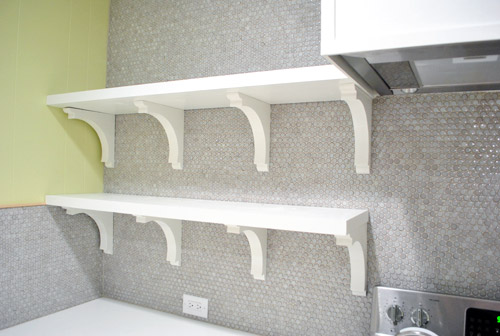
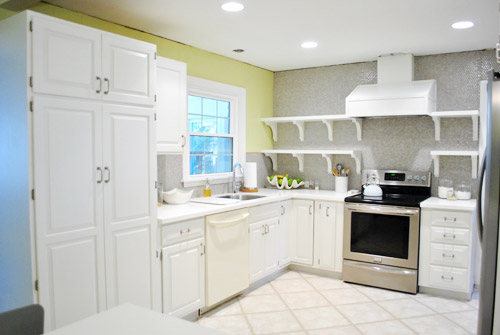
So then we put everything up on the long side of the wall.
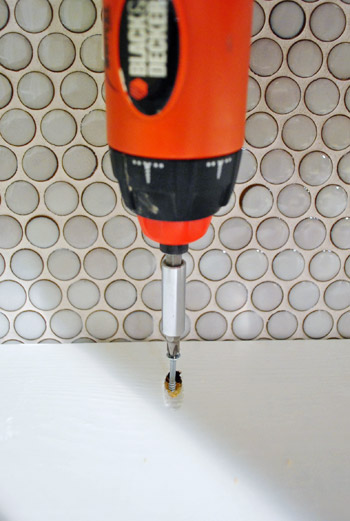
We had mentioned in the previous post that we had originally planned to screw the shelves into the wall (we even made some pocket holes in preparation for this step). Well, after feeling how solid the brackets felt (more on that here) and not really wanting to put 12 more cringe-inducing holes in our tile – we opted to just use those pocket holes as a spot to screw the shelves firmly into the brackets (so the screw actually went straight down, not at the angle of the pocket hole). In hindsight, we definitely could’ve skipped the pocket hole step, but at least now the screw will be hidden in a spot that we can easily caulk over.
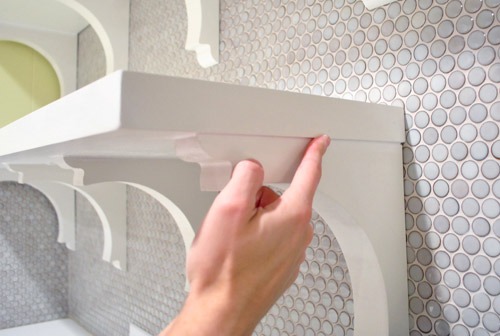
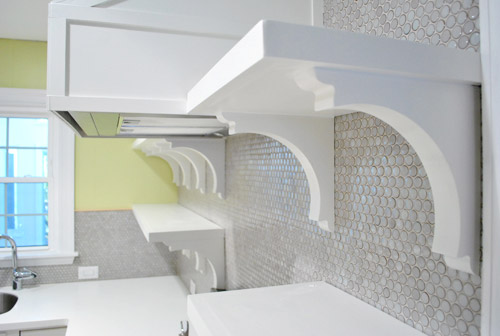
Speaking of caulk, that was our next step after everything was drilled together. Since there were some dark seams where the shelves met the brackets, we just ran a thin bead of white paintable caulk along the top of each bracket and smoothed it with our finger to make the shelves and brackets look more like one unit. Tedious? A smidge. Worth it? Totally. Then of course we painted over it so everything matched.
And with that folks, we were done! Except for more waiting. Booooo.
As eager as we are to immediately fill them with plates and bowls and cups, we resisted that urge in order to let all of the paint cure a little bit longer – just because we caulked those screw holes and around the edges which called for some touch up paint. We definitely don’t want to jump the “fully cured” gun (which could result in a bunch of dents and dings in our shelves during their first few days of use). So for now we’ll just have to enjoy these empty “after” shots thanks to following the full curing time on the paint can’s directions. But tomorrow – oh baby, it’s on. Sherry’s even planning to shoot a little time lapse video of the process of loading them up.
Oh and of course we still have to add crown molding to the ceiling to finish things off and make the top of the hood a lot more seamless. But slowly it’s all feeling a lot closer to “done” than “just started” – especially now that the hood is painted too (never mind the fact that we still have some patch work to do on the ceiling along with that aforementioned crown molding).
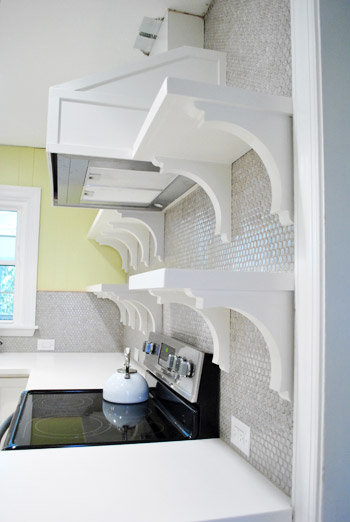
We’re really happy with how the brackets turned out, so we haven’t thought twice about our decision not to do true floating shelves. We think these are really charming – and they’re super stable so Sherry could probably hang off of them if she wanted. Instead she wants to fill them with ceramic animals. Same difference.
It’s nice that there’s still plenty of room to load them up and make them really functional, even with the brackets (no, they will not actually end up full of ceramic animals- not on my watch). Our shelves are deep enough for our 12″ dinner plates and the brackets are 15″ apart so we should have lots o’ room to put everyday stuff up there – which we hear from other open-shelf-having folks works really well, since it’s used often enough not to get dusty).
And even though it was a bit weird at first to see our wall of penny tile suddenly broken up by these bright white lines, it’s cool to see the thing we’ve always envisioned come that much closer to being a reality.
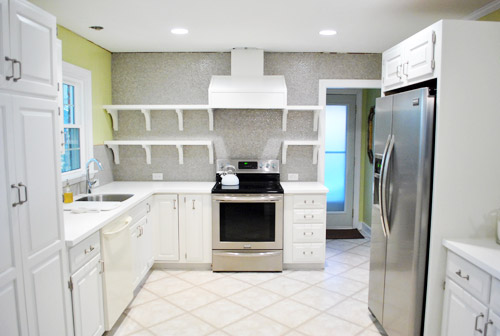
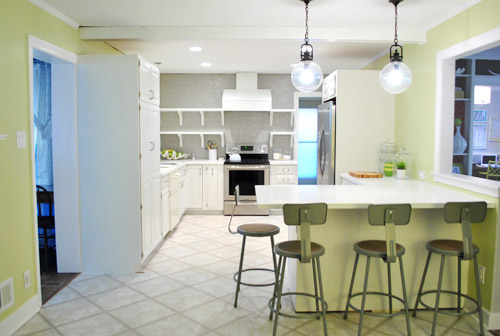
So we should have pics (and a video) of the shelves all filled for you tomorrow. Until then, we’ll leave you with this slightly-closer-to-after shot of the room. We’re definitely getting there. And we’re counting down the seconds to Operation Cork My Floor (along with adding that crown molding, patching the ceiling, adding a pendant over the sink, covering the base of the peninsula with some decorative wood planks, hanging some art to the right of the fridge, do something to the side of the pantry, etc).
We feel especially giddy when we look at old photos of the room back when it looked like this:
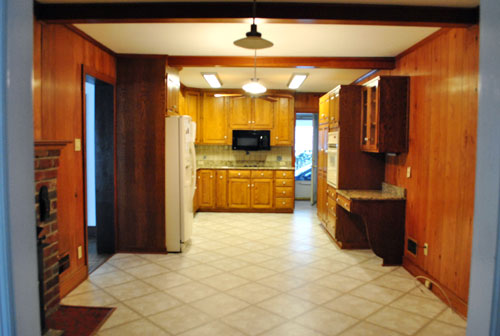
We can hardly picture that old room anymore. Isn’t it funny how quickly your brain replaces things? It’s so crazy that we lived with the room just like that for over six months before even painting the paneling. But once we finally got the ball rolling… well, it’s still rolling. Haha. Is anyone else in the home stretch of one of their home projects? Though I probably should knock on wood when I say that, since it sounds like a sure way to jinx myself into some last-minute wrench in the plan (he says as he gets up to literally go knock on wood while crossing his fingers and eyes).
If you’re interested in more ideas for adding shelving or vertical storage, this post has a bunch of DIY shelving projects and ideas for you.

Gina says
Awesome! So fantastic! You guys are geniuses! How much more can I praise your work? I am psyched to check in with your blog every day and can’t wait to see what it will look like tomorrow.
Again, so beautiful; what a transformation! Your blog rocks!
YoungHouseLove says
Aw thanks Gina! You guys are all so sweet.
xo,
s
Katy says
Wow, it looks fabulous already. I can’t wait to see the time lapse video. Now I really want to buy a house with a so so kitchen and fix it up! Thanks for all the inspiration!
~Katy
Allyn says
Haha. Operation Cork My Floor. Brilliant.
The kitchen is looking so great!
I think those are perfect for an animal collection. Just sayin.
Elizabeth @ The Little Black Door says
BEAUTIFUL!
chris says
wow looks amazing! How about a shot looking at the window….now that it should be centered :)
Elisabeth says
Hi Sherry and John
It’s wonderfull! I imagine you will
cook a “Cinq Etoile menue” every day in your
new Kitchen.
Happy cooking!
Elisabeth
Amy @ this DIY life says
You’re going to love having everyday stuff on the open shelves. We love our open cabinets (http://thisdiylife.wordpress.com/2011/10/17/parakeet-and-two-cats/) and I can’t wait to make them into shelves when we do our full reno!
YoungHouseLove says
So pretty!
xo,
s
Justine says
LOVE the open shelving! I can’t wait to see how it looks with all your pretty dishware.
sallie says
hotdog!!! it’s looking so gooooood!
YoungHouseLove says
Haha, people don’t say hotdog enough. I love it.
xo,
s
Lisa says
You say it a lot if you have two toddlers who like Mickey Mouse Clubhouse!
YoungHouseLove says
Haha, I love it.
xo,
s
Jenni says
Wow! I would love to be the previous owner of that house and walk in and see the transformations you all have done!
F A B U L O U S!
I wonder if they look at your blog? :)
YoungHouseLove says
We think they read (they did when we moved) so it’s really fun! They say they love watching the house transform without having to break a sweat. Haha. They’re such a sweet family!
xo,
s
MissCaron says
What an amazing transformation! I can hardly believe how different it looks. What great vision y’all have and it really is looking fantastic. CONGRATS!
Lindsey d. says
Interesting… your clean-lined, modern kitchen now has a French Provincial thing going on on that back wall. Not sure if it’s the range hood or the brackets that makes me get that feeling. I get what happened; I’ve certainly felt limited to the more fru-fru, not my style options at the big box stores before.
I loved these featured on Apartment Therapy earlier this week.
YoungHouseLove says
We think with the dark cork floors the mix of contrast and stainless appliances and oil-rubbed bronze lighting and steel stools will be really fun. A modern but not completely sleek mix of old and new and industrial if you will! Haha.
xo,
s
Emily says
That’s funny! The featured kitchen you linked to is from the same house as the entry post from today! :)
YoungHouseLove says
That’s so funny!
xo,
s
Libby says
Those brackets seal the deal on the shelves. Did you guys do a little “my kitchen is so pretty dance” ? I sure would.
YoungHouseLove says
Haha, it’s more like the restain-me-from-putting-things-on-them-before-they’re-dry dance. And it’s really awkward looking.
xo,
s
Kristen @ Popcorn on the Stove says
This is so snazzy… I like the shelves a lot! Are you planning on having some shelves on the window wall too??
YoungHouseLove says
There are 14″ of “breathing room” on either side of the window over the sink that we love! We just want to add a pendant over the sink and that side of the room is good for now!
xo,
s
Kate says
Squeal! It looks so wonderful! I love that you guys post a before photo in almost every post about the kitchen, because I totally would too. Every kitchen post I keep thinking “And just think what it looked like BEFORE!” and then it turns out you guys are thinking the same thing. Love it. Can’t wait to see the finishing touches come together.
Emma says
Oh my! Looks fabulous – can’t wait to see the shelves full of awesomeness!I am so looking forward to the cork flooring and all the little details that you guys will add bit by bit. yay!
Laura says
I love the way the shelves look! You’re kitchen is beautiful and I can’t wait to see the finished product. I’m trying to find your post on painting the paneling because it looks like an entirely different material from the original panels. When I click on the link it just takes me to a picture of the original kitchen though. Where can I find that post? Thanks for all the inspiration!
YoungHouseLove says
Oops, here’s that post for ya: https://www.younghouselove.com/2011/06/woot-its-done/
xo,
s
Ainhoa@ALittleBite says
It looks awesome! I love that you decided to go with brackets – I think they’re great.
sarah says
ooh, it looks so lovely. I cannot wait to rip out my cabinets.
I’m oddly excited to see how it looks tomorrow.
Linda says
You guys are SO.DARN.CLOSE!
I still can’t stop staring at the gorgeous orbs above the peninsula. I feel like I would pet those on a daily basis…though that might look inappropriate given their shape.
Still.
YoungHouseLove says
Haha, come on over and pet them with me.
xo,
s
Barb says
Just stunning!! No need to say more…..S.T.U.N.N.I.N.G!!!
YoungHouseLove says
Thanks Barb! You’re so sweet!
xo,
s
Suni says
Looks beyond incredible and gorgeous, what a completely different kitchen!! You both are such an inspiration, and make me feel like anything is possible in the DIY world!!
Kate says
So pretty. Great job!
Sian says
That Looks amazing can’t wait to see it all finished
Alecia says
Looks great! Can’t wait to see everything accessorized.
Have you guys thought about doing a rectangular chalkboard area on the side of the pantry? That would be cute for Clara to write on, and for you guys to write little notes. Just an idea! :)
YoungHouseLove says
Yes, we definitely want to do something on the side of that pantry!
xo,
s
Kristi says
Funny – that is the same exact idea I had!! Would be a cute touch!
Erica says
Wow, the transformation is amazing. You two are so talented.
maryb says
i cant wait for the cork floor – i think it will really bring everything to life!
Sarah E. says
Where do you keep your appliances? My counters are offensively crammed with ’em.
It all looks really beautiful, by the way.
YoungHouseLove says
We don’t really use the blender and toaster much so those are in the cabinets and we don’t drink coffee so we don’t have a coffee maker. We really just use the tea kettle all the time and occasionally use the microwave which is built into that upper cabinet next to the pantry. Hope it helps!
xo,
s
Kristen says
Well now I’ve heard it all…you get a zillion, trillion things done every single day and you DON’T DRINK COFFEE???!!! I only drink decaf, but I MUST HAVE COFFEE AT ALL TIMES and I get about a fraction of what you get done in a day in maybe a month or two. Wow, you guys are amazing! :-)
YoungHouseLove says
Haha- we’re into chocolate though!
xo,
s
Lizzy says
You guys are totes super human to be able to get so much accomplished sans-coffee!
Amanda says
Sarah E., as a coffee-guzzling, toast lover, I limit myself to three appliances on the counters, which I have spaced out on three separate walls. My three are my kitchenaid mixer, my toaster, and my coffee grinder (we use French presses instead of a coffee maker).
All my other kitchen appliances (blender, hand mixer, waffle iron, etc.) go into a cabinet, and I only take them out when I use them. If I don’t use it at least once a month, it should not be on my counter.
It also helps to put them in places that do not break up your counter space as much — like on small counters by large appliances.
That said, a cute toaster is a decorating accent, and most kitchen catalogs have great examples of cute, small-appliance filled kitchens.
Ang says
Holy smokes. I LOVE it!!! Cork floors please! Pant. pant…I can’t wait.
Brittnee says
LOVE the shelves. I can’t stop staring out them. They are so pretty. Your kitchen is making me envious :)
YoungHouseLove says
Aw thanks Bittnee!
xo,
s
Anna says
Looks fabulous. i’m on the home stretch of packing to move continents again. it feels like a bit of a home improvement project of sorts!
Ali says
Those look fantastic! When drilling the tile, is there anything you did to ensure they didn’t crack? Hooray for almost-done-kitchen! :) Crown molding in the kitchen = love it!
YoungHouseLove says
We just used a drill bit meant for tile!
xo,
s
Haley says
I love how the brackets/shelves/hood cover/etc came out. The room looks amazing compared to what it was before….
Shauna says
Oh man, it looks SO GOOD! I just love it all. So light & airy & fun. Now I really want shelves like those for my house…nah, I NEED them!
Rachel Tatem says
It looks so beautiful and so modern! Congrats at how it is all coming together!
Rebecca says
We are in the home stretch of the bathroom project. Although I just heard from my husband that we will have to rip open the wall to do all the new plumbing for the double sinks since the new vanity (just delivered an hour ago) doesn’t give us space inside to do that. So maybe we’re at halftime. have you guys done any plumbing? My husband is super handy on so he’s tackling it for us.
YoungHouseLove says
We have done some basic plumbing but since our homes are so old we usually call the pros for heavy duty jobs so we don’t end up with a big ol’ leak in the wall.
xo,
s
Lizzy says
I love it! Great job YHL! Isn’t it great to go from a drab, orangey-toned kitchen to a crisp white?!
We just started hanging a few of our cabinets last night and will try to get the rest in over the next few days. Scratch that – we MUST get the rest in over the next few days since our counters are being templated on Monday. Eeek! Luckily we work best under pressure! :)
(Here’s our progress from last night: http://anexcellentadventure.blogspot.com/2012/02/cabinet-beginnings.html)
BTW – totally agree with your choice to use the brackets over floating shelves – I think it looks so much more custom that way! Enjoy!
YoungHouseLove says
Wahoo! So much progress!
xo,
s
Susan (Between Naps on the Porch) says
Wow, such a great transformation! It looks beautiful! Love the bright, light-filled space it’s become! You’re going to have so much fun cooking and entertaining in that bright, happy kitchen. :)
Kate says
Has it really only been two days? I feel like it’s been a week since you primed…guess I’m just impatient. I started a kitchen remodel in November of 2010 and FINALLY got around to replacing my broken stove and dishwasher thanks to you guys and the whole get on it already. This month I’ll build the island and hopefully get the ceiling patched and trim up. I did it all myself and once it was functional I just didn’t want to look at anymore. I think I’m finally ready.
Amanda says
I love the open shelves! I wish there was a good place in my kitchen to use them! Can we see a shot of the wall above the sink now that the shelves are up? I’d love to see how they balance things out.
YoungHouseLove says
Oh yes, will have to take shots of that asap!
xo,
s
Jimmy says
Looks great guys. Gives a good sense of balance to the back of the kitchen.
I feel like I’ve been in the “home stretch” of just about every project I’ve started recently for a while now. That last 5 percent of detailing (the trim, molding, etc), seems to take 50 percent of the time to complete. And like you said, it’s tedious, but totally worth it in the end. Nothing looks “finished” until you’re done with those finishing touches – even if it is technically functional in the meantime.
It’s what I get for starting a new project before finishing the old I guess.
Becky O says
Love the kitchen, the before & after pics are amazing! We are building a new house and are at the painting stage, today the first colors go up on the wall, and I am SO excited to see it. I was boring though and picked Sherwin Williams Alpaca (a nice tannish-gray color) for most of our rooms because I want to be able to redecorate when I change my mind on my favorite colors without having to repaint. I could never be as brave as you are with color, even though I love how it looks! :)
Kelsey Robinson says
Very inspirational. Makes me want to leave the office immediately and get crackin’ on our kitchen makeover. Thanks for all the tips!
Rubina says
Great job, it looks amazing! I’m in a similar spot with my living room…I felt like I was painting and DIY-ing for years but now it’s time for the “jewelry” and load it with tons of fun things!
I blogged about it here…http://homesandheels.wordpress.com/2012/01/25/vignette-etiquette/
Thanks for the inspiration!
YoungHouseLove says
So pretty!
xo
s
Melissa says
Fantastic job! I love those brackets and it really makes your kitchen feel more cozy. The floor will help loads too I’m sure. Of course, I adore white kitchens anyway… I have been doing counter decluttering and it makes my kitchen feel huge!
Elesea says
this is beautiful. i can hardly stop looking at the before kitchen compared to what it is now. i so admire your ability to see how things will come together. can’t wait for some cork floors!
Maddie says
So, I’ve been loving to whole kitchen re-do, and have been enjoying every update, and then when I saw today’s photo, I’m like “wow! they’re almost done!”. . . then I read the post, and realized that I totally forgot about the floors! And I was totally excited about them before! haha
Great job!
Liz says
Gorgeous gorgeous gorgeous!!!!
Jess @ life, happily ever after says
So maybe tomorrow we can get a shot of the window above the sink and how nice and balanced it looks now with the shelves :) I am excited to see that since you have mentioned it a lot lol.
Your kitchen is fabulous and I am so inspired by everything you do! Also, the book craziness is not detectable in any of these photos, so bravo!
YoungHouseLove says
Wahoo! Will have to remember to snag that shot!
xo,
s
JanetL says
When do the floors go down? I can’t wait to see them!
YoungHouseLove says
Soon! In the next week or two I hope!
xo,
s