This is it. My most favoritest art ever. Yes I know that’s a big statement. A big statement with a non-word, at that. But it’s all deserved because I’ve framed and hung my bike art and I’m in love. Not only with how the final product looks, but how easy and cheap it was to achieve. So forgive me if my enthusiasm is more annoying than usual today. I’m a man with a love of all things bike and all things easy. Wait, that sounds wrong…

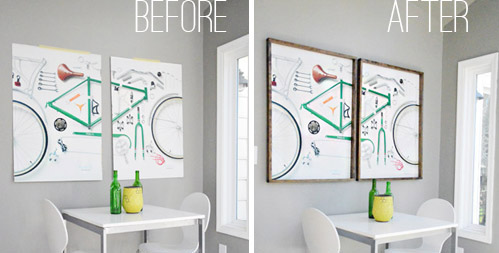
So here’s that wall before with my retail display cast-offs just pitifully taped to the wall.
And here they are all framed up. In frames that only cost us $14 to make ($7 each!) and whose most challenging step was finding the patience to let the wood stain dry before I could finally hang them. Seriously, they weren’t hard to make in the least.
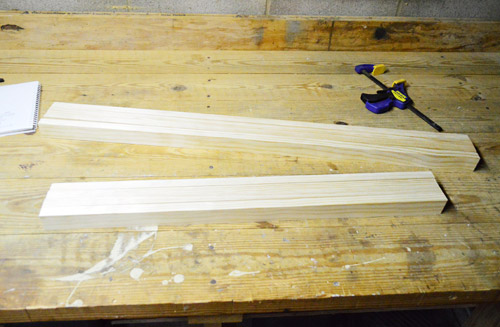
Here’s how it all went down. Er, up. My $14 was spent on four boards of 6 foot long 1 x 2″ pine from Home Depot.
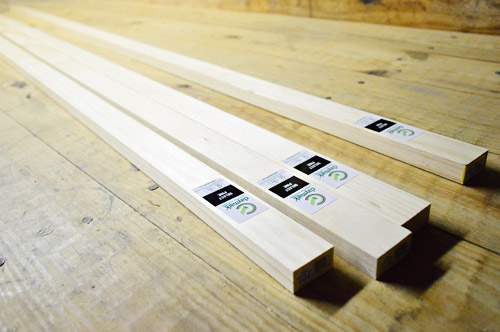
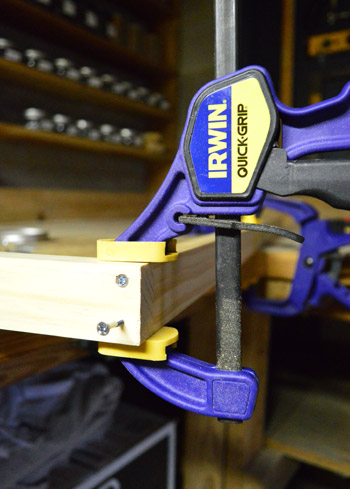
Since we were building two frames, that meant we needed four boards of the same length (for the sides of each of the two frames) and four shorter boards of the same length (for the top and bottom of each of the two frames). To make sure I cut the four sides of my frames (and the four tops/bottoms of my frames) evenly, I clamped four boards together and cut them all at the same time (you could have your boards cut to size at the store if you don’t have access to a saw, btw).
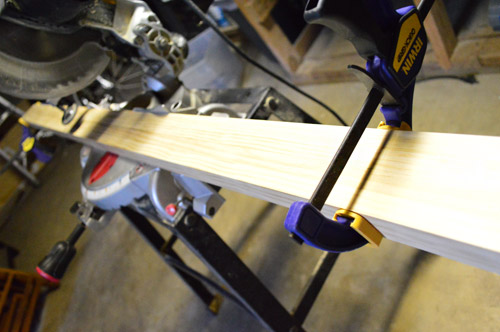
So two clamped cuts later I had four long boards (for the two sides of the two frames) and four short boards (for the top and bottoms of each of the two frames).
The short boards were cut to 1-inch longer than the width of the poster to create some overlap (i.e. each poster is 27″ wide, so I made the boards 28″ wide). The side boards were cut to 1-inch longer MINUS the width of the two top boards (i.e. each poster is 39″ tall + 1″ – 0.75″ for the top board – 0.75″ for the bottom board = 38.5″). This will make a bit more sense soon, I promise…
I chose not to complicate matters by doing mitered corners and went for more of a rough and raw look. So attaching the boards into a rectangular frame was pretty easy and completely miter-saw free (seriously, if you had Home Depot cut your four boards to the right sizes, all you’d need to do is the following part at home).
I clamped the pieces tightly together and screwed through the top and bottom boards into the side boards. Oh and it did help to make pilot holes first with a small drill bit so my wood didn’t split when the screws went in.
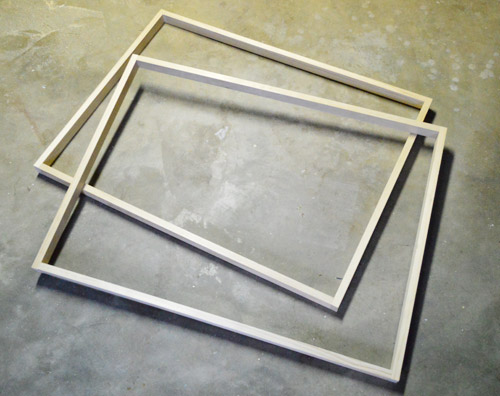
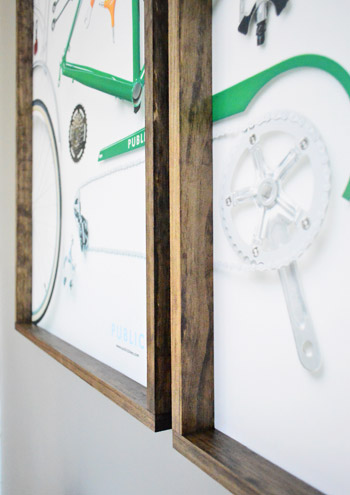
Here’s what my two frames looked like once everything was screwed together. I didn’t do anything to cover up my screwheads since I figured not many people will be staring at the tops or bottom of the frames once they’re hung (you’d have to be pretty dang tall or lying on the floor to see them). Plus I was going for the raw and imperfect look anyway. A bike’s gears show, so what are a few screws in a few not-easily-seen locations?
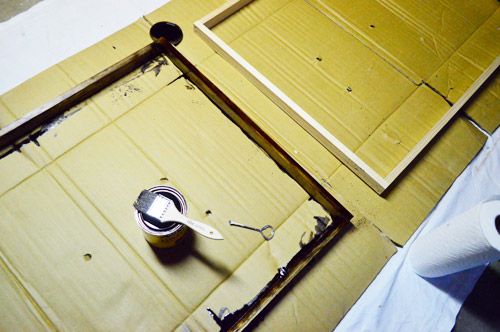
I contemplated leaving the wood raw (since that’s how we originally saw them at store) but Sherry and I agreed they’d look better in a dark stain (we used Minwax’s Dark Walnut since we still had a small can leftover from some project long ago) to tie into a few other wood items in the room like a wood side table and some wooden art over the daybed. Once the stain dried, I put a coat of Safecoat polyurethane over it and patiently waited another night (torture I tell you) to put everything together and hang them up.
With everything dry, I laid my posters face down on the back of the frames. The inch I added to each side meant the poster sat on the frame comfortably without being visible along the edges. My poster was printed on pretty sturdy paper (it’s similar to thick poster board) so I was able to just staple it around the edge in a few spots as a means of attaching the art to the frame. If you’re trying this with a poster on thinner paper you might want to consider gluing it to a piece of sturdier poster board to make it less flimsy (maybe use a glue like rubber cement or spray adhesive that won’t make the poster wrinkle when it dries?).
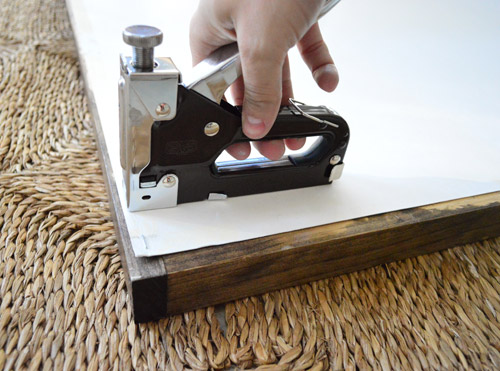
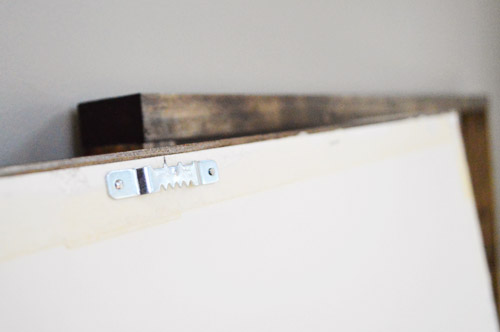
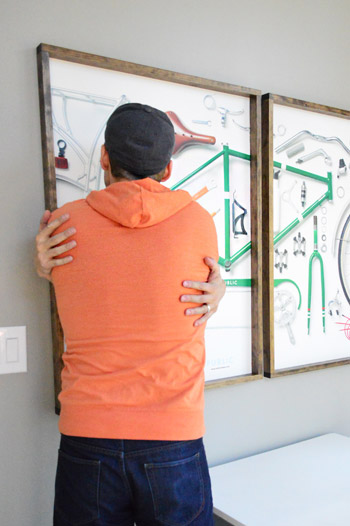
Once I put a few staples around the edges (I did about four per side, but depending how stiff your paper is you might need more) I attached some simple picture frame hanging hardware through the poster and into the wood of the frame – so it wouldn’t show through on the front or anything:
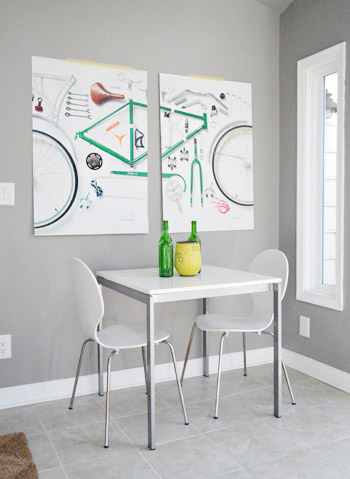
Then those babies were ready to hang. Cue the angels. Part the clouds. I am in bike art heaven. Oh yes, and ignore the way-too-airy table and chairs. Once we have a chunky storage piece of furniture (we have our minds set on something, so we should have that update for you soon) the bike art will have the nice grounded and proportionate look that it deserves.
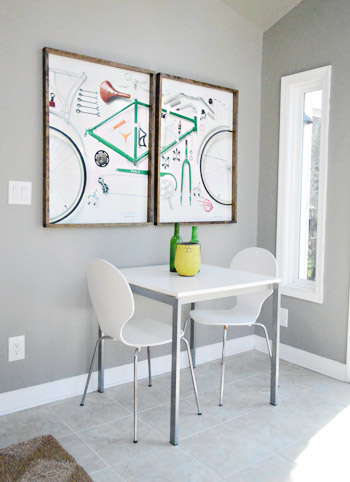
Seriously though, I’m pretty stoked about how they turned out. Obviously the art itself (featuring a deconstructed bike by Public Bikes) is the real star. But I like to think that my frames have at least earned a “best supporting actor” nomination. And heck, they’re honored just to be nominated.
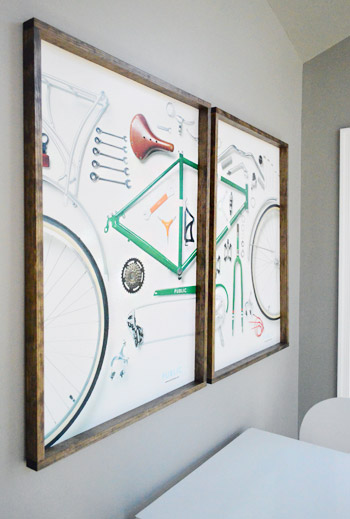
We’re both really happy with our decision to use the boards so they raised off against the wall a little bit – giving the poster some dimension instead of just being big and flat. That thick frame feels uncommon and artful – and thanks to the posters being so firm and un-delicate, we don’t anticipate any issues with there being an absence of glass. They’re just like poster board so we think they’ll hold up for a nice long time (of course we can always add glass or plexi if we change our minds, but for now we love them completely unobstructed).
Then I had an impromptu make out session with them.
Sherry probably won’t have to witness that again (I can’t make any promises), but I’m glad I can see these babies from the window over our kitchen sink. So she may catch me gazing lovingly at them while doing dishes. And it might just be a love triangle since she occasionally lovingly gazes at me while I do dishes.
So that’s the latest in the sunroom. Can’t wait to share the storage-y piece of furniture that we’ll be adding under the bike art. Soon I hope!
Update: We finally created this Shop Our House page to help you hunt down any furniture/accessories that you see in our house, along with all of our paint colors.

Angela says
Love!
karla says
I love these prints so much!! They have a great color scheme in them too! Your old master bed shams with the green and white stripes would look sweet in that room with them! I like the masculine/industrial direction that room is taking! An old card catalog would also be awesome underneath those prints.
Nicole says
Ha! The make out photo made me giggle.
Kim @ Yellow Brick Home says
Man oh man! I am so happy to see those guys up on the wall! Back when you first posted about them, I just knew Scott would have loved them too (he’s a HUUUGE bike buff).
Also, I love how simple this project was. We JUST DIY-ed a huge, huge frame for a 2013 calendar (with glass and all), and it was still less than $50!
http://www.yellowbrickhome.com/2013/01/03/diy-a-big-honking-frame/
I’m totally pinning this project too for something that’s a little stiffer… (now THAT sounded wrong).
YoungHouseLove says
Hahahh!
xo
s
Kristen L says
That art is SO awesome!!! I think it looks great framed the way you did. Great work
Amanda says
Thank you for this tutorial! I’m in much need of some frames and will definitely be using this! Y’all rock!
Allison says
This is seriously the best idea ever. I’ve been stressing about how to frame my totally non-standard size 20×38 poster from Prinstagram without breaking the bank. Enter you guys. Awesome!!
Christina @ Homemade Ocean says
Oh my gawh….that make out picture made me choke on my water!!!!
HIYAlarious :)
The art looks amazing as well.
Maribel says
In my book this post is on the same page as the naughty console reveal video…. You crack me up. By the way how come you never got into biking or does your love end at bike art…lol
YoungHouseLove says
We do some random family biking (Richmond has some awesome trails and spots for biking) but nothing too hard core most of the time. More on that here: https://www.younghouselove.com/2012/08/window-shopping-high-bridges-green-fronts/
-John
Alison says
I see a few others mentioned this, but I highly, highly, highly recommend putting some sort of UV protective glass in the frames (key words -UV protective). The posters are so awesome, but are absolutely going to fade in the sun room and it would be such a shame to lose the vibrancy of the colors in the print. That being said, it might be good for all/any of the art in the sunroom.
Love the frames, good work John!
YoungHouseLove says
Thanks for the tip Alison!
xo
s
Tirsa says
Love what a simple frame can do to your favorite art.
Jimmy says
haha That make-out picture caught me totally off-guard. Hilarious.
I’ve got a canvas that is in need of some framing. This might do the trick. Also, I just bought a pair of those Irwin quick-grip clamps (12″) this week and I love them. Maybe not quite impromptu make-out love them, but you get the idea.
Marge says
With a canvas you could position the canvas flush with the front of the frame (I did that when piecing together some slim frames here) or have the ledge that John created (it looks great!). The frames were a huge improvement for the canvasses in my house.
Harper says
WOW, those frames make a world of difference. Well done!
LauraC says
Looks really really good!!
Maggie says
This is perfect timing! I have a print from IKEA I need to frame (the frame I bought crashed 2 sec. after hanging it…) I think I go do this, I even have leftover stain! Thanks!!
Isabelle says
I love my PUBLIC bike so much I can see why you love your art ;-)
John – I know you’ve said you’re more of a bike admirer than a bike rider…but that will change if you get a PUBLIC bike. It’s like riding butter.
YoungHouseLove says
Sounds awesome.
-John
Sarah says
My husband’s Aunt has been saying “my very best favorite” lately. Now WE can’t stop saying it. Like, these bike prints are my very best favorite!
YoungHouseLove says
That’s so funny!
xo
s
Mel says
Awesome!
Thanks for the refreshingly open manly enthusiasm ;)
YoungHouseLove says
Just exercising my manthusiasm. Ha.
-John
SarahWNY says
Would like to see DIY framing without attaching the sawtooth hangar through the artwork. I know the prints were second-hand, but normally you wouldn’t want to both staple and attach a sawtooth through original art.
YoungHouseLove says
Oh yes, you could do a thicker wood frame and go straight into the wood with the hangar if you’d like!
xo
s
Anele @ Success Along the Weigh says
The perfect compliment to your favoritest art!
emma says
Hey John,
What’s the difference between a table saw and a miter saw? I thought a table saw was more flat and ripped wood but the one in your picture looks like a miter saw. I got a miter saw for xmas (haven’t opened it yet) for simple cuts – straight and angled and want to make sure I got the right saw!
YoungHouseLove says
Sorry – that wording was confusing. I did use a miter saw and that’s what’s photographed. The folks at the hardware store use something that’s more like a table saw, which is why I referenced that. But yes, you got the right saw!
-John
emma says
They’re used interchangeably often, I get confused, thanks!!
becky says
Awesome frames. Love them! They really look fantastic – great job, John! Quite the contrast from the girly pastel colors on the other side of the room ;)
Woah, just saw your original post about the bike posters…from 2011?! Did you guys just get them?
Seeing the poster closer up – how cool! What a sweet, sweet snag!
YoungHouseLove says
No, we got it shortly after that original post – we just haven’t figured out where to put them ’til now!
-John
Janelle says
Haha. Thanks for making me smile with the last photo! And, you know, for all the useful info about framing big things on the cheap. I’m all for it!
jillian says
You guys are so silly – I love it!
John, I’m so impressed with how far you’ve come with building things! Seems like only yesterday you were making those bookshelves for Clara…
Admittedly, sometimes I feel a bit weird and creepy talking about your lives as if I am in them. Oh well!
Michelle @ Lifewithacrazypup says
Love the frame! It really adds some pop to the room! I also love the comment about about adding a similar frame to a canvas! Great idea! The only frame that I’ve made was around our chalkboard (similar to yours, but it hangs on the wall near our fireplace). http://lifewithacrazypup.com/2012/12/23/basically-free-chalkboard/
Whenever I start staining wood… it becomes so addicting! I just want to stain everything! Haha. How has this become my life?
Lana says
I really like that! It gives me an idea for a poster/map that is odd shaped and so virtually impossible to find a frame for. Thanks, guys!!!
Lindsey says
lmao. How does Sherry feel about your impromptu session with the bike art?
Best part of my day! Thanks for the literal LOL!
YoungHouseLove says
I dunno, but she volunteered to photograph it!
-John
Ally says
JBoom makes it to first base – with himself! :)
I’d say: Get a (sun)room! But you’re already there :)
xox
Sayward says
I’m going to start saying ‘get a sunroom!’ now. Dying.
YoungHouseLove says
Hahahah!
xo
s
Sharon says
Wow – My husband loves to ride. Sure wish someone would sell those posters – they would look so perfect in his office. Maybe I can take a picture of his bike on a white backdrop and then crop to reproduce (without disassembling of course).
YoungHouseLove says
That would be cool!
xo
s
heather says
The part of me who loves rustic simple, yet clean lined, items loves these frames with this particular art and decor style. The other part of me loves a beautiful miter for durability and strength, and the other part of me loves the look of shaker frames, which on a large scale like this could look awesome (though I don’t take you guys as even remotely shaker style people, maybe I’m wrong though).
If anyone is looking to watch a tutorial on mitered edges here’s a great one. There are less complex methods but I think I might just be smitten with both how thorough it is, and the gorgeous wood they’re using.
http://www.finewoodworking.com/item/57000/building-custom-picture-frames
YoungHouseLove says
Great link Heather!
xo
s
M says
last pic is super cute.
Kirsten says
Awesome! I LOVE them! (albeit a little less intimately than John.) Must say I’m more than a little envious of Sherry today. What’s it like to have a handy husband who recognizes the need for a grounded and proportionate look AND admits it openly. Sigh. And I would love to know where you found what looks like a fairly small staple gun. Mine is huge and hard to squeeze! Thanks!
YoungHouseLove says
Oh that’s just John’s big hands making it look small. Hah! It’s pretty standard sized (from Home Depot I think, but we get staples at Hobby Lobby now since it’s cheaper).
xo
s
Ed says
Wow those do look good!
Gilit says
Making out with inanimate objects and love triangles? You guys are getting so scandalous! Love it!
I also genuinely enjoy your enthusiasm for this project, John (and it’s a good thing Sherry is so secure)
Megan B says
I LOVE this! We have a few DIY framed art pieces (most recent being a print with old cameras on it from caravanshoppe.com–I’m a photographer so very appropriate) and they get more compliments than anything else in our house. But now I’m a little envious of your bike prints. My husband just took up cycling as a hobby, so if they mysteriously disappear from your house one night, I apologize in advance.
Megan B says
BTW, caravanshoppe has a fun bike print for you to make out with, John!
YoungHouseLove says
Ha, thanks!
-John
Jeff H. says
The frames look great and I can relate to the agonizing wait time for staining and sealing. We’re planning on using some leftover wood from older projects to create a few similar frames for smaller pictures.
Rachel says
Haha you guys are hilarious. And I love the way they turned out! Gives me an awesome idea for a project I’ve wanted to tackle. Yay for the bike art!
Patti says
You’re so funny, ‘they’re honored just to be nominated’ killed me … AND they look wonderful, ‘natch.
Liz says
I’ve never commented before, but I just saw this ceramic dog chihuahua stamp at Anthropologie, and I thought of Sherry..
http://www.anthropologie.com/anthro/product/home-office/F25682014.jsp?cm_mmc=PJN-_-Affiliates-_-Placement=21181-_-ShopAnthropologie
YoungHouseLove says
Love it!
xo,
s
Jennifer Laura says
I love them! They look pretty awesome, it seemed like so long ago John got these from the Gap, I had kind of forgotten about them!
MegW says
So what would you have done if the paper hadn’t been so thick? I’ve been thinking about doing something like this with a map… so it’s pretty thin paper.
Thanks!!
YoungHouseLove says
I would have used spray adhesive to attach it to thicker poster board :)
xo,
s
Leigh says
Nice work, J-Boom! The art looks awesome. But honestly, what I love most about this post is your positivity! It’s so infectious. ($herdog too!)
Internet high five, man!
-Leigh
Shannon says
I was expecting you to say that you were really “spoked” about them…
YoungHouseLove says
Ha! How did I miss that?
-John
Donna says
Looks great, John! Really nice job. Sherry, how great you’ve got a man who does dishes, cooks, is a great dad, AND is handy! I’d say you’ve got yourself a keeper!
YoungHouseLove says
I thank my lucky stars every day. I have no idea how I bagged such a catch. Haha!
xo,
s
Pallavi says
ooh! so excited about these frames. so simple, i shouldve thought of this so thank you for saving me the trouble! im thinking this will work perfectly for the “things that are awesome” poster I bought after seeing it here on YHL!
Rachel says
love love love the frames! It makes me want some giant art work. You are too funny,I didn’t think I would actually laugh reading a post about a frame.
Lisa says
You guys are hilarious. This is one of the funniest posts I’ve read. I’ve never commented before, but I love you guys (I keep up on the blog and have the book!) but this post is too good not to comment on. I about fell off my chair on the pic of John’s make out. I have been there with projects and totally know how your feeling!
YoungHouseLove says
Haha thanks Lisa!
xo,
s
Hanna says
Hmmm. Technically it would only be a triangle if the poster gazes lovingly at Sherry while she gazes lovingly at you and you gaze lovingly at the poster…
Aaaand I think I will stop my brain right there. *grin* That plus the makeout picture and things are threatening to get weird in my head.
YoungHouseLove says
Hahaha!
xo,
s
Susan says
Wow. Love.
Can you get them to release these in poster form so the rest of us can buy one?
YoungHouseLove says
We wish!!
xo,
s