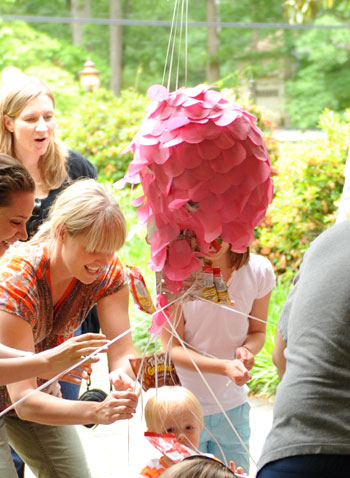
We had a bunch of requests for a tutorial on Clara’s pull sting piñata, so here ya go. And if you have no interest in this project but want to blow off some steam after work you could easily turn this post into a drinking game and take a sip every time I say the word piñata. But beware, you won’t be ok to drive afterwards. Anyway, I had never heard of a pull string piñata until I got some unsolicited baby party catalog with one and I instantly realized that it was a genius idea for wee ones. Clara’s not exactly strong enough (or coordinated enough) to whack a regular piñata with a bat, but she can definitely tug a string like the best of them. And the entire concept behind a pull string piñata is exactly what it sounds like: each kid holds a string and tugs on it so the piñata bursts open and treats fly out. Here it is in action for ya (you can also see the video here) and although Clara just ended up watching from the sidelines, she really seemed to enjoy the show:
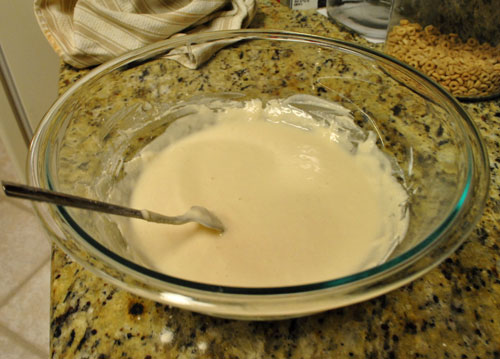
Who knew my weird homemade piñata would actually work? Anyone who saw Friday’s post saw that the first few steps left it looking a little questionable (I’ll recap those steps quickly so this post is a one stop shop for anyone who wants to whip up one of their own). And I’m sure there were some doubts that it would work out (mine included) but I guess this piñata was destined to beat the piñata odds. First we made paper maché (mixing approximately two parts water to one part flour)…
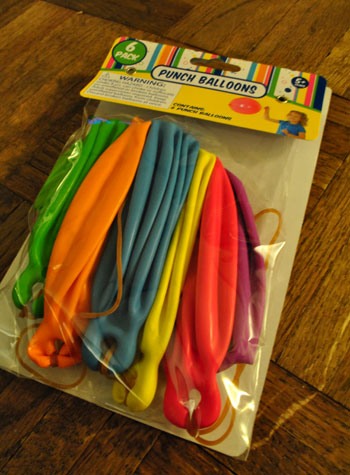
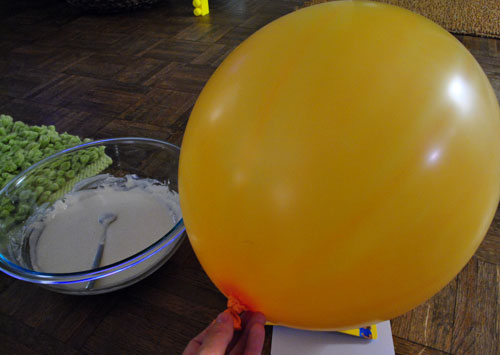
… and blew up one of these punch balloons from Target that wasn’t in our color scheme (the orange one)…
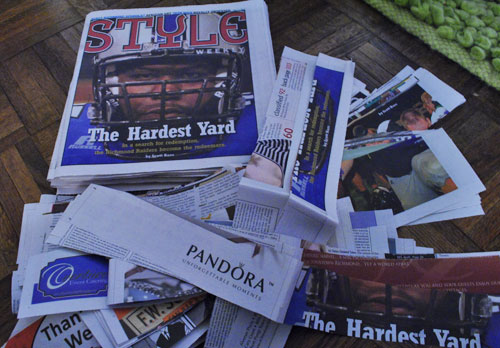
… and cut a bunch of newspaper strips…
… which I paper machéd to the big balloon…
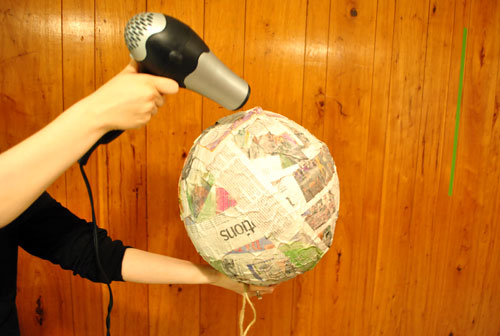
… which I then let dry a bit overnight and then hung outside in the morning to hopefully speed up the drying process (since it was still soggy and looking a bit like a goiter).

That didn’t help much because it was a humid day, so I brought it inside and thanks to some reader recommendations I actually opted to break out the hairdryer on that sucker. It worked really well (drying it out completely in about ten minutes for a nice hard shell).
How about that orangey paneling in the background? Are you feeling inspired yet?
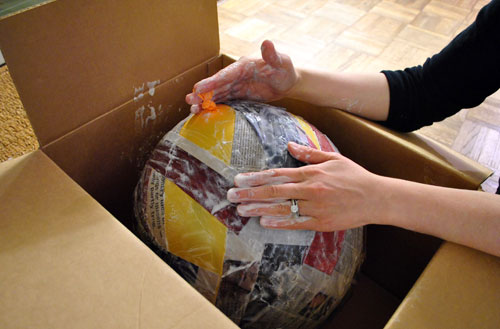
Anyway, then I popped the balloon which slipped out really easily, leaving me with a large hollow piñata-ish thing (which still wasn’t breaking any hearts in the looks department):
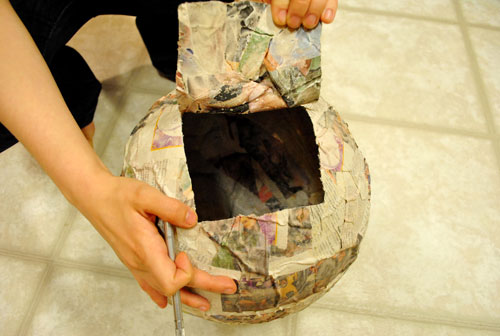
I turned it over (with the bottom of it facing up) and used an exacto knife to cut a little “exit flap” for all of the treats to fly out of:
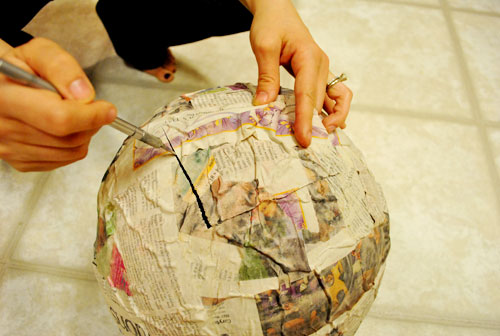
Here it is opened so you can see what I mean:
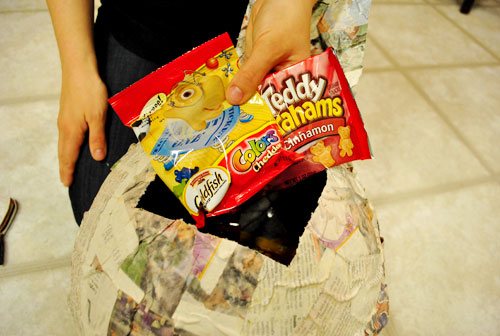
Then I added our kid-friendly treats. We didn’t want anything too small and choking-hazard-ish going on, so we went with crowd pleasing packs of Goldfish and Teddy Grahams.
Once they were inside I used a hole puncher to make nine holes that I’d use to attach nine pieces of ribbon (since there would be nine kids coming who I figured might want to get in on the fun):
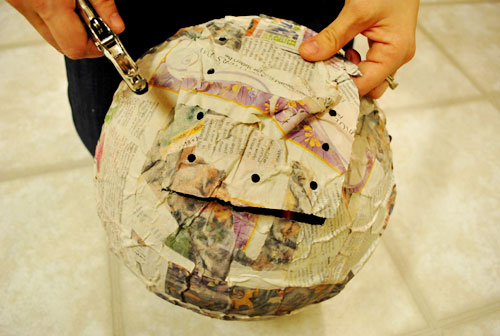
I cut nine 30″ lengths of curling ribbon and treaded them each through the holes so they could be duct taped down on the back of the flap.
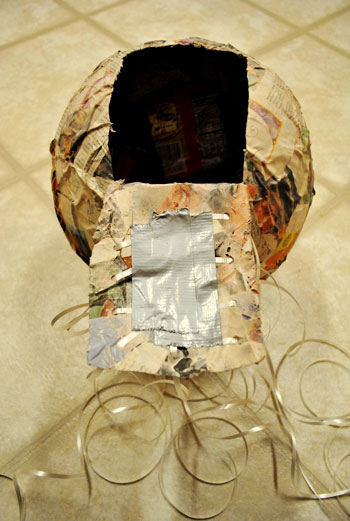
Then I realized that in order for my flap to stay closed with all the weight of the treats inside (since this was the bottom of the piñata and gravity wasn’t on my side) I would need smaller flaps of cardboard to hold it closed. So I used more duct tape to secure those smaller flaps to the opening…
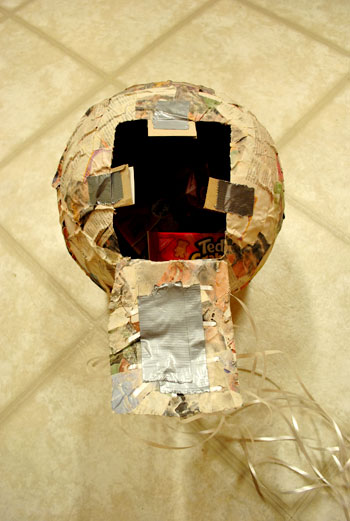
… so that my large flap could be slid in behind them and held closed by those handy smaller tabs. It worked but I’ll admit it- at this point it was looking pretty grim. Have you ever seen an uglier piñata? I said a little prayer that tissue paper could cover a multitude of sins.
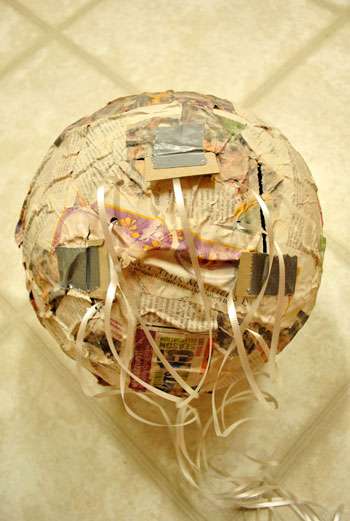
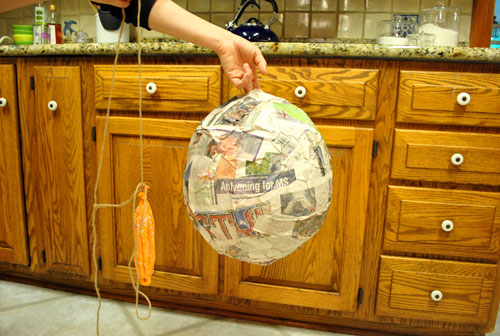
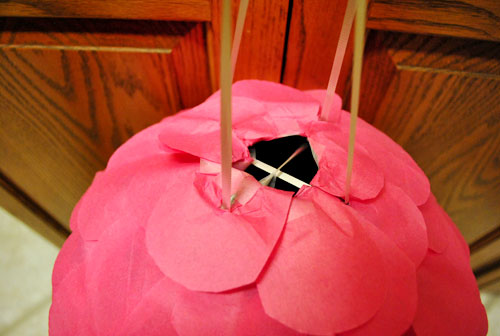
Since the balloon was no longer inside, I had nothing that the piñata was hanging from anymore, so I folded four 4″ pieces of duct tape around the top hole (to reinforce the paper maché shell) and then used my trusty hole puncher to create four holes through the duct-tape enforced areas. Then I used two long pieces of ribbon (which Burger was mildly interested in) and looped each one through two of the holes (the ones that were opposite each other) and tied them off at the top to create two long loops that were the same length. I figured that was stronger than trying to knot four of them inside of the piñata or something, and it really did turn out to be nice and secure.
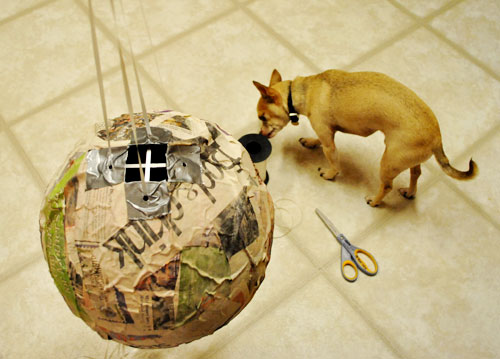
With my heavy duty string-it-up system going on, I looped my two long strings over those weird eyeball cabinets in the kitchen (so they could watch- more on those here). This enabled me to have two free hands to start adding little pink fish scales in the hopes of saving The World’s Ugliest Piñata.
It only took one 99 cent pack of pink tissue paper from Target, which I folded and then cut little scales out of (by folding it I was able to cut out a bunch at a time, and soon I was left with a big pile of them). Oh and on the subject of budget, that was all I purchased for this project since I had the ribbon already and the newspaper and paper maché paste (flour + water) were free since I had those in the cabinet and the recycling bin. Oh and the multi-packs of Goldfish and Teddy Grahams were $7 all together, so this whole project came in at under $8.
But on to the fun stuff – the fish scaling step. As I mentioned yesterday, the design was inspired by this one that I pinned on Pinterest a while back. So I figured that taping the scales from the bottom up would hopefully yield the same sweet (and semi-finished looking) results as my inspiration piñata (and yes, I just snickered at the use of “inspiration piñata” – what an insane sentence).
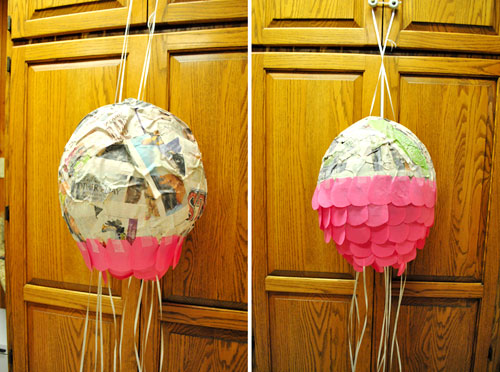
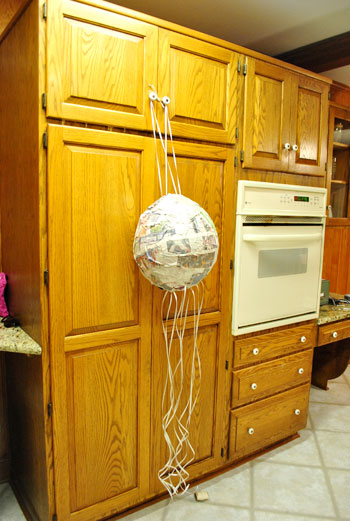
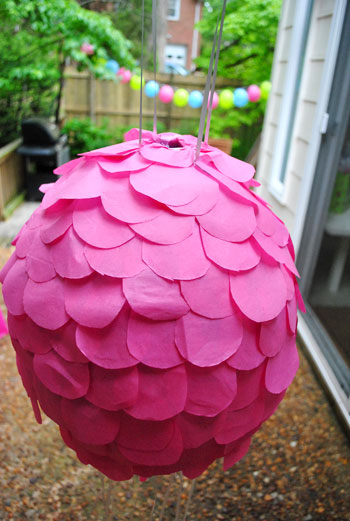
I just worked my way around in rows, gently twisting the piñata as I taped around it on all sides (using regular old scotch tape), and moving up from the bottom slowly – row by row. I was left with a pretty cute result. Definitely something at least 5,000 times easier on the eyes than the mess of newspaper and duct tape underneath it all. As for the top, I just folded the top scales into the hole and taped them to the inside for as polished of a look as I could manage (I knew it would be hung pretty high so no one would likely see the top, but I’m weird so I still tried to make it look ok anyway).
Isn’t she kinda cute?
It was definitely lots o’ fun. So that’s how I started out making a record-breakingly ugly piñata and then tried to course correct with some sheer determination and a pack of tissue paper. Hope anyone at home who decides to follow suit ends up with something at least this sweet (and most likely a lot sweeter).
Good times. Have you guys made piñatas or other homemade party games (cornhole? pin the tail on the donkey?). Share and share alike.
Psst- We’re over on BabyCenter sharing the play by play for making cheap and easy balloon garlands here. When it comes to festive party bang for your buck, it doesn’t get much simpler than those.

Sally says
When my 12 year old daughter was little, we did a Dora the Explorer party. I drew a picture of Dora on a larger poster board. Then I printed out coloring book pages from the internet of her backpack. One activity at the party was for each child to color their backpack. Then we used them to play pin the backpack on Dora. My daughter still talks about that. When my 20 year old son was little we did something similar with a space shuttle theme. Homemade is the best!!!
Love the pinata. At the middle school I teach at, one of our Spanish teachers has the students make pinatas for an extra credit project. One day she has a fiesta with the students, and invites the other teachers to stop in her room and judge the best design. I have seen some great creations over the years.
YoungHouseLove says
That sounds like so much fun! Love the Dora/backpack idea too!
xo,
s
elaine K says
I made a pin the hat on Madeline game for a Madeline party years ago. I like the string piñatas. My son had a Barney piñata eighteen years ago and none of the 3 year olds could break it so we had to have them close their eyes and say the magic words (“shimbaree, shimbarra”!)
YoungHouseLove says
Hahaha, hilarious solution. And I love the hat on Madeline idea.
xo,
s
Andrea says
What a cute project! Thanks for the tutorial! I have say though that I cringed a little when I saw you smearing on paper mache goo in your wedding rings! Ack! How do you clean them?
YoungHouseLove says
I never take them off – but the funny thing is that flour and water must be some sort of organic ring cleaner because after I washed my hands my ring was sparkling like crazy!
xo,
s
Sarah says
I couldn’t help but to notice how much your pinata looks like the broken bells album cover!
http://i773.photobucket.com/albums/yy20/finggphotob61/B61/B64BrokenBells-BrokenBells2010.jpg
YoungHouseLove says
That’s too funny! I definitely see the resemblance.
xo,
s
heather says
In being reminded that your kitchen cabinets have “monster eyes” from a previous post, it makes this post more hilarious. Especially with the pinata hanging. Maybe I’m over tired but it looks like it laughed hysterically and shot milk out it’s nose. HAH.
YoungHouseLove says
I TOTALLY SEE IT.
xo,
s
tiffany says
such a great tutorial on making a pinata, love the step by step photos! totally saved it for a future party date…
Alanna says
it turned out great! i actually had to make a pinata in spanish class back in high school many years ago. but instead of fish scales i crunched tiny squares of tissue paper around the end of a pencil and then used glue to attach the tufts of tissue paper to the pinata. it took forever! fish scales would definitely have been easier!
April says
Love it! Thanks for sharing, I’m going to do this for my daugter’s 4th birthday but with hot pink, purple and black scales. So excited as bothe her and my husband have been wanting to do one!
Donna Huebsch says
The pinata turned out so cute – it looked all girly with the pink tissue paper scales and curling ribbons. I can’t believe I am planning our daughter’s 16th birthday party – time flies!
Mrs.Buck says
I’m totally filing this in my folder called “things awesomely creative people online are doing that I should try some day too”
Dumpster Rental Pros says
My little girls birthday is coming us and she will think that is the coolest thing ever. She’s turning 3 and loves pink. Something like this for her and her cousins will be a lot of fun.
Sofie says
So pretty!
Courtney says
So funny you mentioned cornhole. My dad and my boyfriend have been making cornhole boards all weekend and every day this week–They finished up their second set of boards last night..Oui.. My birthday is coming up and they thought it would be the perfect gift for me. So sweet. They bought me black and gold/yellow paint so their vcu alum (me) could paint it and exude school pride every time we play.
My dad is an engineer (a perfectionist and has every tool known to man). He found directions online, printed them and put them in a binder.I laughed out loud.. My equally crazy perfectionist boyfriend was in heaven when he saw it. I’ll send you pics when they are finished!
Note- I helped on Sunday and it was a lot more work than I thought it’d be..and the entire time I just kept thinking about John and the console table behind Karl..Props to him for doing all that hard work and making such an amazing piece..
susan says
I actually made a pinata out of a paper bag. Kids decorated the outside. They were old enough to whack it so a good time was had by all. It was ugly…not cute like yours:) susan
Heather says
For my son’s fourth birthday I made a pin the plate on the stegosaurus game for his dinosaur themed party. I found a black and white clip art stegosaurus that I modified in photoshop. I colored the picture to coordinate with our other party decorations and removed a plate from the dino’s back so that there would be an obvious spot for the kids to try to stick the plates. I also remembered to “save” the plate that I removed from the dinosaur to a separate file so I would have a plate to print out for each of the kids to try to stick on. I uploaded my stegosaurus to http://www.blockposters.com (free site) to make it nice and big on the wall. Then I printed a bunch of copies of the lone plate on lightweight cardstock. I used double-sided photo squares for sticking the plates. I stuck one side to each of the plates in advance and wrote each child’s name on a plate. At the party I just had to peel the backing off of the photo square, blind fold and spin the kid, and hope they hit the target. The game was so fun that my son requested we do it again for his sixth birthday, which was dinosaur-themed for the third straight year!
YoungHouseLove says
That sounds like so much fun! What a creative spin!
xo,
s
Mary says
You both are awesome and fun parents!! I am inspired to try this for my
son’s upcoming 4th birthday!! I am thinking of filling it with those little
temporary tattoos and maybe a little baggies with a simple diy craft inside!! An activity and favor all in one! The kids love making their little
creation and the parents get to treasure their little ones art work!! You
know the only problem here is that you set the bar high for birthday number 2!!!! Lol!!
Susan says
Am I crazy, is Clara not in the video pulling the pinata?
YoungHouseLove says
She was nearby (in Grammy’s arms) watching the whole thing with a big smile on her face. It turned out she liked being the “observer” better than a “tugger.” Haha.
xo,
s
Lauren says
I have been following your blog for quite some time now, and I have to tell you that although I love you…my husband is a bit miffed.
Everytime I read a post I turn to him and say “I’ve been thinking…” (which is code word for I’m going to plan a project and you’re going to have to help me with it). After reading this last post I told him that although our little girl is only 3 months old, I like the idea of your party (color themed rather than cartoon characters or filled with crazy expensive stuff) and would like to do something similar for our Meredith.
He rolled his eyes and said “you’ve been reading younghouselove again, haven’t you! Everytime you read their blog, I end up doing work” hahahahaha
After looking at the post, he agreed that you guys are awesome and he likes the party idea too :)
So, I wanted to say thanks for filling my head with great ideas, and my life with banter material :)
YoungHouseLove says
Aw that’s sweet! We hear that husbands get annoyed with us for “planting ideas in their wives” pretty often – haha. So I’m glad we’re not on your hubby’s naughty list anymore – at least for now.
xo,
s
Erica says
I just read this morning in the new Martha Stewart Living magazine that she covered round paper lanterns with the same scales as you did for the pinata and when it was lit up it looked beautiful to hang over a table or outdorrs!! Just wanted to pass that along!
YoungHouseLove says
Oh yeah someone shared the link and they looked so pretty! Such a fun idea!
xo,
s
Lindsy says
My husband and I made our own bags – er, cornhole? – game for our wedding reception. He and my dad built the structures and then we painted and customized them with our initials. Of course, I had to make matching bean bags. They were a big hit! You can see pictures here:
https://picasaweb.google.com/114244055326118201892/WeddingReception?authkey=Gv1sRgCIm3yNjp2MDY0gE#5607821188369777170
https://picasaweb.google.com/114244055326118201892/WeddingReception?authkey=Gv1sRgCIm3yNjp2MDY0gE#5607820709549842530
YoungHouseLove says
That looks like so much fun!
xo,
s
Erin J says
Love the pinata – even love the idea of a couple of differently sized empty ones for a decoration.
Not to get into the shoulda, woulda, couldas, but would it have worked to accordian fold the tissue paper and cut a scallop instead of individual scales (leaving a solid strip at the top) so that you could attach strips of scallops rather than each individual scale? Maybe at least for the majority of it ad maybe you would need to do individual scales for the top few rows? I’m just thinking it might be a bit easier and just as cute! You know – for next time!
YoungHouseLove says
Oh that’s a great trick! Never thought of that!
xo,
s
Amanda Wells says
I’m so impressed! The scales turned out adorable!
http://www.amandadovewells.com/?p=476
Stephanie B says
Love all the ideas!! We did a luau for my daughter’s first birthday and it rained like a monsoon! For her 4th b-day party last month, I didn’t have the time to make a pinata for my daughter’s but I got a cheap-o one from the dollar party store and then gave it a makeover:-) I used my Silhouette cutter to make a Hello Kitty face for both sides and then added her name and some glitter to it. My sis made a giant hello kitty painting on a big piece of cardboard so the kiddos could play “Pin the Bow” on Hello Kitty.
YoungHouseLove says
Haha, that’s cute!
xo,
s
Carrie says
It might just be me, but the piñata really reminds me of Clara’s chandelier! The pull-string idea is great.
Love the patio and coinciding tutorials! Awesome work :-)
Niña says
Hi Sherry!
The Piñata you made is absolutely pretty and I love it. You know what, we also have our Filipino version of Piñata. We call it “pokpok palayok” and it is made from clay.
YoungHouseLove says
I never knew that! Sounds fun. I used to love playing with clay when I was younger!
xo,
s
Blanca A. says
that pinata came out so pretty :D also, i know you never take off your wedding ring, so what do you use to clean that big rock ? anything special? i would die if i dipped my ring in anything.
YoungHouseLove says
I just use a toothbrush with some very mild soap (usually Dr Bronners or Mrs Meyers). Seems to work until I do some other project and it gets dirty again. Haha.
xo,
s
Heather says
I think this looks like a cross between Clara’s piñata and the light in your bedroom. Best of all it was a DIY for less than $12!
http://www.apartmenttherapy.com/chicago/look/look-pendant-lamp-makeover-for-under-12-073260
YoungHouseLove says
Pretty!
xo,
s
Heidi P. says
Hi! First I have to say that I love, love, love your site. I think this is my first time commenting, but I’ve been visiting for a month or two :). Anywhooo, after reading your “how to paint anything” post about the Rust-oleum paint on your patio chairs, I decided it was time to take on our older-than-my-husband coffee table (no joke, older). And because we’re having a bbq here on sat w/ his co-workers. Unfortunately, it’s been cold and rainy, which has me worried that it’s not going to dry in time. But a blow dryer… think that’d work? Should I try to do a protective minwax coat, too? And do I have to wait for the Rust-oleum to dry comPLETEly before doing polyacrylic?
Thanks in advance for your help!
p.s. Awesome pinata.
p.p.s. I just noticed an itty bitty smiley face at the bottom of your site! That’s so cute!!
YoungHouseLove says
I wouldn’t do any minwax or polycrylic because Rustoleum doesn’t need a sealant (it’s made to be the top coat). As for the blowdryer, I’m not sure since that’s high heat and it might actually make it take longer for the paint to cure. I would just try to keep the furniture out in the sun as much as possible so it can cure (of course bring it in if it’s going to rain).
xo,
s
Gloria says
Thank you so much! I threw one together (literally – started Sat with the party on Sunday) for my three year old son’s party. My 9 year old daughter helped me with the paper mache and the blow drying, and her twin helped decorate it. It was a fun family project.
We had the tornado sirens going off (here in MN) at the beginning of the party, so needless to say we did not go outside. When it was piñata time, my husband just held it up high, and we had seven little boys pull the strings. The loved the fish crackers and teddy grahams, and so did their parents. Thank you for a super easy, cheap, and really fun party idea!
YoungHouseLove says
So glad it all worked out! Sounds l like lots of fun!
xo,
s
Jody Bell says
Hi Sherry, Saw in June issue of Country Living a DIY honey bee pinata, and thought of your 2nd bday party aspirations for your daughter.
YoungHouseLove says
Love that so much! I already pinned it on Pinterest for next year’s party! Haha.
xo,
s
Christi says
I would love to archive this WONDERFUL idea, but I can’t see a “print” link. Help ;)
YoungHouseLove says
So sorry- we don’t have a print link. Maybe try cutting and pasting or just printing the page or something? Anyone know?
xo,
s
Lacey says
Hi Sherry!
I’m planning on making your pull string pinata for my daughter Margot’s first birthday. We’re having an owl theme, so I’m adding a couple of googly eyes and an orange triangle for a nose. But, I was wondering when you made it? A week before or just a few days ? I want to have it ready and not be in a rush, but after it’s dry should I be okay to store it somewhere for a couple of weeks? Is that too long?
Also: CONGRATS on your feature on Ohdeedoh.com! You guys are a sweet family and an inspiration. Quite deserved! My shop has been featured on Ohdeedoh too (Gaga). I always see toys we sell in little Clara’s hands. Like the punch and drop by Plan Toys. My daughter loves that thing!
Keep up the great work!
YoungHouseLove says
Aw thanks! I made the piñata a day before, but I bet if you carefully stored it you could make it a few more days in advance and maybe even a week. Good luck!
xo,
s
Lacey says
Thanks so much! Now I know that I CAN procrastinate a little longer ;)
Alison says
What a cute idea to make all the strings attached so all the little ones open the pinata at once! I never thought of that before…I always make it so only one string opens the pinata and the others are just loosely taped on. It looked like it was more fun for the kids—less competition and more team work and happiness!
SD DealsnSteals says
this is SO great!!! I am TOTALLY doing this for my littlest’s first birthday in June!! THanks for the great tutorial!
Zoua says
Just saw this tutorial on Tori Spelling’s website!
YoungHouseLove says
Oh yeah, isn’t that crazy!?
xo,
s
Carrie N. says
I wanted to tell you I just made this for my daughter’s second birthday party, based on your instructions. It was easy and looks adorable! Thank you so much for posting. (Oh, and one thing that helped us was to wrap the balloon in a sheet of dry newsprint and tape it down with masking tape first, so that the paper mache had something to stick to).
Erin says
I am going to make this exact one for my little girl’s bday party. Only I am going to add a green topper to make it look like a strawberry! crossing my fingers :)
YoungHouseLove says
Aw, good luck Erin!
xo,
s
Monica says
I love love love this idea! I looked this up yesterday morning while at work! Soon as I got home my husband and I got to work on a piñata! Our daughter’s party is tomorrow and I’m so pleased with the results!
Keena says
Im so glad I found this tutorial!!! I cant wait to make this for my daughter’s 5th birthday party!!! So happy that I can personalize it with our colors & theme!
AineMistig says
Brilliant! Exactly what I was looking for. We’re having a part with kids ages 2 – 7, so I wanted a pull pinata, (no bats with babies around!) but I wanted to make one look like a pumpkin. All the other pull pinata tutorials I saw used round, flat designs made of cardboard boxes — but I had already picked up those same jumbo balloons to make a round paper-mache one! And then, ta da! I found your tutorial! You even have a solution for “how do I keep the bottom from falling open from the weight of the prizes?” I’m going to make mine where most of the pull strings don’t open it to keep it interesting for the older kids, with only one or two “winning” strings. (hopefully, those don’t get pulled first!) Thank you so much for posting!