Sherry’s junk drawer switcheroo was actually just the beginning… the beginning of our kitchen makeover. At least the first phase of it.
With our self-imposed six month waiting period running out earlier this month, we finally started putting some plans into action last week (we like to force ourselves to live with things for a while before doing anything drastic – you know, so we’re sure to remove/demo/open the right things after some thought). The plan: to do sort of a “Phase 1” kitchen makeover where we work with as much of the existing kitchen as possible first (aka, keep the cabinets, the countertops, the vinyl floor, the paneling, the beams, etc). Then down the road we’ll enter “Phase 2” (where we do a more invasive reno after saving our pennies and really thinking about what we want/need and what we can keep/work with). But for now we’re happy to ride the Phase 1 wave (and see where it goes and how much our “refreshed” kitchen will meet our needs before jumping the gun on Phase 2 down the line).
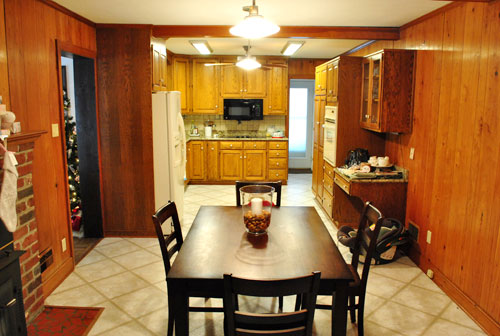
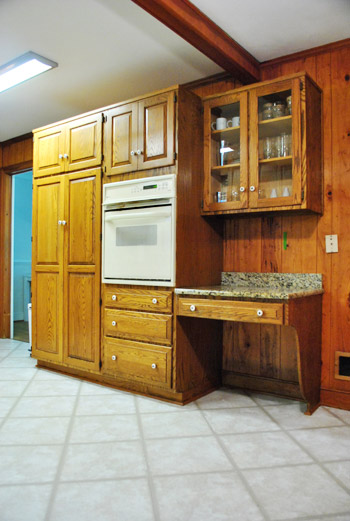
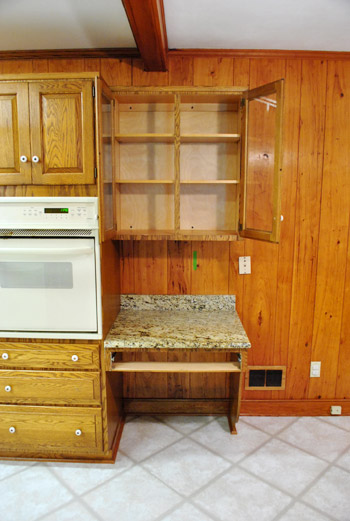
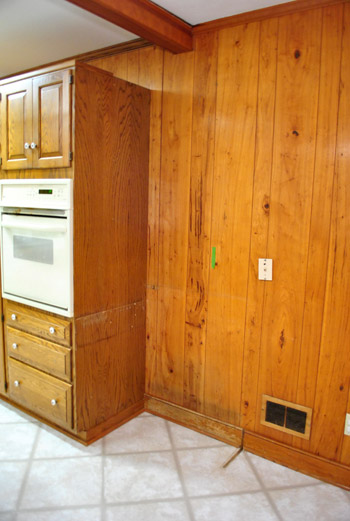
Here’s a taken-recently shot of the kitchen as it looks now for reference.
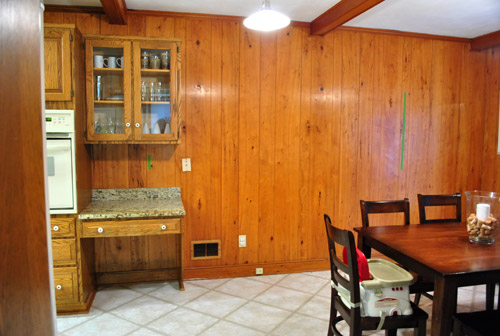
And here’s a taken-a-long-time ago shot from the other direction (see the stockings and the tree?) to refresh your memory. Apparently we don’t take many photos of the room from that direction, so this one is the most recent:
And now here’s the Phase 1 breakdown. Even this first phase has a lot of steps to it, so it won’t necessarily be a quick task (we plan to tackle it on and off as we have the funds/energy). But here’s a quick rundown of what we want to eventually accomplish (not necessarily in this order):
Remove woodstove insert from fireplace<– done herePrime and paint fireplace<– done here- Remove the desk area to the right of the oven to make room for a nice wide doorway into the dining room (we’ll be adding an island so a desk is redundant)
- Prime and paint all that dark paneling
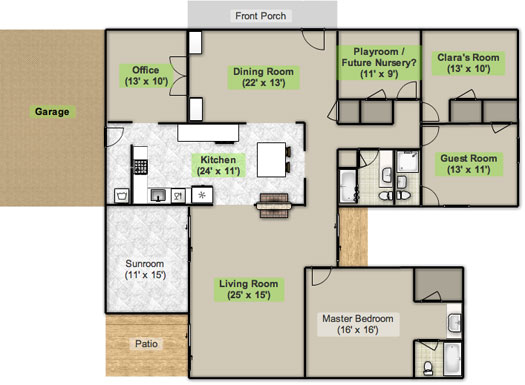
- Open the aforementioned double-wide doorway between the kitchen & dining room (which will line up with the big dining room window for balance – so it looks like it has always been there) <– we’ll need a pro and a permit for this
- Swap the too-low-hanging microwave over the cooktop for a proper hood (the current microwave isn’t to code and causes steam to go everywhere but into the vent)
- Replace the wall oven with a wall oven/microwave combo
- Prime and paint the cabinets
- Completely redo the backsplash
- Overhaul and update the lighting (buh-bye florescent lights)
- Add an island full of storage and seating space where the current kitchen table resides (since the wide doorway to the dining room will make large gatherings at our big round table in there nice and convenient)
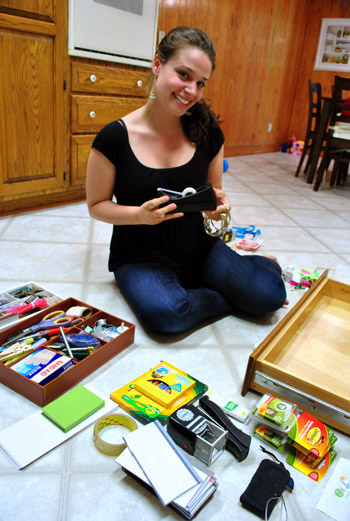
So as you may have guessed, Sherry’s junk drawer shenanigans were all in preparation for removing that desk area and the cabinet above it. Why? Because our future mega-doorway will slice right through it otherwise.
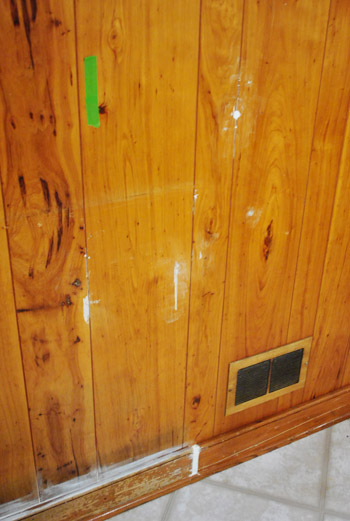
Can you see below where we’ve begun to tape off the future opening with green painter’s tape? We actually have had those pieces of tape up for months- just to live with them and see if we like that placement. And after 60+ days of consideration we’ve come to the conclusion that it’s the perfect location for the doorway, since it’ll open up the kitchen to the dining room while mirroring the width of the front window in the dining room on the other side for some nice balance. We don’t mind losing that one upper cabinet and desk area for the sake of a nice open kitchen and dining room along with a much larger island full of storage (and desk-ish usage if the mood strikes).
Obviously we could have worked around this cabinet if we wanted to, but so far that desk has only served as a junk magnet (kind of like the kitchen table that we’re desperately trying to keep clear). And we’re not short on upper cabinet storage at the moment so there’s lots of room for stuff to relocate (and you already saw that we had a few empty bottom drawers to put to use here):
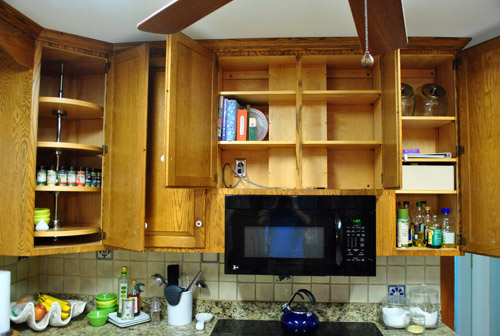
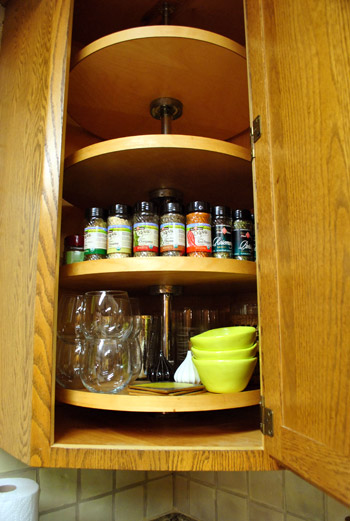
In fact, we had no problem transplanting all of the things in that glass upper cabinet (full of obedient items according to the wife) into our mostly bare lazy susan’d cabinet. Here they are all packed into the bottom tier (with upper space to spare):
Not to mention that once we add a nice big island we’ll have tons more when it comes to stash space in this room. So with the junk drawer and upper cabinet all clear, we were ready for this little slice of our kitchen to come down. Like yesterday.
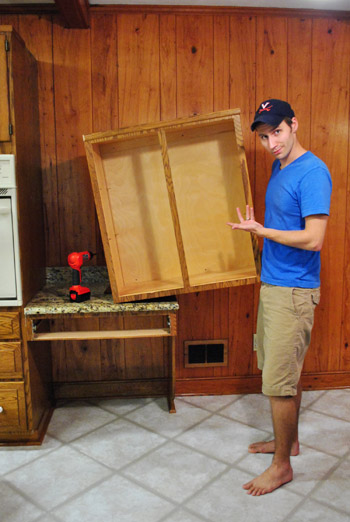
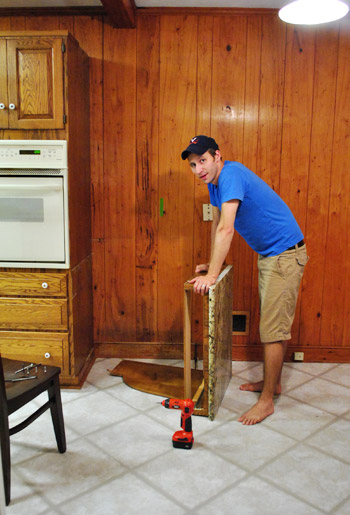
The upper cabinet was a cinch. First we removed the doors so there was no shattering of glass or slicing of body parts in the process. We’d like to find a use for these (we love a glass-fronted cabinet) – though they unfortunately don’t fit any of our other kitchen cabinets for a quick switch. Boo. Might rehang the whole thing in another room though. We’ll keep you posted.
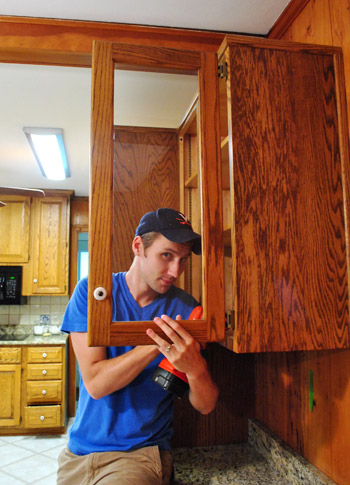
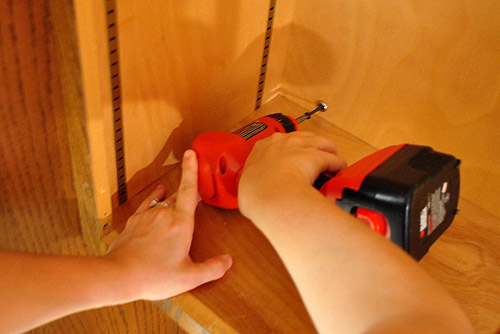
Then I supported the weight of the cabinet while Sherry unscrewed it from the wall and the cabinet next to it.
And just like that, the cabinet came down in one remarkably light piece. I was so unphased by the task that I even broke out my smirky Vana White impression. Look at that creepy lopsided half-grin. It reminds me of a face that Mystery (aka: The Pick Up Artist) would make. Anyone remember that show?
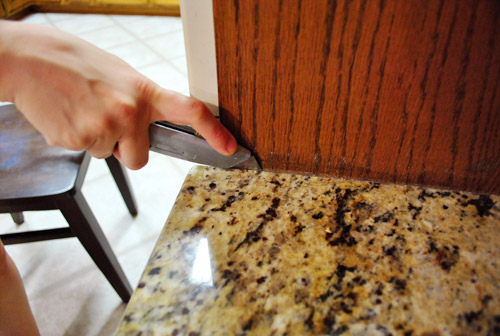
So the top cabinet was a cinch. But the little desk area below was a slightly different story. Sherry approached it the same way that she removed the granite backsplash from our bathroom (seen here). First she used a razor to slice through the silicone caulk holding it in place.
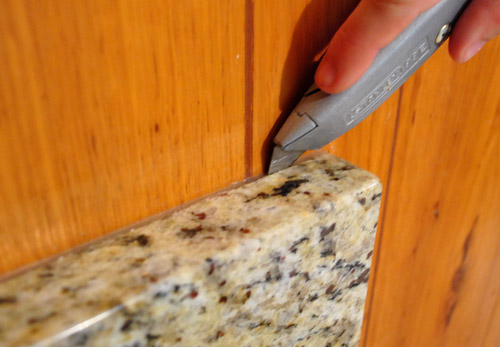
The backsplash part came off pretty easily (with a little prying with a screwdriver and a hammer used chisel-style to get behind it).
Then Sherry sliced the clear caulk holding the counter to the wall as well as to the other cabinet and the drawer below it – assuming it would just lift right off.
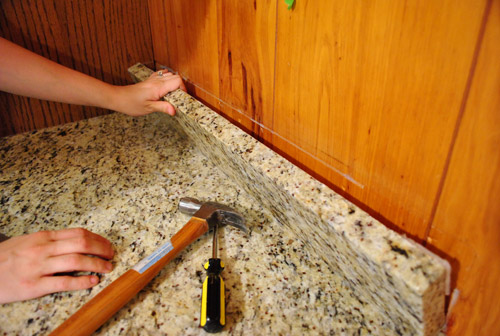
No dice. We tugged and shimmied that sucker with all of our might. We sliced the caulk again and again. We shimmied a few more times (just for good measure). And finally, in one strong tug, the whole thing (granite and drawer) tipped over onto the floor – nearly pulling us down with it as we struggled to keep it from slamming to the ground. Man, granite is HEAVY. This is my tired face. Note: Wear shoes when demo-ing. Barefoot = stupid and not recommended. Shame on us.
But at least everything was gone (and we still had all of our toes). There was some residual damage left in its wake – like some missing trim and some glue on the remaining cabinet. Both are semi straightforward fixes (we just have to scrape off the glue, use wood putty to fill holes, sand and stain things to match, and add back the missing trim up top).
Since we eventually plan to paint the cabinets we may not even bother with all the sanding and staining, but we’ll definitely tend to the trim.
The most notable “damage” was the hole in the floor where the leg support once sat. We had hoped that the flooring went under the desk’s leg, but nope:
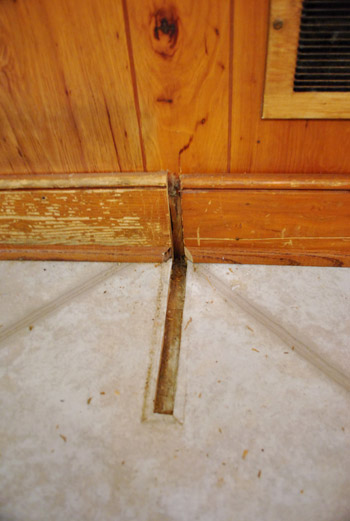
Lucky for us, the previous owners had left some spare vinyl floor tiles behind. So all I had to do was scrape up this old damaged tile (which was VERY thick, by the way)…
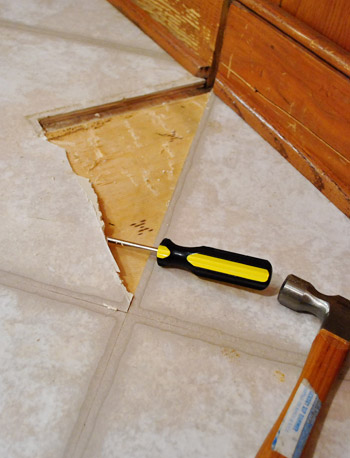
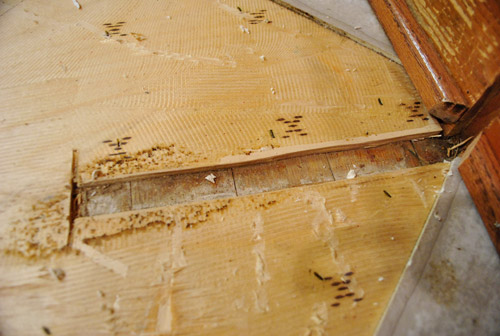
… to reveal something very interesting indeed: original hardwood flooring (wahoooooooo! picture me doing flips and cartwheels and clicking my heels in the air) underneath a thick layer of plywood. Perhaps I should add “restore old hardwood floors” to our kitchen to do list? Nah… that’s more of a Phase 2 project since it’ll necessitate removing all the lower cabinets and appliances which sit on top of the vinyl and plywood layers. Plus we’re not certain it runs all the way through the kitchen (this part of the room used to be a family room, so it stands to reason that there’s not any hardwood under the main part of the kitchen – I guess time will tell).
But back to the floor tile replacement task at hand. After I removed that tile and went crazy over the hardwoods, I just measured how much of the tip I needed to cut off of my replacement tile, and then used a razor to make my cut:
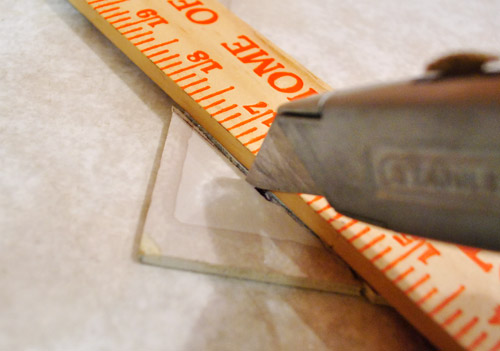
This isn’t the type of vinyl tile with a peel-n-stick base, so I just relied on the leftover glue residue on the plywood below (of which there was plenty) and slid the new tile into place.

Then we sat Clara’s carset on that tile for a while to hold it down while the glue took hold. Now it’s nice and secure. And it looks like new, right?
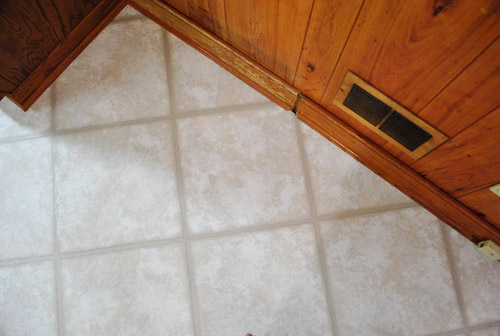
Well, except for that gap in the molding. But luckily I was able to reuse a perfectly sized piece of quarter round (that had been nailed to the front of the desk) and Sherry broke out her mad spackling skills to bridge the gap in the baseboard (along with some other cracks and holes in the paneling).
Of course, had this part of the baseboard not been on the “to be removed” area of the wall (our doorway to the dining room will be right here), we probably would’ve gone the more professional route (buying some baseboard, cutting it to fit, and nailing it in instead of caulking the gap). But this works for now since it’ll all be gone-zo when we open up the doorway to the dining room anyway.
And now that we’ve got this cabinet gone and those ugly caulk spots all over the wall, I guess that means it’s time to prime and paint (we learned that opening up the wall calls for a permit – which might take a while – so we’re happy to brighten up that dark paneling in the meantime). Sayonara dark paneling. But more on that later… well, sooner rather than later if all goes well. In fact, we’re probably priming as you read this.

Kristen @ Popcorn on the Stove says
You can’t even tell that you replaced a tile! Amazing! And I can’t believe how easy the desk area came out. If you can’t find a place for the cabinet, you can always use it as a small bookshelf somewhere. Or maybe when you make your entertainment center/tv stand, you can reuse the doors there.
cafenoHut says
I am awaiting the last version excitedly…
Krysta @ Domestic for Dummies says
I am so excited you guys decided to start on the kitchen I can hardly contain myself! I know you are all about DIY but I am still curious if you are planning on taking the wall down by yourselves or hiring someone?
YoungHouseLove says
It’s a load bearing wall, so we’ll need a permit and a licensed contractor. We’re happy to rely on the pros when it comes to keeping the house from collapsing- haha.
xo,
s
Melissa says
That is so exciting! Can’t wait to see the spruced up paneling!!
Cherie says
so exciting! can’t wait to see it painted!
Kerri says
Ahhhh I am so excited for your kitchen transformation!! It’s what I’ve been waiting for all along since you bought the house :) :) I’m especially excited for the budget-friendly/renovation lite phase because it’s most likely what I’ll be doing with my own kitchen later this year. Can’t wait to see what you guys do.
Taylor @ TheProposalEnthusiast says
I am so excited for the kitchen reno to start! Can’t wait to see more of your progress! Good Luck!
Amber says
I have been waiting for you to takle the the kitchen! I can’t wait!
rhiannon says
ME TOO. since day 1. i was like, “forget the living room, do you see that wood panelling?”
Jessica says
How exciting!! This is one of the makeovers I’ve looked forward to the most! Although it’s bittersweet…I know from experience just how much work this room is going to be.. with that said, Happy Priming! :)
beth says
Woo to the hoo. I can’t wait to see where this goes :) We painted cabs in our last house and I’m eagerly awaiting your process on your cabinetry, because I have 80s oak cabinets (with cathedral style uppers…uggggh) that need to be dealt with sometime soon. They are excellent quality cabinets, so at least not builder’s grade oak…but they are most definitely OAK. I’m really, really excited to see you start the kitchen.
Brittany says
Yayyy!! SO excited for your awesome progress guys : ) I can’t wait until we get to see the paint on the walls…it’s gonna be great!
Amanda @ Our Humble A{Bowe}d says
Wahoo for kitchen progress! I’m impressed that you guys didn’t start painting earlier. The paint will make a huge difference, too. We’ve lived with our kitchen for five years and we’re hoping to get crackin on it this fall. A complete gutting, including opening up a wall. We started by removing annoying cabinets, too: http://ourhumbleabowed.wordpress.com/2011/05/16/guess-what-we-did/ That made us feel so much better, too.
Elisa says
I thought that too (painting earlier) but when you have a billion people reading your every move I’d be patient and make sure it was *exactly* what I wanted too. Hah!
J & S — how long did you wait to start your kitchen reno in your first house?
YoungHouseLove says
About a year and a half actually. We’re so glad we waited or we never would have thought about closing the doorway to the old dining room and adding a dining area to our long living room (which enabled us to gain a whole wall of cabinetry and an a whole extra bedroom). Waiting is so hard, but it can really help you think through more possibilities than those obvious first-thought ideas.
xo,
s
Kate says
Yay! Its 1.30am Tuesday in Wellington, New Zealand and now I know the actual time of the previously, seemingly magical middle-of-the-night time when you guys post and am the first to post a comment. Love you guys! You are getting so much done you’ll have to buy another house before long! xo
Kimberly says
Oooohhh, I’m excited to see how it turns out!!! What color are you planning to paint the cabinets, or is it a surprise?
YoungHouseLove says
We’re thinking glossy clean white. Can’t go wrong with something so classic (can you tell we miss our old white cabs in our first house?).
xo,
s
Robin @ our semi organic life says
So glad we all get (almost) as much satisfaction as you both probably do. Can’t wait to see the progress!
Alyssa says
Lookin’ good!!! I’m loving the idea of opening that wall and have been wondering when you two were going to give in and start on the project:) Hope you’re having fun priming!!
Rachel says
Yeah! I love kitchen makeovers. Can’t wait to see your progress.
Kristin @ Ogo's Loves Nest says
Great progress you two! I think you chose the perfect spot. :)
Elisa says
Whoop whoop! Sounds like you guys have a busy week ahead… good luck!
Kristin says
Woohoo! Sounds so much fun, both for us to read and hopefully for you to actually do and write about!)´
We bought a microwave/oven combo for our tiny kitchen (two appliances would have robbed us of too much cabinet space) and love it. One less appliance to clean and maintain without losing any functionality.
Besides, I find it absolutely hilarious that John is starting demo’ing the kitchen in the new house just like the bathroom in the old house – with bare feet. Yoou should browse through your photo archives for more evidence on that topic… haha.
YoungHouseLove says
Oh my gosh- what’s wrong with us? Don’t try this at home folks. Wear protective footwear. Shame on us for setting a bad example.
xo,
s
Meghan, UK says
My first thought on reading about the next stage was that I was worried about your feet. What a bad example to blogworld you all are, tut tut!
YoungHouseLove says
We just added a “Don’t try this at home!” note. So sorry to set a bad example. As John mentioned, we just thought we’d be lifting off that granite top and carrying it about two feet before setting it down. Had no idea the whole thing would topple over! We’re happy to have all of our toes.
xo,
s
Cait @ Hernando House says
Haha I noticed that, too! But then, my husband and I started demoing our bathroom in flipflops.
Shunta says
Oh this excites me!!! I’ve been waiting for the beginning of this process and had a feeling when the fireplace was painted that the kitchen makeover was on the way!!!
JennyB says
How exciting that you have hardwoods under the flooring! Fingers crossed they’re in good enough shape to keep. Have fun priming and painting–can’t wait to see the results!
Ashleigh says
I’m so excited to see this stage of your house start. You guys are awesome.
Leslie Ann says
No, I never guessed that “Sherry’s junk drawer shenanigans were all in preparation for removing that desk area and the cabinet above it.” You guys caught me by surprise! How slick :P Also, I am so excited to see you guys get down to some serious renovations!! This is going to get fun :)
Giulia says
Looking great.I like how you try to keep things looking great in each phase rather than living with destroyed walls/baseboards etc. for months at a time. That can be so depressing.
What are you planning to do with that chunk of granite?
YoungHouseLove says
Not sure yet. Maybe cragislist? Or the Habitat for Humanity ReStore?
xo,
s
Dave says
save it you never know what your doing with a new kitchen layout may come in handy and granite is not cheap stuff.
Jenny says
I agree with Dave. Save it. you may need it just in case you decided to move something around in the kitchen. If not saving it then I suggest something cool like a backyard BBQ or backyard decorative piece.
YoungHouseLove says
Will do, it’s sitting in our dining room until we figure things out!
xo,
s
Alyssa says
I am so excited that you are starting on the kitchen! I’d love to see the color you choose for the paneling, and I really can’t wait to see what you do with the cabinets! My boyfriend and I have been looking for a house, and every time we see one online, we say to each other, “We can do so much with this kitchen! Remember what John and Sherry did with their kitchen?” Your site is going to be our #1 go-to spot for home improvement ideas :)
Lindsay says
Had you guys already removed the cabinet and desk when that first picture of Sherry was taken??
YoungHouseLove says
Yup, well it was in progress. I transferred the drawer after we demo-ed but before we replaced the tile and the baseboard. Gotta alternate between big projects and little ones. Haha.
xo,
s
Laura Hunter says
Can’t believe “Mr. and Mrs. Safety” are DEMOING a granite desk BAREFOOT! Holy geezers! :)
YoungHouseLove says
You’re totally right. We’re a no-shoes-in-the-house kinda place, so we forget – and we expected to lift off that granite slab and carry it a few feet (we had no idea it would topple over). But we always recommend proper footwear while demo-ing. Shame on us.
xo,
s
Harinee says
That’s interesting that you don’t wear shoes in the house – it’s common around here(Asia) but how did you guys arrive at that rule?
Can’t wait to see what colour you’ve chosen for the walls! Apple green??! Lime green? Give us a hint!
YoungHouseLove says
It’s semi-common in the US to have a shoe free household I think (when we had the baby we decided to really make ourselves take them off every time we walk in the door so we don’t track pesticides from the park (and goodness knows what else) onto the rugs that Clara lays around on. But the ideal solution to the shoeless home improvement thing would be to grab our very lesser used hiking boots and just put them on in those messy demo areas for the job (it’s not like they don’t get a little messy during that phase anyway- but then we give everything a wipe-down). Next time for sure!
xo,
s
Julia @ Chris loves Julia says
I think this is the post we have ALL been waiting for. Just me? Doubt it. Can’t wait to see how you transform this space!
Chris Loves Julia
Roshni says
Exactly! Every time you guys post a pic showing your kitchen, I used to get the heebie-jeebies, thinking when are they going to paint that awful panelling!! So excited now… waiting for the next post!!!
Leslie Ann says
I see you guys are looking at white cabinets. Do you ever find those get easily stained, from drips off the counter to splatters and fingerprints?
YoungHouseLove says
Ours were really easy to care for in the other house (over 3.5 years of them = no staining, even with a baby and a dog).
xo,
s
Rachel says
Our white cabinets are super easy to clean. Just choose kitchen-friendly wipeable paint!
Leslie says
You guys make things look so easy! The open wall is going to be so amazing! Will it be hard to move that heating/air vent?
YoungHouseLove says
It’ll definitely be a little extra speed bump, but we’ll be relying on the pros (since we need a permit and it’s a load-bearing wall) so we’ll have some help!
xo,
s
Sarah says
I’m in the process of kitchen reno as well – have you see the new Rust-Oleum products?? Cabinet and counter top transformation kits – so excited to try them! Thank goodness for a long weekend this week, I hope to get at least the cabinets done.
YoungHouseLove says
I’ve heard good things! Haven’t tried them for myself though.
xo,
s
lisa says
I have used the “giani” granite counter paint…It looks like we have granite countertops…looooooove it.
Dave says
look and have are not that same thing……..it will always be paint but hey whatever works for you.
lisa says
Dave,
Many people who have seen our “fake” granite countertops are amazed that they are not real.
So, they look amazingly good and we love the look.
Many people we know are goign to order the kit since they’ve seen ours.
Brandy says
Looks Great!!!
Hanna says
It’s a bit twisted — I can’t decide whether I am more excited to see the season premiere of Leverage, or find out what color you are going to paint your wall! Poor Leverage marketing department…
Looking forward to seeing your kitchen progress!!!
Sara says
Yeah! I’m so excited to see the kitchen makeover (both phases!) I’ve been waiting not so patiently for you to start working on this room. =) Kitchens are my favorite rooms to see madeover. Can’t wait to see how yours turns out, I’m sure it will be gorgeous.
Shreya says
Oooooooh – so excited to see how it all turns out – I cannot even begin to imagine how the four of you must be feeling! :)
meghan says
Holy smokes I’m so excited for this phase of the kitchen! As i’m sure you are…and Holy Smokes x2….no shoes during the granite removal? You have all your toes right?! EEK! :)
Leslie Ann says
You guys should definitely try to use that upper cabinet, because I need some ideas on what to do with the old cabinet we removed from our kitchen. If you have any ideas, let me know! (Though ours sadly are not glass fronted.) I think the cabinet would make great storage somewhere, I just don’t want it to look like its misplaced from our kitchen. I think the first step would be to paint it, since ours is faux-wood.
(Sorry for my commenting frenzy, the renovations have me excited haha)
myhonestanswer says
Great! I’ve been excited about your kitchen make-over since the day you moved in.
Bree says
YAY!! That wood paneling next to the cabinets is crazy! I’m so excited to see the paneling painted…such a big difference with just paint! AND a wood floor discovery!! What a lucky find!
Meredith says
Wow, congrats on starting your kitchen project. It’s so exciting once everything gets moving. I can’t wait to see how it turns out. I think the wide doorway will be dramatic and really open the space up a lot.
We just completed a kitchen renovation at our house. We kept all of the existing cabinets, but we painted them, added new countertops and appliances. It really makes a huge difference, we’re so glad we did it! http://newlywedmcgees.blogspot.com/2011/06/kitchen-reveal.html
Allison says
Looks like a great plan! Are you guys planning on taking that wall down, or getting someone else to do it? Is it a supporting wall?
Can’t wait to see everything as you go :)
YoungHouseLove says
It’s a load bearing wall so we need a permit and the help of a pro. Can’t wait!
xo,
s
Lauriane says
Looking good! and hardwood floors yay!
But John…. bare foot again?! while moving heavy things around? tsk tsk… :)
kathy from ct says
Why is Rachel McAdams cleaning your kitchen drawers?
YoungHouseLove says
Haha- I get that sometimes. Although now I get the girl from Game Of Thrones all the time. Which is kind of awkward since she’s so often naked on that show…
xo,
s
Paige says
You guys are so awesome! I was wondering how you were going to repair the piece of flooring in the kitchen. So super excited to see your kitchen progress. Have fun!
Whitney says
Couldn’t have come at a better time…We’re working on Phase 1 of our kitchen as well! Have the walls, trim, and ceiling almost fully painted and began sanding and priming the cabinet doors yesterday. It’s amazing what a shiny new coat of paint can do!
Debbie says
its exciting to see someones DIY skills. i would love to do more than decorate my homes, but w/ three residences & all of them down to the studs remodels on timelines, i just dont have the time…or the skills frankly. i am just finishing up the complete re-do of the kitchen in my lake property. its a log cabin w/ vaulted beam ceilings on four acres of the most gorgeous land. every room went down to the studs including the kitchen which has been by far the costliest room to re-do (coming in so far at a whopping $52,000) including moving & replacing all the plumbing, adding a gas line, new heated slate flooring, custom cabinetry, granite, stainless steel appliances w/ giant exhaust hood, rock backsplash & track lighting. the only thing i kept were all the logs (obviously.) i had nothing of value to work w/ from the previous owners. it was all garbage. so consider yourself lucky that you have that to work w/. cant wait to see what you are able to create.
fd says
now this is exciting!
and ahem, like others have said, demoing granite in bare feet. tut tut.
Rachel says
I laughed out loud about the Mystery smirk comment–and the face did look like his! Please keep referencing reality TV-you guys crack me up when you do!
Amber Kanady says
WOW..you guys are doing such a great job so far on your kitchen. I am also in the process of remodeling our kitchen and we can’t decide on cabinet colors etc. How did you guys decide on the cabinet colors for your old house?
YoungHouseLove says
We just looked at inspiration photos in magazines and online and took note of the cabinet color (9 out of 10 times it was white).
xo,
s