Happy Friday, y’all! We’re painting the foyer today (pics on Monday – woop woop!) but I realized that I forgot to share two bathroom related happenings. And one’s a giant oops moment, so this should be fun.
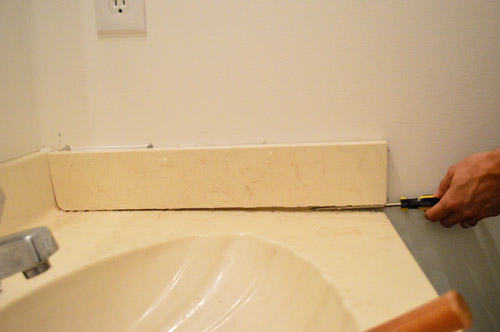
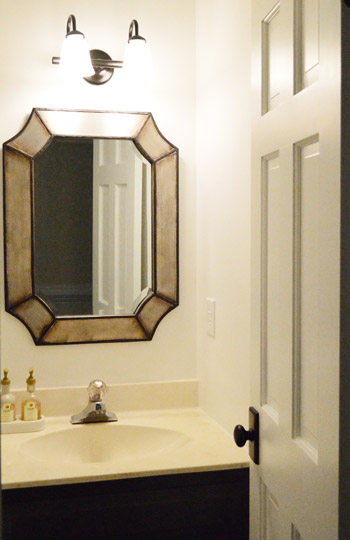
First of all, it’s fitting that this thing is called a vanity because I did a little surgery and removed its love handle. It’s hard to see in some of the more recent photos of the bathroom, but this one shows it loud and proud:

That slab of counter against the right wall just felt imbalanced to us, and it’s actually a pretty simple DIY project to remove it. So if you have a side-splash thing that you’re not in love with (most modern sinks these days don’t have them at all and the walls are just fine) here’s how we gave ours the boot.
First we fired up the ol’ liposuction machine manual screwdriver and shoved it under the side slab, trying not to dig into the top of the sink (remember you just want to loosen and remove the side slab, not ding up the sink underneath it). You can use a rubber mallet or even a hammer to tap the screwdriver under the panel along the top seam, bottom seam, or even the side seam like this:
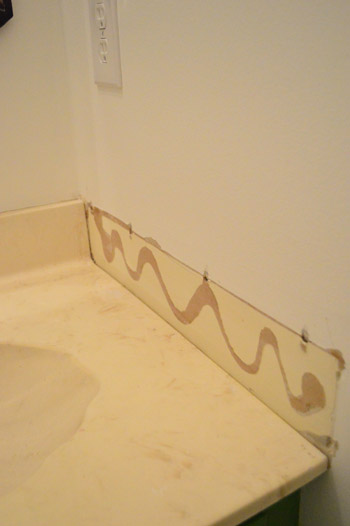
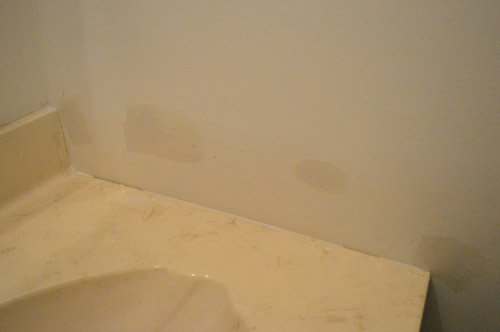
Eventually it got loose enough for us to yank it right off, although we were left with four puncture marks in our wall – along the top seam – where the screwdriver dug into the drywall.
Here’s where I said to myself: Self, don’t panic. Breathe in. Breathe out. You can do this.
I grabbed a sanding block, just to get off any chunks of glue or drywall that weren’t flush with the wall. Then I got my spackle and a 2″ putty knife (I like Dap Crackshot Spackling paste, not only because the name is entertaining but because it does the job). Using the spackle knife I just smoothed spackle over the entire area that I wanted to smooth out, building it up just a smidge beyond the wall in all areas so that when I sanded it down it would be smooth and flush again.
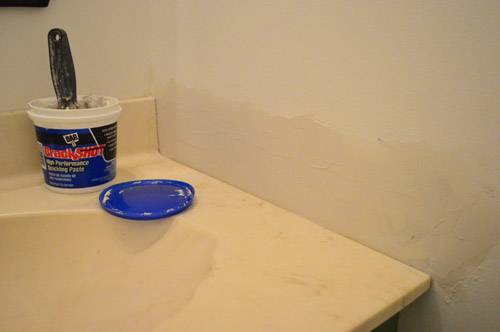
After it dried (I usually wait about 5 hours just to be sure), I got my sanding block again. I prefer a block since it has straight edges which can help you keep your wall straight instead of ending up with something wavy and pitted. This will be dusty, and you might panic because often when you sand something smooth there are a few little low spots or dings that come through and you’re all “man, I just want to paint this and be done with it” – but RESIST my friend. Put the paint brush down.
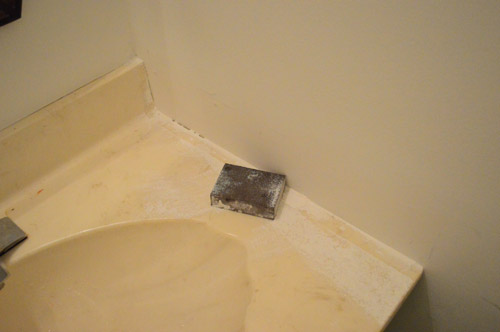
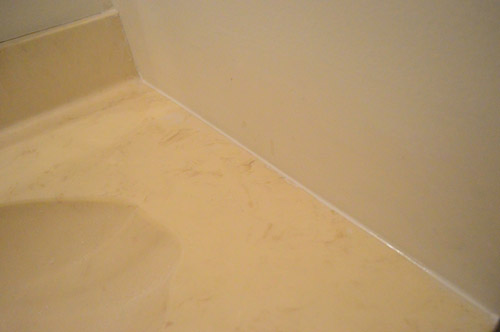
Wipe down all of the sanding dust and then go back with your spackle for a second pass at those dings and low points. Trust me, this ten minute second step is the difference between a smooth wall and an annoys-you-everytime-you-look-at-it wall. Here are the spots I spackled again, just to get them nice and flush.
After it was all dry, once again I used my sanding block to sand them smooth. Then it was time to caulk a nice clean line between the vanity and the wall with white paintable silicon caulk (paintable is key, and for brands I like Dap). That’ll keep any water from rolling down the side of the vanity, so it’s a nice “housekeeping” step – plus it just looks nice and finished. As for application, I just squeezed a line of caulk down the wall into that crack and then used my finger to smooth it out a few times until it was clean and unassuming.
Then (and only then!) did I allow myself to grab my paint brush and touch up the wall so it was nice and seamless. This was one of those lessons I have had to learn over time. You will never, ever be in the mood to do that second pass of spackle (“gee, there’s nothing I feel like doing more than spackling and sanding this wall that I already spackled and sanded”) but it makes all the difference in how smooth it looks in the end. At least for a bugged-by-dings girl like me.
Speaking of smooth, we spilled half a quart of the Baby Fern paint that we used on the vanity (and then painted over) right onto the concrete floor in the garage. Whoops.
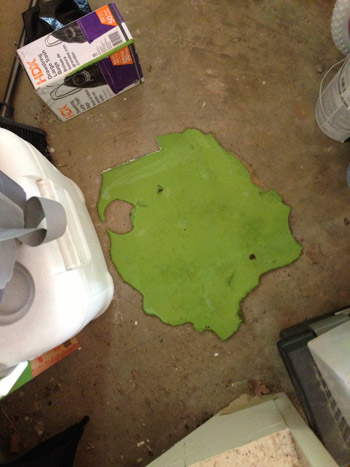
There was panicking. It was a hot gelatinous mess. While we struggled to remain calm we both came to the same conclusion: let’s not touch the paint at all. Let’s not try to clean it up or thin it out or add water or anything. Let’s just let it sit there, and hopefully once it dries it’ll be a thick enough glob that we can peel off like a giant latex sticker.
So we waited about a week for it to fully dry, and then we yanked on it…
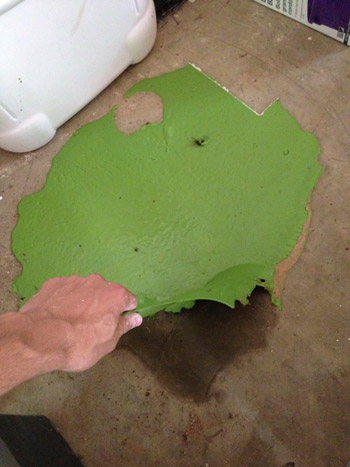
Wouldn’t you know it peeled right up in nearly one piece (there were a few spots we peeled off a second later that were left behind). There initially was a big brown wet-looking mark under it, which you can see in the picture above, but we hoped that once the mass of latex was up off of the concrete it would just dry itself out and go back to being normal looking.
Well lookie here. Besides a few slightly tinted spots, it’s not noticeable at all. In fact we’ve since moved all the stuff that was framing “the scene of the crime” and we can’t even really pick out the spill spot anymore.
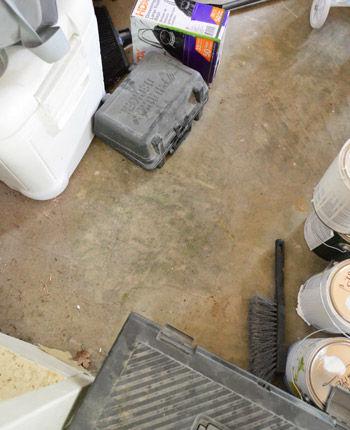
I still kind of can’t believe our leave-it-and-peel-it-later approach actually worked. And I’m endlessly grateful that it was so easy (even attempting to wipe that up when it happened might have taken a while and resulted in a giant mess). So when in doubt, just do nothing and wait a while and hopefully whatever problem you have will peel off like a sticker. Well, I guess that advice doesn’t work for everything, but for a giant goober of paint in the garage, it was a pretty darn good outcome.
**********************************
Psst- We’re trying out a new little bonus feature on Friday posts by ending with four fun projects, chats, or questions going on over on the Forums. You know, just in case you don’t want to go back to work just yet…
 |
 |
 |
 |
 |
|||
| by ElizabethAnn | by KatyRICEdesigns | by KellyLawler1 | by ArtisanDesarts |
 |

Cassie @ LittleRedWindow says
I love how you say “we” spilled some paint without blaming whoever the guilty part was. You guys are always so diplomatic and respectful of each other, love that!
Hannah says
Thank you for always adding in the advice to wait, even when the impulse is to rush ahead. It is so easy to read the steps on how you did it, get all motivated, then dive into a project and somehow expect it will magically only take 5 minutes (because that’s how long it took to read about it, that’s how long it should take for it to happen, right?) Then I look back and see ah, they waited 5 hours, they waited a week, it took over a year to get to this particular project – it’s ok, slow down.
DJ says
For some reason, I expected this post to be about the sink faucet, but it was really interesting to see what to do to repair minor holes in drywall.
Angela says
Love Handle made me think of this because I’m a mom to a 7 year old boy:
http://youtu.be/IBSYX2c1vpg
YoungHouseLove says
Haha!
xo,
s
carrie says
Wow! You and that green paint just can’t seem to get along!
YoungHouseLove says
Seriously!
xo,
s
Maura says
What a difference that made! Definitely going on my project list for Operation Bathroom De-Ugify.
Funny, your method for cleaning up the paint is the same method I use to clean up stacks of “important” papers I don’t know what to do with. If I wait long enough, 98% of the adorable school papers, notices, event flyers, and party invites will have expired and I can peel them off the stack and put them in the round file. ;)
paintergal says
You guys rock! What a clever way of dealing with that paint spill. I bet it was hard to not touch it and just let it sit there. Quick thinking!
Jessica says
I like the Friday forum idea, sometimes I forget it’s there and this is a great reminder!
YoungHouseLove says
So glad!
xo,
s
Heather says
I don’t comment often, but I just wanted to say that I love the new feature. I keep forgetting about the forum, and this will definitely remind me to check it out and to participate more often.
And since I’m here, excellent job on the “wait and see what happens” approach with the paint spill! :P
YoungHouseLove says
Thanks Heather!
xo,
s
Dorothy says
Thanks for the talking-to. I will go buy enough spackle to do the 2nd coat (instead of painting RIGHT NOW) and I’ll be happy I did!
Emily @ Life on Food says
I think I would have completely freaked out with the paint spill.
Kristin says
Ahhh…so glad you guys spill paint. Can’t remember if I commented that I stepped off a chair last month & into a gallon of paint as I was painting my daughter’s room. Luckily it spilled onto our dropcloth/sheet & we were able to pour a lot of it back into the can. Such a klutz.
YoungHouseLove says
So lucky!
xo,
s
Jill says
Bad as that must have been to clean up, it also must have been sort of delightfully gooshy when you landed…
Kristin says
Wow Jill…wish I’d taken a moment to enjoy the gooshiness (because you are probably right!) but I went into full blown panic mode immediately!
Michelle says
I am so excited you posted about this because I’ve been wanting to remove our “love handle” in the guest bathroom too (which looks nearly identical) but I was too scared!
Yvonne says
AH! I LOVE when you guys make scary projects look easy. I have some “side tile” in my bathroom and I can’t wait to rip it out! Going to try this TONIGHT. Thanks for inspiring ;)
Kim says
You should put the paint tip under the projects section-it’s a great one!
YoungHouseLove says
Oh yeah we keep meaning to update that page!
xo,
s
Jamie says
Love all the posts this week! I’m catching up from a busy week at work and it’s been so nice to see all the updates this week – AND you’re designing a whole new house just for fun and to donate your pay – you guys are really amazing.
I am sure you have seen this already, but Anthro has your book on display! Take a look at the site! :)
(I’m a little comment-challenged so I hope the link shows up)
YoungHouseLove says
Thanks so much Jamie! I totally screamed when I saw that!
xo,
s
Krystal C. says
I don’t have time right now to read all of the comments, so I’m hoping this isn’t a repeat: Keep in mind that concrete will suck up anything. It’s a porous jerk like that! Once it’s sucked it up it will seep out of the pores when it’s humid or if you have a lot of rain from time to time. That stain may come back to haunt you in the future if you try to refinish the garage floor (like with a stain or paint). Latex shouldn’t be that big of a deal being water based and all, but in the future… really try not to spill anything oily on it!
YoungHouseLove says
Great tip!
xo
s
Diana Buchanan says
I’m having trouble commenting but I just love how you call this a love handle! I’m dying of laughter over here! I also had a question about the sand block but after my post hasn’t been showing up I’m a bit discouraged. :( Yay for progress, though! Can’t wait to see the foyer all pretty and painted!
YoungHouseLove says
So sorry for the comment issues! This one came through so if you still have a sanding block question I’d be happy to answer it for ya!
xo
s
Karla says
Hi, I want to do this same project but I’m afraid of ruining the walls, did you use a hammer to go in between the countertop and the side ? What advice for a newbie like me?
YoungHouseLove says
You use the screwdriver (flat head, like the pic) to get behind that slab of stone and then you hammer the end of the screwdriver to drive it behind it so you can pop it loose. You can also use a rubber mallet if you’d like :)
xo
s
Tamara says
Sherry and John, is your new house built after 1978? We just bought an old house and I’m so nervous about the lead paint issue, especially with sanding projects like this and two little ones. I’m not sure how nervous I should be about it and what precautions to take.
YoungHouseLove says
Our first two houses were much older, so they were in the lead paint era (just be careful not to sand or demo walls without testing them with a lead kit from Home Depot and take care of any flaking paint with fresh paint so it’s sealed in). Our new house is actually just after the lead paint years, so it’s nice to have one less thing to worry about but the test kits from Home Depot are great and helped to keep us all safe in the first two homes (Clara was regularly checked for lead since we are DIYers who lived in old homes and always got a completely clean bill of health without any elevated levels- even when she was a newborn!).
xo
s
Linda says
Amazing the difference this made! And I was totally impressed with John’s cable adventure and tutorial yesterday.
Just wondering – are there any good hints for minimizing and cleaning all that sanding dust? Yes, I sometimes got so tired of spackling and sanding that I have have a few spots I see every single morning and want to re-do. But it’s cleaning up the dust that’s adding angst to the prospect. Thanks!
YoungHouseLove says
Lately I have had luck just sweeping it into a pile and dust bustering it. Then just beware when you empty your dustbuster (over a garbage can so it doesn’t get powder all over).
xo
s
Angie says
Seems simple but I love this fix. I hate how all the counters in our new house have edges to them. I can kind of understand the reasoning with splashes and such, but I do NOT like the look of it. I’ll have to add this to my super long list of To-Do’s!
Gail says
It looks so much better without the “love handles”! Ha! And good info about the second spackle layer. I always want to do things fast and furious and end up being bugged by sloppy work too. Good to remember…slow makes pro.
And awesome about the paint glob- yay!
Gail
Jennifer : Creative Scatter says
I’m really impressed that the paint could just be peeled off like that. Nice job! It’s always a pleasant surprise when big accidents can be easily fixed.
Donna says
Great tip, guys! We have a side-slab in our bathroom too ( as well as the oh-so-popular seashell sink ), and I was looking for some small fixes to make it a bit less dated on a shoestring budget. This is perfect. Thanks!
Summer says
The way you two spruce up everything is just unbelievable! Also, huge shout out to the Four Foursome! I love it and it definitely pulls me deeper into the blog…sometimes I come out…hours later :)
YoungHouseLove says
Haha, thanks Summer!
xo
s
Kristi @ Addicted 2 Decorating says
I’ve spilled two quarts of paint over the last three weeks (just call me butter fingers), and after panicking a bit, I did exactly what you did. I think I waited about four days, and it peeled right up. I spilled both of mine in the guest bedroom. Thank goodness we have tile in there instead of carpet! But yeah…that’s definitely the easiest way to deal with spilled latex paint.
YoungHouseLove says
No way! So glad it worked!
xo
s
danielle says
thanks for the bonus life-coaching. i love the moral of the post!!!
Jessica says
Hey- this is so totally unrelated to this post – or DIY slash home improvement AT ALL, but I just had a super rough day (family issues and my boyfriend of 4.5 years just broke up with me too), and I know you don’t know me, but I feel like I know you guys (not really, I promise I’m not a creepy stalker, I live in Canada). BUT, you guys are awesome and good at life. And I’m not sure where I’m going with this (other than sounding sad and creepy) but any life suggestions? I’m taking any/all advice because I’m genuinely thinking something’s gotta give, and I’m so ready for what comes next in life. Ok wow sorry. Thanks.
YoungHouseLove says
Aw, Jessica! I feel for you. We’ve all been there, I promise! No one has it all together, no matter how much you think they do. My best life lesson came from dating a guy for a really long time but just knowing it wasn’t right. It was comfortable and what I was used to, but it wasn’t IT. At the time it felt like starting all over again to break up with him and I already had so much time invested in the relationship (our families were close at that point, etc) but I just realized that if I didn’t pull the plug I’d blink my eyes and we’d end up married. I somehow got the guts to end it, and a month later I met John. So I think that taught me that letting go of things that aren’t right somehow makes room in your life for the best possible things. John felt like my reward for doing this big scary thing and going out on a limb and starting over again. So I’m a huge believer in not settling (not only in relationships, but in other aspects of life like your job, decorating your house, etc) because somehow it feels like when you let go of what’s wrong, even if it feels really unsettling & scary, it can make room for the good stuff to creep in.
xo
s
Amy says
Sherry what a great response! And Jessica, I’ve been there too. It’s so hard to see it this way in the beginning but looking back on them, breakups are always a blessing in disguise. I am not a believer in fate or destiny but I agree with Sherry, some things are right and some are wrong and sometimes it’s tough to know the difference. But if it was right, it wouldn’t have ended.
Jessica says
Sherry and Amy:
I wanted to thank you both for your responses. It really is so inspiring to see two people who don’t know me that took time out of their day to be kind to someone else. All good advice, by the way. I truly appreciate it. Still figuring my life out but had a few moments if clarity so I’m in a really good place for now – and if things don’t work out in the end, I’ve decided I’m going to apply to teach abroad! Going for what you want really is good advice. Thanks so much.
YoungHouseLove says
Of course Jessica! All the best with everything!
xo
s
Kathy says
This post was simple but SOoooo helpful to an impetuous, panicker like me! Thank you!
Its title should’ve been “Patience is a Virtue” or “Good things come to those who wait”… or something like that. :)
Betsy says
I love this blog!! Because it inspires the little people, not just the behemoth budgeted folks. I’m loving the fix-up reno process on our new home, but one DIY I keep putting off is painting all our windows – they are all beautiful divided light style windows but priming, painting, scraping just ONE was a whole day project. Is there anywhere on this blog where you’ve detailed your system for window painting? I know I’d learn something. Thx!!
YoungHouseLove says
Thanks so much Betsy! I don’t know if I’ve written about windows, but we have a bunch of those here on the second floor that we tackled and it took 2 coats of primer and 3 coats of paint and then I used a straight razor to scrape the paint off the windows. It was a pain but so worth it when we were done. They look like new!
xo
s
Sara Vogel says
Oh No! That green paint has just been a giant pain in the rear right from the get go lol
Marissa says
Just had to share- last week I RAN OVER a quart of light, but bright, blue paint in our garage. I must have hit it just right/wrong because it exploded. I laughed at first. Then I got out of the car. My garage was a Jackson Pollock gone wrong. Blue paint splattered everywhere. Garage floors, cabinets, wall, all items on the walls/ shelves, the lawn mower, THE CAR. I was not laughing any more. Now it reminded me of the blood splatter trajectory in a crime scene / visions of Macbeth.
On top of that I was pretty sure emergency paint clean up and the 2-year-old in desperate need of a nap I had in the back wouldn’t mix well. I prioritized the best I could- put kid down for nap, clean off car first after that. Neighbors even came over with a pressure washer. We had some success. The car is clean…as for everything else, we decided we can laugh at it. And it does come off with a little effort here and there. Thank god it was the garage.
YoungHouseLove says
Oh my gosh! That sounds so crazy! So sweet of the neighbors to come over and help. And I love that you can laugh about it.
xo
s
Sara King says
I’d like to remove the “love handles” from our bathrooms. However, it’s just a flat piece of laminate countertop. Help! Same method? I’m so afraid of gouging the wall!
YoungHouseLove says
Oh yes it’s the same method, just be careful not to scrath the laminate counter that runs under the love handle. As for the wall, that’s easy to spackle. You can do it!
xo
s
Katrina Schlomann says
I would have never thought of removing that side piece, and now that I have seen it I can’t un-see it! Ahh, now I must do this to my bathroom or it will never stop bugging me!
JEN C says
How do you make spackled spots bend with the wall? I took down a towel bar in our bathroom, but I can still see the spackle spots. I sanded it smooth, but it seems that even though the walls are flat the previous layer of paint created a slight texture that doesn’t match. I did the spackling shortly before repainting the bathroom, so I assumed the roller would make it all blend. It’s rather irritating that I can still see those 2 spots when the light hits it just right. I would like to prevent this in other projects I have planned.
YoungHouseLove says
Oh no! Maybe the spackle “flashed” meaning a primer rolled on first and then paint would cover that little inconsistency.
xo
s
Lisa Barton-Collins says
Once I spilled about 2 litres of white gloss on the ex garage/converted office space floor. I rang my husband in a panic about how to clean it up, and he suggested I get a roller and just paint it out. Which I did. We liked it so much that we painted the rest of the floor white, and we love it!
YoungHouseLove says
Love that!
xo
s
Theresa says
The builder of this house put up the same side thingys. Only they were used to cover the facet that the counters (every single one!)is half an inch or more from the wall! So for now they stay…But yours looks lovely!
kelly @stayingonbudget says
Great tip with the paintable caulk. I will have to remember that when my bathroom remodel is in full swing.
Eileen says
This is crazy, I told my husband about your paint spill an he said that we had an old paint spill in our garage from the previous owners and he went out with a small chisel and it popped right off! Thank you so much for the idea!
YoungHouseLove says
SO GLAD!
xo
s
Andy says
That looks such a lot better! it had been method off balance before. You’ve do some abundant for that small toilet in such a brief time!
Gwen, The Makerista says
wow, that really makes such a difference! funny how the small things can completely change the look.
and the paint spill, i know all about that! way to wait it out!
Eco Handyman says
I don’t understand why a lot of bathroom sinks have love handles, but nice to know it’s such an easy removal project!
karen l says
I too have dumped paint on my garage floor. After the initial panic, I decided I’d deal with it later and grabbed a handful of newspaper from the recycling stack and threw them on top. I truly forgot about it for at least a week, then once again decided to deal with it later! After at least a month, my brave husband simply picked the pile of newspapers up and all the paint had soaked into the paper. No peeling off the floor – just picked the whole thing up. Who knew procrastination was such a good cleaning method?
YoungHouseLove says
Haha, I love that!
xo
s
nicole j. wroblewski says
I’m in the middle of a spackling project right now and you guys definitely gave me the push I needed to go for the second coat and sand. It really does make all the difference. Thanks :)
Ken Little says
Sorry if someone already mentioned this, but one way to avoid or at least reduce the screwdriver holes is to insert a wide, thin paint scrapper between the wall and the love handle. Then insert your screwdriver between the paint scrapper and love handle. It may be harder to get the screwdriver in that way, but when you pry the love handle, the paint scrapper protects your wall.
YoungHouseLove says
So smart!
xo
s
Paula says
I just removed our side splash in preparation for replacing the entire sink top and found the happiest wallpaper miracle ever! They had wallpapered down behind the vanity cabinet and the side splash was glued to that – so the glue all stuck to the wallpaper, the wallpaper peeled off, and no wall patching necessary – woohoo! After seeing yours I kind of dreaded it because my spackle skills aren’t quite what yours are =)
Jessica@OneShinyStar says
Once upon a time I was so excited to paint my dining room that I started painting with out putting anything down on my laminate floors. So I painted the whole room, late into the night. The next morning I went to check out my paint job and everything was beautiful – except the the plops and drops and drips of paint ALL OVER THE FLOOR! Then… it just scraped off! I took a flat dish scraper and it all came off! Best.moment.ever!
YoungHouseLove says
Oh my gosh, so lucky!
xo
s
Jessica says
What grit sanding block do you use? Thanks to your blog I have been inspired to rip down the AWFUL half-painted over wallpaper that my mom inherited in her new bathroom. I’m heading back down this weekend to spackle, prime and paint. I’ve been all over your blog collecting your various painting tips. If all goes well I may even tackle replacing her exhaust fan. Thanks for the inspiration and making this feel do-able!
YoungHouseLove says
Thanks Jessica! I think ours is a 200 grit block.
xo
s