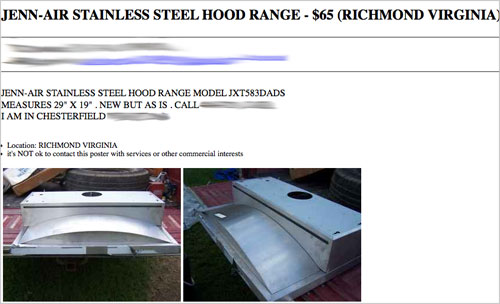
“How’s it hanging?” That was the big question last week. Not in the “Hey, how ya doing?” sense of things, but more in the “Um, how are we gonna hang this $60 hood we found on Craigslist” kind of way.
Sherry talked last week about how we planned to encase it in a DIY’d wood cover (see inspiration pics back on last week’s post). Both of us were so excited about (1) the price tag and (2) the final look that we didn’t really think through the middle part: actually installing the darn thing. So yeah… #planningfail?
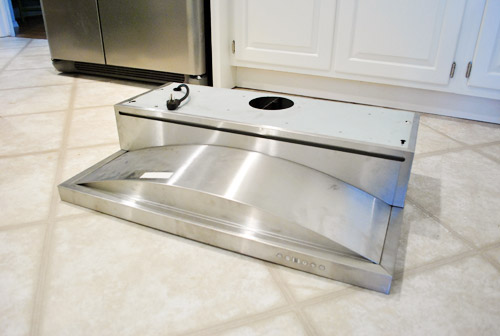
Here was our challenge (beyond just not having any of the installation materials or instruction): this is an under-cabinet hood and, well, we don’t have any cabinets to install it under. I figured that there were dozens of sites online detailing how to convert an under-cabinet hood to a wall-mounted one, so I wasn’t worried… until my Google searches started coming up empty. That’s when I started to second guess our plan. Was this just something that couldn’t be done?
Then I discovered these.
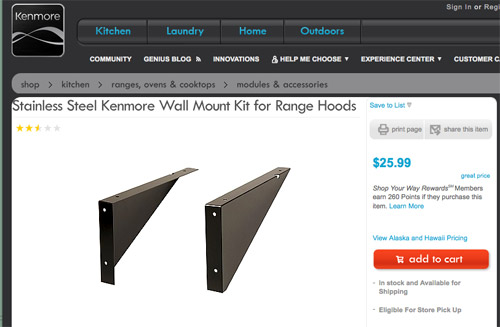
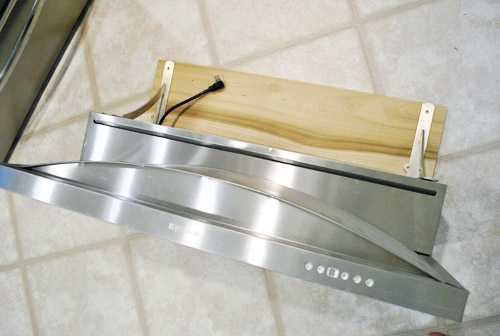
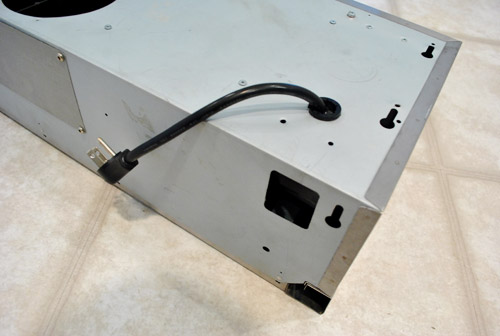
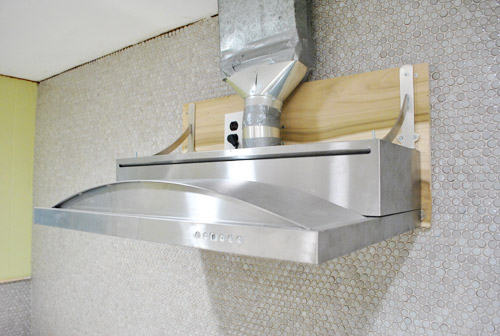
We didn’t buy these (our hood is Jenn-Air brand). But the fact that Kenmore sold bracket specifically “for mounting range hoods to wall when overhead cabinet is not used” meant it was not a completely crazy idea to retrofit ours to hang on the wall as well. So Sherry and I concocted a plan, did some shopping, and readied ourselves for some hood hanging (and possible hood hanging failure, as is always a possibility when we attempt to figure this stuff out as we go). This picture will make more sense soon, but just know it involved some wood pieces as a makeshift mounting panel and some heavy duty metal brackets as a stand-in for a cabinet.
But before we could put our plan in motion, some details needed to be taken care of. You know, little things like oh-yeah-we-didn’t-tile-high-enough-under-the-vent-pipe. Another lapse in planning. Oh well, it took about 20 minutes to whip up a small batch of thinset and fill it in with some spare tiles. Yes, it was slightly maddening to have to go back to the tiling phase (especially for eight measly rows) but by this point we’ve learned just to laugh. Wince a little. Laugh some more. And get it done.
Then we mapped out all the important stuff on the wall to ensure that things would hang where they were supposed to hang. Looks pretty crazy, right? But I promise it makes lots of sense…
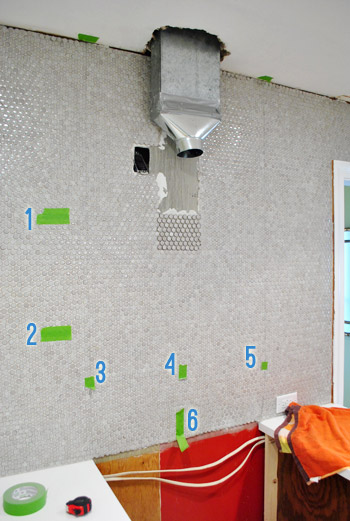
All of this painters tape is marking important reference points, such as:
- 1 & 2: Where our floating shelves would go – important because we wanted the bottom of the hood and the top shelf to be lined up (which was about 34″ from the top of the counter which is right between the hood manufacturer’s recommended 30″ – 36″ distance from the stovetop)
- 3, 4, & 5: Where our studs are – important so we could attach the hood securely to the wall
- 6: The center point of our stove – important so the hood would hang squarely over the stove
In case you’re wondering how I located the studs, it was actually thanks to some forethought on Sherry’s part. Back when that wall was open she begged me to somehow mark where they were before we tiled and covered everything up, so I opted to make small marks on the ceiling to keep track of where each stud was. Then I taped a piece of thread to that mark, tied a paper clip to the other end (to weigh it down) and voila – a perfectly marked stud all the way down the wall. And once we hang our crown molding around the ceiling those little stud-marking dots will be hidden once and for all.

With all of our guides marked, it was time to screw in our first piece of wood. Here’s the deal with the wood. The hood by itself was technically wide enough to hang from two studs, except the studs didn’t line up with the two notched holes in the back of the hood (which were at either end) and I didn’t trust that it would hold that way even if they were lined up perfectly.
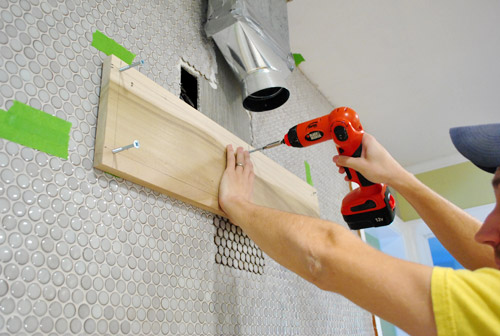
So we figured we’d screw a slightly wider-than-the-hood piece of wood into two studs (and use a heavy duty anchor to secure it in a third location) and then hang the hood onto additional screws that lined up with the hood’s notched holes. We actually got a contractor’s blessing (just didn’t feel right drilling into our pretty wall o’ tile without double checking our plan with an expert first. So after that phone call we took a few deep breaths and moved on to the next (very scary) part of our plan: drilling into our tile. GASP.

I bought a special bit that’s meant for glass and tile. It took a bit of pressure, but eventually I got all of my holes drilled. Though I think we both silently freaked out the entire time drilling was in progress.
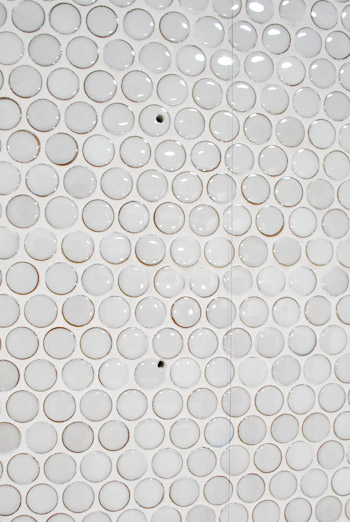
Once we got over having riddled our tile with holes (okay, there were just six) I used some 2.5″ screws to secure the chunky plank of wood to the wall. I have to tell you, feeling those screws grab the stud so tightly was one of the most confidence inspiring parts of this process. I felt like I could’ve hung my whole body weight from this thing – that is, if I was able to grip the tiny ledge with my lanky girl fingers.
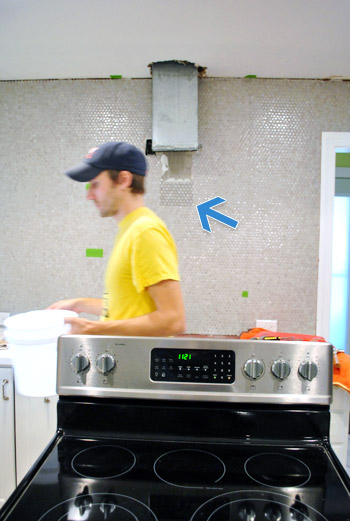
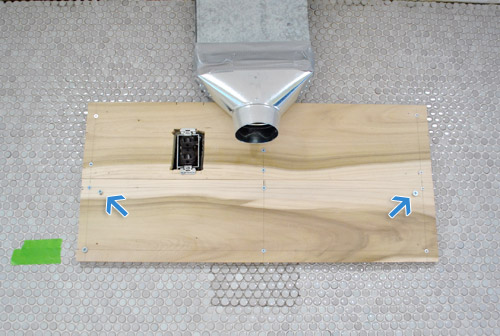
With one board in (to hang the hood from) I then had to attach a second one (to hang the brackets from) also with long screws into two studs and a third set of screws into heavy duty anchors to further enforce things. Then it looked a little something like this. Note: the vent pipe is slightly off-center, not the boards (so once we build the frame for the hood that will be solved and it’ll all look centered). Oh, and the blue arrows are pointing to the two screws that the hood will hang from.
We felt pretty good when we realized that most upper cabinets are just held to studs with screws and then loaded up with dishes and plates and other items (and then a hood might be added on top of all that weight) and the whole shebang stays up.
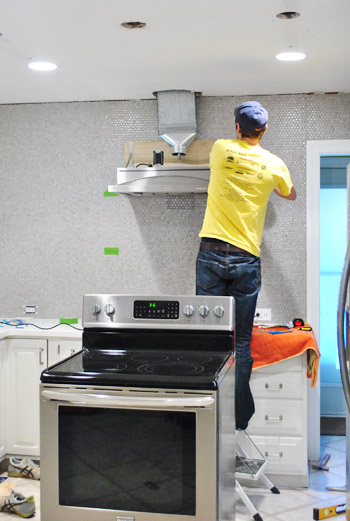
Speaking of which, it was time to put the hood up (since the brackets would need to go up after the hood). Okay, so maybe this part was scarier than drilling into tile. We half pictured the whole wall of tile pulling off of the studs. But lucky for us, it didn’t budge. It was up there solid as a rock. Which is good news, because clearly I could use less time worrying about hanging hoods and more time spent shaving…
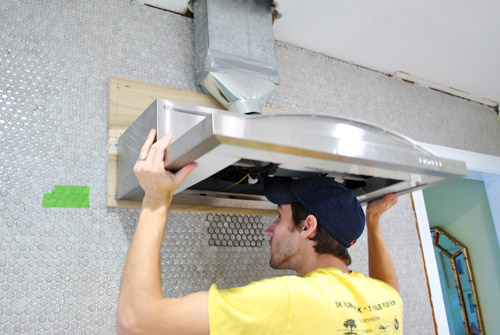
Anyways. Sherry supported the hood just in case (she’s the perfect height to rest it on her head from underneath it while standing on a small stepladder) and I attached the brackets to the wood panel and then into the hood using the same slots where it would’ve attached to a wall cabinet.
It was feeling plenty secure by this point, so I relieved Sherry’s head from hood-holding duties while I secured the second bracket and she took some more photos.
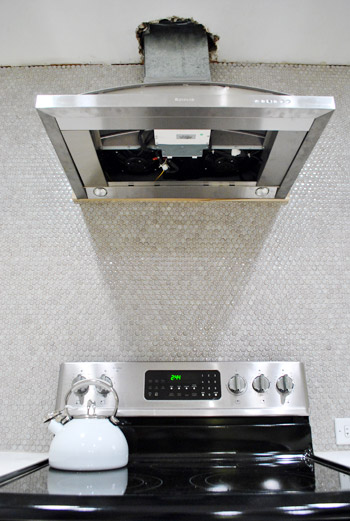
Once it was tightly held to the wall, I took care of some of the finishing touches – like attaching the vent pipe to the hood and plugging it in (btw, how lucky were we that the existing plug hole in the range hood was pretty much perfectly placed for our outlet???) – and we were in business. Phew! Update: We’ve since learned that metal foil tape (sold at hardware stores) is better for taping that duct together than duct tape (regardless of the more fitting name of the latter – haha) so we’ll be retaping that vent with foil tape to keep the seal nice and strong for the long term. Thanks for the tip guys!
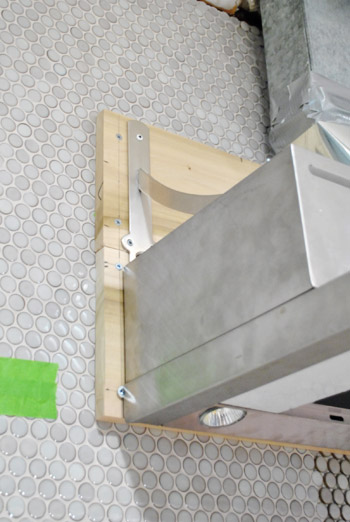
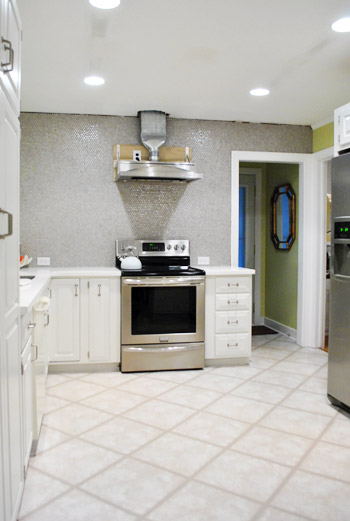
Okay, so admittedly it looks kinda ugly right now. The exposed pipe / wood / giant hole in ceiling aren’t really a good look, are they?
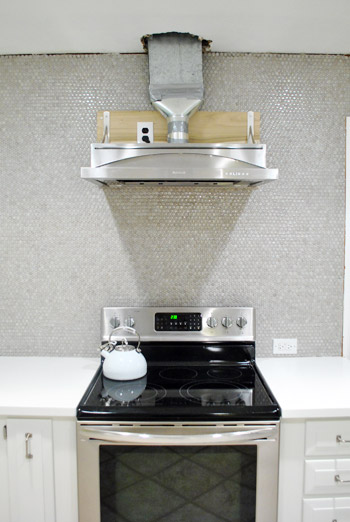
But it was a good start. Not only did we have a hood for the first time in over two months, but we had a hood that wasn’t crazy close to the stove like our old microwave was (we hung it 34″ from the top of the counter which is right between the hood manufacturer’s recommended 30″ – 36″ distance from the stovetop). And this hood has two fancy light settings. Oooooh. Ahhhhh.
And I know the exposed wood looks kinda crazy – especially because it sticks out about an inch on the sides. But I promise this is all part of a plan (hint: they’ll make for a good spot to attach my homemade wood hood cover), so just bear with me for a couple of days.
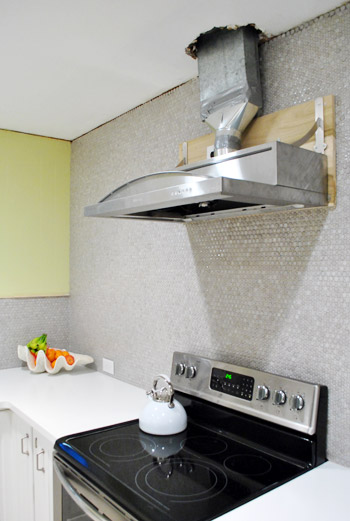
Oh and don’t mind this POV, we didn’t have the filters snapped in yet (they’re basically big stainless steel rectangles, so it looks a lot better from below once those are in). We’ll have to share more photos soon.
Now in case you’re still worried about this thing coming crumbling down overnight (we were – we actually pulled the stove out before we went to bed the first night just in case!), know that it has survived a few full days now with nary a creak or shake. So without jinxing ourselves, Sherry and I are calling this hanging project a success. All is good in the hood, as they say. Between the long screws going firmly into those studs and the heavy duty brackets also adding extra from-the-top support, this guy is pretty darn secure. So after a few days of breath-holding, Captain Careful can officially exhale.
Now for the fun (?) part – building a pretty wood cover for it. Somebody crank up my jams! We’ll be back with all those details in a few days, but in the meantime, what did you guys do this weekend? Any heavy-object hanging? Tile drilling? Using your head to support something? Oh and something crazy crazy crazy is going on in our house today (well, it starts today and lasts for the next three weeks!!!) so we’ll fill you in on all that tomorrow (once we have lived through one day of it and have some photos to share).

Trisha says
Sherry, can you reach it? The hood looks so high up, maybe it’s just me…I’m so short.
YoungHouseLove says
Yep! It’s just about 4 inches over her head, so it’s an easy reach.
-JOhn
cheep3r5 says
Not the one I am visualizing but a good one with lots of pictures.
http://www.remodelaholic.com/2010/06/how-to-build-a-range-hood-kitchen-remodel-guest/
YoungHouseLove says
Love it! Thanks for the link!
xo,
s
Megan E. says
I love your new hood! Wish I had one instead of my build-in microwave. Perhaps one of these days I’ll be inspired to DIY a range hood like yours!
Instead, I spent the weekend finishing up my counters– new counters weren’t in the budget, so I tried a faux granite paint. It turned out really well! http://megeletto.wordpress.com/2012/01/30/giani-granite-how-to-paint-your-counters/
And, in YHL fashion, I jumped right into another big project (inspired by YHL) and took down all my cabinet doors, sanded, cleaned, and set them out to start painting them white. Now I know why you guys did those steps in two separate days…
Elise says
Your website just like Days of our Lives for me. I’ve been away on holidays for most of January, adnd just come back to pick up my blog reading, and its so nice to pick up somewhere familiar. The good old kitchen makeover. The kitchen looks great, you’ve done so much since I last checked in, I love those penny tiles.
Anna says
Hey guys! Looks great! How did your improv thing go? (I looked but didn’t see a post about it.)
I had *two* YHL dreams this weekend. I’m a creeper.
YoungHouseLove says
It was SO MUCH FUN! The improv team was hilarious! We hear they’ll be posting the video at the end of this week so we’ll have to link to it!
xo,
s
Chaucea says
I love the front, curved section of the hood–very stainless-steel shiny and sleek looking. It’d be really cool to have that part exposed and only have the rectangular-box part of the hood that’s against the wall covered with a hood box (same depth as the shelves?). :-)
YoungHouseLove says
We have toyed around with a few different designs – will have to see what we end up with! Of course we’ll share the deets as we go!
xo,
s
Heidi P. says
Wow!
So so glad to see that the tiles didn’t shatter when you drilled. Phew! And so impressed your ingenuity and problem solving skills!
Haha! John sounds so uppity-white with “All is good in the hood, AS THEY SAY” Hahaha! I pictured him in a blazer with a silky, poufed out scarf thing and a cigar when he said that!
Heidi P. says
No offense John!
p.s. Is that the much-requested beard you’re working on?
YoungHouseLove says
Haha, I actually have since shaved (and Clara and Sherry rejoiced). Burger didn’t care either way.
-John
Heidi P. says
Oh! And have you applied the sealer stuff to the tiles yet? Or is it in the grout itself?
YoungHouseLove says
Oh yes we sealed the tiles! We’ll have to come back with all that info asap!
xo,
s
PatC says
It’s really pretty guys!
I can already see it completed in my ‘mind’s eye’.
Patty Reid says
I am already having HOOD ENVY :) It will be awesome when encased :) You guys are braver than I, to drill through the penny tile! Thumbs up, ya did good! Love it
gemma@thesweetestdigs says
The kitchen is coming together so nicely guys!
Back in 2010, we did a big basement renovation which included a small kitchen (we turned our basement into a one-bedroom apartment to help out with the mortgage). Anyway, we build a hood range cover out of MDF and then painted it. I didn’t go into all the details on the blog (I was a new blogger then!), but you can have a look at the finished product here: http://thesweetestdigs.com/2010/11/12/basement-reno-update-10-smitten-with-the-kitchen/
Good luck!
YoungHouseLove says
Love it! What a gorgeous room! I love that green!
xo,
s
Kelly says
You guys are amazing… Looking good!
Lynn @ SafeBeauty says
If I wasn’t sitting in the McDonalds parking lot across from my daughters Pre School right now I would so be starting up one of those slow starting claps like I wanted to once I read that part about Sherry begging you to locate the studs and you putting the thread hanging from the ceiling. At first I thought that I could see the seams of your tile job, but I’m so nice I wasn’t going to mention it – I mean come on you guys worked so hard on it PLUS after reading Fridays post how dare I mention something like that? I aint crazy! You guys have (rightfully earned) some rabid fans (me being one of them) that would staple me to the wall like one of those neglectful parents that post vids of themselves abusing their own kids and then have the shocked look on their faces in their mug shots.
Forgive me, I’ve had caffeine. It gets bad…
My best, Lynn
*was meant to be sent this morning but my mac petered out before I could hit submit, just so you don’t think my daughter goes to some special night school PreK. Florida’s weird but not THAT weird! Why am I STILL TYPING????
YoungHouseLove says
Haha, that’s too funny! In person the string looked like seams too so you can imagine my relief when they finally came down and I got to see that wall o’ tile again without them!
xo
s
Jenna at Homeslice says
ta da!! That’ll be great once you work your magic and get it all built in. Great job once again!
Lorraine says
OH SO BRAVE! I don’t mean this is a bad way, I mean – thank you for being brave, because it makes the rest of us a little more brave to try new things. Clearly it was very well thought out and I have no doubt it’s going to stay up there. Looks amazing!!
Kim says
I’m sorry Sherry but this is one of those haven’t we answered that a billion times already question – so are the floating shelves going to be longer on the left side of the stove than on the right side? I thought I knew the answer to this but seeing the hood up there made me realize I might be confused about how the floating shelves will go.
Lookin’ good and inspiring, as always!
YoungHouseLove says
Yep, they’ll be about 4ft wide on the left side of the hood and just about 18″ on the other side (because of the door).
-John
Feeza says
Hi guys,
My first time posting here. Love your new kitchen! yeay!
But in the first paragraph there is a link to the old post? about the inspirational wood cover? It didn’t link to the old post. It links back to the kitchen hood. Or it is really means to link there?
YoungHouseLove says
Ooop, sorry about that – it’s fixed now!
-John
Amanda says
I was wondering why you decided to put the penny tile in your kitchen all the way to the ceiling on the wall with the stove if you intend to hang cabinets there?
Wouldn’t it have saved time and money to only tile up to the edge of the cabinets? I am about to undergo a kitchen remodel myself. Is it imperative to remove the upper cabinets before installing a tile back splash? Any tips to help someone stay inside a budget? Where is it better to save and splurge?
YoungHouseLove says
We’re actually not putting cabinets on that wall – just open shelves. So our tile needed to go all of the way up because it will be seen behind the shelves. If you’re putting up upper cabinets (or already have them there) it’s certainly not useful to install backsplash behind your cabinets. Just got up to the bottom edge of the cabinets and save yourself the time, money and headache! :)
-John
Jennifer says
Is the vent fan loud? I bought a stupid microwave/vent combo and the vent is so loud that I can’t hear myself think . . .
YoungHouseLove says
It had three settings, the lowest of which is very soft and the highest is definitely on the loud side – but I’m hoping not to have to use that one very often!
-John
Kim says
If you’re REALLY paranoid, you could put a little lip around the bottom of the hood cover that you’re building that would give the tiniest bit more support. Or one of you could probably hang from it to placate your fears :)
Yeidie says
mmmm…I don’t know guys. I’m a little on the fence about how this hood looks. But then again you guys always surprise me so I’m sure the final product will be amaze! =)
Tirsa says
I’m loving all the progress. Can’t wait to see if the hood cover you make matches what I’m picturing in my head. Ha, ha, ha!
Thanks for all the inspiration!
Laura says
The hood looks great! I had no idea they are supposed to be so high! Ours certainly isn’t.
We did a “fun” weekend project….installing an attic ladder. Scariest thing we’ve ever done. Both of us on ladders. Moving floor joists. Lifting overhead. And balancing on our head. Never again! :)
YoungHouseLove says
Oh my!
-John
Laura says
Just dropping in to say how much I love this kitchen remodel. The penny tile, the amazing cabinet transformation, etc. It’s all so inspiring! Can’t wait to see how the hood turns out!
brandi says
You guys are moving right along with your kitchen progress. I am so amazed that you guys were able to hang the hood yourselves. Looking forward to seeing what you do with the cover!
Kara says
more time shaving…balancing that thing on your head…can’t stop laughing. oh, and gorge!
Bonnie Vasko says
Really great idea to mark the studs beforehand. Even working with drywall I like the idea of finding them once and marking them with tape. Waay better then my method of standing there with the studfinder the whole time.
Pamela says
I’ve missed something here. If 3, 4, and 5 mark the stud locations, why couldn’t you put all the board-mounting screws into studs? Why the special anchoring screws?
YoungHouseLove says
The stud marked at 5 was too far to the right for the hood to catch it, (it would have overlapped the countertop too much and hung off-center) so we scooched it in a bit and used heavy duty anchors on that side. Hope it helps!
xo,
s
elizabeth says
It looks like you patched some of the holes in your ceiling already, are you going to post a tutorial on them?
YoungHouseLove says
Yes, we’ll be back with those details asap (aka: tomorrow)!
xo,
s
SarahDavid says
Heard enough comments on the use of duct tape yet? This one makes me grin, because I was probably 30 years old (with at least 20 good years of sticking duct tape to all sorts of things) before I learned that it was never really supposed to be called “duct” tape. It’s original nickname was “duck tape” since it repelled water so well. The name change probably took hold because people couldn’t really figure out why anyone would ever need to tape up a duck, or because people started using it for all sorts of things it wasn’t meant for (like permanent installation in duct work.)
Anyway, all of the openness in your kitchen is inspiring my wife and I to look at how we cram things into cabinets, so much so that we aren’t sure what’s going to fall out when we open the doors, and certainly enough that we generally don’t know what’s behind the stuff precariously perched within sight once opened. We were trying to figure out how to best make use of the tall cabinet above our microwave/range hood last night (to make more room in the other cabinets for baby food and baby dishes!). Almost none of the storage up there was well thought out. I was wishing we had a simple range hood, high enough that my 6′ self could cook comfortably without having to stoop to see the stovetop controls. Our microwave/hood, sadly, doesn’t vent outside. It just circulates greasy air through a charcoal filter. I was very disgusted to find a greasy film on all of the glassware we were keeping on the top shelves of our cabinets!
Did you already have a vent going to the outside, or did you have to crack that code, too?
YoungHouseLove says
Luckily we already had it vented outside!
-John