“How’s it hanging?” That was the big question last week. Not in the “Hey, how ya doing?” sense of things, but more in the “Um, how are we gonna hang this $60 hood we found on Craigslist” kind of way.
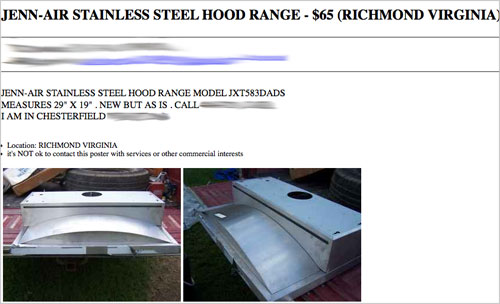
Sherry talked last week about how we planned to encase it in a DIY’d wood cover (see inspiration pics back on last week’s post). Both of us were so excited about (1) the price tag and (2) the final look that we didn’t really think through the middle part: actually installing the darn thing. So yeah… #planningfail?
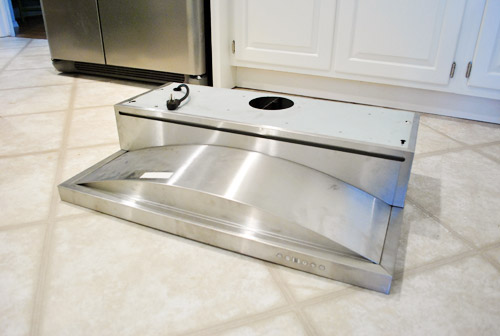
Here was our challenge (beyond just not having any of the installation materials or instruction): this is an under-cabinet hood and, well, we don’t have any cabinets to install it under. I figured that there were dozens of sites online detailing how to convert an under-cabinet hood to a wall-mounted one, so I wasn’t worried… until my Google searches started coming up empty. That’s when I started to second guess our plan. Was this just something that couldn’t be done?
Then I discovered these.

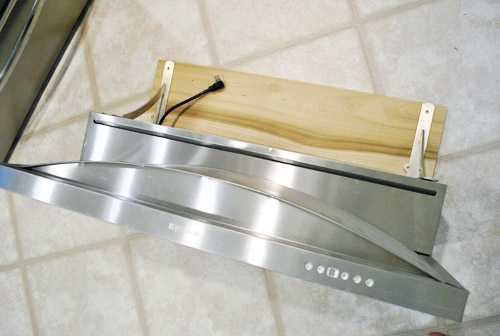
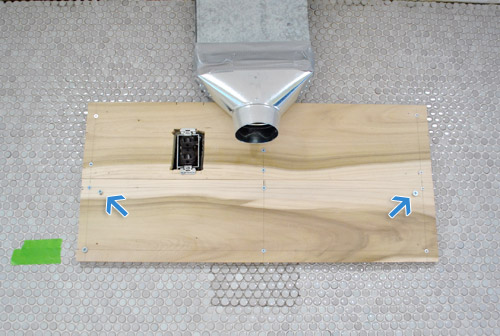
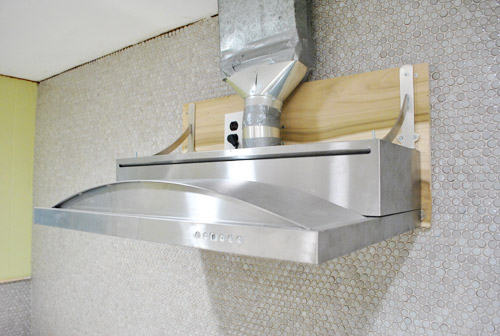
We didn’t buy these (our hood is Jenn-Air brand). But the fact that Kenmore sold bracket specifically “for mounting range hoods to wall when overhead cabinet is not used” meant it was not a completely crazy idea to retrofit ours to hang on the wall as well. So Sherry and I concocted a plan, did some shopping, and readied ourselves for some hood hanging (and possible hood hanging failure, as is always a possibility when we attempt to figure this stuff out as we go). This picture will make more sense soon, but just know it involved some wood pieces as a makeshift mounting panel and some heavy duty metal brackets as a stand-in for a cabinet.
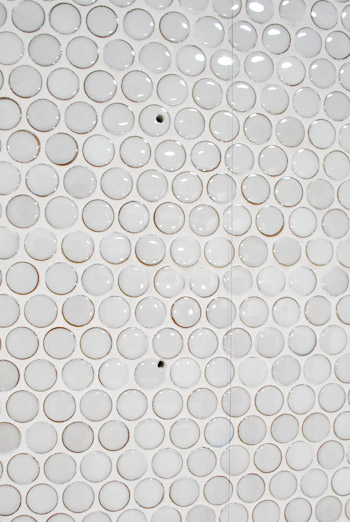
But before we could put our plan in motion, some details needed to be taken care of. You know, little things like oh-yeah-we-didn’t-tile-high-enough-under-the-vent-pipe. Another lapse in planning. Oh well, it took about 20 minutes to whip up a small batch of thinset and fill it in with some spare tiles. Yes, it was slightly maddening to have to go back to the tiling phase (especially for eight measly rows) but by this point we’ve learned just to laugh. Wince a little. Laugh some more. And get it done.
Then we mapped out all the important stuff on the wall to ensure that things would hang where they were supposed to hang. Looks pretty crazy, right? But I promise it makes lots of sense…
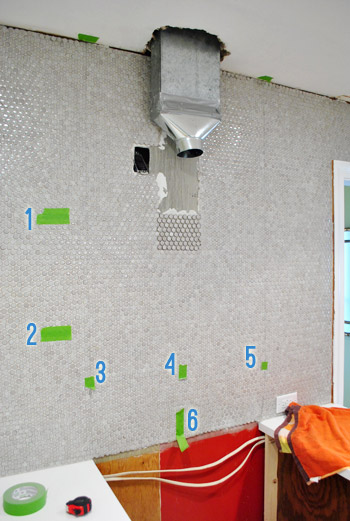
All of this painters tape is marking important reference points, such as:
- 1 & 2: Where our floating shelves would go – important because we wanted the bottom of the hood and the top shelf to be lined up (which was about 34″ from the top of the counter which is right between the hood manufacturer’s recommended 30″ – 36″ distance from the stovetop)
- 3, 4, & 5: Where our studs are – important so we could attach the hood securely to the wall
- 6: The center point of our stove – important so the hood would hang squarely over the stove
In case you’re wondering how I located the studs, it was actually thanks to some forethought on Sherry’s part. Back when that wall was open she begged me to somehow mark where they were before we tiled and covered everything up, so I opted to make small marks on the ceiling to keep track of where each stud was. Then I taped a piece of thread to that mark, tied a paper clip to the other end (to weigh it down) and voila – a perfectly marked stud all the way down the wall. And once we hang our crown molding around the ceiling those little stud-marking dots will be hidden once and for all.

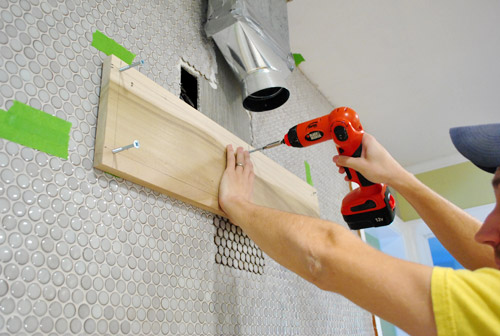
With all of our guides marked, it was time to screw in our first piece of wood. Here’s the deal with the wood. The hood by itself was technically wide enough to hang from two studs, except the studs didn’t line up with the two notched holes in the back of the hood (which were at either end) and I didn’t trust that it would hold that way even if they were lined up perfectly.
So we figured we’d screw a slightly wider-than-the-hood piece of wood into two studs (and use a heavy duty anchor to secure it in a third location) and then hang the hood onto additional screws that lined up with the hood’s notched holes. We actually got a contractor’s blessing (just didn’t feel right drilling into our pretty wall o’ tile without double checking our plan with an expert first. So after that phone call we took a few deep breaths and moved on to the next (very scary) part of our plan: drilling into our tile. GASP.

I bought a special bit that’s meant for glass and tile. It took a bit of pressure, but eventually I got all of my holes drilled. Though I think we both silently freaked out the entire time drilling was in progress.
Once we got over having riddled our tile with holes (okay, there were just six) I used some 2.5″ screws to secure the chunky plank of wood to the wall. I have to tell you, feeling those screws grab the stud so tightly was one of the most confidence inspiring parts of this process. I felt like I could’ve hung my whole body weight from this thing – that is, if I was able to grip the tiny ledge with my lanky girl fingers.
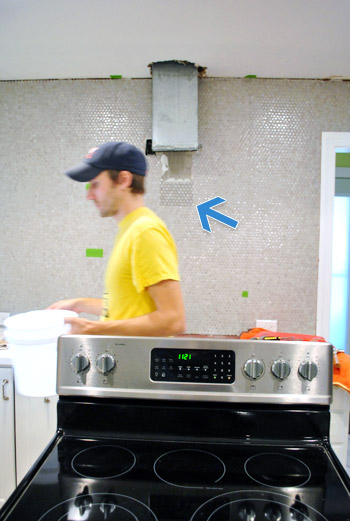
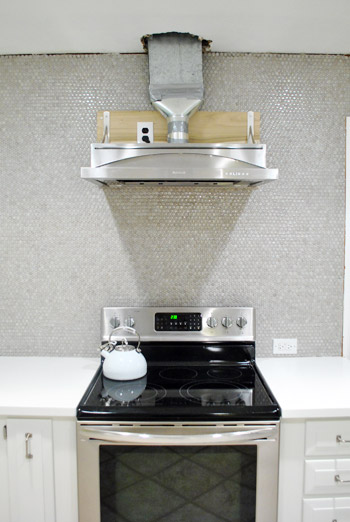
With one board in (to hang the hood from) I then had to attach a second one (to hang the brackets from) also with long screws into two studs and a third set of screws into heavy duty anchors to further enforce things. Then it looked a little something like this. Note: the vent pipe is slightly off-center, not the boards (so once we build the frame for the hood that will be solved and it’ll all look centered). Oh, and the blue arrows are pointing to the two screws that the hood will hang from.
We felt pretty good when we realized that most upper cabinets are just held to studs with screws and then loaded up with dishes and plates and other items (and then a hood might be added on top of all that weight) and the whole shebang stays up.
Speaking of which, it was time to put the hood up (since the brackets would need to go up after the hood). Okay, so maybe this part was scarier than drilling into tile. We half pictured the whole wall of tile pulling off of the studs. But lucky for us, it didn’t budge. It was up there solid as a rock. Which is good news, because clearly I could use less time worrying about hanging hoods and more time spent shaving…
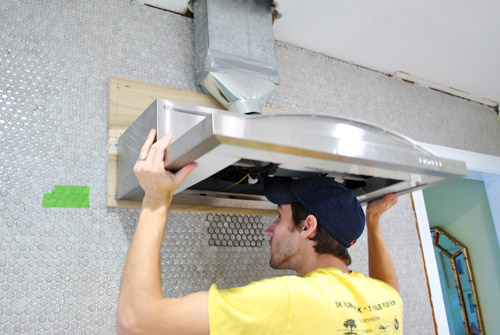
Anyways. Sherry supported the hood just in case (she’s the perfect height to rest it on her head from underneath it while standing on a small stepladder) and I attached the brackets to the wood panel and then into the hood using the same slots where it would’ve attached to a wall cabinet.
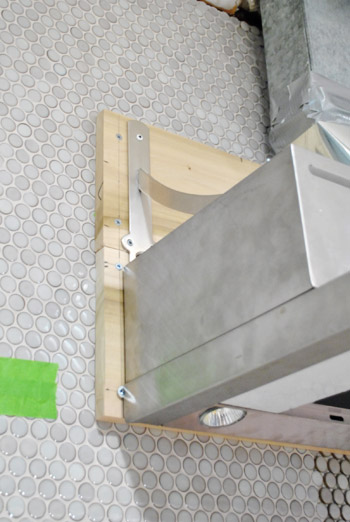
It was feeling plenty secure by this point, so I relieved Sherry’s head from hood-holding duties while I secured the second bracket and she took some more photos.
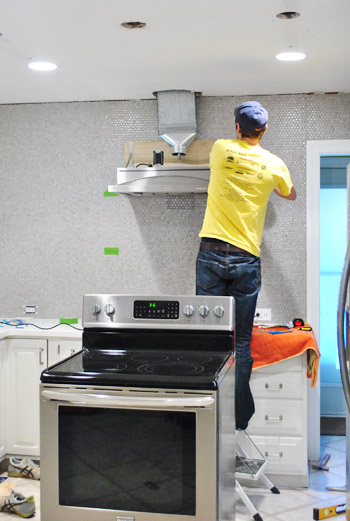
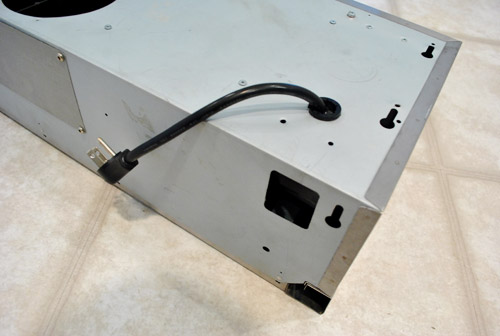
Once it was tightly held to the wall, I took care of some of the finishing touches – like attaching the vent pipe to the hood and plugging it in (btw, how lucky were we that the existing plug hole in the range hood was pretty much perfectly placed for our outlet???) – and we were in business. Phew! Update: We’ve since learned that metal foil tape (sold at hardware stores) is better for taping that duct together than duct tape (regardless of the more fitting name of the latter – haha) so we’ll be retaping that vent with foil tape to keep the seal nice and strong for the long term. Thanks for the tip guys!
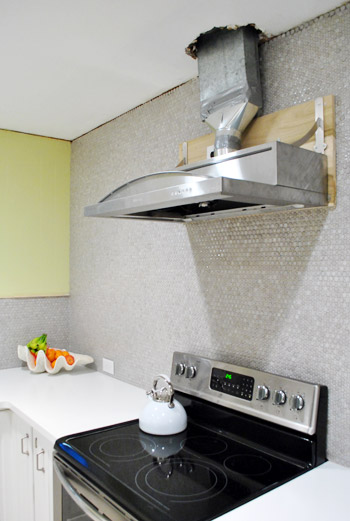
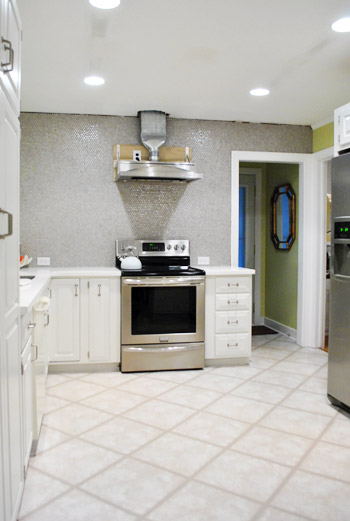
Okay, so admittedly it looks kinda ugly right now. The exposed pipe / wood / giant hole in ceiling aren’t really a good look, are they?
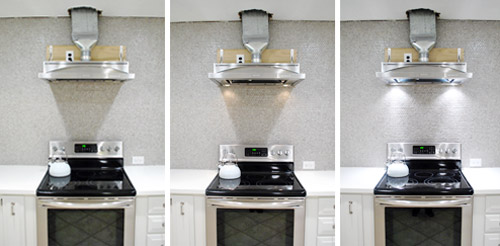
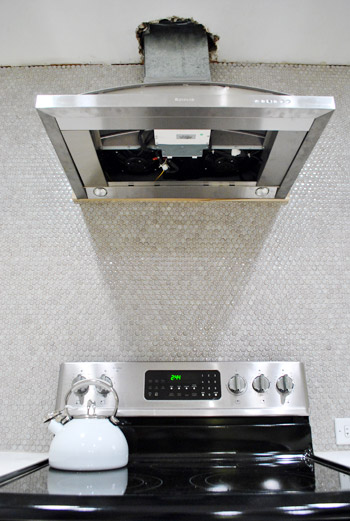
But it was a good start. Not only did we have a hood for the first time in over two months, but we had a hood that wasn’t crazy close to the stove like our old microwave was (we hung it 34″ from the top of the counter which is right between the hood manufacturer’s recommended 30″ – 36″ distance from the stovetop). And this hood has two fancy light settings. Oooooh. Ahhhhh.
And I know the exposed wood looks kinda crazy – especially because it sticks out about an inch on the sides. But I promise this is all part of a plan (hint: they’ll make for a good spot to attach my homemade wood hood cover), so just bear with me for a couple of days.
Oh and don’t mind this POV, we didn’t have the filters snapped in yet (they’re basically big stainless steel rectangles, so it looks a lot better from below once those are in). We’ll have to share more photos soon.
Now in case you’re still worried about this thing coming crumbling down overnight (we were – we actually pulled the stove out before we went to bed the first night just in case!), know that it has survived a few full days now with nary a creak or shake. So without jinxing ourselves, Sherry and I are calling this hanging project a success. All is good in the hood, as they say. Between the long screws going firmly into those studs and the heavy duty brackets also adding extra from-the-top support, this guy is pretty darn secure. So after a few days of breath-holding, Captain Careful can officially exhale.
Now for the fun (?) part – building a pretty wood cover for it. Somebody crank up my jams! We’ll be back with all those details in a few days, but in the meantime, what did you guys do this weekend? Any heavy-object hanging? Tile drilling? Using your head to support something? Oh and something crazy crazy crazy is going on in our house today (well, it starts today and lasts for the next three weeks!!!) so we’ll fill you in on all that tomorrow (once we have lived through one day of it and have some photos to share).

Meredith says
Wow, I love your ‘just go for it’ attitude! It looks great, I can’t wait to see the built-in hood :-)
This weekend my BF and I hung blinds and curtains in our master bedroom! 4 windows and 2 closets (curtains replaced old closet doors) took us 6 hours, haha. I used the YHL trick of hanging them all the way up to our 8′ ceilings and I can’t believe the height they add! I had a hard time going to sleep last night b/c I was just staring at our windows :-) The guest bedroom gets curtains this weekend!
YoungHouseLove says
Oh man I bet it looks so good!
xo,
s
Maureen @ This (Kinda) Old House says
Looks great! That’s a nice hood, actually all on its own. But the new wooden cover will look so pretty!
I am very intrigued about this three week long project…. Hmmm…. Something for the book perhaps?
We got the boards hung (finally) for the board and batten treatment we are doing in our main bathroom. Quite the project when your house was built in 1956 and apparently no one cared about straight walls or those walls bowing out in the middle (how does that even happen??) Oh, the joys of owning an older home. But, I like to think of her as a living entity that we are taking some great and needed care of. :)
YoungHouseLove says
That sounds so pretty! Congrats!
xo,
s
Stephanie says
I’m impressed! I have vowed again and again that one day I will be able to confidently hang any heavy object (know the proper anchors to use, etc.) anywhere in our home. I mean, that would be better than a doctoral degree right?? ; )
Sara says
It looks great! Really love the tile and looking forward to seeing the cork floors pull it together.
Side question: Is that duct-tape holding the vent together? If so, will it stand the test of time? (I have no idea, just asking)
YoungHouseLove says
We’ve actually learned we should use foil tape to connect that duct so we’ll be switching it out!
xo,
s
Michele says
“All is good in the hood…” i die.
Well done you guys! Your kitchen is looking GORGEOUS. I’m jealous and in awe, all at the same time. :)
Lori B. says
Amazing how you pulled that off so easily! Don’t you just love when things line up correctly? The second setting of the lights looks really pretty and will be great lighting for cooking :-)
We had a bunch of trees taken down this week and the stumps were ground over the weekend. People can finally see our house from the street!
http://familylovehome.blogspot.com/2012/01/trees-are-down.html
YoungHouseLove says
Wahooo! Congrats!
xo,
s
Kristen says
You guys are awesome! I totally laughed at the thought that you pulled the stove out before you went to bed…true story…a few months ago, after completing our home office re-do (it was mostly minor), we stood back to admire the IKEA shelves we had just put up (partly in the studs, partly with anchors; a brand we had used thousands of times), and both shelves came crashing down on top of my husband’s 3 computers. In the end, it was fine (nothing was damaged except for the 6 inch+ holes we had to patch where the anchors failed and pulled out a ton of drywall with them), of course the shelves are now completely in the studs (even though that wasn’t quite where we wanted them!) And I’ll confess that every night we took everything off the desk just in case, for several weeks! :-)
YoungHouseLove says
Haha, that’s so funny. I’m sure those studs will hold it nice and strong now!
xo,
s
Ann says
I am so amazed at how fast you guys are!
Kristi says
I just wrote the longest comment and it didn’t post. :-( Oh well – I’ll summarize. We bought a house in October and the kitchen came with a pretty wood cover and NO hood! Needless to say I cook in the dark and the smoke alarm goes off every day. But we are having trouble finding a hood that fits perfectly. Sigh. May have to tear it down and start from scratch (because cooking in the dark and having the smoke alarm go off every time we cook is getting old.)
Also – totally had my first YHL dream last night. I just happened to be in Richmond (I live outside of Boston) and came over to your house for the day. We were hanging out having a great time – but then I had to leave. You both begged me to stay, claiming that when Clara goes to bed you were going to paint your dining room table and wanted me to stay and help! How could I resist. In the dream Sherry laughed – a lot! And we painted the table plum. Too funny!
I also worked on a frame/photo gallery in my living room – using the YHL newspaper method. Will post you pics on FB.
Kitchen is coming along great! Way to go!
YoungHouseLove says
Haha- so funny! See, I’m giggling right now about laughing in your dream.
xo,
s
Danielle @ Casa Bower says
WOW! Looking good in the kitchen! Can’t wait to see the finished hood and some sleek shelving on either side of it.
I am going to guess the 3 week project is the car port getting turned into a garage?
Greg says
Hey guys… just a word of advice from a professional kitchen manufacturer, if you used duct tape to seal your vent, I’d recommend you go and buy some HVAC foil tape, I couldn’t tell from the photos (duct tape isn’t acceptable in most areas) and also insulate that duct as well. The insulation can be considered extra overkill but it also keeps that heat inside the duct so that (over time) the heat is less likely to warp the wood. Great job on the kitchen, I’m always impressed. -Greg
YoungHouseLove says
Thanks so much for the tip!
xo,
s
Carolyn says
Nice work! When did you swap out the blue tea kettle for the white? Or did you PAINT it?!
YoungHouseLove says
Haha- that’s a HomeGoods find. You know me and ceramic. Can’t resist.
xo,
s
Ashley@AttemptsAtDomestication says
It looks good! Can’t wait to see the wood box close it all in! :D
elaine says
love it! Looks fantastic and what a great explanation of how you got it up. Very succinct! I can’t wait to see your homemade cover. :)
Lizzy says
oooh, what a treat – j-boom on comment duty this morning!
:)
Laurie says
Drilling into the tile would have made me so nervous but it came out great!!
3 weeks….enclosing the carport? Making the fireplace 2 sided? Refinishing all of the floors? So many possibilities!
emily says
ah these are all such good guesses! i had my mind stuck on refinishing all the floors but since they’re in kitchen-mode right now, popping out the other side of the fireplace wouldn’t be too far fetched. and the carport change would be so exciting!!! i know that no matter what it is, we’ll all be thrilled about it :)
Kathy says
I know, I know! It’s book pictures. Something like every day for the next 3 weeks, with today being first. Yeah, they already told us last week, I’m sure they’re having a good giggle over the guesses. ;-)
Kelly says
Wow! It looks great so far and I’m looking forward to seeing the finished product.
My big project this weekend was finally learning how to use my mat cutter and making custom mats for several oddly-shaped prints and photos that have been collecting dust since I got the (insane!) quotes for custom framing. I think my mat cutter might be my new favorite toy!
Laurie says
I would have been so nervous to drill into the tile but it came out great!!
3 weeks….Enclosing the carport? Making the fireplace two sided? Refinishing all the floors? So many possibilities!!
Dina says
A random off-topic comment: did you see that Joss & Main has Amy Butler bedding on sale today??!! I don’t know if you decided to leave your duvet naked for the long haul, but if not I think the “sari blooms” pattern could look really pretty in your room! Unless you’re all Amy Butler-ed out by now…
YoungHouseLove says
Oooh! Gotta check those out!
xo,
s
heather says
…and I suddenly wish I hadn’t read the comments. Amy Butler has no idea that we’re best friends.
YoungHouseLove says
Haha.
xo,
s
Allen says
I made sure to read through all the comments to avoid asking an answered question, so I hope you didn’t lap me whilst moderating!
I’m sure it’s the lack of shelves that messes up my proportions when I look at the hood, but I know you guys would have thought of everything so I hesitate to ask…can Sherry reach the controls on the hood? It just looks super high floating all by itself!
YoungHouseLove says
Yep! She can – it’s just about 4 inches above her head so she’s got plenty of reach.
-John
Ruth says
I have to laugh about the return of the “is it too tall for Sherry?” question. You’d think she’s only 4 feet tall!
It looks like it’s about the same height as John’s head so I hope she can reach that high…
Firesparx says
What, no photo of Sherry as a support bracket?!
FYI, if you find your exhaust hood loud, now is the time to install a silencer (like a muffler) into the ductwork. You just cut out a piece of duct and install the silencer in it’s place.
YoungHouseLove says
Can you imagine the look I would’ve gotten if I paused to take a picture while she rested the whole thing on her noggin? :)
-John
heather says
It would have been worth it.
Michelle says
Looks awesome! Can’t wait to see the hood cover!! My husband and I worked this weekend on our kitchen backsplash, going with subway tiles, but thought of your penny tile work while we were out shopping and installing…love how it looks!
Adrienne says
Oh man. What a cliffhanger! I’m super excited!! Everything is coming along so well!
Rebecca says
This weekend we bought a vanity and picked out tile for our bathroom floor. Until Saturday we had no timeline for our bathroom remodel but once the vanity was ordered and had a delivery date, it was game on. The tiling goes down Superbowl Sunday!
Andrea @ the yellow cottage says
The hood lighting option on the far right looks tres nice in the photo.
Courtney says
Love it! You guys give so much motivation that DIY is possible. In fact, after two 5K estimates from contractors, I decided to and convinced my husband to let me) reno my bathroom myself. I’m using pros for plumbing and electricity, but the rest is me. Two weekends of demo and I have the room down to its guts. Next step, put new walls back up! Thanks for the push that it was possible to do this DIY (and save a few K’s). Hopefully I’ll have good before/after shots to share!
YoungHouseLove says
Wahoo! Good luck and send pics!
xo,
s
Andrea Ross says
Now you guys can be the google search help for the next person!
Looks great and the kitchen is really coming together!
Over here my Dad and husband built a deck platform to go over this ugly grate we have in the front yard, now its pretty and ready to be decorated with plants in the spring!
Paige says
Now that I’m seeing the hood up on the wall, the wooden cover TOTALLY makes sense. At first I wasn’t sure how all of it would work, but it’s like the lightbulb has been switched on. Ha ha.
My guess for the crazy 3 week project is either turning the carport into a garage, or doing a huuuuge photo shoot for the book. Either way, good luck!
Alex says
I was watching Dear Genevieve last night and saw your exact penny tile for another kitchen re-do! They ended up getting the wrong kind while shipping, though, and had to go with a bluer shade of the same type, but it was still really cool to see.
Darcy says
You guys are KILLING ME with that sort of teaser!!
Can’t wait till tomorrow to find out what you are up to….
:-)
Jeremy says
Don’t use Duct tape. Get the metal foil tape that is used for ducts. Unless you don’t plan to be in the house for a long time.
YoungHouseLove says
Yep, we’re gonna get that switched out!
-John
Tom M says
Looks really great guys!
I just wanted to second what Greg mentioned above. I’m not sure why it’s called duct tape when I’ve always been told to NOT use it for taping HVAC ducts (are there other ducts that need taping??)
Go with the metal foil tape instead.
YoungHouseLove says
Thanks for the tip Tom! We’re changing it out asap!
xo,
s
Krystle @ ColorTransformedFamily says
I have to admit I wasn’t completely crazy about the tile at first. But it looks great with the stove on the wall and is really starting to shimmer in the pictures. It looks like y’all made a great choice. I am excited to see what the hood cover is going to look like. I can already tell how it makes the kitchen look bigger just by elimiinating the over head cabinets.
MJB says
“all good in the hood” *snort with laughter
Love lines like that. :D
Lindsay says
Well it technically wasn’t this weekend, but at the end of last week I hung a little shelving unit in my kitchen. It was not nearly as intense as your project, but I did it all by myself- which definitely required some interesting balancing acts!
Your hood looks great, can’t wait to see the final result! http://youngscholarslife.blogspot.com/2012/01/additional-kitchen-storage.html
YoungHouseLove says
So cute!
xo,
s
Cletus Harbuckle says
I think the most impressive part of your renovation is using tools that would make my Moms tool look like Norm Abrams. Very innovative! Nice Work!
Katie says
We put up a penny tile backsplash this weekend, which went so quickly thanks to your amazing step-by-step posts! I’ll be picking grout off my fingernails for awhile, but the walls look great!
YoungHouseLove says
Wahooo! So excited for you. Congrats Katie!
xo,
s
Amy @ The Button Casa says
Great job! I don’t see myself ever doing that and my hubby would much rather pay someone to do it *but* it looks great so far (I’m sure it will look better later) and I love.that.tile.
Wendy says
What did you use to seal the joints of the duct work on your range hood? In the photos it looks like duct tape.
Regular duct tape from the hardware store is not actually meant for duct work, as the adhesive does not hold up. It is recommended to use metal/foil tape designed for duct work or mastic designed for duct work. Just thought I’d give you a heads up in case you were not aware.
Your kitchen is looks amazing, can’t wait to see the finished project!
YoungHouseLove says
Oh yes we added an update about that! Thanks for the tip! We’re trading it out tonight!
xo,
s
Diana @ Boy + Girl says
This looks great! Your kitchen is really coming together! You guys are fearless! We got up to demolishing our basement this weekend. Well, the man of the house did. I made pretty silhouette art instead! Ha. What a trade!
-Diana
Todd says
Well, of late I haven’t had anything to say when y’all ask “Did you do any big home changes this weekend?” but this time I do! My father-in-law and my buds helped me remove my old formica counter top, stabilize the old base cabinet frame (hello Wobble City) and install the second hand granite countertop from the ReStore that has been sitting in the garage for, oh, about a year. So I also have a weekend full of “Please, don’t come crashing down” stress. The hood looks great- look forward to seeing some shelves flanking each side.
YoungHouseLove says
Wow – you were busy! Congrats!
xo,
s
Sarah H. says
I love how well you guys problem solve! I can’t wait to see what the frame you build looks like. I also can’t wait to see your floors. I think that is really going to make your white cabinets pop.
Also, every time you say you have a surprise, I keep hoping it’s a sibling for Clara…just sayin!
YoungHouseLove says
Haha, sadly that takes a bit longer than three weeks!
xo,
s
Allison says
I don’t even think it possible to express through text how impressed I am that Sherry thought to mark the studs while the wall was taken apart. HOLY COW that was smart!
I am SO envious of your ability to pre-plan your projects out (though I wasn’t sure this post was headed that way in the beginning!). My fiance is the WORST at that. He will normally think of some kind of project, start it, not have anything he really needs to start it, then get really frustrated running around looking for something simple like a screwdriver, then not be able to find one, then have to go to the store and get a new one… and you get the idea. I wish I could convince him to blog read to see that if you carefully consider things and are prepared before you jump in head first it usually ends pretty amazingly!
YoungHouseLove says
Aw thanks Allison. It was one moment of brilliance crowded by many suggestions that make no sense. Haha. I’m all about saying “wait should we…” and then John looks at me like I’m crazy and says “no!” but I got a yes! Haha.
xo,
s
Theresa says
John, are you planning on insulating your ductwork? I was watching Holmes on Holmes this weekend and they said any pipe that goes into an attic space should be insulated. Just thought I would pass along their recommendation. It looks great. Well Done.
YoungHouseLove says
Thanks for the tip! We’re definitely going to look into it!
xo,
s
maria says
Looks great! Can’t wait to see it up and running with the wood cover!
This weekend I decided the waiting game is ovah and I’m either building a desk or a bar cart…still in the deciding process :)
Leana says
Man, your kitchen looks freaking AWESOME!:) And it’s just in the progress! I can’t wait to see the finished product! I’m secretly (not any more, since I’m commenting:)) stucking your blog because we just bought our first house that needs a lot of love and I need some inspiration that I took from you!:) Especially your tips on painting and picking paint colors.
Our problem was (and still kind of is) that last time house was painted with oil-based paint and our latex would “stick” over it, so it scrapes easily especially in the bedrooms and hallway because I don’t think we washed those walls with TSP (we washed our living room and kitchen/dining room and the paint seems to hold up a bit better). Still we had to put 2 coats everywhere and my husband is so sick of painting we have to take breaks. Now, I don’t know what we should do in the areas where paint scrapes easily. Any ideas/advice? Thanks.
YoungHouseLove says
Hmm, I think using an oil-based primer should help (that “neutralizes” oil-based paint so latex paint can be applied on top of it and hold steady). You might want to sand whatever is flaking off heavily before priming and then just prime and paint!
xo,
s
Kate says
So exciting! I think it looks like it would be very solid, and I’m Captain Worry over at our house about things pulling out of studs.
I’m sorry that this is totally unrelated and something you’ve probably answered but I couldn’t find it searching… but do you have any recommendations for an affordable low/no VOC paint from somewhere other than Lowe’s? We’re hoping that in the very near future there will be a reason that I will be wanting to not have VOCs around, as well as a reason for quite a few more projects (I’m sure you know what I mean), but the nearest Lowe’s is over an hour away and I haven’t found anything else local. We have Home Depot, Menard’s, True Value, as well as the paint stores, but the only thing I found was uber expensive at one of the specialty paint stores. Any suggestions?
YoungHouseLove says
Oh yes, Benjamin Moore has awesome paint called Natura that’s no-VOC and Mythic paint is also no-VOC and sold at many paint places like Benjamin Moore. Maybe just google around for a local paint place and call to see if they have Benjamin Moore or Mythic? You could also ask Home Depot if they have anything that’s no-VOC (every day they get closer!).
xo,
s
Ellen says
Not only do we have the same stove, but we have the same tea pot! You have a better kitchen though! :) :)
Jenny@Vegetarianhatesvegetables says
Looks great! What a find! Drilling into tile would make me nervous, too. It’s coming along so well.
Jamie says
Ooooo, it looks so pretty! I would have been a little more than sick drilling that tile. I am excited to see the wood hood!