The discolored and dirt-stained grout in the tile floor of our foyer looked super old and gross, but after trying nearly a dozen cleaners and cleaning tricks we nearly gave up. Then we finally find THE SOLUTION to making the grout look white and clean again!
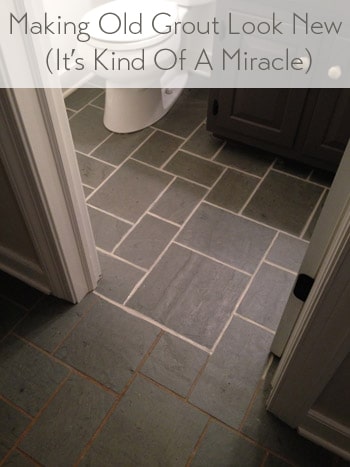
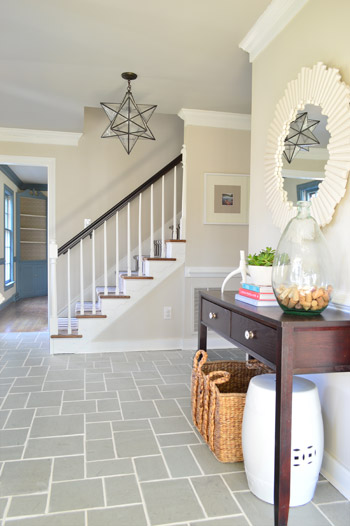
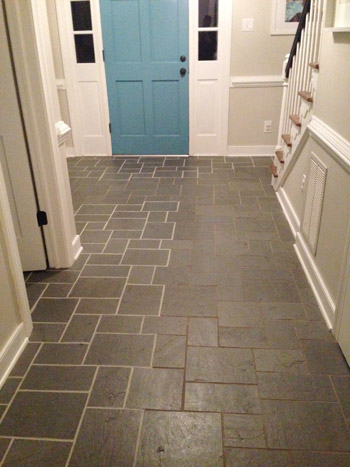
Now that we’re done, you can see how the view just got a heckova lot better around here. The crisp white grout lines play off the white trim and make the whole space feel newer and cleaner.
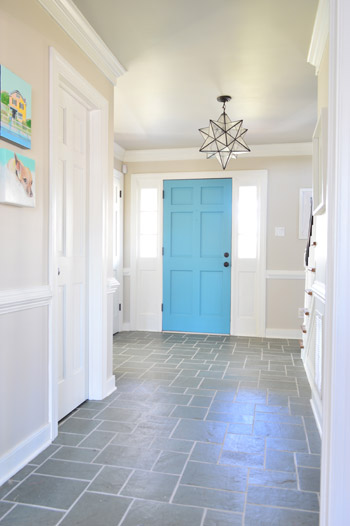
The funny thing is, it wasn’t actually cleaning that did the trick. So if you’ve got a similar issue with discolored or stain grout, here’s our official intervention: stop scrubbing! Well, maybe give scrubbing a fair shot, but don’t be discouraged if it gets you nowhere. There’s another way!
Cleaning Tricks That DIDN’T Work
As you might recall, for the past six months that we’ve lived here, it has looked like this.
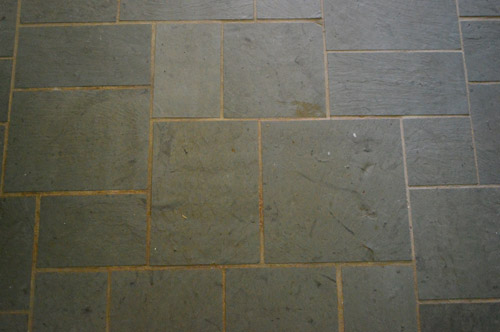
I gave nearly every method under the sun a shot to make that grout look clean. After repeatedly scrubbing the heck out of it, I knew that it was actually very (very, very) clean… it just was so discolored and stained in certain areas, that no amount of blood, sweat, tears, or elbow grease could make it look that way.
Some of my attempts to clean grout included (but weren’t limited to):
- various baking soda paste mixtures
- various white vinegar solutions
- copious magic erasers
- specialty grout cleaning floor sprays/potions/scrubs
- bleach pens
- oxygenating cleaners like Oxiclean
- Mrs. Meyers powdered cleanser + a wire brush
- Barkeeper’s Friend + a wire brush
- a borrowed steam mop
- scrubbing with a stiff bristle brush
- lots and lots of muttered cursing
The Solution To Getting White Grout Again
By this point I did what most people would do. I gave up and ignored it for another few days (what’s a few days after six months of no-dice results?). And then I finally faced facts. The grout either needed to be scraped out and regrouted entirely (which makes for a pretty messy job, especially in the main hallway of our house which connects the entire upstairs to each room downstairs) or it needed to be refinished.
Thankfully a few of you tipped me off to a product you’ve used with success called Polyblend Grout Renew. Let me just skip to the punchline: it worked, and I wish I had tried it before spending six months scrubbing my mind out.
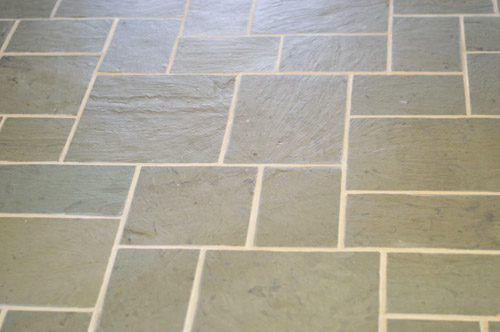
The cost? A cool $12 from Home Depot. (Update: it’s closer to $20 now, but there are more affordable grout pen alternatives available.) Can I get a what what? Note: this might sound like an ad for the stuff, but Grout Renew doesn’t know us from Adam – I’m just beyond grateful that it worked.
Choose Your Grout Paint Color
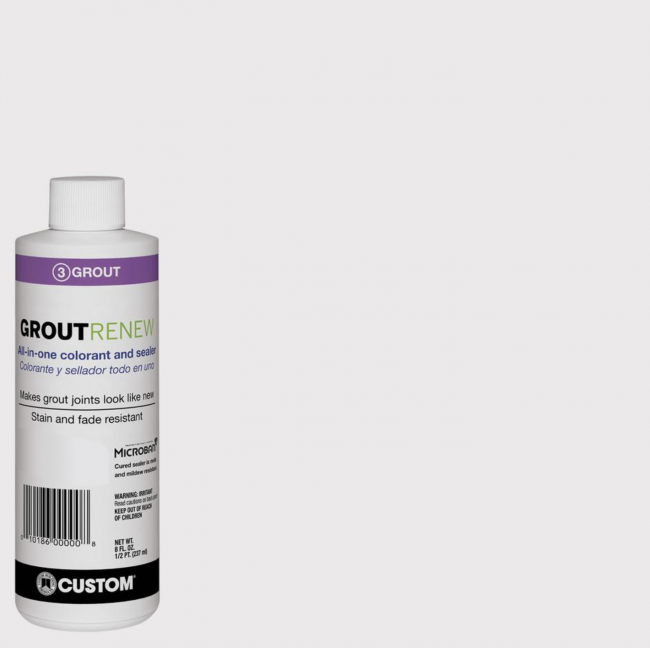
GroutRenew comes in several colors now – over 3 dozen, in fact, including several shades of white and off-white. So you may be tempted to go for the brightest white to get the cleanest, freshest look (that’s “Artic White” pictured below). However, just like paint colors, the brightest, whitest version may not be best for you.
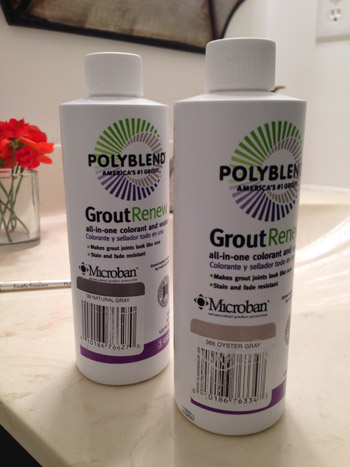
Be sure to take some time to look at your room, your tile, and your lighting to make sure you’re choosing something that blends well with your space. You can always test out a few colors too before committing to one. John and I actually considered two colors – Natural Gray and Oyster Gray, which both look pretty dark compared to the brighter whites. We had seen a neighbor with darker grout in her slate floor, so we thought it was worth considering.
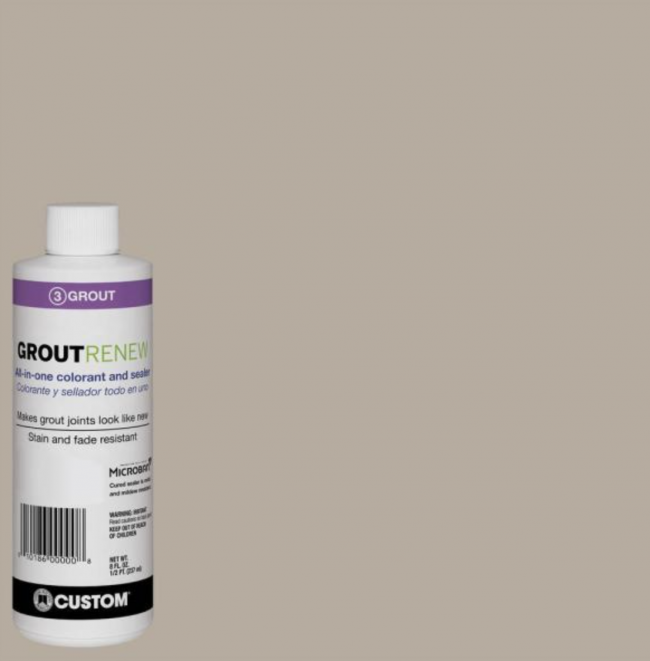
In the end we chose Oyster Gray (shown below) which is still a mid-tone Ivory color – definitely not a bright white. But it looked the most natural and still seemed very bright in contrast to the dark slate tile, without looking artificiall white. Any brighter and we worried it would look like someone in a Crest Whitstrips ad! You know, almost too blinding.
Oh and the Grout Renew was low odor and low-VOC, so this pregnant lady could get down with it. I did wear a respirator, along with opening windows, just because I’m into added ventilation and bad Bane impersonations.
GroutRenew Alternatives
This is the only product we’ve used, but there are some others on the market if this particular one is not available. Lowe’s sells a similar product by MAPEI that comes in a squeeze bottle. Amazon also has a well-reviewed Grout Pen product that comes in a white or beige option. Again, we haven’t personally tried those, but they may be some alternatives to consider if the PolyBlend is not available to you.
How To Apply Grout Paint
The downside to this solution is that it can be time intensive (and patience testing) depending on the size of your surface. For this floor, it took nearly eight hours to apply. But since I had easily spent 25 hours trying various stain lifting methods before resorting to this, well, eight hours with a bottle of Grout Renew was a small price to pay for VICTORY.
Step 1: Clean Your Tile & Grout
I know I said scrubbing wasn’t the solution, but it part of the process. I’ll pause while you laugh since I had already done that TEN MILLION TIMES. But like any surface you’ll be painting, you want to make sure it’s clean of dust and debris. So at least we’re not talking a heavy-duty scrubbing, just your regular washing to remove surface dirt should do.
Step 2: Pick Your Brush Or Application Tool
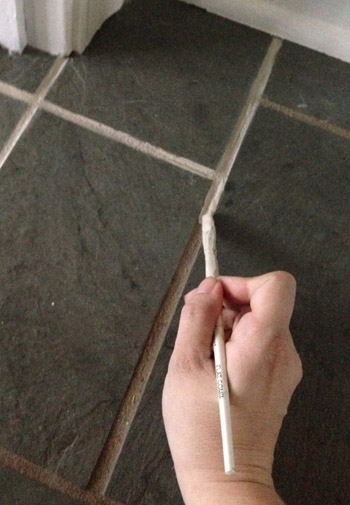
The instructions suggested using an old toothbrush to apply the GroutRenew it into the grout lines and then let it dry for 24 hours. I went with a thin craft brush instead because I had way more control (read: way less mess on the tile surface). The thin paint brush was also easy to dip directly into the bottle when I needed to load up with paint.
Step 3: Plan Your Starting Point & Exit Route
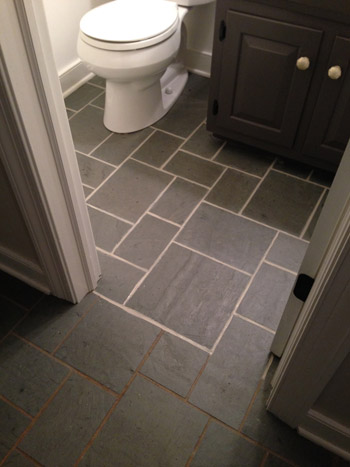
If you’re painting a floor, like we were, you’ll want to sure you don’t paint yourself into a corner (or at least if you do, you can carefully tiptoe across your tile without stepping on the cracks). I started in the half-bathroom because I figured I could work my way out of the room and close the door behind me so it could dry.
It was the opposite of fast. But it worked. Slowly I eked my way out from around the toilet and right out the door, which took about an hour and forty five minutes.
Step 4: Be Ready For Mistakes
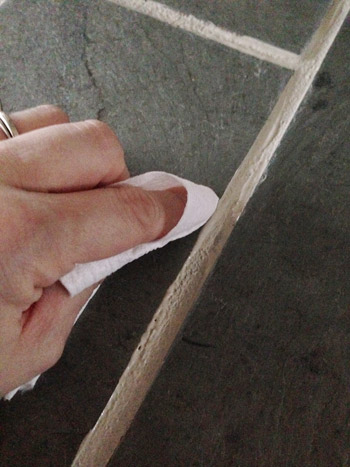
Even with a small craft brush there were still times when it got on the surface of the tile, and there was a very short window for wiping it off before it set (and then had to be scrubbed with a fingernail, which was a huge pain) so I literally would do one or two cracks at a time and then quickly follow up to smooth both sides of the seam out with a small piece of toilet paper (this would remove any from the surface of the tile as well as make the sides of each seam nice and straight looking). A paper towel or clean cloth would work as well. That is, if toilet paper isn’t fancy enough for yo?u.
Step 5: Be Patient & Pace Yourself
Being pregnant, the bathroom was all I had energy for on Day 1. Day 2 involved three more hours of line painting and wiping, and I opted to do 50% of the foyer in a strategic way so we could all still walk on the other half of it. Here’s a shot to show you how hilarious John is. I said: ok, get creative with this picture so my giant respirator doesn’t look weird. I like his version of getting creative – just lop off the whole head area.
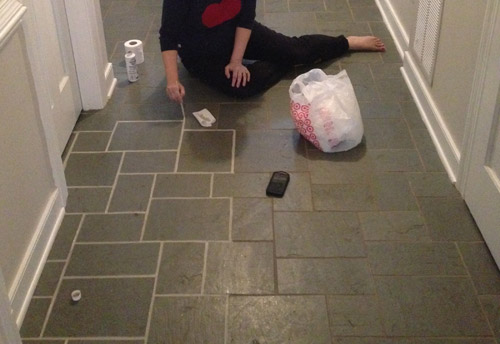
The second day was the hardest day by far, just because I was still kind of sore from contorting my pregnant body around in the small half bathroom the day before, and the little knobby parts of each of my ankles were dragging on the tile as I scooted around like a dog with fleas, but it was all worth it. Worth it and then some!
Day 3 was another three hour process, but it was the most exciting day because I could see the light at the end of the tunnel. The end of the longest-running house battle that I had ever waged was near. I just worked my way around the foyer doing the other half of those pathways that I had done the day before, and I ducked into that last closet while pausing occasionally to fist pump and work on my clean grout acceptance speech (“I’d like to thank the academy, and the grout gods who invented this cheap bottle of miracles and unicorns”).
Step 6: Let It Dry
After each application process, we gave that section a full 24 hour drying period and made sure nothing got wet for 72 hours (since that was another warning on the bottle). It’s a good deal lighter than the old grout was, which still makes us say “whoa now” when we walk through the hallway, but we think it’s just our eyes adjusting. Maybe after 6 months our brains just can’t get over the fact that it finally looks clean!

We also had about 1/4 of a bottle left all of this, which was great in case we need some touch-ups down the line. I’ll definitely update you guys if anything funky happens, but so far it has been great. I mean, just look at how far it’s come from the before:

Update: After nearly two years of use, even with semi-frequent moppings, muddy shoes/paws, and a whole lot of foot traffic, our grout still looks identical to when I applied this stuff (you can see an updated picture that we shared after six months of use here). For the folks who can’t find it in stores, here’s an affiliate link to it on Home Depot.com. There are also alternatives like grout pens on Amazon.
Originally Published in 2014
Psst- Wanna know where we got something in our house or what paint color we used? Just click on this button:
*This post contains affiliate links to things we have actually purchased and love*


Angela N says
This looks amazing! You guys rock! I think I now have my solution to my upstairs 2nd bathroom. When our crappy contractor mixed the grout, he did not mix it correctly so it is not even the right color. We had to have another contractor come in and repair some of his mistakes….floor tiles he cracked and still put down! When the new contractor mixed the grout (using the same bag of grout), it was a different color…the color it was supposed to be. Now I have grout that is two different colors and of course highlights which tiles were replaced. It drives me nuts and makes me frustrated after the money we spent. Of course my husband will not let me get someone to re-grout as he is done spending money in there but I bet he would be on board with this $12 bottle miracle solution! Thank you!!
YoungHouseLove says
Oh no Angela! Hope this helps!
xo
s
Cassandra says
I’m also waging war on my grout… but in the shower.
http://www.ckandnate.com/2013/12/gross-white-grout.html
Do you know if it will work in areas that are constantly getting wet?
YoungHouseLove says
Someone else commented that they used it in the shower and it has been great! I’d read the bottle to make sure there aren’t extra steps for a super wet area like that though!
xo
s
Kerry says
Psst… a bit of unsolicited advice. Seal your grout!!! Just take a small craft brush and some grout sealer, brush it on, then wipe it off (try not to get it on the tile, as it may make the finish a wee bit shinier). I do two coats everywhere, but three around the toilet. The sealer protects grout from water and makes the grout so, SO much easier to clean.
YoungHouseLove says
Great tips!
xo
s
Kerry says
That “before” grout is exactly why I always, ALWAYS seal my grout. I moved into a new construction townhome in August and the first thing I did was seal all of the grout. I used a sealer that came in a yellow bottle from Mosaic Tile (can’t remember the name). I never have to scrub my grout, and it stays looking like it did on Day 1. I do two coats everywhere, but three coats around toilets…because boys are messy.
YoungHouseLove says
SO SMART!!
xo
s
Jessica says
Oh man I just did a happy dance at my desk. I’m so glad you posted this! I have had a similar battle with cleaning our kitchen floor grout, and I ordered this product a few days ago on amazon with the intention to tackle it over MLK weekend. I am so excited that you used it, liked it and provided a tutorial! Perfect timing YHL!! :) And it looks AMAZING!!
Kim says
Amazing!!! And so crazy that when I was about 6-7 months pregnant with my second, I decided to wage the war against grout in my house…in the entire hallway, bathroom and kitchen. I did the Vim cleaner and toothbrush method…which cleaned them for a good long while…however my ‘fetus helper’ of that time period is now 2.5yrs old and running around on these floors..and the grout is starting to accept stains and grossness again…so this might be my new project!!!
Ashley @Girlyobsessions says
We used this stuff on our kitchen floor after installing new tile. The grout we bought had a haze that just would not go away, so I went back and painted all the grout lines. That was 3 years ago and it still looks great! Love the outcome in your foyer!
Emily says
After you are done with this, can you seal it so the results last a very long time?
YoungHouseLove says
A few others said they sealed theirs and it has held up really nicely, so I think I’ll give it a try. Will update you guys as to how it wears for sure!
xo
s
Sarah says
This looks amazing!
As a side note, do you have a link or info on the light in the entryway? I love it!!
YoungHouseLove says
That was from a local shop called The Lighting Outlet but Ive also seen it on Joss & Main and amazon.com.
xo
s
Alicia M says
Sarah, you can search for “moravian star”. They’re everywhere!
Hope that helps :)
Melissa@TheChicDream says
It looks great! I can’t believe how you guys have taken that dark and dingy (and oh so blue-licious) foyer and made it bright and crisp. So so pretty!
Elaine says
Amazing! It looks fantastic! Thanks so much for the info and tutorial – and awesome Fallon/JT video. Hadn’t seen that one before :)
ale norris says
i can’t believe what a HUGE difference that made! great job, guys.
Jessica @ Decor Adventures says
WOW, what a before and after! I love that they have all kinds of products for things like this. That is a completely new floor.
Try some knee pads and scoot your way around next time. Or maybe get one of those cushions you use for gardening to sit on. I do that on floor projects, it helps!
YoungHouseLove says
Thanks Jessica!
xo
s
lizaanne says
I sooooooo adore that slate, always have, and now it looks AMAZING with the sparkling grout!!
I know one day you will take it out, and I will be sad, but until then I will totally enjoy the photos of it there all pretty and nice. :-)
Great job!!!
Kelly says
Just curious, how did you keep the dog off the floor while it was drying? I have 3 cats and would love to use this but can’t figure out how with the cats in the house.
* it looks great BTW, as everything always does! You’re an inspiration!
YoungHouseLove says
I just blocked him into half the house (either upstairs, or downstairs in the living room) and we carried him through the spots we could step on if he was acting like he wanted to be somewhere else. Burger’s a sleeper though, so he just slept on the couch for hours, and then slept upstairs for hours. Rough life. Haha!
xo
s
Andrea says
Once again YHL to the rescue — had never heard of this stuff and am about to put a house on the market! Great job, Sherry, and thanks for the enlightenment (figurative and literal)!
Caitlin says
Looks so great! We have pretty much the same tile in our foyer/powder room that has the same issue. I’ve just been closing my eyes and walking through since we moved in last March. Part of our problem is that it looks like the sealant over the grout has yellowed over time causing an “ick” look. Do you think that your floors were previously sealed? Just curious if that would make a difference. I’m definitely thinking of trying this out – we are starting our hallway reno this weekend!
YoungHouseLove says
I’m not sure ours were since they felt very rough, but that could be from all of my scrubbing! Maybe test it on a small area first?
xo
s
Bonnie @ The Pin Junkie says
I can completely relate to this Sherry! I also have light colored grout in the entry and hall just like you do and it does stain. Like you, I tried a variety of ways to scrub and clean it. After scrubbing and cleaning, it did look better but the problem is that after a few months to a year, the grout starts looking stained and discolored again. After you used this amazing product, did you seal it in anyway to prevent staining from happening again? I hope you do an update in a few months to show how well this product does at preventing stains over time. Thanks for sharing this product! I’ll definitely be getting some next time I’m at the store.
YoungHouseLove says
A few others used the same thing and sealed it and said it has been great so I think I’ll give that a try. Will update you guys with that info and how it wears down the line!
xo
s
Carol Farrish says
Quick an impressive job,Sherry. Might work for me. I have one row of tile on the wall behind the sink. Though the tile is wine color, the grout is white. It took me 3 minutes after I moved in to get coffee stains on it, so I am anxious to try this remedy.
Michelle | Birds of Berwick says
That looks amazing!
Gretchen Brown says
Beautiful!!! I did this too and I agree, that stuff IS magic in a bottle! My 1960’s builders tile had black grout (I’m fairly confident it started off black, but I can’t be sure!) and I tried everything to clean it. I finally bought the grout renew in “linen” and went to town. What a difference!! It took me 5 hours to do one coat. I need to do another one, but I’ve not gotten the motivation up yet. ;)
Before and after: http://goo.gl/6WP23m and http://goo.gl/4FFrgn
YoungHouseLove says
LOVE those before and afters!
xo
s
Reenie says
Holy Grout!!! That looks fabulous. I’ve written it down and gonna get some.
Can’t believe you did all that being pregnant!! :)
Betsie says
It looks awesome! I tried the baking soda paste on our grout with no luck – then tried straight peroxide and a toothbrush and had awesome results. Took forever, but totally worth it!
YoungHouseLove says
That’s awesome!
xo
s
cc says
that looks spectacular, and the one upside to your 6 month adventure to find a solution is that you got 25 hours worth of free workout.
YoungHouseLove says
Seriously! But where are my Madonna arms?
xo
s
Amy says
Thank you thank you thank you for posting this!! I have white/grey tile on my bathroom floor, and made the mistake of choosing a very light grout for it. It of course looked dirty after a few months, and I have tried to clean it many times, but nothing worked. I’m so excited to pick this stuff up! :)
Jennifer says
That looks fantastic! That stuff is a miracle worker! We used it at our house to recolor our nasty kitchen grout from white to gray.
http://www.jjmodern.com/2013/04/04/staining-the-kitchen-grout/
YoungHouseLove says
Looks awesome!
xo
s
Annie says
Oh man, I’ve also been waging war on the grout in my bathroom recently… I’m glad I read this post before I got too far in :) Thanks for the tip!
Jacqui says
THANK YOU for using this! I work at HD and have been eying this product for our apartment’s gross shower! I didn’t know how well it would work or how good it wood look.
Keep us posted on how it holds up!
Amy says
This might have been covered, there are a lot of comments to run through, but do you think this could works with grout that is not only dirty but has also erroded? I used a brush on our grout lines a year ago and it just took off that top layer like you mentioned. Does it fill in those spaces nicely or will it just appear like we’ve painted over the nooks and crannies? We’re trying to decide between trying this and regrouting before selling our home.
YoungHouseLove says
Hmm, if yours is crumbling or eroded I would dig it out and regout, just because your result has to do with how “strong” your base is, and you want it to be stuck nice and firmly.
xo
s
Annette says
I think you may have just saved my sanity. I’ve done the 90 different ways to clean your grout too. Ugh, why do they put cleaning tips online that JUST DON’T WORK??? Yay, thank you I’m going to try this ASAP!
Laurie says
Holy cow! What a difference! I do sympathize all that time on the floor but it was worth it. That is night and day and looks fabulous.
I have lots of things that I’m trying to pretend doesn’t but me but actually does. Like my front porch light that isn’t installed really well (why do they make those so hard to install?) and, for some reason, the original box in the ceiling was installed crooked so a square light sits askew up there. Makes me crazy. I’ll conquer it someday.
Beth says
Where did you guys get the large glass vase with the corks in it? I have been looking for one with an opening wide enough for corks.
Also, I used the polygrout renew in my bathrooms a few months back. (White)and it was great for a few weeks…but seemed like of the stains came back through…after a second coat it has done MUCH better.
YoungHouseLove says
That was from ZGallerie years ago, but I think HomeGoods sells it now too! And as for the stains coming back and needing a second coat, that stinks! Maybe try sealing it now that the second coat is doing awesome? Others have said that really helps it hold up for them!
xo
s
Amy says
Looks great! Do you think this would work on painted grout? We are considering painting our outdated tile and this would be much easier than replacing the grout.
YoungHouseLove says
I’m not sure if it can be used on that, I would check out the bottle/website!
xo
s
Alicia M says
*Picks jaw up off her desk* This is AWESOME!! The cream tile with brown grout in our kitchen has been the bane of my existence for the past 5 years. We’ve been wanting to update it (phase 1 style) but couldn’t decide what we wanted to do. We will eventually replace it later on when we remodel our kitchen. This is the perfect solution!
My question: We have a couple places where our grout is crumbly or cracked. I assume that should be patched before it’s painted. How do you recommend doing such a thing? Is it even possible to “patch in” grout?! Thanks!
YoungHouseLove says
I think in the spots that it’s crumbling I would scrape it out and then regrout them so they’re all flush and secure like the other ones and then you can use something like this over them to unify the color (although be sure to follow drying instructions because I think you need to let new grout dry out a while).
xo
s
Alicia M says
Thanks for the tips! Talking to hubby about it TONIGHT! You guys have lit a fire under my bottom :)
Mollie says
I’m totally going to buy some of that today. Also, I am disappointed that John didn’t get any video of the full on pregnant lady end zone dance. Come for the grout tips, stay for the hilarious video. Jimmy Fallon and JT are a nice consolation.
YoungHouseLove says
Oh man, he’d be in seriously trouble if he ever shared my dance moves.
xo
s
LISA says
Amazing, Amazing, Amazing. Everytime you guys do something different I love it but them think to myself, ‘ugh, those floors’. It looks great! Totally fits now.
Lauren says
Wow. That looks so much better!
Julie says
This is so freakin cool. What I would have given to have known about this in our last house, where I waged a four year battle on to make the grout look better, all to no avail. In my new house we used epoxy based grout, so as to avoid staining. We are getting stains though. I wonder if this product would work on that type of grout?
YoungHouseLove says
I’m not sure. Anyone know?
xo
s
Gretchen Brown says
The bottle says it is for “changing the color of cement grout joints” so I’m not sure it would work. You could always try a small area and test it!
YoungHouseLove says
Great tip!
xo
s
Becca says
Wow! Who knew it would make such a difference?!
Cindy says
Great job! I love posts where you guys revive something old and and make lemonade from lemons! :-) This grout paint is a great find! We used a different brand to paint over our freshly grouted subway shower tiles a few years ago (my dear husband assumed all grout came in one color and I didn’t know about it until he had finished grouting the entire shower while I was at work! Sadly our color scheme was NOT orange/rust-colored grout with white subway tiles!!)
So we made a half-hearted attempt with white grout paint and were completely amazed at how great it turned out! You could never tell it wasn’t white grout to begin with and three years later, it has held up beautifully. :-)
This makes your foyer look so fresh and very modern.
YoungHouseLove says
That’s so awesome! So glad to hear it held up so well, even in a shower!
xo
s
Sam Kelley says
WOW. Amazing. I did once have amazing luck using toilet bowl cleaner to clean my grout. However it smelled and was gross to get clean. It did however do the trick. So if your grout ever gets gross give that a go!
YoungHouseLove says
Thanks Sam!
xo
s
KarenH. says
It looks wonderful!! Obviously, I’m way too late now, but in case you ever have to do something similar, consider using ankle weights with the weight bars removed. They help cushion the bony parts of your ankles from hard surfaces.
If you don’t have ankle weights, just put a folded towel under your ankles. You’ll have to adjust it as you go, but it’s still comfier than tile on your ankle bones :)
YoungHouseLove says
SO smart!
xo
s
Casey says
Oh my GOSH, I am doing this this weekend. For real. Bathroom, you have been warned! Great job Sherry!
YoungHouseLove says
Haha! For some reason “bathroom, you have been warned” is cracking me up. Go get ’em Casey.
xo
s
Katy says
That’s amazing! Man.. kinda wishing we had tile and grout somewhere so I could do this. What an amazing difference!
Jess says
holy crud!!! game changer! our bathroom is in desperate need of this treatment and I’ve tried several pinterest-inspired home remedies as well, to no avail. So thank you for the tip! And PS- your foyer looks so fab. The light fixture, the door color; what a happy space to walk into/through each day :-)
Ben says
My wife used this on our bathroom tile, and it is an amazing product. I’m glad you found it for your entryway/hallway/bathroom too!
YoungHouseLove says
So glad to hear you guys loved it too!
xo
s
Michelle says
Thank you for showing us this! My husband and I were just starting to wonder what to do with our tile in one of the bathrooms. Its a nice gray ceramic tile but with a mauve colored grout. Were going to be changing the bathroom wall color to something other than the poopy brown it was painted by the previous owners but didn’t want it to clash with the flooring. Who knew you could change colors of grout!?
Meike says
It might sound a little weird but as a long time reader your refinishing the grout with those fantastic results makes me happy with little tears in my eyes at the same time.
We are going through a long process of restoring my deceased grandma’s house built in the 1930s and building on to it at the same time. Unfortunately we were having lots of problems with the architect and other hired people. The project came to a halt for almost a year due to legal reasons. Finally were are back on the road with a new, caring architect and his team.
I CAN’T WAIT to finally get down on my knees cleaning or refinishing grout, refinishing the original pitchpine floors, painting, sanding, hanging artwork etc. I already have a long list of DIYable stuff – many things inspired by you guys.
Reading YHL is like therapy for me. It helps me envision that our future home will be a happy place – even after all the problems and sleepless nights we went through. Thanks guys for being there and being so inspiring!
YoungHouseLove says
Oh Meike, you’re so sweet! Sending you so much love and all the DIY luck in the world!
xo
s
Tiffany says
Oh my! You just made my day!!
We have really pretty tiles as our counter tops in our kitchen but the grout is so stained and ugly!
This will make SUUCH a huge difference in how our entire kitchen looks!
My only concern; about a year ago some cooking oil leaked from our cupboards onto the counter tops. It has left a stain on the grout. Do you think the paint would adhear to the grout if there is still a bit of oil soaked in?
Thank you SO much for sharing! Your posts and projects continue to inspire!
YoungHouseLove says
Oh no, anyone have an oil-stain removing grout tip for Tiffany?
xo
s
betty says
i love how little changes (not that this project was little in time or effort) can make such a HUGE difference!
ps.. since our floors turned out great.. our next project is to hopefully get some herringbone action on our fireplace like your last one!! cant wait to save up and see how it turns out!
YoungHouseLove says
That sounds awesome Betty!
xo
s
Liz says
I saw the after image on Pinterest (with the caption: gorgeous entryway)and thought to myself “That looks a lot like John & Sherry’s entryway, but without the blue tile.” Fast forward to my lunch break/YHL reading time and it IS your entryway! I don’t know if it’s the picture or what but the tile looks a lot less blue and more grey now. Love it!
YoungHouseLove says
SO FUNNY!
xo
s