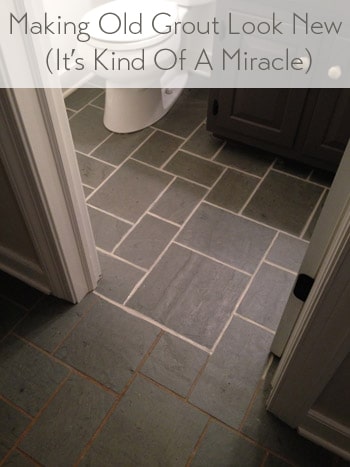
The discolored and dirt-stained grout in the tile floor of our foyer looked super old and gross, but after trying nearly a dozen cleaners and cleaning tricks we nearly gave up. Then we finally find THE SOLUTION to making the grout look white and clean again!
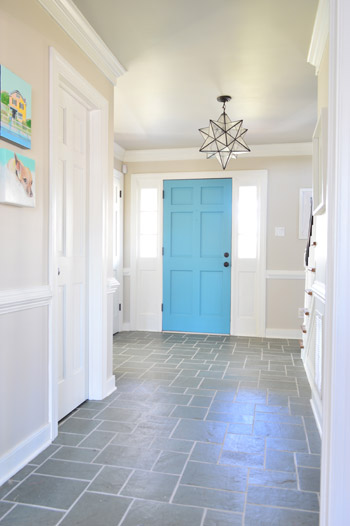
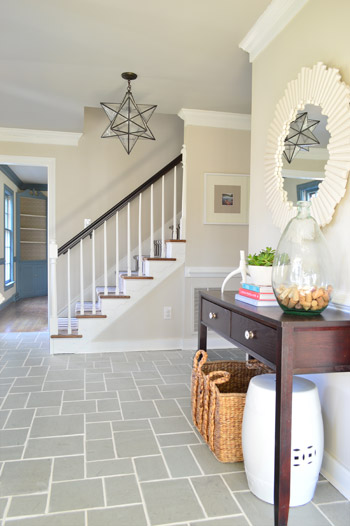
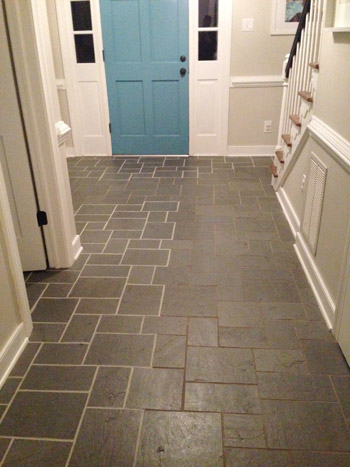
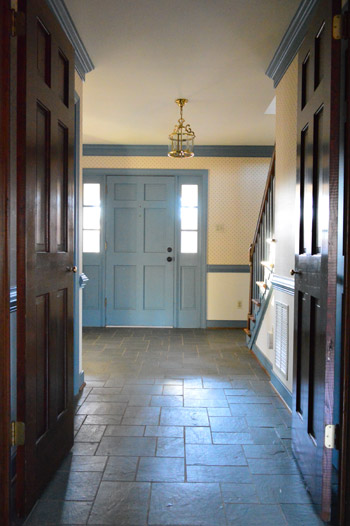
Now that we’re done, you can see how the view just got a heckova lot better around here. The crisp white grout lines play off the white trim and make the whole space feel newer and cleaner.
The funny thing is, it wasn’t actually cleaning that did the trick. So if you’ve got a similar issue with discolored or stain grout, here’s our official intervention: stop scrubbing! Well, maybe give scrubbing a fair shot, but don’t be discouraged if it gets you nowhere. There’s another way!
Cleaning Tricks That DIDN’T Work
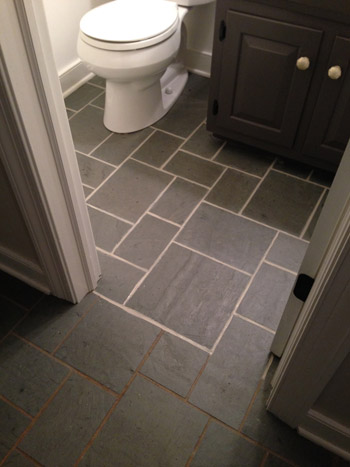
As you might recall, for the past six months that we’ve lived here, it has looked like this.
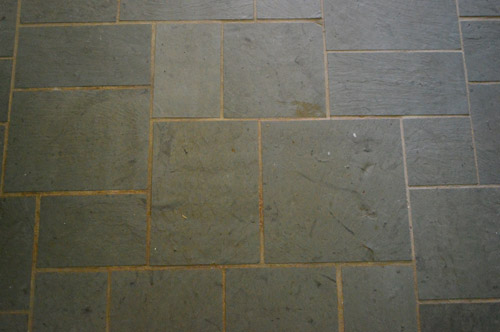
I gave nearly every method under the sun a shot to make that grout look clean. After repeatedly scrubbing the heck out of it, I knew that it was actually very (very, very) clean… it just was so discolored and stained in certain areas, that no amount of blood, sweat, tears, or elbow grease could make it look that way.
Some of my attempts to clean grout included (but weren’t limited to):
- various baking soda paste mixtures
- various white vinegar solutions
- copious magic erasers
- specialty grout cleaning floor sprays/potions/scrubs
- bleach pens
- oxygenating cleaners like Oxiclean
- Mrs. Meyers powdered cleanser + a wire brush
- Barkeeper’s Friend + a wire brush
- a borrowed steam mop
- scrubbing with a stiff bristle brush
- lots and lots of muttered cursing
The Solution To Getting White Grout Again
By this point I did what most people would do. I gave up and ignored it for another few days (what’s a few days after six months of no-dice results?). And then I finally faced facts. The grout either needed to be scraped out and regrouted entirely (which makes for a pretty messy job, especially in the main hallway of our house which connects the entire upstairs to each room downstairs) or it needed to be refinished.
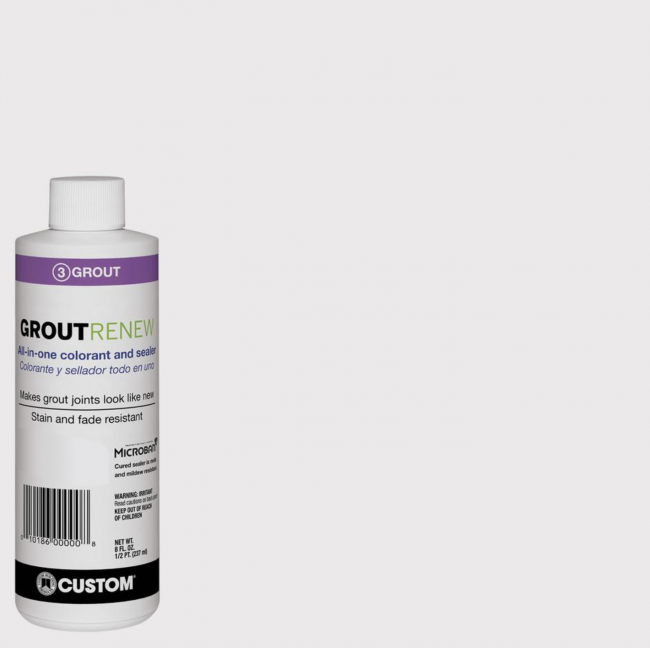
Thankfully a few of you tipped me off to a product you’ve used with success called Polyblend Grout Renew. Let me just skip to the punchline: it worked, and I wish I had tried it before spending six months scrubbing my mind out.
The cost? A cool $12 from Home Depot. (Update: it’s closer to $20 now, but there are more affordable grout pen alternatives available.) Can I get a what what? Note: this might sound like an ad for the stuff, but Grout Renew doesn’t know us from Adam – I’m just beyond grateful that it worked.
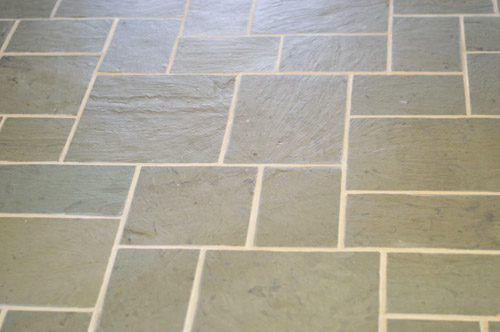
Choose Your Grout Paint Color
GroutRenew comes in several colors now – over 3 dozen, in fact, including several shades of white and off-white. So you may be tempted to go for the brightest white to get the cleanest, freshest look (that’s “Artic White” pictured below). However, just like paint colors, the brightest, whitest version may not be best for you.
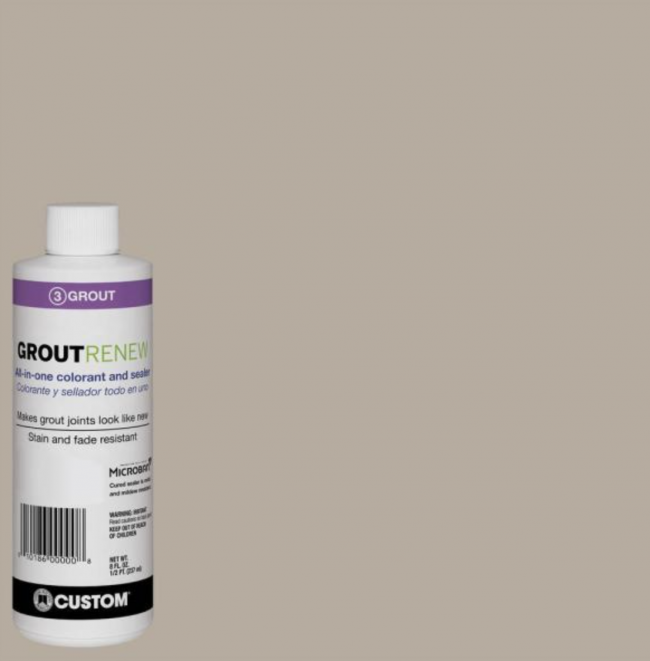
Be sure to take some time to look at your room, your tile, and your lighting to make sure you’re choosing something that blends well with your space. You can always test out a few colors too before committing to one. John and I actually considered two colors – Natural Gray and Oyster Gray, which both look pretty dark compared to the brighter whites. We had seen a neighbor with darker grout in her slate floor, so we thought it was worth considering.

In the end we chose Oyster Gray (shown below) which is still a mid-tone Ivory color – definitely not a bright white. But it looked the most natural and still seemed very bright in contrast to the dark slate tile, without looking artificiall white. Any brighter and we worried it would look like someone in a Crest Whitstrips ad! You know, almost too blinding.
Oh and the Grout Renew was low odor and low-VOC, so this pregnant lady could get down with it. I did wear a respirator, along with opening windows, just because I’m into added ventilation and bad Bane impersonations.
GroutRenew Alternatives
This is the only product we’ve used, but there are some others on the market if this particular one is not available. Lowe’s sells a similar product by MAPEI that comes in a squeeze bottle. Amazon also has a well-reviewed Grout Pen product that comes in a white or beige option. Again, we haven’t personally tried those, but they may be some alternatives to consider if the PolyBlend is not available to you.
How To Apply Grout Paint
The downside to this solution is that it can be time intensive (and patience testing) depending on the size of your surface. For this floor, it took nearly eight hours to apply. But since I had easily spent 25 hours trying various stain lifting methods before resorting to this, well, eight hours with a bottle of Grout Renew was a small price to pay for VICTORY.
Step 1: Clean Your Tile & Grout
I know I said scrubbing wasn’t the solution, but it part of the process. I’ll pause while you laugh since I had already done that TEN MILLION TIMES. But like any surface you’ll be painting, you want to make sure it’s clean of dust and debris. So at least we’re not talking a heavy-duty scrubbing, just your regular washing to remove surface dirt should do.
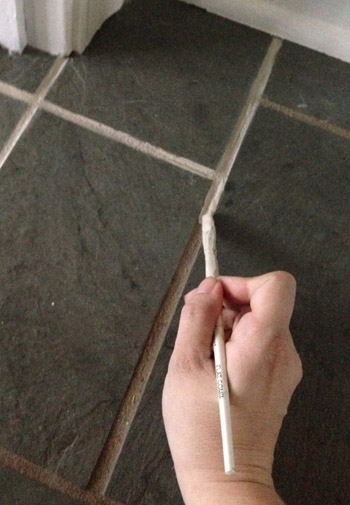
Step 2: Pick Your Brush Or Application Tool
The instructions suggested using an old toothbrush to apply the GroutRenew it into the grout lines and then let it dry for 24 hours. I went with a thin craft brush instead because I had way more control (read: way less mess on the tile surface). The thin paint brush was also easy to dip directly into the bottle when I needed to load up with paint.
Step 3: Plan Your Starting Point & Exit Route
If you’re painting a floor, like we were, you’ll want to sure you don’t paint yourself into a corner (or at least if you do, you can carefully tiptoe across your tile without stepping on the cracks). I started in the half-bathroom because I figured I could work my way out of the room and close the door behind me so it could dry.
It was the opposite of fast. But it worked. Slowly I eked my way out from around the toilet and right out the door, which took about an hour and forty five minutes.
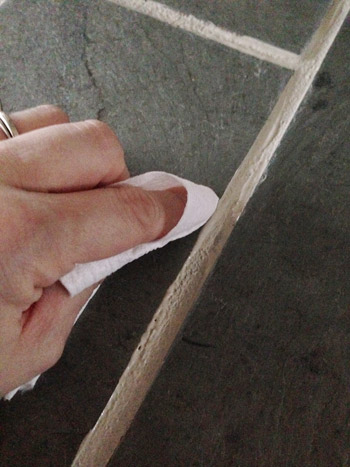
Step 4: Be Ready For Mistakes
Even with a small craft brush there were still times when it got on the surface of the tile, and there was a very short window for wiping it off before it set (and then had to be scrubbed with a fingernail, which was a huge pain) so I literally would do one or two cracks at a time and then quickly follow up to smooth both sides of the seam out with a small piece of toilet paper (this would remove any from the surface of the tile as well as make the sides of each seam nice and straight looking). A paper towel or clean cloth would work as well. That is, if toilet paper isn’t fancy enough for yo?u.
Step 5: Be Patient & Pace Yourself
Being pregnant, the bathroom was all I had energy for on Day 1. Day 2 involved three more hours of line painting and wiping, and I opted to do 50% of the foyer in a strategic way so we could all still walk on the other half of it. Here’s a shot to show you how hilarious John is. I said: ok, get creative with this picture so my giant respirator doesn’t look weird. I like his version of getting creative – just lop off the whole head area.
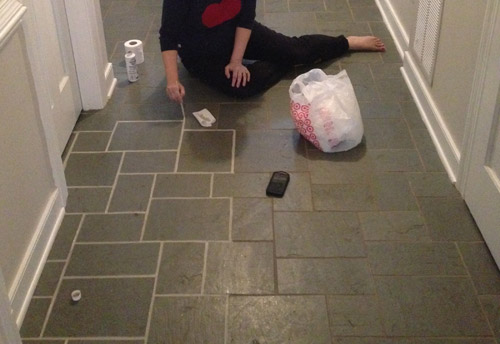
The second day was the hardest day by far, just because I was still kind of sore from contorting my pregnant body around in the small half bathroom the day before, and the little knobby parts of each of my ankles were dragging on the tile as I scooted around like a dog with fleas, but it was all worth it. Worth it and then some!
Day 3 was another three hour process, but it was the most exciting day because I could see the light at the end of the tunnel. The end of the longest-running house battle that I had ever waged was near. I just worked my way around the foyer doing the other half of those pathways that I had done the day before, and I ducked into that last closet while pausing occasionally to fist pump and work on my clean grout acceptance speech (“I’d like to thank the academy, and the grout gods who invented this cheap bottle of miracles and unicorns”).
Step 6: Let It Dry
After each application process, we gave that section a full 24 hour drying period and made sure nothing got wet for 72 hours (since that was another warning on the bottle). It’s a good deal lighter than the old grout was, which still makes us say “whoa now” when we walk through the hallway, but we think it’s just our eyes adjusting. Maybe after 6 months our brains just can’t get over the fact that it finally looks clean!
We also had about 1/4 of a bottle left all of this, which was great in case we need some touch-ups down the line. I’ll definitely update you guys if anything funky happens, but so far it has been great. I mean, just look at how far it’s come from the before:
Update: After nearly two years of use, even with semi-frequent moppings, muddy shoes/paws, and a whole lot of foot traffic, our grout still looks identical to when I applied this stuff (you can see an updated picture that we shared after six months of use here). For the folks who can’t find it in stores, here’s an affiliate link to it on Home Depot.com. There are also alternatives like grout pens on Amazon.
Originally Published in 2014
Psst- Wanna know where we got something in our house or what paint color we used? Just click on this button:

*This post contains affiliate links to things we have actually purchased and love*

Rachel Laree says
OHHHH MEEHHH GARD, I am so buying this for my grout. Thanks for waging the war!!
Tanya Zehnder says
Thanks for the tip!
Corie says
I LOVE them! I have to admit, I was skeeved by the dingy grout but this looks GREAT, guys. Major improvement. Big Bravos for you!
Flavia says
Looks nice very nice
Julie says
Oh my gosh, what a difference. I love it! We have white tile in our kitchen with a brownish grout–ick. I may have to try this. It looks fantastic!
Erica says
YES YES YES! I was just about to start going down your list of failures myself as I compiled every Pinterest DIY grout cleaner solution out there. Glad to see those would have been a total time waster! I’m heading straight to HD for a bottle of that. And I get weird satisfaction to do tedious projects like this. :)
Lindsay Butler says
That is amazing! I love this. I LOVE the look of clean, so this simple fix rocks my world!
Sarah @ The Simple Home says
Wow, I would have never even thought of that! Maybe it’s because I have never lived in your house? Could be a reason. It looks soooo much better though! I love it! Even if the tile is perfect (not scratched or broken or anything) do you think your going to keep it? No offense or anything (because I know you didn’t choose it) but it sort of looks like the tile in my old school (it was built in 1960). It doesn’t look horrible in the least but when you have a little money to spare do you think that you will replace it? Just wondering.
Sarah
http://www.thesimplehomeblog.blogspot.com
YoungHouseLove says
There are some areas where it’s broken, and we’d like the same flooring to run from the kitchen out into this hallway and half bathroom someday. So way later when we do the big kitchen reno we’ll most likely redo this area as well, just because there are currently three different floors that meet in the corner of the kitchen (slate, faux brick, and hardwood) and it just looks really weird. I’d love to do a heated floor or something cozy like that.
xo
s
Cherie says
I used this product in my kitchen about 6 months ago and so far it’s held up great. I love how it makes such a huge difference!
The craft brush is an excellent idea- I had a lot of excess to wipe up with a toothbrush. You’ve motivated me to tackle the bathroom next!
Kaylin says
Wow! That looks awesome!! Deff gives your house a “pop”!
-Kaylin
http://www.bombshellwifelife.blogspot.com
Kristin says
This post brought tears to my eyes because I have a section of my living room that is slate tile that looks so dirty that I’m embarrassed by it. I tried scrubbing over XMas break to no avail. Thank you for the recommendation! Do you have any products that you personally like as a slate tile cleaner?
I’m struggling with the layout of our dining room/living room open area because the LR (small space) is where the slate is. There are original hardwoods underneath that were cut and are sure to be in horrible shape. I’m not sure whether to just spruce up the slate to make it a homey feel or attempt to rip up the slate (and laminate through the rest of the room) and redo the hardwoods. I’m scared. :)
YoungHouseLove says
I like to clean tile with watered down Dr Bronners or Mrs Meyers soap and a moist mop or cloth. It’s mild but seems to do the job if you’re not dealing with huge stains like the ones on our grout.
xo
s
Andrea says
i love this and you guys. you just solved one of my biggest home problems. we have pretty much the same floor as you do in our foyer, and when we first bought the house we spent a ton of time stripping whatever sealant the previous owners had put on that had completely yellowed and started filming off. yuck. so after all that work we were left with stained grout that I could never get clean! I cannot wait to try this!! thanks guys!
Stephanie says
Looks fantastic! We used this in our horrible shower, after living with grout that wouldn’t get clean for years! I wish we’d done it sooner… It is holding up great 6 months later.
Marcia says
This is AWESOME! This is such a practical/attainable post – it is VERY much appreciated. Makes me feel like I won’t have to gut my half bath as soon as I thought!
Nicole J. says
I was literally ready to call in professionals to regrout the tile in all of our bathrooms before reading this! I think I can do the job for under $75 bucks now because of this. Thank you thank you thank you!
Rebecca W says
Does this basically paint over the grout? We have grout chipping out at some spots and I was wondering if I just use any grout to fill it in then use this (the current grout is gross and stained) would it all look cohesive in color? Thanks!
YoungHouseLove says
Yes, I think it basically paints (although it’s not paint since paint would peel and crack, so it has some polymers that stick to grout, even when it’s wet or washed, etc). Ours was super varied in color since some stains were in some areas, and it’s all one color now.
xo
s
Michelle says
Amazing makeover! It is like the perfect makeover, too – only $12! Guess what it lacked in actual dollar cost it made up for in sweat equity – I am impressed you did all of that while pregnant! You go, girl.
Jessica says
I really cannot believe the difference! I didn’t realize in pictures the grout was holding this room back until now! I thought the changes you made were lovely, but now this room is totally magazine worthy! Also, can I just say you are my hero? Getting down on the floor like that all pregnant and working for hours on hard tile… You are unstoppable!
YoungHouseLove says
Aw thanks Jessica! What can I say… that dirty looking grout was driving me mad! Haha!
xo
s
allison says
wow!! that’s an amazing transformation!! Nice work! *high five!*
Theresa M. says
Stick a fork in this foyer, it is DONE! (at least for now.)
Sheena says
You guys have no idea how perfect this is for me! We have a tiled foyer too- it’s a beige travertine-wannabe square tile with dark brown grout & it has bugged me for the whole 2.5 years we’ve lived here. I’ve pinned about a hundred ways to clean grout, but I’m thinking it’s just brown, not dirty. Can’t wait to give this a try!! Do you have a color recommendation for a sandy/beige tile? Thanks! :)
YoungHouseLove says
I would just look at the colors they sell. I don’t remember them offhand, but many were gray-based and many were beige/sand-based (I’d go with one or two shades lighter than your tile with the same sand undertones. Good luck!
xo
s
Josee says
Wow! It looks GREAT! So clean and just makes the tile feel a bit more modern. I might have gone with “Grout! Grout! White It All Out!” for the title of this post, though. : )
YoungHouseLove says
John did a “grout grout, let it all out” post title once, so I didn’t want to step on his jam. Haha!
xo
s
Skeeter says
I am so glad you guys posted this! I have also tried numerous cleaning methods to no avail. I’ve never been so excited about grout before lol
natalya says
I just cannot believe the difference this foyer has undergone!! It went from ghetto to gorgeous! I love the end result. Way to go~
Ashley says
In the infamous words of Sheldon Cooper, “Bazinga!”
YoungHouseLove says
Ha!
xo
s
Jessica says
What a difference! Sometimes the simplest (albeit time consuming) DIY projects are the most rewarding!
I’ve been battling with the vinyl tile in my kitchen which is laid edge to edge with no grout, but is made to appear as though it has grout (the edges slant in a little to create a little groove). The “grout” is gross and I’ve tried many of the cleaning methods you listed in your post (baking soda, vinegar, barkeeper’s friend…) which help a little, but not enough to motivate me to complete the whole kitchen. In addition to regular dirt and grime, I’m also fighting with grease buildup since it’s in the kitchen. Has anyone had any luck cleaning vinyl tile? I should mention I’m in a rental for grad school so something that will go easy on my wallet would be nice since this isn’t my forever home :)
YoungHouseLove says
Anyone have vinyl tile cleaning tips for Jessica?
xo
s
amy says
Holy moly! What a huge difference! I’m so happy it worked out, after 6 months of feeling like the floor was dirty I can only imagine how glorious that feels!!
We just redid every floor in the house before we moved in (minus the guest room which was finished…on Christmas day haha). Clean floors for the win!
Jillian @ Hi! It's Jilly says
Oh man! I wish I’d known about that stuff a couple years ago when we were getting our house ready to sell! We ended up regrouting our whole front hall, living room, kitchen, and bathroom! Aack!
Katie Rose says
Did you also pin this recently? I swear I just saw this product on Pintrest a couple days ago and thought it was JUST the thing I need for my rental apartment’s bathroom. I have white tile (Never do white tile in a bathroom! Brown hair shows EVERYWHERE) and the grout by comparison looks brown – ugh! SO GLAD to hear from someone I “know” that it really does work! Luckily I only have to do a small bathroom :)
YoungHouseLove says
Wasn’t me, but whoever pinned it was onto something! Haha!
xo
s
April says
Seriously, I wish I could high-five you. I’ve been mulling over this product for our basement, and now I’m ready to take the plunge. Thank you, thank you, thank you for testing it out first.
Ally says
Well done! I found this product a few years age and have used it a few times. The results are amazing. I have a house covered in white tile with pets and people and I really like that I don’t have to scrub constantly. An annual application and we’re good to go.
Casey says
We used this stuff in our last house. It’s a wonder product! The foyer & bathroom look great!
Roberta says
Looks very good! What kind of respirator do you use???? I will be needing one soon :)
YoungHouseLove says
We got ours years ago at Home Depot, and it doesn’t have a brand name on it! It was around $40 I think, and it takes filters, which we change out occasionally. I would just look at Home Depot to see what options you have (I think there were two at ours, so it wasn’t too hard to just pick one, haha!).
xo
s
Jeanna says
Happy Dance! Happy Dance! Happy Dance! They look great!!!!!!!! :) Can’t believe the difference :)
Shana says
I am so excited for this post – I spent a ton of time in early December using a toothbrush and oxyclean to scrub all the grout in our upstairs bathroom before the holidays/influx of out of town guests – it made a difference but now a month later and it looks bad again. Our bathroom is small but has 2 inch stone tile with thick grout lines – I think this is going to take me forever. I am totally going to steal the idea above to watch netflix on my lap top as a work! Also glad to hear others say it is working well in a bathroom when people get out of the shower!
I did try to do the same cleaning technique in our kitchen – bigger 12 inch white tiles with thinner grout lines – and the grout started CRUMBLING. I would appreciate any advice of what to do with that. We bought our house a couple of years ago and the previous owners did most of the renos but for the kitchen did a “Phase 1” to help them with the sale – which was cool – many of the houses we looked at we were planning to do the same – and they saved me from painting cabinets myself! They did a great job painting the original 1920s cabinets white/replaced hardware with ones with a brushed nickle finish/replaced the counter with a faux granite laminate/retitled the floor and added fun backsplash. We’re planning to totally gut it next year so the floors will go then but we want it to be clean and liveable while we save up for the big reno.
Do you think I could dremmel out the old grout (or part of it?) and throw some new grout in?
Sigh – it’s like one step forward and two back sometimes!
YoungHouseLove says
Yes, I think you have to dig out grout if it’s crumbling (they sell a sharp tipped thing you can do it with manually, or a dremel hopefully would work too). Good luck Shana!
xo
s
Diane says
Wow that looks amazing! I’ll have to keep that in mind for future products!
Holli Anne says
SO Beautiful! I’m definitely going to remember this product for our little bathroom :)
Melissa says
Best $12 spent ever, Sherry! It looks AMAZINGGGG
Loni says
This looks amazing! Definitely going to buy some for my kitchen/bathroom! Thanks!
Totally, mostly, unrelated question: have y’all tried painting a bathtub yet with that epoxy paint at the orange/blue? Our tub/tile is that awful olive green. I love green, it’s my favorite, but not in my bathroom.
YoungHouseLove says
We have only had professional reglazing (at our first house, which we loved and held up well). Anyone have DIY tips for Loni?
xo
s
Kelley says
Hey y’all! This looks amazing! I have had a similar “keep scrubbing” saga with our vintage black and white hex floor in the bathroom. These tiles are tiny (1″) with teeny-tiny grout lines (1/16″). Based on your experience, would this product work well for my situation? I have a pretty steady hand and figure I could use a tiny craft brush. Am I crazy to consider it? I know it would take FOREVER (but thankfully the bathroom is small)…but aside from time, what are your thoughts? Is the product thin enough to work on grout lines that small? Do you think it would be worth it? THANKS! You have given me new hope for our bathroom floor!!
YoungHouseLove says
I would totally do it! It’ll take FOREVER like you said, but as long as you wipe the excess as you go (literally wipe each line as you do it, so it doesn’t set since it’s much harder to get off when it sets) you should have some pretty awesome results!
xo
s
Gretchen says
Looks great! I had the same dirty grout in our kitchen and actually used Resolve Carpet cleaner, sprayed it on the grout, used a cleaning bush to give it a little scrubbing and it worked like magic. So next time or anyone that wants to try another tick.
Kate says
I’m glad you guys decided to keep this floor! I was worried you were going to get rid of it. I have a similar floor in my entryway that I love — dark grout and all — BUT it is nice to know that I could always “refresh” it this way. Thanks for the tip!
Here’s my floor, it is more of a green/grey mix:
http://retroranchrevamp.com/house-tour/
Kate C says
I have to be honest. Every time you mentioned keeping the tile, I just couldn’t understand what you were thinking. I couldn’t imagine how you could ever make that floor look nice, in comparison to the awesome walls/ceiling/stairs. It just drug the whole look down so far. But this is amazing! The transformation is incredible. The floor actually fits in and looks great now! Call me impressed.
Amy says
Ummmmm, yeah, GROUT!! This is perfect timing to me since last Saturday I spent about 2 hours cleaning the grout in our laundry room, and it does look better! but nowhere close to white. We are refinishing our laundry room and attic (some DIY and some contracting) and since the laundry room was finally mudded and painted, I decided it was time to finally clean the grout…. with somewhat disappointing results. Thank you for this post (and all your others). You guys are a huge inspiration to us as we do this laundry room and attic :)
Kacey W. says
I feel like this is almost as big a deal as the pregnancy announcement! Almost :)
Congrats on your “new” floor!!!
YoungHouseLove says
Haha!
xo
s
Becky Wilson says
Victorious! What a glorious improvement!!! I love the slate and am so glad that you didn’t rip it out. Also, thank you for this post because I need to go get some Grout Renew ASAP!
Whitney says
I am so surprised at how much less blue the tile looks now! I’ve been contemplating lightening up our dingy grout with the Grout Renew, also! I can’t wait to take the plunge now!
heatherb says
Thank you, thank you, thank you! The grout in our kitchen is much like your old grout. I thought I’d tried everything, but your list of attempts has mine beat. It looks better after the scrubbing, and I know it’s clean, but it doesn’t look clean. I was thinking about having Stanley Steamer out to see if that would do the trick but hesitated 1. Because of the cost and 2. Our grout is the minty green color of toothpaste, and quite frankly I wasn’t sure I wanted it restored. Was afraid would have to resort to digging out old and regrouting.
So excited to know there is a perfect solution! Not sure how to accomplish 24 hour dry time…kitchen is open concept in middle of house, plus we have a large dog and a 3Yao and 1 Yao to keep off it. I’m thinking apply and then leave for a well deserved vacation? ;~)
YoungHouseLove says
Oh yeah, give yourself a nice trip after all that floor work!
xo
s
Lisa R says
We don’t have a Home Depot but searching for some of this right now!! I LOVE this post!!!!!! I need a facelift on my kitchen grout!
Kristin says
That is flippin’ gorgeous! Kind of wishing I had some grout that needed a pick me up…wait! Maybe I do…