Dude, removing wall to wall carpeting (and all the layers under it) is no joke. We learned that when we finally tackled that task this weekend – and lived to tell the tale. Let me just tell you, progress smells a lot better than old carpeting. Even when there’s a substantial amount of sweat involved…
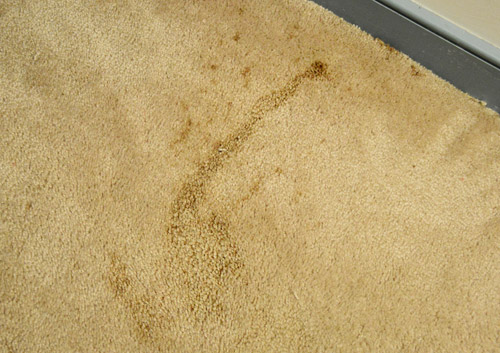
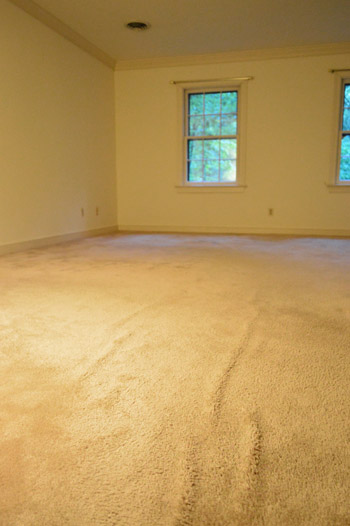
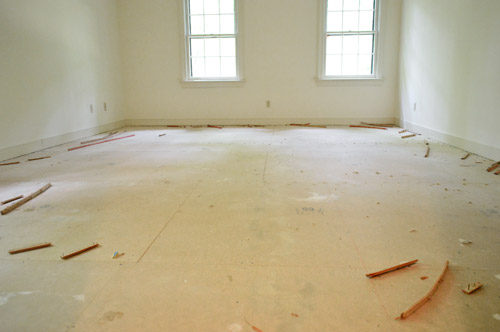
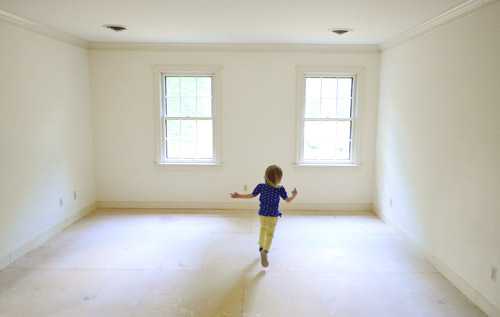
When we bought this house we knew that the four bedrooms upstairs (along with the hallway) needed new flooring since the once-cream (now mostly tan) wall to wall carpets were stained, threadbare, and even holey in some areas.
Thankfully a few areas were so loose we could peek under them during our very first walk-through to see what we were working with. Sadly, there was no hardwood to be found under there, and we were greeted with subfloor. But we’re so glad we made that discovery before buying (we definitely factored that expense into our decision). And after we got over the sadness of not having old hardwoods under there to revive, we got excited about picking out new flooring.
We considered a whole range of things for a while (hardwoods, new wall to wall carpeting, bamboo, tile) and after a lot of thought ended right back at oak hardwoods, since it’s what we had in our first house as well as our current one (even in the bedrooms). We like that we can always toss down an area rug to cozy things up (and since those can change over time it feels a little more flexible than committing to a certain type/color of wall to wall carpet for a decade or two). Plus with a kid and a dog we have just found wood flooring to be easy to keep clean/wipe down/etc.
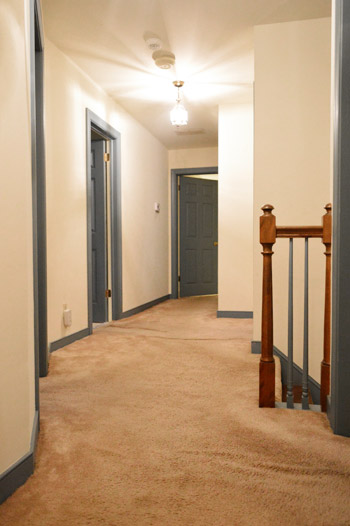
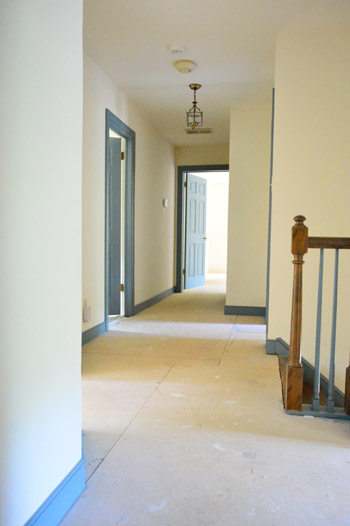
We also already have oak flooring on the stairs that lead to the second level as well as in the future office, dining room, and living room – so we thought finding some in the same finish and grain would be a nice seamless this-has-always-been-here choice. But before we could bring in some delicious new hardwoods to install ourselves (at least that’s the plan!) we were faced with stripping away all of the aforementioned nasty carpeting in all four bedrooms up there and the hallway… which turned out to be quite the job. Here’s how we got ‘er done.
First we used a mini crowbar to pry back the corner…
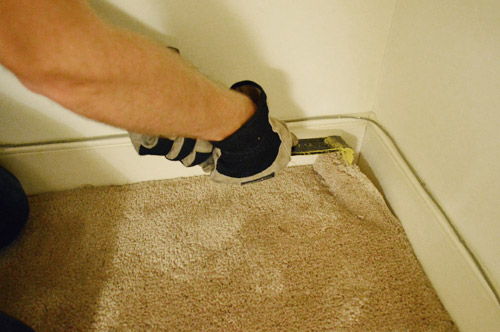
With some gentle force it popped right up and we could start to pull it out from that corner.
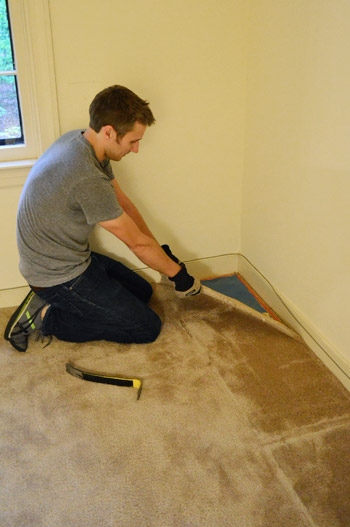
It definitely wasn’t delicate pulling, more like forceful yanking, but with John working on one corner and me in another we were able to free up enough of it to start rolling it towards the other side of the room (we paused to take this photo, but picture me standing next to John rolling along with him). It’s definitely one of those four-hands-are-better-than-two tasks if possible.
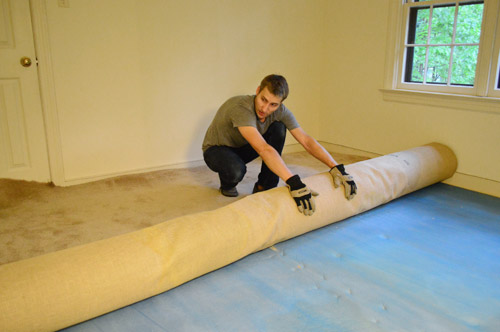
Oh and wear gloves! And long sleeves if you’re smart. We wised up after our forearms got raw from carrying rolls of carpeting down to the garage, where we’re storing it all until we can figure out what to do with it (it’s too gross to donate, so we might need to rent a Bagster or something to get rid of it). Update: thanks for all the info on recycling carpets, cutting them down for curbside pickup, and all the other cheaper/greener alternatives than just trashing them. You guys are geniuses!
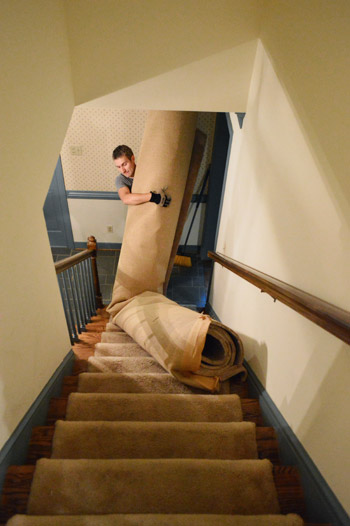
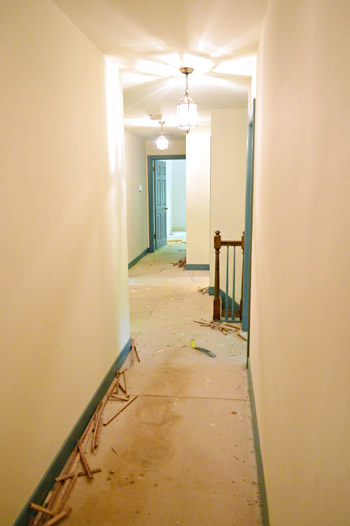
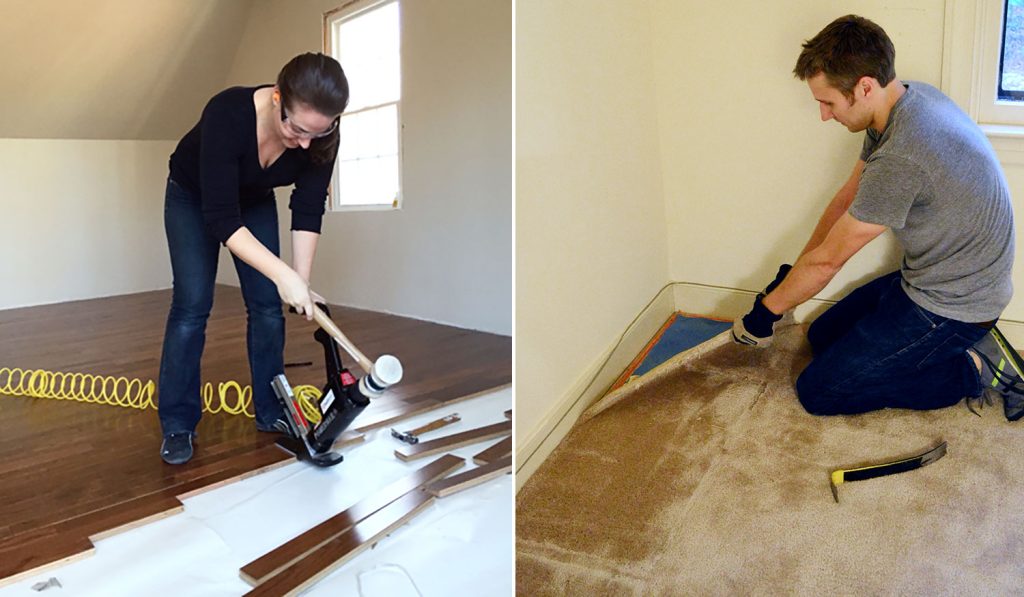
Room by room we repeated that process (and down the hallway as well). Pry up the corner, yank yank yank, roll roll roll, and drag that baby down to the garage. In some areas there was so much carpeting that we cut it in half with a box cutter before carrying it down to lighten our load. Then we were left with this lovely blue carpet padding underneath. Which was stapled and nailed down in about a thousand places per room (sadly that’s not an exaggeration).

Just like the carpeting, it could be yanked up, but it left a ton of little staples and nails and tack strips all around the room once it was stripped from the space. These are tack strips. They run around the perimeter of a room and are thin little shim-like pieces of wood with nails poking up through them (they grab the carpet pad and carpet to hold it in place).
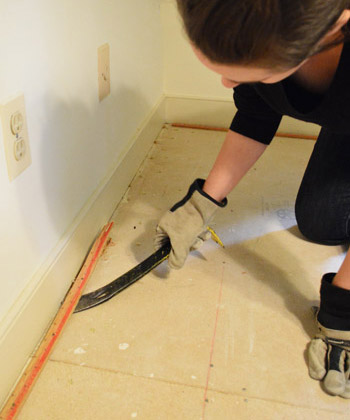
Sometimes you can shove a crowbar under them (this takes borderline brute strength, so your palm is red even with gloves on afterwards) and pop them up all as one piece. The hard thing is that if they’re old and brittle (check) sometimes they splinter as they go, which means instead of slamming a prybar against them to try to get each 2′ long strip up in about 30 seconds, if it splinters a ton it can take five minutes to dig out all of the nails and splintered wood that break apart but are still stuck in the floor. You can see me gracefully (and breathlessly) doing this in the video we made for you about five photos down.
I worked on all of the tack strips in the master bedroom while John did the hallway and the nursery and then I tackled the guest room while John worked on Clara’s room. It probably took us about an hour and a half to get that part done, so one person trying to do that all by themselves might be in it for 3+ hours (probably with some blisters even with gloves on).
Once the tack strips were all up we were faced with the harder part…
… these guys.
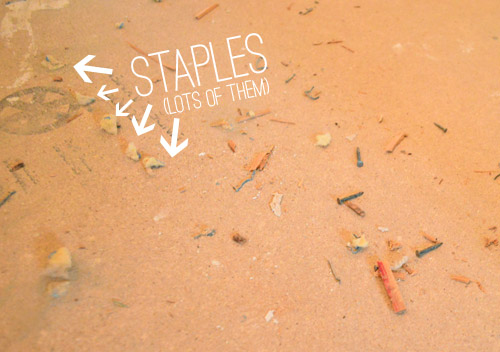
They were everywhere and the prybar was of no help since it couldn’t really get under them. At first the only way we could get them up was by hand with a needle nosed pliers. One by one. But after John did Clara’s closet that way and it took over an hour (for one closet!!!) we decided we needed to find an alternative. Thankfully a little googling turned up the idea of a nice heavy duty long-handled floor scraper (we got ours for $25 at Lowe’s) and that was a lot faster! It still took some serious strength, and we both had sore backs, but we were able to get all of the staples up in all four bedrooms and the hallway in about two hours (at the by-hand-with-a-pliers-rate we thought it might take us about two days). Warning: if you have hardwoods, you might not want to use a scraper since it could ding them up, but it’s great for subflooring.
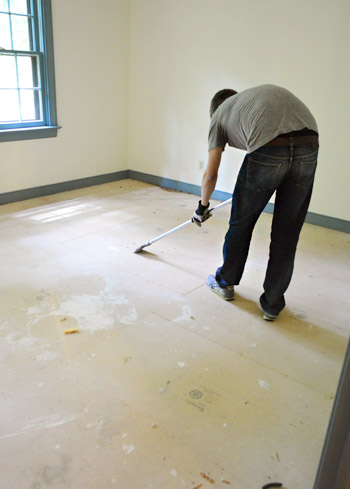
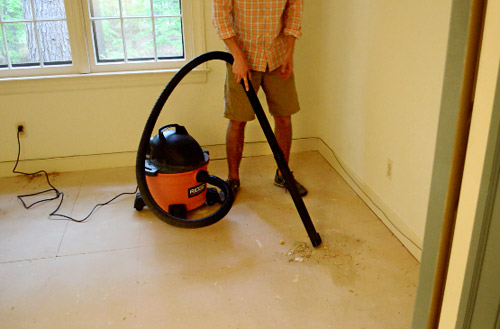
The next day we returned to clean up, using a broom to make piles followed by the shop-vac to suck up all the staples and nails.
You can see in this video how each step of the process went (it shows how to get up those tack strips and staples a little better than still photos can):
Now we have smooth, bare subfloors that are ready for hardwood.
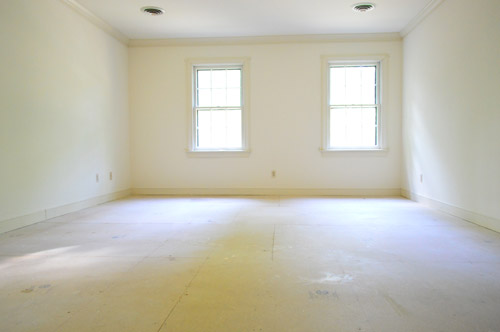
We never thought we’d be so glad to see pure unadulterated pressed wood in our lives!
And now our garage looks like this:
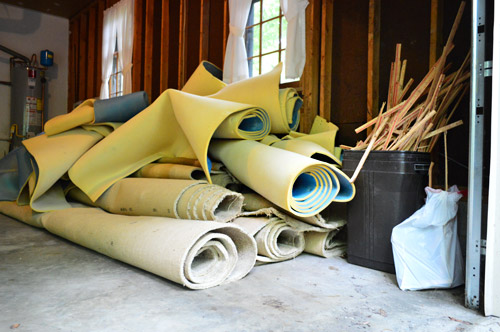
That, my friends, is what progress looks like. Turns out progress looks a lot like stinky rolled up carpeting.
But oh happy day, we’re moving in the right direction!
Any other carpet stripping going on? Are the staples your arch nemeses? Those little buggers were infuriating until we discovered The Amazing Wonder-Scraper! Seriously, my “what superhero power would you have?” answer would now be to have a paint roller on one arm and a floor scraper on another. Never know when you’ll need one…
More Flooring Projects
If you would like to read about other flooring projects we’ve done, please check out the posts below:

heather says
Love that you’re going with a basic oak!
Here are a few tips I’ve learned the couple times I’ve removed carpet, to help with the removal process and limit damage. When prying up the carpet, try putting a piece of wood between your pry/wonder bar and the wall. Without it one could easily damage their baseboard/wall, especially if it’s a soft wood. Also, tack strips come up a lot easier of you use a hammer to lightly tap the pry bar under the strip as you go down it. If you have hard wood underneath the tack strip you may want a thin piece of wood under your bar so when you pull back to pop the tack strip it doesn’t damage your floor (dependent how hard you have to pull back).
YoungHouseLove says
Smart!
xo
s
Alicia M says
I cannot describe my excitement to see your progress on the new house!!
I also just want to say, do you know how LUCKY you are to have that immaculate subfloor underneath your icky carpet!?! No pet stains, mold, rotting, etc! We’re looking to remove carpet in our living room and the stains left by the previous owners make me nervous as to what we’re going to find underneath! :/
Mery says
Will you paint the walls/trim before you put down new flooring? Maybe you’re better about not dripping than I am so it’s not an issue…
YoungHouseLove says
Yes, we’d love to spray the trim before the wood goes down (repainting every room won’t happen, but we paint with wood floors down all the time so that’ll be ok) :)
xo
s
Leah says
Ugh! Carpet removal is so much more difficult that it seems like it should be! When we removed our first floor master bedroom carpet last summer the best part of the project was tossing the rolled up strips of nasty old carpet straight out the window into the yard. No dragging it through the house and leaving a trail of mess, and hurling it out the window was very satisfying.
amanda says
My cat, She-Ra, hates carpet and was kind enough to destroy the corners in every single room. I am planning on ripping out the few rooms I have and putting in something different. I just have to find something that will work for a sick cat that won’t be damaged easily by moisture.
Rebecca says
Oh those staples are the worst! We ripped up the carpeting in our house last summer to reveal the lovely hardwood floors, only to discover that they must have used leftover pieces of carpet padding. Each small piece of padding was stapled all the way around and it was a nightmare! 7 months pregnant with a pair of pliers and a knee pad it took two days of prying those up and scrubbing the floors clean of the disintegrating carpet pad. Totally worth it though!
Sharon says
WRT the subflooring, if it is particle board then you may be limited on your choice of hardwood flooring. It is my understanding that you cannot nail into particle board. My sister recently installed a floating prefinished wood floor for that reason.
YoungHouseLove says
Thanks Sharon!
xo
s
Sara says
We didn’t find out about the scraper until we had already spent 8+ hours pulling staples with needle nose pliers…my hands have never been so sore!
As far as getting rid of our old carpet/pad, we slipped $50 to the guys who put the new floor in, and they disposed of it for us! Their only request was that we cut the carpet into smaller rolls, which was fine by us! Good luck!
ashley jensen says
I would think hammering the mini crow bar underneath the tacking strips would have helped in getting it under there a little better. At least if I ever rip up carpet that is what I will try. Curious, are you planning on installing the wood floors yourself? The hall looks like it could be tricky.
YoungHouseLove says
Yes, we’d love to DIY it! Here’s hoping!
xo
s
Sarah says
Hey YoungHouseLove!
First off, I love your blog (and I won the book too lol) – my husband and I are in the process of purchasing/redoing our first home, and he laughs at me because our taste is so similar I keep unintentionally doing projects in our house that look like they came straight from yours.
Looking good on the carpet! One thing I thought I would mention for all those leftover tacks and staples (and is safe for people with hardwoods underneath the carpet) is a large magnet. An old magnetic knife bar works great since it’s a) big, and b) strongly magnetized. Just hover it close to the floor and anything metallic should come right up. Can’t remember where I got that tip (certainly not from my ‘lil pea brain, lol) but I thought it might be helpful for future carpeting adventures!
YoungHouseLove says
Never would have thought of that! Wow!
xo
s
Andrea says
OH. MY. GOD. This reminded me a HORRIBLE experience ripping up carpet. My husband and I lived in a house with NASTY carpet. But, before we moved in we ripped up a corner and discovered there was hardwood under them, oh happy day! Not. Apparently, it wasn’t uncommon whenever the carpet was put down for people to GLUE the carpet to the floor. GLUE. Glue to BEAUTIFUL hardwoods. SO sad. (I guess that corner we pulled wasn’t glued well or something but we had no clue about the glue)It was horrendous and we eventually gave up. I bought all kinds of creepy chemicals (with life threatening warnings.. not bueno) to try and scrape that floor glue and spent countless hours try and trying and trying but.. no dice. *Shudder* it was horrible. Glad that didn’t happen to you guys! In our first house we ripped the carpet up much like you guys and laid laminate. That processes was so much more satisfying!
Jennifer says
Ripping out our nasty blue 90s carpet was the best feeling ever! We lived with concrete floors for about 6 months while deciding on the perfect wood floors, but even the concrete was an improvement over the gross carpet. I did our entire master bedroom by myself while my husband was at work because I couldn’t stand looking at it any longer.
Our padding was glued down instead of stapled. I thought the glue was a pain to remove, but I think those staples look even worse!
Are you guys going to do a glue-down floor or floating?
YoungHouseLove says
We’ll be back with a flooring breakdown post about all the things we considered in a day or two :)
xo
s
Loreen says
Yeah for ripping out carpet and replacing it with wood! As a kid I missed countless school days because of chronic sinus infections. My family thought I was just sickly and would be on and off antibiotics all my life. Turned out I was allergic to the mold or chemicals in ou wall to wall carpet. Once I moved to a place with wood floors, I could go years between even catching the common cold. I will never live in a house with carpet again – they are little incubators for disgusting, unhealthy things! You guys will be healthier for your decision, especially in humid Virginia!
Caroline says
Since moving into our house last August we’ve ripped up carpet and installed hardwood floors in all but one room. Those little staplers are. The. Worst. Good luck with the install! That’s the fun part. Are you doing solid hardwood or engineered? Either way I would definitely recommend a pneumatic nailer if its in your budget. It makes the job so much faster.
YoungHouseLove says
Thanks Caroline! We’ll share a post all about the hardwood choices we considered in a day or two (we’re writing it up right now for ya) :)
xo
s
Christina says
Oh gosh, I do not envy you guys right now. We pulled up our carpet a few years back and had to pry the tack strips out of concrete subflooring. I was 30 weeks pregnant and cursed every single, stubborn nail that was embedded in the floor. Revealing the hidden inch of baseboards throughout the house was totally worth it, along with the fantabulous laminate flooring we installed.
Can’t wait to see those rooms with the new flooring!
Mariley says
That’s a big dirty job you just tackled! Believe it or not, my hubby got ringworm from the old carpet he removed at our place! Looking at all of the blue trim reminds me of the thing I wish I would have done at the old place. I wish I would have painted the trim BEFORE installing new flooring. It would have been so much easier. It will save you a lot of headache trying to save your new floor from paint drips!
By the way, it’s so fun reading about your new house adventures! We’re in the same boat. It’s fun to read about somebody else buying, selling, and dreaming up the new place! Good luck!
Lili M says
We had to do this a few years back in our other house. We had a flood in our downstairs, so we had to pull all of our (*sniffle) brand new berber carpet up. But then we were on a roll, upstairs we knew there were original hardwoods, so we thought, heck, we’ve done this much! It was a pain in the…. hands, back, neck, legs… but it was SO worth it. I HATE carpet!
Elizabeth says
Will you all paint before or after you install the flooring? Considering there are probably pros and cons to both options.
Elizabeth says
Nevermind… Jill just asked the same question, great minds!! haha.
Amanda says
Yuck! We removed carpet from our 1967 house that was original…and in the bathrooms…who does that?!? Soooooo nasty! Gloves, mask, and pretty much full on body armour. We cut ours into neat bundles then slowly put them out with our trash (we are allowed 50lbs of building materials per week) by our city. It took awhile but we rid ourselves of the funky stuff and saved a bit on dumpster rental. Good luck with the new house, can’t wait to see what you do with it!!!
Roxanne M says
I wish I would have known about that floor scraper! The things you learn on this blog…
We replaced flooring last year and had quite a few staples to remove…though I think you had a lot more to do! Our subfloor wasn’t in too bad of shape luckily. Well we will probably be buying another fixer upper and so we may just need to buy that scraper. Progress looks great. I love the last picture w/ Clara running on the subfloor :)
Terresa says
just wondering if that floor scraper pulls the staples up or scrapes/cuts off the top? are there still pieces of metal down in the subfloor? not that it really matters, just wondering how the heck that would pull the whole staple out!
YoungHouseLove says
It seems to get caught on the flat top part and yanks them right out! You can see it in the video pretty clearly if that helps :)
xo
s
Pam Tarczy says
Hi guys! I remember the pain I went through 3+ years back removing the carpeting in my newly purchased home that was a foreclosure. I live in the burbs of Cleveland and we are allowed to put the carpeting on the curb as long as it is rolled up and in sections no longer than four feet. I noticed people in above comments mentioned exacto knives, and since I was ripping up carpeting by myself…I scoured a line all the way down the room (4 feet wide, coincidence? i think not!) and was able to tackle the task by myself! so maybe check with your city’s trash pickup and see what they offer! might save you some money if you were thinking the best option was that big trash bag thingy! :)
YoungHouseLove says
Great tip!
xo
s
Allie says
How crazy! I just last night started to yank up our carpet from our dining room but quickly decided that I needed a new game plan. We have beautiful original hardwood floors in our house but I’m terrified I’m going to tear them up getting the tack strips out. Any advice for a gentle retrieval? And thanks for the post! It’s just what I needed! Haha!
YoungHouseLove says
A bunch of people have commented about what worked for them! Hope it helps!
xo
s
LisaOK says
I did this in our basement last summer. Orange Shag = Got to go!
The carpet covered stairs were a beast! I never knew there could be so many staples. But boy oh boy do you feel a sense of accomplishment when the 30 year old orange shag carpet is out of there?! Safety goggles are also a good idea since those sharp little suckers can go flying in any direction.
Callie says
What a ton of work!! Good job! Blegh old carpet. We recently recarpeted a *small* loft in our house and I still thought it was a lot of work! And yay that you are going with hardwood floors!! It just wouldn’t feel like J&S if the house was full of carpet. :) Are you going to stain them dark like your first house?? Since the upstairs is a separate space it might look cohesive even if you have lighter wood downstairs. It just looked so yummy in your first house.
Also for disposing of the carpet, we got lucky and there was a ‘large item trash pickup’ for our town right after we did it. So we got to dispose of ours free! You might check when/if there’s one in your area, especially since they could live in the garage till then ;)
YoungHouseLove says
We’ll be sharing a post all about picking hardwoods in a day or two for you guys :)
xo
s
Starr @ The Kiefer Cottage says
We did this at our last house–not fun at all. Luckily, our home had been built in 1950 when even small mill houses had hardwood, so we refinished them. In our current home, we have “new” shag carpeting in the additions. It’s so ugly. One day, it shall be gone. A day far, far away.
nick says
so somebody had to make the executive decision to go with teal trim. that poor, poor somebody.
YoungHouseLove says
Haha!
xo
s
Nikki says
You guys don’t waste any time!
In unrelated news: I’m sure you have already seen this, but in the off chance that you haven’t, Anthropologie is using your book as a display for some book ends! So awesome!!
http://www.anthropologie.com/anthro/product/home-room/27210285.jsp
YoungHouseLove says
Ahhhh! Isn’t that crazy?!
xo
s
Annie says
Wow, you guys are such a good team! Taking up carpet is just so. much. work.
Please consider recycling your carpeting and the padding instead of letting a dumpster take it to a landfill. The Virginia Recycling Association should be able to direct you to a group that accepts both the carpet and the padding and will process it and turn it into either new carpet or other plastic stuff. It’s good to be green!
YoungHouseLove says
Thanks for the tip Annie! We’ll have to look into that!
xo
s
carli says
What a difference! Exciting to see such progress after all that hard work. I’m sure it felt rewarding!
PS. Can I just say how STINKIN’ excited I am about the new house!! Will be eagerly anticipating each post to see how you transform this diamond in the rough. Happy DIY’ing!
Julia says
I don’t envy you guys one bit. This was the first thing we did in our first home too. I remember sitting on the floor with a scraper and a flat head screwdriver asking if we were done yet over and over.
Abby says
Nice to see you guys working on the new house.
Kerrie says
So excited about the first DIY project in the new house! This one is definitely worthy of a first!!
Since you have taken up all of the carpet and talked about spraying the trim, are you going to spray the trim upstairs before you put in flooring, so that you don’t have to worry about taping and covering it?
YoungHouseLove says
Yes, we’d love to spray that before the new floors go down.
xo
s
katie says
We’re right now waiting to get some new carpet installed in half of our upstairs. Our house is a mish mash of red, green, orange, and blue carpets (thank you 70sand 80s) that are being replaced as we can save up. The old part of the house is from the late 1700s, so we’re doing carpet because of the floors being wavy. Anyway, I’m happy we don’t have to uninstall…the guy installing is going to do all the heavy labor there. YAY!! Can’t wait to see your new floors.
Katie says
Yuck! We did the same in our house – 4 bedrooms and a hallway, each with different colored carpet – plus stairs! Since we had hardwoods underneath, we found that using round-nosed pliers made the staple removing a lot faster. You can just clamp down on the staple from above, then roll the staples out rather than pulling. Still a blister-y process, but at least a lot faster!
Kenda Blanning says
Helloo~ So happy I came across your blog, I’m a newbie follower. ( newbie to the whole blog thing). So being a newbie, on your new project is so exciting. I can’t wait to check it out daily, my morning boost I need to get myself going! Love this stuff!!!!
Jessica H says
Brings back memories of buying our house. We were so eager to get out the 70s shag carpet that we started straight after closing and picking up the keys. Also in our eagerness, we forgot to take ‘before’ pictures. So now when people come to the house we just tell them to imagine 70s carpet throughout.
Melissa @ ReThreads Charlottesville says
Great work! You may have mentioned this and I missed it but I’m curious if you took the carpeting off the stairs yet? I know you said you were hoping there would be salvageable oak under the stair carpeting. Crossing my fingers for ya!
YoungHouseLove says
Not yet but they’re on the agenda!
xo
s
Leigh Anne says
Already an improvement! :)
Brittney says
Taking up carpet is the worst. We had carpet in every room in our house (still have it in our downstairs hallway and 2 rooms…that will be coming out this summer. It sucks so so bad, and yes, it smells horrile. We found that cutting them into smaller strips with the utility knife really helps, instead of trying to take full rooms of carpet down the stairs and it touching every part of your body haha. And since we were putting hardwood floors right over the subfloorsfloors, if there was no carpet padding under the staples, we just hammered them in more so the were flush with the subfloor…so much easier than trying to take them up one by one. We never thought of the floor scrapper…good idea. Maybe next time we will try that out. Your upstairs looks way better already! :)
iris says
Save one of those rolls if you are thinking of square foot gardening…..turn carpet upside down,(jute side up) between the rows and put mulch on top….will keep the weeds down forever!!! Have been doing this for every garden I design and build….It works wonders and saves on back breaking weeding!
YoungHouseLove says
Smart!
xo
s
Sarah says
I love that your progress shot has a bunch of old rolled up smelly carpet in a garage with studs showing, but pretty white curtains. So quaint!
That is a huge improvement already. Are you painting pre-floors, or just going forward with flooring and painting down the road?
Sarah says
Okay, just read the paint answer. But I still love the contrast those curtains create in the garage shot!
YoungHouseLove says
Haha, it’s true! Those crack me up too!
xo
s
YoungHouseLove says
We’re pretty well versed in painting walls with wood flooring on the ground already (that was pretty much the story of our first and current house) but we’d love to spray all that blue and mauve trim while the flooring is up, then lay the floors, and eventually paint the walls when we’re sure what colors we want to go with :)
xo
s
Lizbeth says
Looks so much better already! Not sure if you’ve already gotten rid of the padding, but we had a recycler in town that paid us for the padding and took the carpeting off our hands.
Caitlin @ Desert Domicile says
Wow, what a difference! Will you guys have a runner leading down the stairs so Burger can get down safely?
I ask because our stairs and entire second floor (minus the bathrooms and laundry room) are carpeted and we’d love to rip it out someday. We have 3 dogs though and aren’t sure how well they’d do going up and down slippery wood stairs.
YoungHouseLove says
He has hung in houses without carpet on the stairs and seems to just make himself right at home. We even found him sleeping in a sun spot on one of them once! Haha!
xo
s
Rachel says
Hey…I’m sorry, I don’t feel like reading through all the comments to see if anyone else mentioned this, but you can recycle old carpet. We pulled up the carpet on the stairs and in the bedrooms and then dropped it off at a donation center for carpet. I’m in Minnesota, but I just looked up Virginia and found this one place in your area, SB Cox, http://sbcoxdemolition.com/default.aspx I just browsed their site and didn’t see anything specific, so you may need to call.
Here’s the link to the site where I found this information:
http://vrarecycles.org/WhatWhereHowCanIRecycle/RecyclingDirectory/tabid/119/Default.aspx
It’s worth looking into for recycling items like that. I personally felt much better about donating it as opposed to chucking it in a landfill.
YoungHouseLove says
Thanks for the tip Rachel!
xo
s
Theresa says
I have removed carpet from hardwood before and had to sit down and hand-pull every single one of the thousands of staples and it took FOREVER. But it’s oddly gratifying work… it’s simple (hard to mess up) and it’s clear when you’re finished that you’ve made a big change. Simple — not easy.
Megan says
I’m so glad to see this post. I have to rip up carpeting in my “office” and it terrifies me. I fear there is just concrete underneath. Not sure what I’m going to do with that. Paint it and put a rug over it? Who knows!
Lindsey says
Cool! We’re going to be doing this in a few weeks, and I will DEFINITELY be wearing a mask (NASTY with a capitol NASTY carpet in our future house) – unfortunately we don’t have the budget for true wood floors, but we found an awesome laminate that looks true to life and has a gentle, handscraped look to it. LOVE the light that’s coming in your upstairs now that the carpet has relocated itself to the garage. Cool beans, Petersiks!
RJ says
As someone who has gutted a two-story house (gross carpet included), let me suggest that you secure your subfloor with extra screws at the joints. Our upstairs creaked and squeaked so much, it drove us crazy so my husband doubled up at the joints and it removed the noise. While we had the floor bare, he decided to do this with every joint, even if it didn’t squeak. Now, 13 years later, I’m so glad he had the foresight to do that
YoungHouseLove says
Great tip!
xo
s
Sarah says
You guys were lucky that your blue foam padding was only stapled down. We had a flood in our house when I was in high school. When we pulled up the carpet and started on the foam, we found out that in addition to the staples, it was also glued down! So, we pulled what we could and it left little, stuck piles of foam all over the wiggly lines of glue. There was a lot of scraping!
YoungHouseLove says
Oh no! That stinks!
xo
s