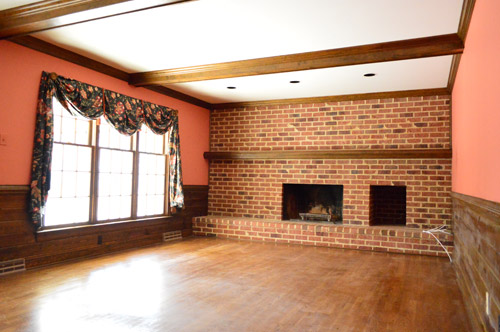
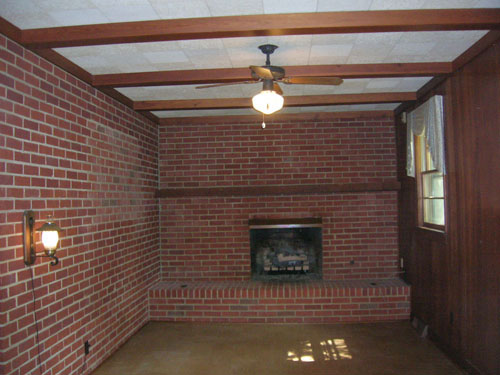
So… the living room. First it looked like this:
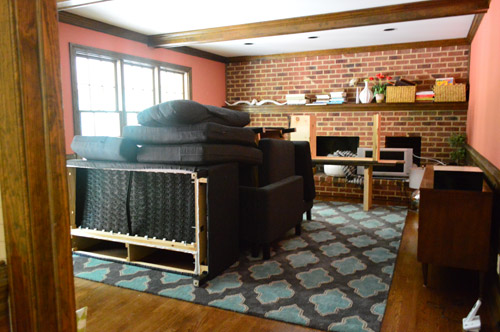
Then it looked like this:

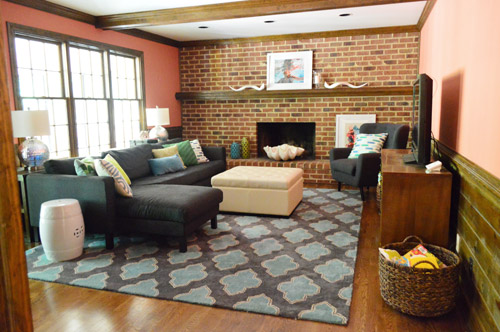
Then it looked like this:
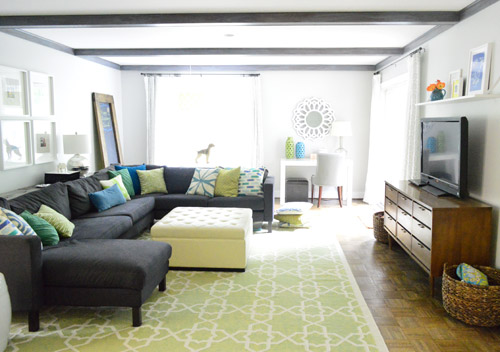
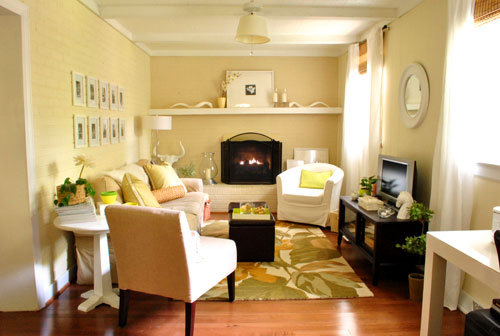
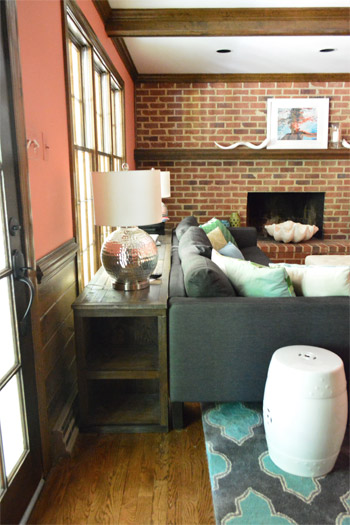
And now it looks like this:
Although the salmon pink walls, orange-brown bricks, and all of that dark wood trim & paneling is a far cry from our vision for this room down the line (we keep changing our minds, but today we’re dreaming of something like this for the brick, coffered ceilings like this, and this for the paneling someday) it definitely feels a lot homier already. You know, with a couch to sit on instead of a pile of non-sit-on-able furniture.
Oh and we shared this picture on Instagram/FB a few nights back, but don’t you think salmon is Burger’s color? That is one good lookin’ chihuahua. Not that I’m biased or anything.

As for our sectional shrinkage (I’ll pause while you titter) we needed a giant sofa for our last house’s giant 25′ long living room. Pictures truly didn’t do that room’s colossal size justice, but the sectional was thirteen feet long and almost that deep (the average sofa is usually around seven feet long for comparison).
And while some folks love giant rooms and giant sofas, our first house‘s cozy den was the room we missed the most…
… so we pretty much thought it was fate when we saw our new house and the living room reminded us of that cozy room. I think they’re cousins. Here’s the before shot of our first house’s den to compare with the first picture in this post.
Anyway, our Karlstad sectional from Ikea (Karl for short) came in four switch-around-able pieces, so we decided that keeping the sofa + the chaise (and losing the loveseat and corner seat that made it into a giant U-shaped couch) made the most sense for our new living room.
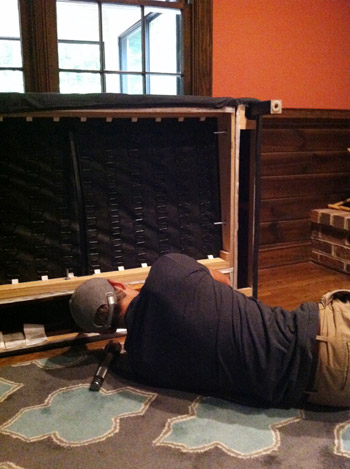
So without buying any additional pieces we were able to just connect the exterior arm that used to live on the end of the sectional to the sofa part and remove the extra stuff in the middle (corner piece and loveseat). Only took about fifteen minutes. And as for the unused two pieces that we removed, we stuck those up in the unfinished storage room with a plastic drop cloth around them. Why didn’t we craigslist them? We just figured selling the corner and loveseat to a sofa that’s incomplete without another end piece that someone would have to purchase might fetch us $20 tops, and it’s worth more just to hold onto them in case we get a new living room couch in a decade or so and decide to use Karl up in the bunkroom/movie room when we finish that space down the line.
We also built the console behind the sofa two years ago, which we made in three interlockable pieces. And the cool thing is that we realized that if we left out the middle piece it almost fit perfectly behind the freshly shrunk sofa. Almost is the key word since it’s still about 6″ too long (over on the fireplace side there’s some overhang) but it works for now, and we’re planning to shorten it so it’s completely fitted for this room.
After a few years of living with a big padded storage ottoman instead of a coffee table and a console that spans the width of the sofa, we’ve just learned that it’s really functional for our family to have the console (for things like tea at night) and an ottoman (for hiding toys and for Clara to lounge on during the day).
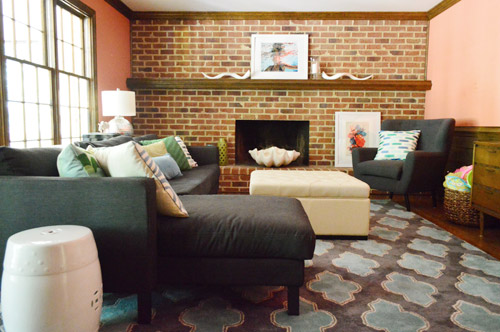
Oh and you might notice that the second hole in the brick fireplace wall, which was meant for firewood back in the day, has been covered by a leaning frame. It just felt like a big dark hole whenever I glanced at it from the sofa, and since this fireplace is no longer functional (we’d love to slip a gas insert into it down the line) we didn’t need it staring at us while we gasped over the last four minutes of last week’s Game Of Thrones episode. Seriously, I audibly gasped at least a dozen times in that span of about four minutes.
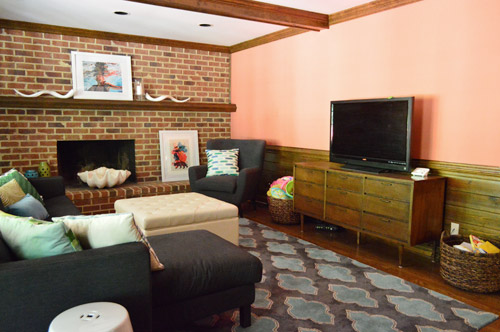
As for the other side of the room, we’re keeping the 80’s wet bar closed off with doors for now (we’d love to expand the doorway to the kitchen into that area down the line since we don’t really have a use for it) but I did have some fun putting things on the built-ins in the corner.
Yup, it turns out when my house is full of freshly deposited moving chaos, I like to putter around with books and ceramic animals. So while it looked like this on moving day…
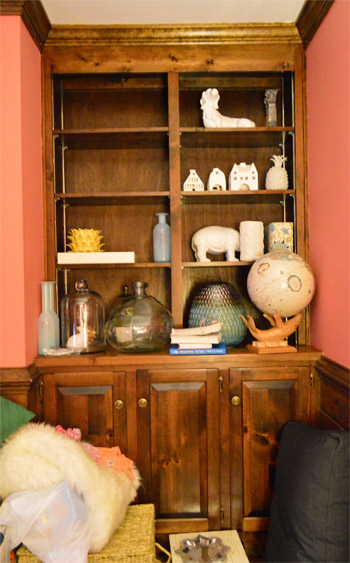
… within 24 hours it looked like this.
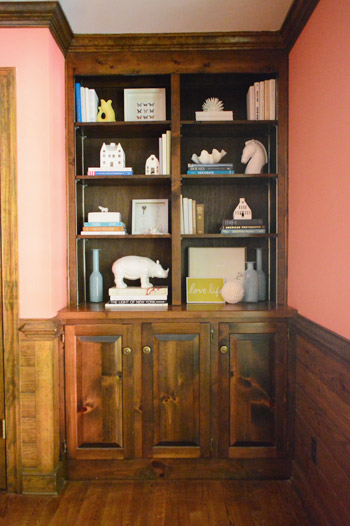
The rest of the house still looked completely trashed, but this little corner was happy. #smallvictories
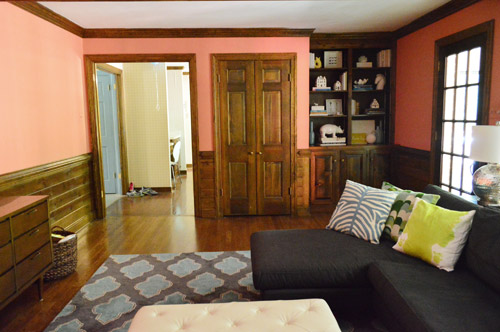
Oh and we took down a bunch of doors on the first floor that blocked off spaces that we prefer to be left open for better flow (the doors on the right block the foyer from the kitchen and the doors on the left block the kitchen from the living room).
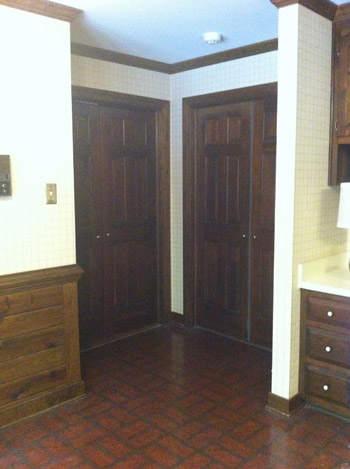
Now we can peek in on Clara in the living room while we cook in the kitchen, and there’s a nice view of the big bay of windows in the back of the kitchen from the foyer instead of staring at two dark and heavy doors about ten feet from the entryway. Clearly there’s still some crazy color going on when you catch a few rooms in one view, but you gotta start somewhere…
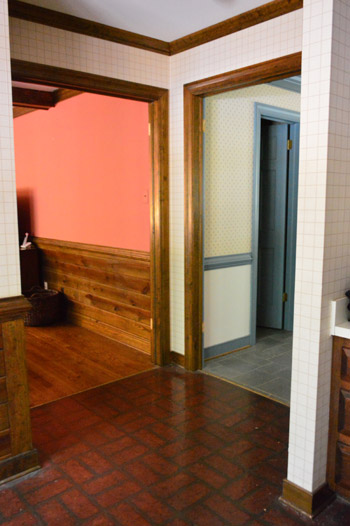
We also took down the doors that blocked off the kitchen from the dining room. It’s amazing how much breezier it feels – even with a bunch of rooms full of dark blue trim, wood paneling, and a boatload of wallpaper (there are at least five different types of wallpaper going on in our house). Speaking of wallpaper, that’s pretty high on my attack list. I think I’m going to test out a bunch of different techniques for you guys and rate them all (should be fun to see which are urban DIY legends and which ones work the best). And… that’s the kind of thing that gets me excited. Yup. I’m grinning at the computer right now. Get a hold of yourself Petersik.

keisha says
You built that sofa console? I LOVE IT. And I don’t know why, but it never occurred to me to put a sofa table behind a sofa that rests against a wall. Great idea (that I plan to steal soon :-)).
Martha says
If you want another idea for the fireplace itself, I just saw a cool project in This Old House magazine. A reader wanted an insert for her non-functioning fireplace that could mimic stacked logs. She painted a board black, and then sliced a log into 3-inch lengths. Glued the logs to the board (cut ends out) in a tight, stacked look. Reinforced with nails from behind, and then tucked the whole thing in the fireplace. looks awesome without the hassle of shifting logs and dust attraction.
YoungHouseLove says
Sounds fun!
xo
s
Christine says
Okay, I love this rug with Karl and the salmon walls. Crazy huh! So smart to get a sectional that breaks down. We did the same thing. I just love a sectional…having the ability for our family of 4 to all sit on the same thing is so nice!
Kim says
I started following you guys back in October 2012 so while I’ve read all the posts and seen all the pictures of your previous houses before you got your hands on them, I haven’t experienced the work in progress. It’s still so shocking to me to think that you live in such an ugly-decorated house right now! lol As someone who looks forward to moving into our “forever house” in the next couple of years, I’m so excited for you. I can’t wait to see how great this house will look once it gets a good dose of Petersik love!
Chris says
Wait… is that a white ceramic Dachshund? Where did it go???? I have two mini dachshund pups and it caught my eye :) I know JA does some ceramic doxies…
YoungHouseLove says
Oh yes, that’s Lindsay! A girl named Lindsay on the tour gave him to us. He’s from HomeGoods I think!
xo
s
Megan Poletti says
Yep, HomeGoods! I’ve seen him. They have some other dogs too. I just found a French Bulldog at Dollar General… $5!
Kristin @ bliss-athome.com says
I know whatever you guys do in there you will make it fab! That room totally reminds me of our living room when we first moved into our house. I remember those salmon walls and dark trim…my husband insists that’s just a way of saying pink. Can’t wait to see how you change things up! xo Kristin
Amelia R. says
I really like the versatility of your couch (and I still love that rug!).
Is the light totally different in your new place, or are you using a different camera? Maybe it’s all the dark tones on the walls and floor that are throwing my eye off . . .
YoungHouseLove says
Oh yes, there was different lighting and a different camera back then.
xo
s
ashley jensen says
You so need a Khaleesi piece! Since Karl is pretty close to Kalh Drogo, it makes perfect sense. I actually screamed “NOOO!!!” and “BOOOO!!” at my TV during the wedding scene. I tried my hardest to fight back the tears but failed. The hubs was pretty shocked too.
Kristin F says
Wallpaper was my frenemy in more than one older home I’ve lived in. I found that the Paper Tiger worked best. I tried steaming it per Mom’s suggestion, but on really old paper and glue it didn’t work to well. But scoring it with that handheld, clawed roly-thingy, then moistening the paper pretty well with solution (sorry, can’t remember WHAT solution it was) had the paper coming off with the putty knife Very Nicely. Just don’t apply superhuman pressure to the claw thing, it can leave marks, especially on plaster.
Megan Poletti says
I do the same thing with arranging as much as possible when first moving in to a new place… it somehow makes it homey, and cuts down on the “overwhelming factor.” And funny, I literally JUST did a post about DIY wallpaper remover on my blog (as in, 5 minutes ago). We tried out 2 types. One room was super easy, but the other was a NIGHTMARE. I think it has to do with whether the installation involved sizing or not… Now I know if I ever use wallpaper I will definitely use sizing first. It made a major difference in the removal.
http://rentalrevival.com/home/2013/6/10/diy-wallpaper-remover-2-ways
Debbie says
Ok, I’m sure you’ve done tons of wallpaper removal research and probably know this, but just throwing it out there, since it’s what FINALLY worked for us (I’m sure there are different techniques depending on the age and type of wallpaper). Ours seemed to repel water (vinyl??), so I was at my wits’ end. A hair drier (!!!) finally did the trick. Heated a small area for a few seconds and it peeled right off. Of course, then there was another layer underneath that was just paper–we used water and a scraper for that. Then we had some super 1950s SUPER glue to deal with. More water sponge and scraping. Oh, man–it was awful. But our beautiful kitchen walls now? Priceless :)
I do hope that you’ll have a much easier time than we did removing it, and if not… well, give yourself small goals. And a glass of wine. Make that two.
Beth says
I love starting to see the changes and vision that u have for each room! And glad ur starting to settle in, hope u guys r starting to feel at home!
Alyson says
I may have just literally died because I am so excited for you guys to get going with the paint etc. I may be typing from The Great Beyond, thus is my excitement. These before pics are THE BOMB because I know that in just a couple of short months it’s all going to look nothing like this. But I love to see what you can do with whatchagot. So excited for that salmon on the walls to go buh-bye, and also to see what you’re going to do with Mr. Extra Hole in the brick wall.
YoungHouseLove says
Haha! The Great Beyond. Oh Alyson, you crack me up.
xo
s
redkimba says
Not an urban legend on removing wallpaper:
1.) Buy paper tiger and apply it to wallpaper surface
2.) Spray wallpaper generously with wallpaper removal solution
3.) Wait 5-10 minutes
4.) Scrape off with putty knife. At this point, the stuff can peel right off the wall if you grab the right edge.
I don’t know what’s in the solution but I don’t think it’s toxic and it sure beats steaming the paper off the wall.
Megan says
After two houses of wall-paper I would say the steamer is my favorite and most efficient way to remove. If you have 5 types I would say buy as opposed to rent for sure. It is a little messy with drippy water, but way better than all the chemicals dripping down and gauges in the walls I dealt with when we did the chemical sprays. I would make sure you try out piercing the paper first to see if it helps before steaming, if you can get it off without all the litte holes it comes off in bigger strips. So much depends on the quality of the materials used (when the paper was originally hung) on how easy it is to get off the walls. Hopefully it is an easy chore for you guys. Excited to see the results.
Lindsay says
Love the linked inspiration photo for the brick! We’re thinking of doing something similar with the fireplace in our den.
Torey says
I can’t wait to hear about wallpaper removal! I started ripping down wallpaper in my bathroom a week ago and it has been a disaster. Even with a steamer I can’t get the paper off (just the vinyl top layer). Part of the problem is that the paper is glued to drywall in some spots (with no paint/primer underneath). It’s a mess.
Erin says
This is an “old house” question: when you spackled the nail holes after removing all your photos and artwork, did you repaint those walls before you left? Or did you leave as is for the new owners to paint over? Just wondering because your walls looked so perfect in the parting shots you took of your former house.
YoungHouseLove says
Yup, we spackle and then just use touch up paint so it looks nice for the new owners.
xo
s
Brittney says
Looks great. I can never get myself to decorate a room before I’ve painted it. We have a little more flexibility since we don’t have any kids yet. I was hoping you would say something about the Game if Thrones episode. I was so furious after I watched it, and I knew it was going to happen since I read the books!
MegW says
Awww yay!! Two rooms set up and starting to feel like home! I LOVE the look of the white washed brick! Looking forward to seeing the end results!
Were the doors in the way when they were open? I grew up in a house that had doors that closed off the entire kitchen, my mom hated them at first, but really grew to love them after moving in.
We left the doors open most of the time, but when Dad wanted to do a low budget romantic dinner, he popped a pizza in the oven for us kids and set us out in the living room while the two of them had steak and candles in the kitchen. Also came in handy when there was a new puppy still in the house breaking stage, and when cooking our annual Christmas prime rib roast indoors that put off some smoke while searing (kept the smoke in the kitchen while opening the doors and getting it cleared out of the house)
YoungHouseLove says
Yes, since that was a corner they sort of blocked each other and were in the way. So cute about your dad and mom though!
xo
s
Stephanie says
I can’t wait to hear your advice & reviews on wallpaper removal! I have taken some paper down off of my bedroom walls but the glue was left behind. Still on the fence about how to proceed….
Lauren K. says
Re: The extra Karl pieces.. your instinct to keep it is absolutely the right one! While IKEA sells the other pieces as individual couches or smaller sectional units, they do NOT sell the corner piece, so if you have a smaller couch and want to upgrade, you’re stuck buying the larger unit with the corner piece to acquire one. That said, if you did decide to sell it down the road, make sure to put a decent price on it because it’s a pretty desirable piece to get by itself!
(I’m actually looking into the Karl myself, but I wanted to do it the opposite way – my new living room has a super awkward arrangement around a fireplace with multiple doors on the walls, so it’s not ideal for the mega sectional i’d love to have one day, or for any couch at all, so at first I was thinking do a loveseat with a chair, but now I’m thinking I may do two individual chaise lounges then add them on to a big sectional in the future!)
YoungHouseLove says
So good to know!
xo
s
Katherine says
Your house wins the award for the most amount of different finishes. The last picture with three types of flooring, wood paneling, wallpaper and trim in various shades/stain – whew! I’m sure the number one word on your mind is EDIT.
You guys will make it fabulous and I look forward to seeing the process.
Martha says
Garden sprayer, HOT water and Dif. Keep it hot by setting it in a crockpot of water, spray lots on the wallpaper, let it soak a while and it might scrape right off! Don’t use the Tiger Paw thing – it tears up the sheet rock! A steamer is hard hard work and hard on the shoulders and arms!
Megan says
I’ve always loved your first den. It’s so cozy and I can see that (even with the crazy colors) in your current den.
As for wallpaper removal, I’m a huge fan of lots of water, elbow grease and a scraper. I’ve been lucky that that’s all it’s taken in my house. I’ve had wallpaper on the ceiling in multiple rooms, on painted wood trim (think of grape vines climbing around trim and up to the ceiling), wallpaper on top of more wallpaper, and then just on walls too. We just found some after our demo of a drop ceiling in my daughter’s future big girl room. Luckily I don’t have to touch it because its being covered up with drywall. You can see it in all its glory here http://thebrickbungalow.blogspot.com/2013/06/lily-big-girl-room-ceiling.html good luck with your wallpaper removal!
Debbie says
Loving the whitewashed idea for the brick fireplace. It’s on my to do list for our fireplace AND… the exterior of our entire house. Our brick is like a calico cat!! In fact, I entered Katie Bowers giveaway just hoping I would win the sprayer! The room looks great!
Wendy says
Just did my son’s room’s wallpaper. I used vinegar in a squirt bottle with a medium scraper. The smell of vinegar bothers me must less than other toxic smells. I sprayed once to loosen the wallpaper on the seams. It was amazing how well it worked. Then I squirted again to get the glue off. I primed with Kilz then painted with Valspar paint and primer in one. Turns out, I will need another coat as some of the glue is barely visible. But it was soooo much easier and cheaper than any other method I had tried. Good luck. Can’t wait to see the new house transformation! love your blog! -Wendy
Wendy says
Vinegar and big scraper!
Brooke says
I hope you do that with the brick. It’s so pretty and I’d love to see how to do it!
stacie says
I do not envy you the job of taking down all that wallpaper. I had to do it in my house 6 years ago and I still have nightmares – I shudder every time I even see wallpaper. I found that hot water and a scraper worked the best for taking it down. Of course, our wallpaper was put up very poorly and was practically falling off already.
YoungHouseLove says
No offense taken at all Katy! I’m kidding right back (typing = all intonation lost). I read the Sookie Stackhouse books before we watched True Blood. Does that count? As for the DIY dork thing, I think folks who paint/stain/build/demo for 5 years straight achieve nerd status. She says as she waves her DIYed drop-cloth banner proudly…
xo
s
Jenn P says
Scoring the wallpaper and HOT water with a little fabric softener works great!
Alina says
Wow – I love the inspiration pics! I hope you do end up on that look! Cognrats on the new house.
Al says
It would be great if you wouldn’t attack everything in this house with paint! Especially the fireplace The link you showed would be a big improvement over painting everything white. It’s going to be sad watching you paint all the wood.
YoungHouseLove says
I totally hear you Al! After over 5 years of sharing what we do in our house we have definitely learned that some folks hate brick/paneling (paint it! paint it! paint it!) while others love it (it’s a crime to paint it!). At the end of the day, we just love living with something until we’re sure, and then we dive in and do whatever we decide we’ll like best. We figure since we live here, doing anything other than that is weird, and we know we can’t please everyone since it’s all such a personal preference thing anyway. But we can’t wait to see where we end up! And for every house with painted trim and paneling, I’m sure there are others out there with glorious unadulterated wood :)
xo
s
Al says
You’re absolutely right.
Al says
You always have such a good way with words.:)
YoungHouseLove says
Aw, thanks.
xo,
s
Colleen says
We used the boiling water in a spray bottle with a little UNSCENTED fabric softener method. And I’m not kidding about the boilin part. It helps steam the paper off the wall. Then start at the ceiling where I guarantee it will be loosest and use a putty knife to help peel it down once the water soaked in a bit.
But be advised if you have really old wallpaper under your new wall paper you will need to lead paint test it. Because it could be safer to texture over it than remove it and risk the lead exposure, this is definitely happened to a bunch of friends in older homes.
We are getting our massive kitchen textured after removing vine and fruit wallpaper from as much as possible. The installers in this house only primed the paper in certain areas and in most adhered it directly to the sheet rock so we had to leave it on to prevent damaging the Sheetrock. Our paint guy said its better to texture over those part since its essentially acting as the paper Sheetrock cover does to prevent mold/damage. Have to love cheap installers!
Lynn @ Our Useful Hands says
I love the inspiration photos, especially the ceiling ones. Our ceilings are too low to get away with that but it’s always something that I am pleasantly surprised seeing in other homes. And I can’t wait to see what wallpaper you pick out. I’m only an expert at tearing down old 80’s floral print wallpaper but not putting anything back up other than paint. :o) However, our kitchen backsplash just might be photos printed on vinyl that we will roll out onto the wall. Still working on convincing Michael that it will look wonderful and we can pull it off.
My best, Lynn
Andrea H says
Glad to hear you’ll give a report on wallpaper, as we’re closing on a house with wallpaper in every room next Saturday. We’ve been told just to buy the steamer up front, but i’ll see what you say. My guess is it depends what kind of wall (plaster vs dry wall etc.) is behind the wallpaper and what adhesive they used.
Kim Franklin says
I used a steamer to remove wallpaper. By far the best way! Good luck and I can’t wait to see the progess as you make this new house your home!
Diane says
Burger is handsome anywhere!
christina @ homemade ocean says
It’s already looking better :)
Sherry has some MAD styling skills!
Jen R. says
I can’t wait to see that living room take shape – it’s going to be so lovely! Our living room is very similar and since we bought our house last November I have been racking my brain for ideas on what to do. Are the wood beams structural or decorative? Do you guys have smooth ceilings in this house or more textured ceilings to deal with? LOVE the coffered ceiling idea.
Thanks for sharing!
-Jen
YoungHouseLove says
Ceilings are smooth and we believe the beams are decorative.
xo
s
Minna says
We’re planning a move for July second, and my first planned project is wallpaper removal, so I’m super excited to hear what you have to say about techniques (and sooner would be better!!)
Alison says
I would love to do that to my brick. Mine makes my room look so dark and we have dark beams on the ceiling that I would like to paint or lighten but I have to convince my husband it will brighten up the room and hopefully make it look bigger.
Ann says
I’ve used almost every kind of wallpaper removal method in my time. A lot of your success with the spray-on stuff depends on the kind of wallpaper you have and the kind of primer underneath the wallpaper. If that paper is stuck directly on the wallboard, with no primer or sizing, you are in for it no matter what kind of technique you use. That said, the quickest and most effective way I’ve found to remove wallpaper is to buy a Wagner wallpaper steamer, fill it up, set a timer for 20 minutes so you won’t forget you turned it on (it has no warning bell), then come back and start steaming. Put the steamer over a seam so the steam can penetrate, hold it in place for about 20 or 30 seconds (or longer), then use a putty knife to scrape away the paper and paste. Have a drop cloth at your feet so you can fling the junk onto it as you work. Once you get the paper off, move the steamer over so it overlaps slightly and hold it in place while you work on the paste. Always holding the steamer over an edge or seam give the steam a place to go. When you’re completely done with the wall or room, wash it down with vinegar to remove the last traces of paste.
If it turns out you have “removable” paper, that means the top layer separates easily and can be teased off in big sheets. This is often the case if your paper is vinyl. If it’s like that, work a putty knife under a seam to get started, then pull it top layer off the wall. You’ll be left with paper backing and glue….which responds very well to the steamer, but also might work well to one of the sprayer methods so you can saturate a larger area.
No matter what method you use for removal it’s a wicked job that will take 10 times longer than you expect it to take, and you’ll be saying words that are normally represented by @#)(%&@#)(&*%$ in print. Send Clara somewhere else to protect her tender ears.
pamela says
OMGosh! My sentiments EXACTLY. I had the arduous task of removing wallpaper in every room of a 1950 ranch. Some had layers with paint between layers, some over bare plaster, etc. It was something else to remove. I found the Wagner Steamer worked best, a good scraper that was actually a floor scraper with a razor blade type edge worked FANTASTIC on plaster, and lots and lots of boiling hot water mixed with cheap fabric softener. I didn’t have to skim coat the walls afterward, but probably a good idea with drywall. It’s almost a given big old hunks are going to come off with the scraping. We actually ended up taking the wallpapered plaster down in the kitchen and both bathrooms as we removed bulkheads, etc. It was just easier that way since the rooms were gutted to the studs and ready for new lighting, new plumbing fixture placement, outlets, cabinets, etc.
I totally get the expletives while removing the blasted wallpaper. I think the devil himself invented it!!! Never, never, never will I put wallpaper on my walls again. I get sending Clara away to protect her ears…..such a funny comment that rings SO TRUE! :)
Tracy says
Looking good already!
About 15 years ago, I was prepared to help my sister remove wallpaper from the enormous wrap-around kitchen/dining room combo in a similar-era house to your new abode (also down in Richmond, but in the West End!).
We had purchased the Paper Tiger, the caustic chemicals, the scrapers and sanders. We were LOADED FOR BEAR and we were ready to spend an entire holiday weekend scraping and cursing.
Until my sister got all, “Oh hey, let’s just peel up this corner and see how much we can pull off the wall without the chemicals…” and then before you knew it the ENTIRE SHEET came off in one giant piece with nothing left behind. We looked at each other, we each thumbnailed up another corner, and off she came — we had the entire room stripped bare to the undamaged drywall in less than three minutes.
Here’s hoping your previous residents were as generous and proper with the prep, and that your wallpaper removal is just as easy!
YoungHouseLove says
That’s what I call a WALLPAPER MIRACLE!
xo
s
Tracy @ WeddingLovely says
I would HIGHLY recommend skipping the wallpaper solution (nasty chemicals!)
I’ve been taking down wallpaper in my 1960’s era house and have been simply boiling water, dumping it into a spray bottle (no issues with it melting, just gets a bit hot), and then spraying down the wallpaper walls. Once you wait a minute you can peel the wallpaper right off! So satisfying. The hardest part is actually removing the wallpaper glue after — we used TSP, which was probably a good thing because our wallpaper hid mold underneath (eww!) After some scrubbing, the walls were ready to paint. :)
Christine says
Can’t wait to see how wallpaper removal will go…it’s so timley! Looking forward to see what works best, thanks for going first!
Jen@The Decor Scene says
Love all the ideas you have for the Living Room in the future. It’s going to look amazing. Seriously the LR looks 10 times better right now with your little touches that made it look homey. :)
Nicki says
Hi John and Sherry,
I am excited for your new house adventure, and so in that vein, I challenged myself with all the possibilities as if it were my new place.
At first, when I saw all the woodwork I immediately wanted to lighten it up…however, when I find myself making fly decisions like that, I like to challenge myself further on looking at something totally different. I still may go back to it, but not without entertaining other options first. Anyway, I found these pics on houzz.com (love that site) when I went looking for dark stained wainscoting instead of white.
Now I am convinced, it is totally possible to get a bright and fresh feel to the room by updating/changing the stain color and whiting out other parts, like door trim, built-ins and ceiling. Anyway, just an idea, since you are at a great starting point and will just have to sand and not scrape paint :) and if nothing else, I can bet you like looking at nice pictures, like I do :)
http://www.houzz.com/photos/724810/Profile-traditional-bathroom-boston
http://www.houzz.com/photos/3375125/Pub-inspired-Basement-Remodel—Theatre-Room—Mechanicsburg–PA-traditional-basement-other-metro
http://www.houzz.com/photos/724810/Profile-traditional-bathroom-boston
Nicki says
Oops, here is the real third link,
http://www.houzz.com/photos/10752/Austin-Patterson-Disston-Architects-traditional-kitchen-bridgeport
YoungHouseLove says
Ooh I like the first one the most! We have the same type of process. We don’t do a thing and just live with rooms for a while until we’re 100% sure about something (since it’s pretty hard to un-paint wood or brick or paneling). Then if we’re sure after a while, we dive right in! Seems to work for us :)
xo
s
Lita says
Our last house was built in 1900 and it was essentially covered with wallpaper (inside at least–outside would have looked odd with wallpaper!). Our bedroom had five (FIVE!) layers of wallpaper including the ceiling. I really thought scraping all of that might have been the key to Madonna arms, but alas…