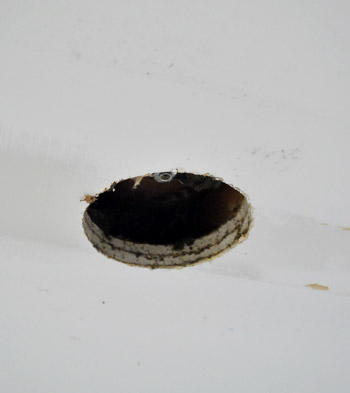
Holey moley. Our ceiling was having a little hole problem after some electrical wizork last week (warning: $herdog is in full effect in this post)…
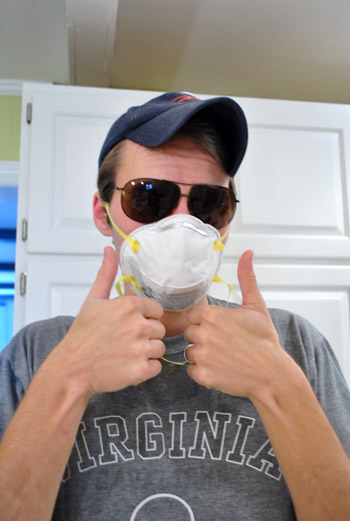
So we did the normal thing and donned sunglasses and hats along with breathing masks. Why? Because we can’t find our safety glasses (book shoots = can’t really find anything). And ceiling dust is gross when it’s up your nizzle.
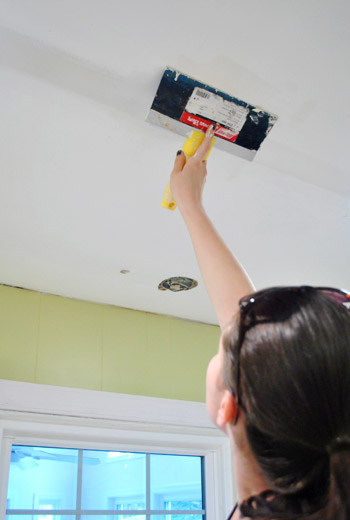
Then we got our patch on. I’m the designated Spackle Wench in our family, but John has longer arms, so he helped me by doing step one: lightly sanding the outside of the holes we were patching.
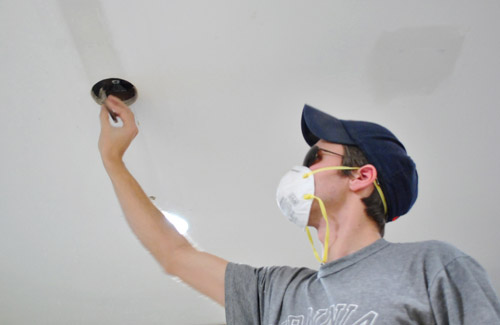
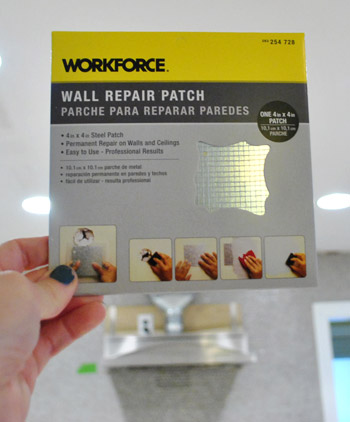
Then it was time for these guys from Home Depot. They’re basically a wire mesh patch that’s stuck to sticky paper. You stick it on the hole firmly, spackle over it, sand things down, and paint. Das it. They really make things pretty easy – even on a ceiling (the most notoriously annoying plane to work on in any room). Hardest part: gravity. More on that later (there’s video evidence of my struggle).
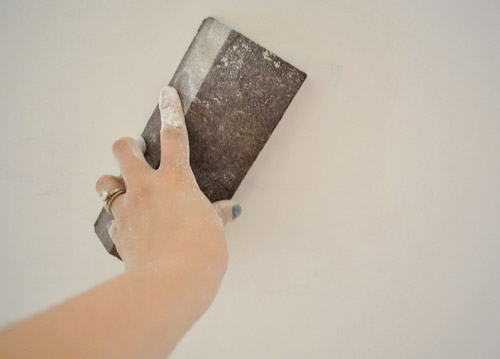
After the mesh patch is stuck up on the wall (darn, no pics of that, but that’s all in the video), just get some spackle on the biggest putty knife you have and squish it all over the mesh pad. Smooth it as much as you can with the spackle knife, but know that sanding everything down afterwards is when you’ll get the finished look you’re going for (so it’s always better to build things up slightly more than you need since you can always sand it down).
Then just wait the recommended drying time and get to sanding. I like to use a sanding block when it comes to sanding large planes like walls and ceilings, just because it keeps things straight (sandpaper is so floppy that it’s hard to keep things as rigid in this case, but it’s great for sanding furniture since it flexes to follow the lines of those items, like the legs of a chair).
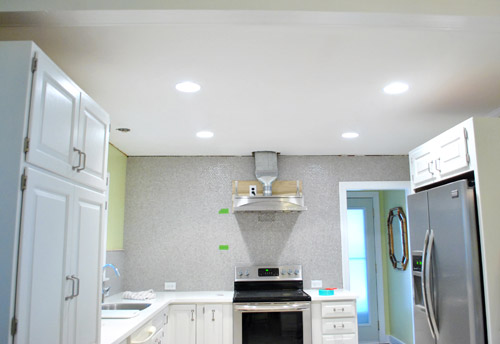
After sanding everything (and sweeping/vacuuming/showering to get the white powder off of everythingintheentirekitchen-urgh!) it hopefully looks like this. See the three dark-ish areas where those holes used to be? They just need some paint (along with other dirty areas of the ceiling that got grunged up under the old fluorescent lights).
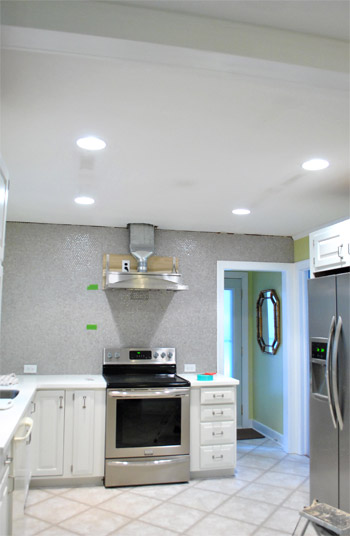
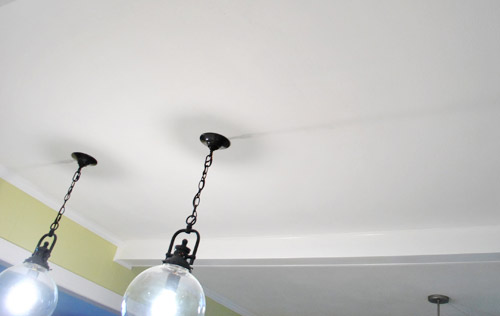
Here’s the hole next to the new pendant lights that we patched too. Oh and see the one over the sink- that’s still waiting for a fixture, so it stays. We’re on the hunt so we’ll keep you posted when we plug that guy up with something light and pretty.
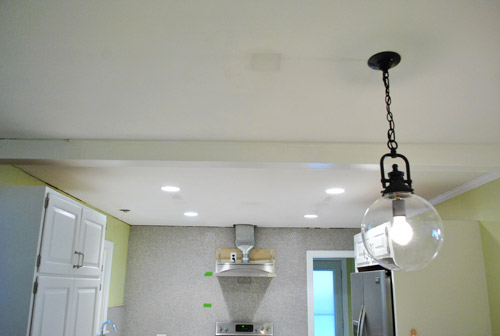
Two coats of ceiling paint later (bless the previous owners for leaving that behind for us), any evidence of those old holes were history:
Here’s the other former-hole next to the pendants after paint. See it? Me either. Huzzah!
And here’s a video. Admittedly, things got a little wonky (falling spackle, shrieking Sherry, an offhanded mention of a slug, etc). Yes, there are outtakes right in the middle of the thing. But it kind of perfectly captures the whole process. You’re gonna get messy, and it might take a few tries to get things to stick. But in the end, you can totally get ‘er done. As in, this is about a 2 on the difficulty scale. So put on your Brave Girl Underoos and get ‘er done! Or your Brave Boy Underoos if you’ve got those.
Hope that comes in handy for ya. Next up in the kitch: shelf planning and hood painting. Hootie hoo. Then floors. Momma’s excited. Bring on the colorful plates and bowls! Ah accessorizing, the best phase of every project. And the cork – that’ll be a room-changer for sure. What are you guys up to this week? Any hole patching? Shelf building? Painting? Secret project-ing? Spackle-dodging? Tell $herdog all about it.

Devlin says
That was such a riot, thanks for sharing ($her-ing?) the outtakes!
Katie G says
I have heard there is not an un-messy way to remove popcorn, but with a spray bottle of water in 1 hand and a trowel in another….spray, scrape, spray, scrap.
The previous owner of my house chose to cover the ceilings with a wide-style of bead boarding instead of scraping them. Gives it a nautical feel, but I like it better than scraping!
Mollie says
looking good! i thought i remembered that you bought a fixture at the PB outlet way back for above the sink? or am i creepily imagining things you didn’t actually do?
YoungHouseLove says
Hah oh yes – it’s just mercury glass and silver so we don’t know if it works with the ORB fixtures…
xo,
s
Jennifer says
Quick question – is your ceiling totally flat, like no texture at all? If not I’d love some tips on making the patch match up. We patched a small seam that had split in our hallway and by far the hardest part was getting the texture to match and blend in! It took weeks of small tweaks!
YoungHouseLove says
Yes, no texture at all. Anyone have textured ceiling spackling tips for Jennifer?
xo,
s
Robin O says
Yep – same problem here. Will be watching for any tips!!
Hayley says
Depends on the texture. We used a can knock down spray stuff, hard to get exact, but ok if it is a small area (not easily drawn in bye the eye).
I actually posted this exact question! Guess I should have read. I was hoping for some tips, too!
jennifer says
Nice work! You guys make it look so easy. I haven’t even looked for our (hopefully left by the owners) ceiling paint, bc I am afraid that it isn’t here, which means the awful flourescent light stays for now, bc I can’t bring myself to paint the entire ceiling….
Can’t wait to see what you choose for above the sink!
Ryan says
I’m ITHCING to do some projects soon – painting the first accent color in our house and attempting my first refinishing project (a dresser).
BUT February and March are shaping up to be busy months, so we’ll see how it goes!
Your kitchen is looking amazing.
Mary says
Just a random thought! As I was watching the video, I noticed how much Clara looks like you, Sherry! (or does this post call for a $her-dog?) I usually think babies just look like babies so when I see a resemblance to someone else, I just get excited!
YoungHouseLove says
Wahoo! We always hear that she looks like John so I’ll take it!
xo,
s
Jeanette says
Looks like our ceiling right now. We just redid our LR and put in recessed lighting. Luckily no patching in that area, just mudding up the new walls right now, sanding next. Hoping for minimal dust!
Robin O says
So it looks like you guys have smooth finish ceilings? We had new lighting put in our kitchen and only had one hole in the end to patch up. However, we have knockdown texture on our ceiling. (Well it’s supposed to be… I think the guys who redid our ceiling actually gave us orange peel, but whatevs.) So after putting up the spackle, and sanding a bit, we’re sort of stuck. Do you have any experience with patching textured ceilings? We bought the texture-in-a-can, but just are a little bit gun shy because 1)we’ve never used it 2) we’re worried once it goes on it’ll look completely different than the rest of the texture 3) in order to blend the edges it you have to spray a bigger area than your hole and we’re worried we’re just going to have a bigger mess than when we started…
YoungHouseLove says
Yes, we have flat ceilings, but if anyone has textured ceiling tips to share with Robin that would be great! I hear they sell spray texture kits that you spray on but have never used them.
xo,
s
heather s. says
I’ve never tried the spray texture on the ceiling but have used it on my walls with success so I imagine it would work on the wall as well. I tested it out on a piece of cardboard first to see how ‘big’ I needed my splatter size (the nozzle turned to adjust the splatter size on mine – fine, medium or heavy). Good luck!
Niki says
It’s not the most fun thing to do; but, whenever my husband and I have to sand something on the ceiling or wall, one of us sands and the other holds the hose of a Shop Vac up near the sanding area/sander’s hand. It REALLY cuts down on dust (and cleanup). Just a tip….
YoungHouseLove says
Soooo smart!
xo,
s
heather says
Ditto! Cuts down a ton.
Angela says
HAHA! A girl from Jersey saying Git R Done!
Teresa @ wherelovemeetslife says
Ugh, ceilings.. we have those wonderful “flowered” textured ceilings. Blech. There is a wonderful line going down the center of an area where they put our mod together. Since we have decided to put our house on the market, I guess it’s time to tackle that thing. I’m def. scared of this one!!
Did you paint the whole ceiling or just touch up the spots?
YoungHouseLove says
Ours is flat and the paint matches exactly so we only had to touch up the spots.
xo,
s
Amy @ The Button Casa says
I hate patching/repairing drywall with every fiber of my being. We’ve had to do that a lot in our fixer and that dust gets *everywhere*. That ceiling and new lights looks fab and hole free :)
MichelleG says
did you guys paint large areas around each patche (sort of “feathering” the paint out with a roller or brush to blend it?)or did you repaint the whole ceiling? my wall patches NEVER look right after the painting stage, but your hole-less ceiling looks maaahhhhvelous! any post-patch painting tips to share?
YoungHouseLove says
Yes, we did the latter! Just feather and go way beyond what you patched and if your paint is the same (and isn’t super glossy, ours was flat) it should blend right in!
xo,
s
Jason says
Let’s talk old paint – or not old paint, just paint that you are storing. I bought enough paint to paint my entire house, and 2 years later still haven’t gotten to half of it. Oh well.
When I pulled out the lightest shade to do the hallway and foyer I shook it and then stirred it – thinking they shake it at the store. But, it seemed to have little bubbles in it on the wall that I had to get after.
Anyway – what do you guys do when you pull out your paint for touch ups, etc. to get it ready to go?
YoungHouseLove says
We just shake the heck out of it and let it settle a bit (sometimes bubbles are from too much shaking and no chill time after that) – then it’s painting time. Hope it helps!
xo,
s
Jason says
Cool – thanks! I will shake shake shake senora in the early day or night before and stir stir stir senora later on or the next morning! Then paint.
Of course – when you have my walls that are wallpapered and painted over by the previous owners and nail pops it’s never going to be perfect!
I’ll sign over picture rights if you run out of projects for book 2 and want to redo my kitchen while you’re in Delaware on vacation:)
Jessika says
Not sure if you want to go with a similar pendant style over the sink, but I noticed that Home Depot has your pendant (over the bar) lights, but the outside bulb, instead of being circular, is cone-shaped (like a lampshade). Very similar, but different.
YoungHouseLove says
Thanks for the tip! Will have to check it out!
xo,
s
Pam M says
Great video! For some reason it brought back memories of my parents. My dad was a true “can-do-it-all” kind of guy so we had many renovations to the house while growing up. Anyway, my mom would stand there with the vacuum hose trying to catch the dust. She was/is slightly OCD – that’s another chapter… Anyway, thanks for triggering a flashback! lol (Can’t wait for the floors!!!)
YoungHouseLove says
Aw, I love it!
xo,
s
angel p says
I’m so glad you put video up for this. We had an issue putting a speaker in a few years ago and my husband tried to patch the hole but since he is not a DIY’er it looks awful. I didn’t know about the mesh pads. I think we will have to try to redo it now that I do know. Good tip on the sanding pad. I was just gonna plug in my hand sander and go to town on it. Guess that would have been wrong.
Jennifer says
Looks perfect! I have had this gouged out area in my basement wall, where I bonked the elliptical against it. It has needed patching for a long time, but I’ve been too scared to tackle it. I need to be brave and just do it because it bugs me everytime I see it. $herdog, I will think of you as I tackle the spackle LOL
Michelle says
Hilarious! ? it
Meaghan says
I hear ya on the dust! We’re removing the popcor ceilings in our house and it’s a mess. We do one room at at time but it’s slow going! Here’s the photo evidence from the most recent rooom.
http://diybymrc.blogspot.com/2012/01/prep-work-complete.html
YoungHouseLove says
Love it! Yay progress.
xo,
s
Shannon @ Bungalow960 says
We are removing old outlets in our 1924 bungalow. There is a mega strength outlet (with a weird plug shape) in each room where the old window air conditioning units used to be plugged in. We are terminating those connections, and then using that trusty mesh sticker thing to plaster over it. Those babies are SLICK! Makes life so much easier.
YoungHouseLove says
Niiice. Sounds like you’re making progress!
xo,
s
Bethany says
The video literally made me laugh out loud! I’m so glad you kept the “outtakes” in, too funny!
Susan says
Even if $herdog isn’t catching on as quickly as you’d like, you’ll be glad to hear that my husband (who does not read your blog) actually said the other night, “Let’s put this baby in the basket and take it to the market.” It’s gone viral, I tell ya’.
YoungHouseLove says
Hahaha. I love it.
xo,
s
Tami says
Any problems getting the new ceiling paint to blend in with the old? Thanks for the great kitchen updates! Love seeing the progress!
YoungHouseLove says
Thankfully it blended right in because it’s flat paint and it was an exact match. I just feathered it out way past the part I spackled and it dried to fit right in!
xo,
s
Shelley @ Green Eggs and Hamlet says
Oh my gosh, I was laughing as hard as you guys were when the spackle went down the back of your shirt. And I love that you and John seem to have such fun while
etcetera says
we have an electrician coming to the house next week and I know they will have to cut a few holes in our walls. This kind of wall patch might be our answer to covering up their holes. Have you ever tried cutting the patches down to match the size/shape of the hole you are covering? (in your demo, the patch size matches your holes quite well.) Or do you lose the sticky part of the patch if you cut it? Thanks!
YoungHouseLove says
They sell them in many sizes so you can use the closest sized one that works or cut them!
xo,
s
melissa says
Looks great! I can’t wait to see the completed transformation! Just curious, do you know if the previous owners read you blog? I would think it would be cool to watch your previous home undergo such dramatic changes, really see its potential and what the new owners have done with it.
YoungHouseLove says
Yes! It appears they do. They’re so sweet and seem to love seeing us do all the work- haha.
xo
s
Katie says
Any ideas on how to patch a popcorn ceiling? We’ve got a hole in our kitchen ceiling that isn’t completely covered up by our light fixture but we have no idea how to patch it since we have those old-school popcorn ceilings…
YoungHouseLove says
I think a few others have asked the same thing back in the comments so hopefully scrolling back to see any recommendations that commenters might make on the subject will help?
xo,
s
Ashley Jensen says
I just did my first patch job (along with adding back the texture)on one of our bathroom walls last year (husband slipped getting out of the shower and grabbed the towel bar yanking it out of the wall)! It was super easy!
Question about the ceiling paint…we have the original ceiling paint can but it was up in our attic and paint is separated and the part that has settled to the bottom is gunky. Any way to salvage it or should I just take the piece of paper from the can that has some paint on it to get fresh paint?
YoungHouseLove says
I would shake the heck out of it and try using it, just to see if it dries and matches anyway. If it doesn’t then you might have to start from scratch (bring the old can and they can match it for ya), but it’s worth a try to work with the existing stuff first!
xo,
s
Diana @ Boy + Girl says
That looks great!!! Woohoo to getting closer to the accesories phase!
We’re working on…demolishing a basement, completing an “in the meantime” kitchen update, and converting two bedrooms back in to a garage. Oh gosh, seeing it all typed like that stresses me out. haha.
-Diana
Stephanie Lareau says
Hey guys! We just had pot lights installed in our kitchen to replace a very terrible halogen light fixture that hung off center and never worked properly….so too funny I have a hole in my ceiling now that I need to fix and was just thinking how to go about that today! I’m going to pop out and grab some supplies and get my sparkle on.
Thanks for the tips all the way from Canada!
Katy @ The Non-Consumer Advocate says
I would have gone with the title:
“The ceiling’s so bright, I’ve gotta wear shades.”
– Timbuk 3.
:-D
Katy Wolk-Stanley
YoungHouseLove says
Haha, nice.
xo,
s
Alanna says
everything looks great!
i stumbled across these bicycle glasses and thought of y’all. could be fun to accessorize your future shelves with. http://www.uncommongoods.com/product/bicycle-glasses-set-of-8
YoungHouseLove says
Love those so much!
xo,
s
Stephanie Lareau says
Oops….spackle….not sparkle….silly autocorrect !
Hayley says
Question. What about wall texturing? Our walls and ceilings both have slight texture to them. What do you do about that? Like when you added drywall to the walkway that was added? Just curious.
YoungHouseLove says
We have never tackled that (walls and ceilings in old ranches tend to be flat in our region) but others have asked for recommendations so maybe other commenters have weighed in on that if you scroll back? Hope it helps!
xo,
s
Sarah says
You should totally post more outtake videos! That made me laugh so hard!
candace says
Hilarious video – made me giggle! Thanks for posting it – I’ve always been unsure how the wire mesh thing sits flush so the video was really helpful!
Melissa N. says
Amazing job! You definitely can’t tell there were ever any holes there. This actually looks easier than I thought it would be, and is good to know in case my hubs and I ever have any holes in the wall that need to be fixed. :)
Question, if you’re fixing holes on a wall, do you need to paint over just the part you repaired or would you have to repaint the entire wall?
YoungHouseLove says
If it’s flat paint like a ceiling and you have the same color you can usually just paint a wide area around the patch (feathering it out around the edge) and be good!
xo,
s
Meredith says
My 8th grade science teacher had his alter-ego, the Great PHEOC (Problem Hypothesis Experiment Observation Conclusion–clearly, it worked for remembering that at least!) and $herdog reminds me of that; she’s your fun, gangsta alter-ego. PHEOC had a cape; I think $herdog needs a giant dollar sign necklace or some other bling. :)
YoungHouseLove says
Haha, I totally need a cape and some bling.
xo,
s
Whitney Dupuis says
Haha, that video cracked me up!
To everyone talking about popcorn ceilings, I am going to have a popcorn-ceiling removal party. Everyone’s invited! :)
Zoë says
We stripped the wallpaper in our hallway before Christmas only to discover a big hole in the drywall caused by the doorknob slamming into the wall. Clearly, the previous owners throught the best fix was to cover up the hole with floral wallpaper, and install a doorstop. My husband and I are novice DIYers, so when we saw that hole, our hearts sank as we had no idea how to fix it. But my MIL knew all about that wire mesh patch. Off we went to Home Depot, found the patch and the spackle, and fixed the hole for less than $10 (which surely cost less than the wallpaper “fix”). Now there is no sign of the hole. Who knew?
YoungHouseLove says
Yay! So glad it worked out so well!
xo,
s
Lauren Nicole says
I think the sunglasses were a wise choice, actually. Otherwise the other ceiling lights may have been too bright for you to see.
YoungHouseLove says
Seriously. Gots to wear shades.
xo,
s
Jen @ The Decor Scene says
I can’t wait to see those floors go in. Ceiling looks awesome. I’m getting excited for you guys. This has been a huge project, but you are almost there. YAY!!! :)
Desiree says
I love it when $herdog comes out to play!
Aly says
Looks absolutely flawless! Quick question about the penny tile – have you guys done the final sealing on it yet? It’s looks so shiny so I thought that I maybe missed where you completed it. Everything looks amazing can’t wait for the accessories – it’s all in the details!!
YoungHouseLove says
Yes! We owe you an update on that!
xo,
s
Nicole says
Didn’t you guys pick up a glass honeycomb patterned pendant for over the sink a while back on one of your road trips?? Did you decide not to use it or am I just crazy and dream the whole thing up?
Nicole says
Never mind – saw your previous comment!
YoungHouseLove says
We did but it’s mercury glass and silver so it might clash with the ORB. Not sure if that’ll end up in a bathroom someday…
xo,
s
Gaby says
The patch work looks great! I had no clue that the metal/mesh thingies existed. I learn so much from you guys!
I’ve discovered the magic of caulk (so easy! and clean caulk makes such a difference!) so this weekend, I’m removing all of the old gross caulk from the kitchen counters and replacing it.
Krystle @ Color Transformed Family says
I love that you are keeping with your goal to wear fingernail polish more. The dark color looks great. Sometimes I like to wear dark colors and pretend that it makes me look like a rebel or a touch of goth. Maybe I think that because I have pasty white skin. Anyway, I think it looks great on you!
YoungHouseLove says
Aw thanks! My skin is super light too, but it hides all the grungy paint and primer and caulk under my nails these days with all the secret book projects! And they’re shooting my hands so they can’t look torn up! Haha.
xo,
s
Emma says
Sherry, you are making $herdog a legit name! Would she have one or some gold/blingy teeth because that’s kinda how I imagine her looking – with Sue the napkin as a bandana. Just sayin’.
Spackle job is looking niiiiiice by the way – and no one else would show folks the real-real low down on DIY projects ala the sunglasses as eye wear and spackle landing on your person! Thanks for sharing everything you do – we appreciate it!