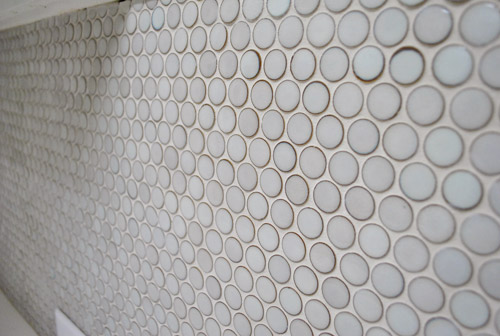
Let’s talk about grout, because with our penny rounds finally all installed, grout was next on the agenda. It has a way of taking things from in-progress to looks-completely-finished-oh-thank-goodness. Observe:

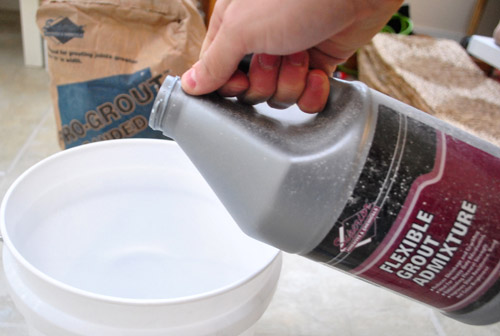
So here’s how we got there. First I have a little “materials shot” for ya:
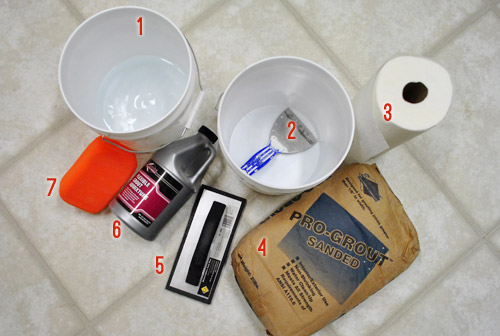
- Bucket of clean water
- Putty knife & another bucket to mix grout in
- Paper towels because, well, grout is messy
- Sanded grout (from The Tile Shop, $19 with discount) – ours is the Mobe Pearl color
- Rubber float (from Home Depot, $2)
- Flexible Grout Admixture (from The Tile Shop, $17 with discount) – this reduces grout shrinking and cracking
- Sponge. Woot!
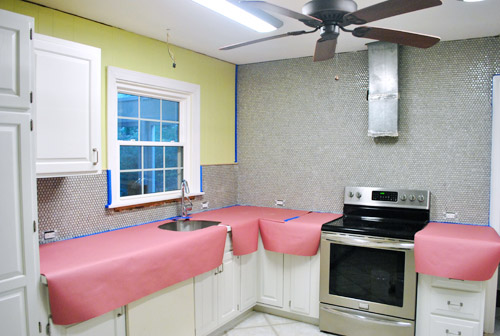
Oh and we used leftover rosin paper from Home Depot to prep the room, since it was again helpful in keeping the mess off of our counters.
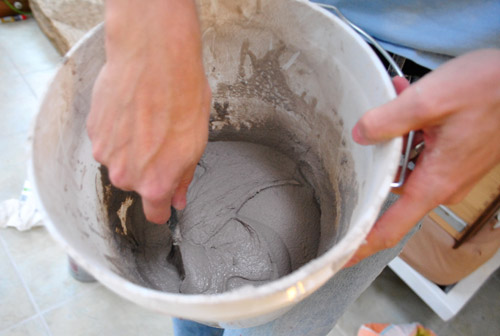
Grout, like thinset, is another mixture that you only want to make in small batches – since it’ll dry out after about 20-30 minutes. So according to the instructions, I started by pouring a bit of admixture into my bucket and then adding the grout powder second.
Just like with my thinset, I used my putty knife to mix everything together until I got a that toothpaste-y consistency that I found easiest to work with.
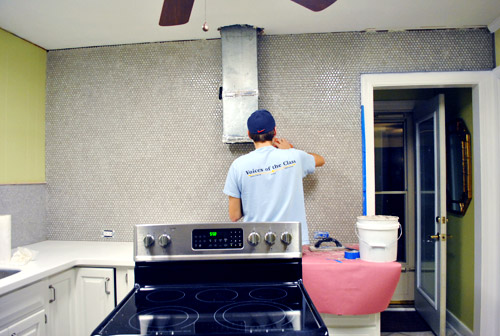
I had forgotten how much I enjoy grouting. That may be an overstatement, but after the focus it took to actually install the tile it was fun to do something that took very little thinking. It was basically just using the float to smoosh the grout onto the tile and, more importantly, into the cracks. Sherry helped too. She was less into it than I was. Ha.
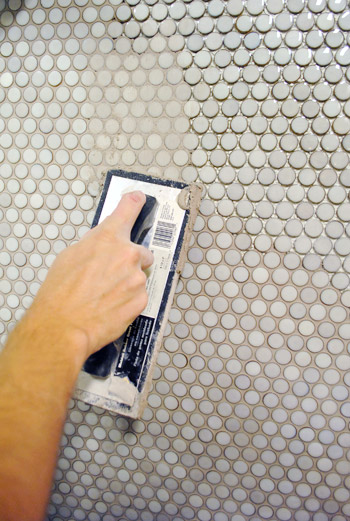
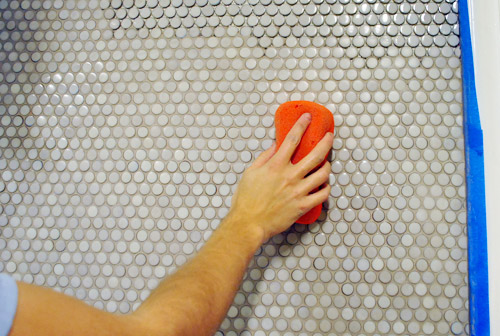
Once we made sure we didn’t miss any spaces, we held the float at an angle and scraped off some of the excess from the front of the tiles. Then it was time for some sponge-and-water action. This not only cleans grout off the front of the tiles, but also kinda smooths the grout between the tiles. It’s kinda weirdly amazing to me how simple but helpful this step is.
If you want to see these steps in action, we managed to film this little one-take video of it. Clara’s need for a cream-cheese refill cut it a smidge short, but you get the point:
Admittedly the task is a bit tedious – and more than bit taxing on your wrist – but we managed to get it all done in one afternoon.
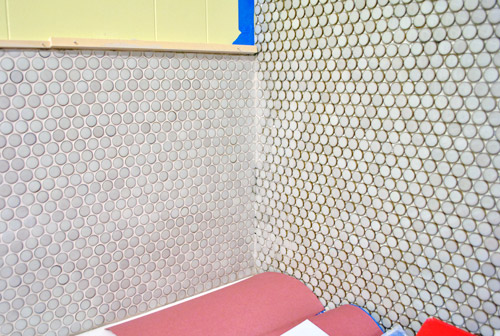
The difference between an ungrouted and grouted tile job still amazes us. Just when we thought we couldn’t love our penny rounds more. You can see the difference below – the left side has dried grout in it, the right side is ungrouted. You can also see how much lighter the grout gets once it dries. Of course there’s still a haze on the grouted tiles on the left, so they don’t look as gleamy as they do once you buff that off with a cloth after it has fully dried.
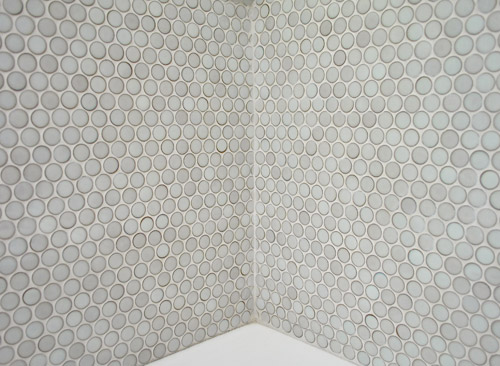
Oh, and since people had asked before – here’s a picture of the corner seam after it was filled with caulk that matches our grout. We also caulked the seam where the tile meets the counter (that’s still drying in this pic, so it looks darker along that bottom edge). This was taken before we buffed the tile with a cloth though, so it’s kinda chalky. But you get the idea.
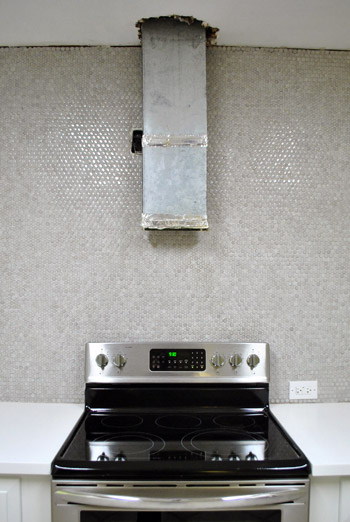
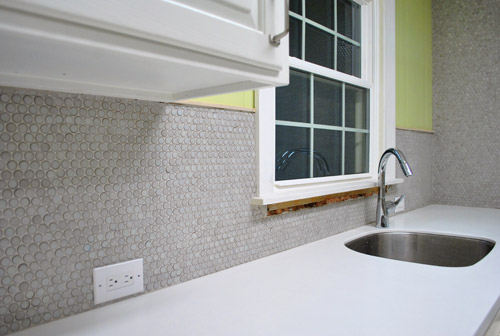
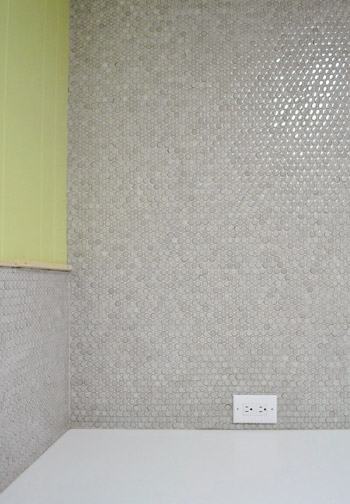
Here’s the whole room completely done, though it’s kinda hard to make sense of it at this picture size – since it sort of just looks like a gray wall. Haha. But in person it’s approximately 50 times bigger than this photo on your monitor. And those gleaming penny rounds look pretty darn lip-smacking. Yes, I just used that adjective. The penny tile does that to me.
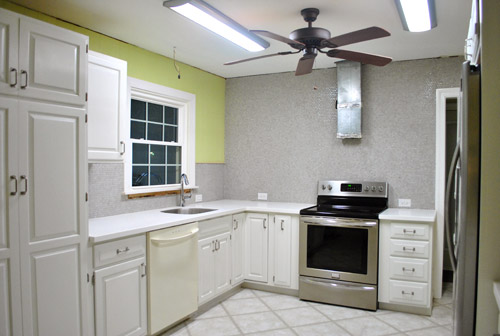
So here are some close ups so you can get a better idea of what it looks like in real life. Thankfully even when you enter the room from the frame hallway on the far side of the kitchen you can easily make out each individual penny tile. Which is nice because it would have been a colossal bummer to spend 14 hours tiling the room only to have it look like gray paint from afar. Even from the front door it clearly looks like little round penny tile on the part under the microwave that you can see from there. Whew.
This shot is probably best at depicting all the varying tones in the tile. It’s awesomely random. Some tiles are a bit darker and some have a dark ring (or semi-ring) around them – we think it looks really charming and adds to the dimension. And you can see the polished shine on the top right corner of this shot (they look hazy in this pic for some reason, but up at the corner you can see that they gleam in real life). It’s actually a really “marble-ish” look without having to dish out the money for marble.
Here’s another close up to show how some tiles have darker rings and varied coloring. And you can really see how the grout cleans things up and adds some nice tone-on-tone action where dark holes and mesh once were:
We were a little nervous about the grouting step because we had heard that it can accentuate any seams or inconsistencies in the way that you laid the sheets. But our experience was the opposite: it actually seemed to disguise those little mistakes. It’s probably because our tile / grout color combo is low contrast, but if it was dark it could highlight those flaws instead of bridging the gap and making things look more finished and even. So this isn’t to say that grout solves a bad tile job when it’s low contrast (unfortunately nothing solves a bad tile job) but if there are tiny inconsistencies, similarly toned grout might be your best friend. And thanks to using a good sealer, it shouldn’t be a bear to keep clean (we used something awesome on our first house’s tiled shower and didn’t have to scrub it ever again – even while hosting Open Houses a year later it looked as good as it did the day we grouted).
Here’s a better shot that shows the shine- although it’s only on that portion of tile on either side of the range hood. I blame our terrible kitchen lighting, but it’s next on our to-do list! Yes, we have an appointment with our electrician and everything.
Speaking of other still-to-be-completed projects, we also still have to add a range hood and some open shelves. We think our tile will be a pretty darn sexy backdrop for our dishware and such (knowing Sherry, there will be a whole lot of “and such” up there with our dishes – the girl has plans).
Even though grout is done, our job with the tile isn’t 100% complete. We still have to seal it. And before that we have to do a bit more clean up (aka: more buffing to remove small traces of haze in some areas). It’s pretty common for grout jobs and The Tile Shop actually sells haze remover, but we’ve found that just good ol’ fashioned elbow grease (and a dry dishtowel) can also do the trick. Buff, buff, buff. So we may try that first. That is, once our wrists recover.
You know we’ll be back to share all the goods as we go (applying our sealer, planning/replacing the lighting, range hood happenings, open shelves, new cork floors, etc). In the meantime, have you guys ever grouted? Did you kind of like it (me) or kind of hate it (Sherry). The good news is that we both admitted that it was totally worth the hassle when we were done, so that’s unanimous. Glad to have it checked off.
Psst- Take a wild guess who is the most excited indoor train rider in our family. Might not be who you think. More on that here.

kali says
Looks fabulous! I see you have wood tacked up to create a straight line next to the window where the tile doesn’t cover the whole wall. What did you do to finish that off? Can’t find any pictures of that. Did you use a finishing tile like a quarter round or did you just leave it plain?
Thanks!
YoungHouseLove says
We just painted the wood and grouted right up to it, creating a sort of “cap piece” – wish I had a better picture for you :)
xo
s
kali says
great, thank you!
Bootsie says
How hard is it to clean? I have heard that with penny tiles it is very difficult, especially behind the stove.
YoungHouseLove says
If you seal your grout it should be great. We cooked regularly (almost every night for over a year) and didn’t have any stains. Just wiped it down once a week or so, but since it was all sealed, it was glossy, so things came right off.
xo
s
Sherri says
Saw you guys in the HGTV magazine and when I saw “penny rounds” I had to check it out. I can’t believe you cut all those tiles with a knipper. Why didn’t you rent a wet saw?
It could have saved you hours on this project. You do need to keep your hands pretty close to the saw so the halves don’t chip, but not impossible.
My husband and I are doing white penny rounds in our shower.
I had him tear out the first 2 walls that he did without me. Instead of “finger locking” the tiles (as they are already made to do) he butted the side circles up to each other leaving horrible spacing and obvious space between tiles.
After ripping that out and fixing the pitted walls we started again. Since we were on our knees in the shower, trying to see the spacing took forever. Then the tiles moved a bit when on the mastic. Had to respace almost each tile on the sheet. Argh!!!
Then for some reason (may have been that they were up-side down or something) we measured the size tile we needed and 6 times it was wrong! I thought my husband was going to bust a blood vessel. So far we have put up 6 tiles and it has taken us 3 hours. I think when we continue I will cut the tiles in half (on the straight side – 2 sides are fingered and top and bottom straight)making them easier to maneuver in the mastic.
the floor of the shower will be 12×12 sheets of small stones. We need to grout that with a pastry bag. :-)
YoungHouseLove says
We actually own a wet saw and tried cutting them that way but it didn’t cut as cleanly (ripped them all off the mesh) so the nipper worked the best for us!
xo
s
Sherri says
Yup that is a problem I have encountered. When the mesh gets wet the tiles fall off. I have also purchased a couple of sheets of colored tiles. I want to intersperse them among the white ones. Maybe in the middle where it looks like a
flower. I am also using glass 12×12 sheets cut into strips to use as a border around the shower.
Kate says
Is the “moss” color more gray than green?
YoungHouseLove says
Yes, it’s not green at all (all gray).
xo
s
Laurie says
What sealant did you use for this penny tile? We used the same tile for our backsplash in our kitchen but the milky white version. Sealant recommendations for this penny round? Thanks,
YoungHouseLove says
Hmm, I can’t remember it off the bat but I believe we blogged about it and it was from the Tile Shop. Maybe try searching our archives for: penny tile sealer?
xo,
s
MoWen says
One word, three letters: Wow! ;)
Ivana says
Great tutorial! We were considering all different kinds of mosaics, but keeping simple is the wining strategy. Thank you
Shauna says
What kind of caulk did you use for the counter/backsplash seam? Was it sanded grout? Did it hold up? We’re having trouble with the grout line between the counter and tile cracking and looking into caulking options. Thanks!
YoungHouseLove says
The Tile Shop sells matching caulk to the grout colors for those seams, which we used and really liked.
xo
s
Greg says
Wow that looks great, and familiar! My wife and I used the same penny round in our master bathroom as a “water fall” in the shower and on a wall behind a freestanding tub. Locally, The Tile Shop carries the penny round.
We recently finished a large addition in Hanover. Although we were homeowner GCs for the project, we hired a sub-contractor to do the tile work given the size of the bathroom (lots of tile and other hands-on projects for us to tackle).
YoungHouseLove says
Sounds really gorgeous Greg!
xo
s
Heather says
Can you remember where you found your tile? I’m looking for that ting around it, but can’t find it. Thanks!,
YoungHouseLove says
It’s from The Tile Shop.
xo
s