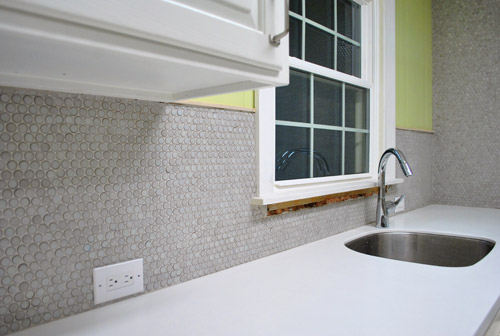
Let’s talk about grout, because with our penny rounds finally all installed, grout was next on the agenda. It has a way of taking things from in-progress to looks-completely-finished-oh-thank-goodness. Observe:

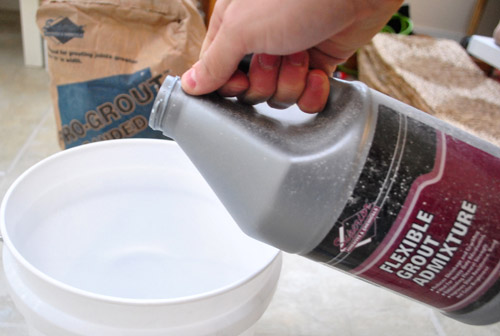
So here’s how we got there. First I have a little “materials shot” for ya:
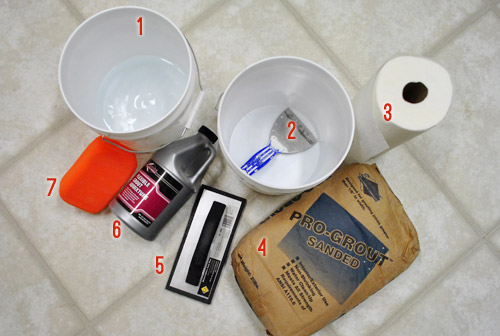
- Bucket of clean water
- Putty knife & another bucket to mix grout in
- Paper towels because, well, grout is messy
- Sanded grout (from The Tile Shop, $19 with discount) – ours is the Mobe Pearl color
- Rubber float (from Home Depot, $2)
- Flexible Grout Admixture (from The Tile Shop, $17 with discount) – this reduces grout shrinking and cracking
- Sponge. Woot!
Oh and we used leftover rosin paper from Home Depot to prep the room, since it was again helpful in keeping the mess off of our counters.
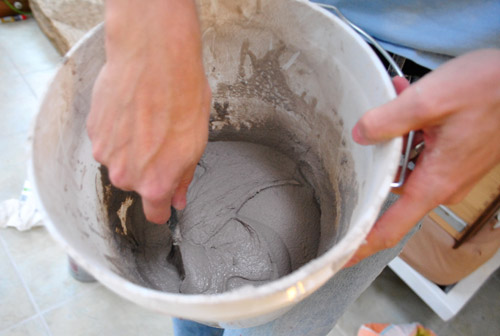
Grout, like thinset, is another mixture that you only want to make in small batches – since it’ll dry out after about 20-30 minutes. So according to the instructions, I started by pouring a bit of admixture into my bucket and then adding the grout powder second.
Just like with my thinset, I used my putty knife to mix everything together until I got a that toothpaste-y consistency that I found easiest to work with.
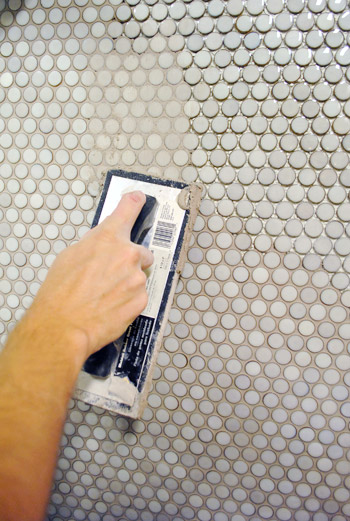
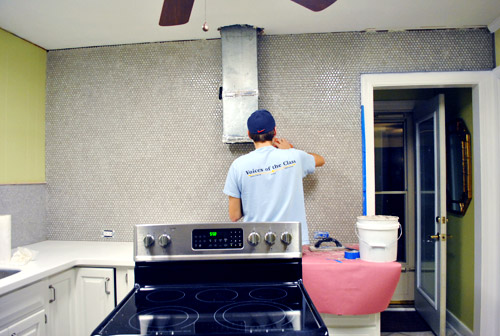
I had forgotten how much I enjoy grouting. That may be an overstatement, but after the focus it took to actually install the tile it was fun to do something that took very little thinking. It was basically just using the float to smoosh the grout onto the tile and, more importantly, into the cracks. Sherry helped too. She was less into it than I was. Ha.
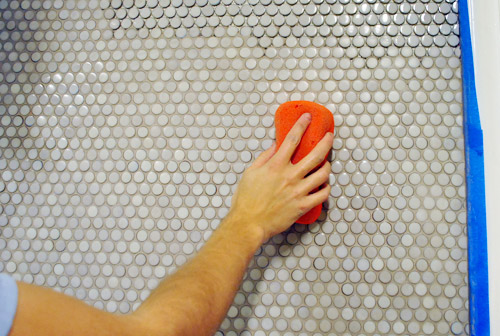
Once we made sure we didn’t miss any spaces, we held the float at an angle and scraped off some of the excess from the front of the tiles. Then it was time for some sponge-and-water action. This not only cleans grout off the front of the tiles, but also kinda smooths the grout between the tiles. It’s kinda weirdly amazing to me how simple but helpful this step is.
If you want to see these steps in action, we managed to film this little one-take video of it. Clara’s need for a cream-cheese refill cut it a smidge short, but you get the point:
Admittedly the task is a bit tedious – and more than bit taxing on your wrist – but we managed to get it all done in one afternoon.
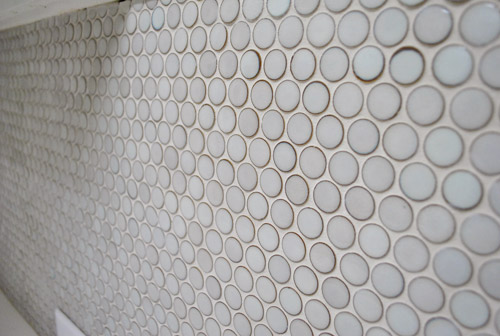
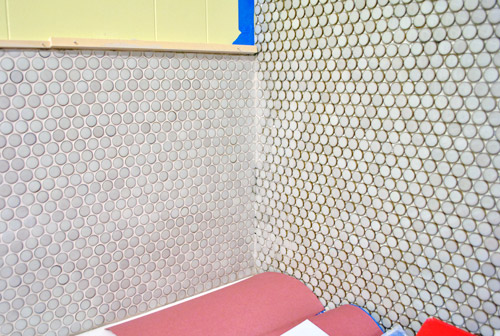
The difference between an ungrouted and grouted tile job still amazes us. Just when we thought we couldn’t love our penny rounds more. You can see the difference below – the left side has dried grout in it, the right side is ungrouted. You can also see how much lighter the grout gets once it dries. Of course there’s still a haze on the grouted tiles on the left, so they don’t look as gleamy as they do once you buff that off with a cloth after it has fully dried.
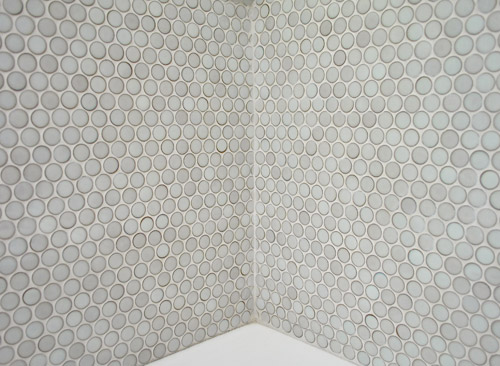
Oh, and since people had asked before – here’s a picture of the corner seam after it was filled with caulk that matches our grout. We also caulked the seam where the tile meets the counter (that’s still drying in this pic, so it looks darker along that bottom edge). This was taken before we buffed the tile with a cloth though, so it’s kinda chalky. But you get the idea.
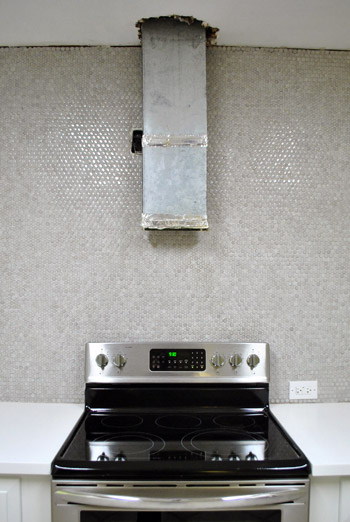
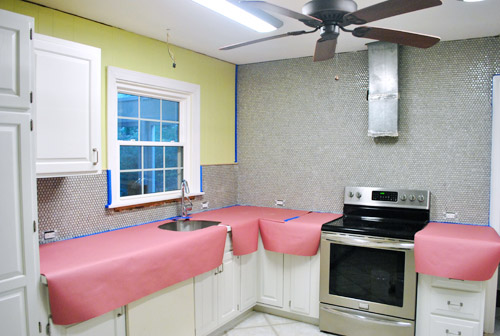
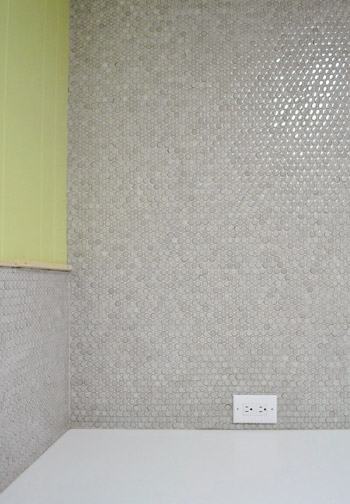
Here’s the whole room completely done, though it’s kinda hard to make sense of it at this picture size – since it sort of just looks like a gray wall. Haha. But in person it’s approximately 50 times bigger than this photo on your monitor. And those gleaming penny rounds look pretty darn lip-smacking. Yes, I just used that adjective. The penny tile does that to me.
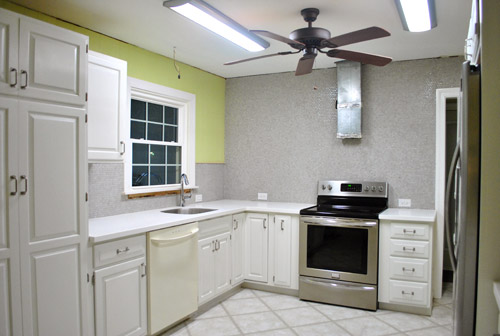
So here are some close ups so you can get a better idea of what it looks like in real life. Thankfully even when you enter the room from the frame hallway on the far side of the kitchen you can easily make out each individual penny tile. Which is nice because it would have been a colossal bummer to spend 14 hours tiling the room only to have it look like gray paint from afar. Even from the front door it clearly looks like little round penny tile on the part under the microwave that you can see from there. Whew.
This shot is probably best at depicting all the varying tones in the tile. It’s awesomely random. Some tiles are a bit darker and some have a dark ring (or semi-ring) around them – we think it looks really charming and adds to the dimension. And you can see the polished shine on the top right corner of this shot (they look hazy in this pic for some reason, but up at the corner you can see that they gleam in real life). It’s actually a really “marble-ish” look without having to dish out the money for marble.
Here’s another close up to show how some tiles have darker rings and varied coloring. And you can really see how the grout cleans things up and adds some nice tone-on-tone action where dark holes and mesh once were:
We were a little nervous about the grouting step because we had heard that it can accentuate any seams or inconsistencies in the way that you laid the sheets. But our experience was the opposite: it actually seemed to disguise those little mistakes. It’s probably because our tile / grout color combo is low contrast, but if it was dark it could highlight those flaws instead of bridging the gap and making things look more finished and even. So this isn’t to say that grout solves a bad tile job when it’s low contrast (unfortunately nothing solves a bad tile job) but if there are tiny inconsistencies, similarly toned grout might be your best friend. And thanks to using a good sealer, it shouldn’t be a bear to keep clean (we used something awesome on our first house’s tiled shower and didn’t have to scrub it ever again – even while hosting Open Houses a year later it looked as good as it did the day we grouted).
Here’s a better shot that shows the shine- although it’s only on that portion of tile on either side of the range hood. I blame our terrible kitchen lighting, but it’s next on our to-do list! Yes, we have an appointment with our electrician and everything.
Speaking of other still-to-be-completed projects, we also still have to add a range hood and some open shelves. We think our tile will be a pretty darn sexy backdrop for our dishware and such (knowing Sherry, there will be a whole lot of “and such” up there with our dishes – the girl has plans).
Even though grout is done, our job with the tile isn’t 100% complete. We still have to seal it. And before that we have to do a bit more clean up (aka: more buffing to remove small traces of haze in some areas). It’s pretty common for grout jobs and The Tile Shop actually sells haze remover, but we’ve found that just good ol’ fashioned elbow grease (and a dry dishtowel) can also do the trick. Buff, buff, buff. So we may try that first. That is, once our wrists recover.
You know we’ll be back to share all the goods as we go (applying our sealer, planning/replacing the lighting, range hood happenings, open shelves, new cork floors, etc). In the meantime, have you guys ever grouted? Did you kind of like it (me) or kind of hate it (Sherry). The good news is that we both admitted that it was totally worth the hassle when we were done, so that’s unanimous. Glad to have it checked off.
Psst- Take a wild guess who is the most excited indoor train rider in our family. Might not be who you think. More on that here.

Margaret says
How are you feeling about the colour of your walls, now that the grout is in? It almost looks like it’s changed tints. Of course, it may just be a lighting thing…
YoungHouseLove says
Yes, it’s just the wacky lighting and it reads differently on every monitor. In person it’s a soft avocado greeny/gold color and we love it with the soft gray and white kitchen!
xo,
s
Erin says
HAHA the title of this post literally made me LOL! love it, and love the grout! i may be sold on the penny tiles now.
vanessa says
Love it! Looks amazing
Rachel says
Oooooooooh. Sparkly.
Julia Lolita says
It is looking really good you guys. You’re killing me with all these lyrics/play on lyrics. lol.
Samma says
Looks so great!
In the video, it looks like John is pretty much going one direction — is that on purpose? It seems like that would make for a less level grout application, but it all looks nice and purty!
Can’t wait to tackle our master bath!
YoungHouseLove says
We went back and forth over all the areas, so it must have just been that we were trying to do a quick demo for the video. Especially with penny tile since it’s open on all sides, you sort of have to grout in all directions for the best result. Hope it helps!
xo,
s
Amy @ The Button Casa says
I so love it! I haven’t been a fan of grey in the past but this might just win me over. Love how it looks with the green too. It’s so crisp and clean looking…two things I love in a kitchen <3
amyks says
Love it, especially with the white counter tops!The contrast is just right!!!
Tammy says
We spent the past weekend tiling our backsplash with white subway tile and some glass accent tile. It was our first time tiling. We’re waiting til this weekend to grout. Can’t wait!
Gabbi says
Wow, that looks so amazing!!
Tracy says
It looks FANTASTIC!!! Love it!!
Jessica says
So, you can clean dry grout off of the tiles? And you do that with just a dry rag?
YoungHouseLove says
You can buff the haze off with things like a microfiber cloth (dry) or dry cheesecloth. I have also heard tips here for using things like windex or vinegar, just make sure they don’t interfere with your tile (ex: vinegar can etch marble).
xo,
s
Suzanne says
Wait, I’m worried folks might think you can leave allll the grout on for the next day. Can you clarify that you mean just the final-final haze, and not the whole mess? whew. visions of grout messes all over america. ;-)
YoungHouseLove says
Yes!!!!! Only the haze! Wipe it down following the steps John outlined in the video in this post after you apply it! Haha.
xo,
s
Yancey says
Cheesecloth works wonders for removing haze from your GORGEOUS penny tile! No liquid necessary, just use the cheesecloth like you would your dish cloth.
YoungHouseLove says
Thanks for the tip!
xo,
s
Lauren says
Ahhh love it! Gorgeous!
Ginny @ Goofy Monkeys says
Seeing this makes me so excited for our kitchen reno! It’s a ways away, but I’ve already gotten so many great ideas from you guys. The penny tile looks beautiful!
Emma says
Ooohhh. Looks niiicce :)
toni from says
LOVE the tiles. It is absolutely gorgeous. What a fabulous kitchen, I am so jealous.
Jillian@TheHumbleGourmet says
So adorable! It’s also pretty amazing how the tile really brings out the green tones in your wall paint (though that may just be a trick of the camera). Gorgeous!
Liz says
I looooove that tile. I wish I could see it in person. I feel like the pictures don’t do it justice. Good job!! (P.S. Love tears for fears)!!
Elaine says
I love it! Beautiful. And is it wrong that I appreciate the ‘outer glow’ on your numbers in the ‘materials pic’? Could be the graphic designer in me but good on ya ;). Ha ha. There you go. I appreciate it all.
YoungHouseLove says
Haha, I’ll have to tell John. He’ll probably beam with pride.
xo,
s
Allison says
I loooove me some tiling and grouting. We did our little bitty bathroom floor a couple of years ago and I got really into it! I did not have the smarts to only mix small amounts of grout at a time though and am sorry to say that not long after completing the project, you could tell. Grout has already started to chip in between tiles and it makes me NUTS! I think it is because the grout was too dry when it was put down to properly stick together. I am also looking forward to finding out about how you sealed this type of grout. I have only done grout between 2 inch square tiles with the little rolly tool…
Dean says
How are you going to put the screws back into the wall to hold the outlet in place? Are you afraid that the masonry bit might break the penny tile as your drilling the hole? If not, how are you getting around that? Thanks so much, my wife and I love this site!
YoungHouseLove says
We’ll use a special bit for that! And it’ll be hidden behind the range hood anyway!
xo,
s
Dean says
Looks like you may have pulled out the electrical box to account for the thickness of the penny tile; Is my assumption correct?
Thanks again!
YoungHouseLove says
Yup!
xo,
s
Sarah says
In two of the houses I previously owned, the sellers had left areas of tile grout-less. They were done remodling – they just either plain forgot to grout it, or were too lazy!
Sassy Apple says
Tile looks amazing….I’m definitely adding that to our ‘to do’ list for our next house. You mentioned lighting, and when we renovated our 100 yr. old bungalow (10 ft. ceilings, glorious wood floors, etc) we redid the lighting in the kitchen. We installed ‘big’ lighting in the center of the room and recessed lighting (there’s several websites that tell exactly how to measure that so it doesn’t leave shadows when you’re working on your counters) Anyway, we also installed a dimmer switch on the recessed lighting, and we congratulate ourselves almost every day. It’s nice to have low light for those trips for snacks and beverage refills without a bright light interfering in other rooms. Just a thought…..not that you don’t have enough of those.
Congrats on all the progress.
YoungHouseLove says
Oh yes John is a dimmer switch fool! Haha. He already bought one that he can’t wait to install once we get the electrician out to do the heavy duty stuff!
xo,
s
Penni McNamara says
Looks even better with the grout! Kudos! I love this tile and wish I had somewhere to put it in our house!
Sydney says
I have been blog stalking you two for a while now and I am glad to say this is my first post! You two did a great job! It looks amazing. I had my first tiling experience over winter break (I’m 21 and a junior in college). My parents redid their very old 1980’s kitchen about 2 years ago and they just decided to add a backsplash last month. Of course they waited until I came home for the extra set of hands (and eyes) to start the project. My dad is pretty handy around the house (I helped build our deck at 14 and refinish floors at 16) so most of our projects are DIY. He’s pretty big on saving money so he was sure to put me, my mother, and my 9 year old brother to work.
The tile we chose were shades of brown and tan with pieces of glass and marble rectangles (horrible description I know). I was really excited to do it and it moved pretty quickly considering our kitchen is a small galley kitchen and we only went about a foot up. It took us about 2.5 hours to do half the kitchen and then we finished it the next morning. As far as grouting goes…. I HATED IT! At first it was pretty easy but some of the glass tile pieces had grooves and bevels. So, of course, when we grouted, the grout kept getting into those grooves and bevels. WHAT A PAIN! We tried wiping them down, using a toothbrush (too soft) and eventually found a small wire brush that was A LOT more effective. We are very happy with the result of it though! VERY worth it!!!
Anyway, PLEASE KEEP BLOGGING! I love all the posts your and your family do and you are so very inspiring! Keep us posted on the book and make sure you tour to Chicago!!!
YoungHouseLove says
Thanks for the small wire brush tip! So smart.
xo,
s
candace says
The grout is such a beautiful compliment to that gorgeously shiny penny tile. Amazing, amazing job. You two must be so proud!!!
threadbndr says
It’s looking REALLY good. I love the grouting video. Someday I want to do hex tiles in my bathroom and subway tiles on the walls in there. But it’s fine for the moment with vinyl and beadboard, so it will be a long time for that renovation (WAY down on the list).
I’m anxious to see what you do with the range hood and the shelves, though. (And I’m totally looking for a microwave small enough to fit into my cabinet now.) So many good ideas!
Georgia says
I’m with you, I like grouting (although I’ve only eve done small areas). I find that the transformation is just so satisfying….almost up there with painting.
Karrie says
Ah John, I have to say thank you, thank you! I have having a total brain lapse yesterday and for the life of me couldn’t think of the song I wanted to download off of iTunes. SHOUT of course.
Thanks for jogging my memory!! And the grout job looks awesome too :)
Karrie says
er was having* …perhaps the brain lapse hasn’t ended yet! LOL
YoungHouseLove says
Haha, I knew what you meant!
xo
s
Sara says
That sure is purdy! And extensive!
I have been wondering, as you move along in your kitchen reno… did you decide to install the flooring at the end? I think at one time you were unsure whether you would put the cork under the counters or not … something like that … Thanks!
YoungHouseLove says
We figure things like tiling and grouting and painting our cabinets are messy jobs, so since the floor will just float over our existing floor (and can’t run under the cabinetry since it’s existing) it’s easy to add it last (and that way it’ll be protected from all the heavy duty stuff!
xo,
s
Erica says
It looks fabulous! I cannot wait to see it all done! You guys have done such a wonderful job! And I thought my pantry re-do was a lot of work, you have me beat! :)
http://hatchlife.blogspot.com/2012/01/kitchen-pantry-organization-reveal.html
YoungHouseLove says
That actually looks like fun! I’m officially crazy, right? Doesn’t it feel great though!
xo,
s
maria says
Thanks for getting that song in my head :) Also, your tile looks awesome! I’m really looking forward to the floors (as I’m sure you are!), I feel like they’re just going to ground your whole kitchen. Exciting times!
Adira benklifa says
Wall looks great. For haze try vinegar and a soft rag….works wonders!
Anna says
I fell in love with penny tile when I saw it on an episode of Sarah’s house. Now, seeing it here, I’m obsessed. Must have!
Lauren says
Sooo beautiful and sooo worth the effort! It makes me even more excited to see the open shelves! I can’t wait to see how you style ’em up.
Rena says
I love it! I’m trying to get my husband to put a back splash in our kitchen, but he is reluctant because he say’s its messy. Did you guys find cleanup a hassle? I’ll have to show him this post and try to convince him again.
YoungHouseLove says
It wasn’t a picnic but it didn’t kill us! Haha. It’s definitely messy when you’re in the middle of it but it’s all worth it when it’s clean and lovely in the end!
xo,
s
John@Our Home From Scratch says
Guys, looks beautiful!! And I HATE grouting. HATE it. such a pain in the neck!
Carrie says
Are you keeping that bit of wall painted yellow/green?
YoungHouseLove says
Yup, the grellow stays! It’ll all make sense once the floating shelves are up on the back wall and we can add our dishes and some other pops of color over there to tie it together!
xo,
s
Sheila @SZInteriors says
Looks great! What a difference!!!
Abigail says
AH! AH! So Beautiful, you guys!!! It’s wonderful :) I’m sure you’re finding even more excuses to spend every minute possible in there looking at it. Whenever I finish a labor of love like that, I’m constantly peeking at it and grinnin’ like a fool in the ‘is-it-real-oh-yes-it-is-there-and-i-did-that!’ style
Victoria says
I’m loving the look of the penny tiles!!! I got chocolates and lot of pug hugs for you if you come over and do mine! :)
YoungHouseLove says
Ooh, very tempting… if our arms weren’t still so sore… haha.
xo,
s
Kim says
When the world slips you a jeffrey, stroke the penny wall. Stroke the penny wall!
This song has been in my head for a WEEK STRAIGHT because of your project. Not that I mind. But for real. Watch Get Him to the Greek if you haven’t yet. Hilarious!
http://www.youtube.com/watch?v=tBODYBNiGXc
YoungHouseLove says
Haha, haven’t seen it yet! Will put it on the netflix list!
xo,
s
melissa says
Love the song reference…and of course the tile too! Can’t wait to see the rest!
LegacyAZ says
That penny tile looks great! Choosing the right decor is overwhelming to many homeowners, but you make it look easy! Less prolific do it yourselfers may consider hiring a designer to help remodel their kitchen, bath or whole house. Most remodeling contractors offer professional interior design services to help make those overwhelming choices a little less daunting. Thanks for the post!
Jen says
That close up with the stove is the money shot. I wasn’t seeing the variation in tile before, but that shows it so nicely. LOVE!!!
Whitney says
Love it! We chose a light grout for our backsplash. I love it when everything blends. I think now that everything has set, it might have been a touch too light…but it looks good! I was told our grout was tough to tackle because we have a crackle (random rhyming) finish on our subway tiles. I am such a fan of the pennies! I think the light grout really brings out the different shades on the pennies! It is gorgeous, updated, but at the same time classic and timeless!
Our finished backsplash: http://cerniks.wordpress.com/2012/01/14/kitchen-back-splash/
YoungHouseLove says
Ooh I think it looks gorgeous! Not too light at all! Love the crackle too. And the random rhyming.
xo,
s
Laura says
Looks great! Lighting will make such a big difference in there. Imagine how sparkly the pennies will be with pretty light shining on them!
marissa says
it’s coming along beautifully! thank you always for taking us through all your stages and eventually sharing the amazing end product :)
Bethany says
LOL – another design pun. LOVE them.
Hey fellow Virginians, sorry I haven’t gotten around to posting here much (the 700 comments kinda intimidate me :)) but I have loved watching you transition from houses and do marvelous things to each one. You really inspire me (and the rest of America).
Keep up the good work, peeps!
Bethany
http://www.powellbrower.com
YoungHouseLove says
Aw thanks Bethany! We love to chat so don’t be comment shy. At least I should say I love to chat. Haha. John pops in every once in a while too!
xo,
s