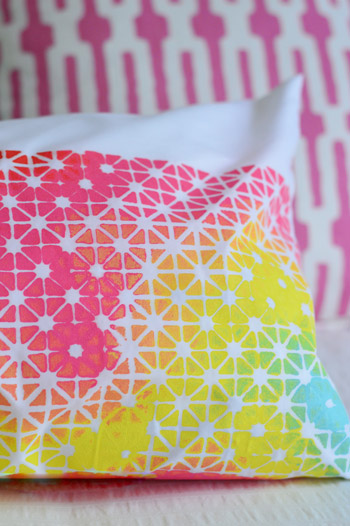
This is a heartwarming story featuring Ethan Hawke and Gwyneth Paltrow about getting crafty with a pillowcase, some fabric paint, and a metal grate, hence that pun-tastic title.
I don’t know about you, but I always seem to have one or two extra pillowcases around. We only have one set of sheets per bed, but I think since I buy two extra pillows for every bed (and therefore need extra pillowcases) I must see them on sale and grab them without making sure I really need them (hence the over-abundance). Really, it’s sort of a mystery to me since I’m the girl who won’t buy tomato sauce or toothpaste unless I’m sure I’m out, but maybe in another life I was short a pillowcase and it ruined my day so now I hoard them. Truly, it’s weird.
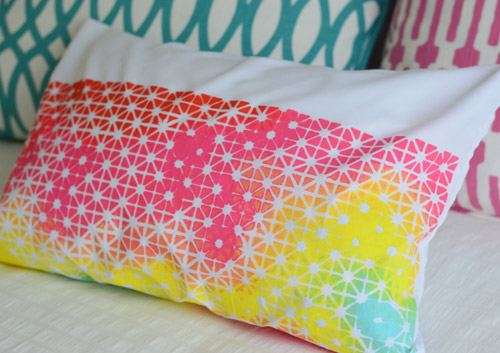
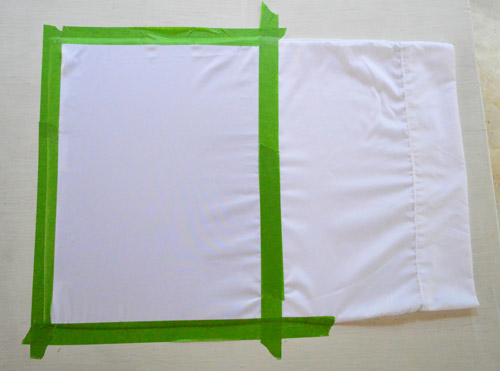
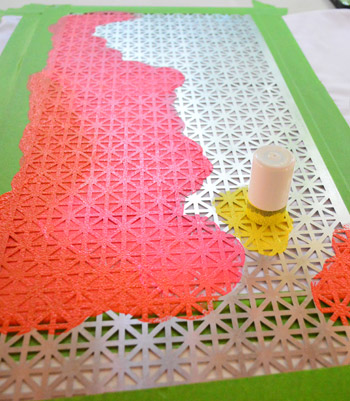
But anyway, I had this extra pillowcase so I thought it would be fun to use it as spare fabric and get a little crafty. And thus this project was born. First I taped it off in a rectangular shape using painter’s tape to hold the fabric taut. Oh and I slipped a piece of cardboard inside the pillowcase to keep it from bleeding or sticking together before taping it down.
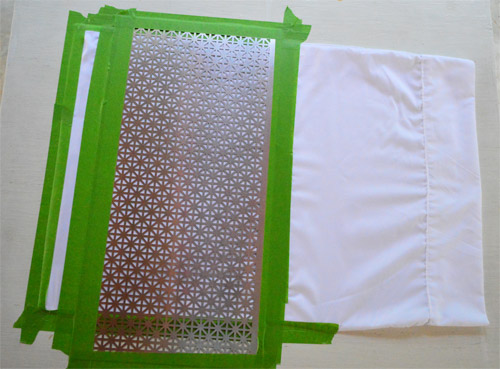
Then I taped this cute metal grate over it that I picked up at Home Depot for $9, which I immediately looked at and my brain said “um – STENCIL!” At first I debated doing this on paper to make some frame-able art, so you can go that route too, but then I thought using fabric paint on a pillowcase and stitching that up to make an easy little bolster could be fun, so I veered that way at the fork in the road that is Craft Street.
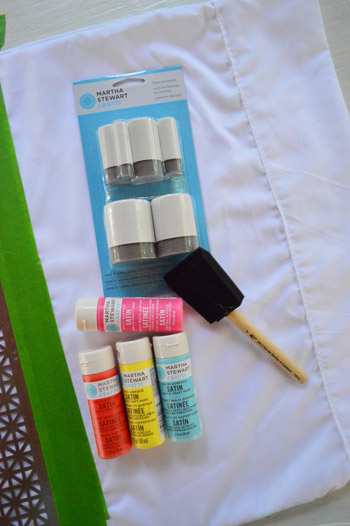
I raided my supply drawer for some Martha Stewart craft paints (they say right on the label that they work on fabric – and they’re only a few bucks a pop so I grab them in colors that I like whenever I see them on sale). I also had these stencil brushes (the ones in the blue package) in my craft basket after using a coupon to get them almost free a little while back from Michaels, so I was happy to finally put them to good use. All told, the only thing I bought for this project was the $9 grate, but if you had to pick up the paint and the brushes and the grate it would probably be around $20 as long as you have some fabric on hand. The good thing is that the grate is reusable, so you could make a few pillows or even a table runner and matching napkins and then make some art/stationery/gift tags with it. Oh man, now I’m thinking about the holiday-gift potential…
Next it was stamping time. I tried not to load my brush up too much (I worried from the start that things could bleed under the grate – and thick paint applications can make fabric crunchy) so I dabbed it on a paper towel a few times to get rid of excess paint before tap-tap-tapping my way around the grate. I tried to do sections of colors in sort of an irregular wave shape, just so nothing looked like obvious stripes and dots, but had more of a sand-art feeling. Oh yeah, who remembers sand art?
Occasionally I blended stuff using a bunch of extra dabs. This is what the blue did on top of the yellow after some extra pats in that area (see how it mixed to create sort of a yellow to green to blue gradient there?).
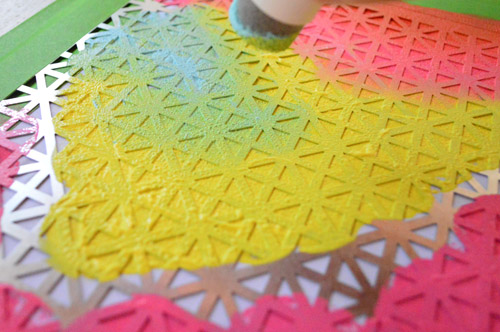
In other places I went with less of a blended edge and more of a defined color-meets-another-color border. It was fun and loosey-goosey and the whole thing probably took me around twenty minutes.
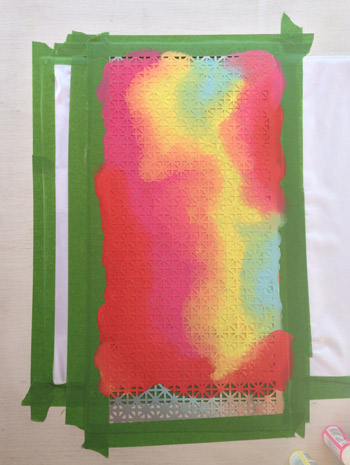
I waited a little while to remove the grate (maybe an hour?) just because I worried I’d shift it slightly while ripping off the tape and smear the whole thing. When it dried and I finally removed it… welp, there was some bleeding in a few areas. At first I was sad, but the more I looked at it, the more I liked the varied/imperfect pattern. It almost reminded me of constellations.
I think if you were going for a perfectly clean-lined look at home, using some stencil adhesive to stick the grate to the paper/fabric might result in a crisper edge, and using even less paint on your brush (and just dabbing it suuuper lightly) would probably cut down on the bleeding issue as well.
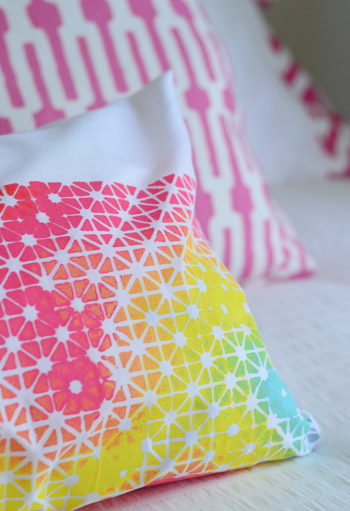
But in the end, I’m calling those imperfections a happy accident. Sort of like how you pay the big bucks for those hand stamped block printed fabrics that are cool and irregular… but that’s the charm. At least that’s what I’m telling myself.
Update: For those asking if this is washable, someone commented to say they had luck washing fabric that they painted with the same Martha Stewart product by following the directions on the container, so it looks like it can work! I’d just read the label first to find out what you’re dealing with if you plan to wash the item often (like cloth napkins for example) because other fabric paints might have simpler instructions.
Heck, I also think the grate is pretty great art itself. So you could always just paint the grate and not worry about any bleeding under it and then use a metal snip to cut it to fit a frame.
And now that I’ve mentioned the potential for reusing the grate, I’m kind of excited at the idea of a homemade runner or a matching set of napkins. Anyone else planning to try their hand at some grate creations? Will Ethan Hawke be invited? Will Gwyneth Paltrow bring the crudités?
Psst- Wanna know where we got something in our house or what paint color we used? Just click on this button:


Carla says
That turned out really cute!!
It’d be nice across the bottom of curtains in three shades of the same color. :o))
YoungHouseLove says
That would be fun!
xo
s
Megan @ The Brick Bungalow says
Hello! I love the imperfections. It makes it more unique and lovely. I used a similar metal grate to hold my earrings. I kept it silver but if I use the rest of it for my daughter’s future earring collection (you know, once they are pierced…), I may just have to paint it! Here’s my version: http://thebrickbungalow.blogspot.com/2013/09/closet-earring-organization.html
Koliti says
Beautiful! Love your amorphous-grid – looks tie-dye-ish.
Yes, please! More “Happy Art Tuesdays with Sherry :)
Laura says
Craftily Creative! Love it!! This would be a great craft to do with my granddaughters! Thanks for sharing!
Michelle @ A Healthy Mrs says
Love this — imperfections and all! :)
sarah says
That grate looks so pretty painted. I’d bend it into a cylinder and wrap it around a glass hurricane candle holder or to make a cool pendant light. It woulf would look great when the light shines through.
YoungHouseLove says
Love that!!
xo
s
bella says
I love it. It’s very fun. I love the imperfections, as they give it added interest.
Skittle says
Sherry, I love this so much! I think it is perfect just the way it is. And I would slap that grate up on my wall any day. LOVE!!!!
alg (amy) says
SO glad you did this — I’ve been wondering if using a metal grate as a stencil would work for a while now.
(And it kind of reminds me of AbFab, because Patsy always makes Eddy “go first to see how much it hurts.”) Haha :)
YoungHouseLove says
Haha!
xo
s
Briel K. says
Fun! I love the colors you ended up with. Looks great!
Ortisse says
Hi! I follow your blog since few years now, I commented only once or twice because my english is not very good (it’s ok for me to read but it’s much harder to write).
This idea is awesoooome! When I saw the 1st picture I hoped it was a DIY and not a pretty pillow case you could only buy in the USA! And thanks to your super creative brain Sherry, I can now go to the craft store here in my little place in France and have the same pillow on my couch!
As you, I like it better with the happy accident.
I’m not sure to write again before a while, so I wanted to thank you for your great work, my appartement looks very different from your house(s) but I still get a lot of inspiration here!
YoungHouseLove says
Thanks so much Ortisse! So glad you liked it!
xo
s
Desiree says
LOVE this idea. So beautiful. Thanks for sharing!
Sarah says
I love how the paint bled – it looks really pretty and unique! I’m glad to know where to buy those grates too – I saw a tutorial once that made one into a jewelry holder by framing the pretty grate, and I’ve wanted to do that ever since.
Marni @ Haberdashery Fun says
Saw this on craftgawker.. Love it and great idea! I should try Martha Stewart paints. I usually get the Tulip brand for fabric. Will test it out on my next project.
Cassie Moore says
I’d like to thank you for reminding me that I should try a crafty approach to things. I’ve been so into “decorating” my house I forgot I can craft things for my home! I’ve been hunting for the perfect fabric in the perfect colors for my kitchen curtains. The only fabric I kind of like is too expensive for me to justify buying when I kind of liking it. I need to love it. What I do have is an extra white flat sheet and I can totally paint on it and cut it up for curtains! Keep bringing these craft projects. They are pure gold!
YoungHouseLove says
Aw, thanks Cassie!
xo
s
ryanres1 says
Sherry, I really like the parts that bled together – happy accident is right!
Krystle @ Color Transformed Family says
This is too cute! I love how the paint ran through in some parts. I kept going back and forth looking at the stencil trying to figure out how you got that pattern. It worked out perfectly though.
Kathleen Mapson (kaydehim) says
This is sooooo awesome!! I love the way it looks like constellations (very geometric) and the colors are sooooo fresh!! Great idea!! Makes me wanna try something new! YEEE!!!!
Natalie says
ummm I LOVE IT! :) Such a unique idea, and so fun!
Holly says
I NEVER comment on your projects (sorry) and usually don’t always read these crafty posts (sorrier!) but I cannot get over how amazing this turned out. Sherry, I am SERIOUSLY impressed and jealous that this pillow isn’t in my house. Make more and sell them! If only there was room in that pie chart for another venture!
YoungHouseLove says
Thanks so much Holly, you’re so sweet!
xo
s
See Emily Shop says
Nice!
Dani says
It’s…So…PRETTY!!!
I’ve never seen grates like that before, think I’ll have to go hunting for them now.
Anna, Sydney says
Girlfriend. You just raised the craft roof.
Jennie says
This looks fab! Such a fun project …thanks for the great (grate?) idea :)
Josephine says
Hi fives! Where can I buy it ;)
Actually, I’d love to give this a go for christmas gifts…
Thanks for the grate (!) idea :)
Susan says
That is BRILLIANT & beautiful.
lesley says
I have to say that this is probably one of my favorite projects you’ve created. I love color and art and this is such a perfect blend. Plus I have a slight obsession for accent pillows. Now my wheels are turning, I think I may have to make some like these but with different colors for our playroom. Thanks so much for the inspiration!
Katie says
you are brilliant! i LOVE this!
Ashlee says
It looks so pretty! Love it!
Kelsey says
Frame it – make it into a earring holder! I got pinteresty with the exact same piece of metal and it’s perfect…now I want to add color!
http://2010yearoftheblog.blogspot.com/2011/08/pinterest-strikes-again.html
YoungHouseLove says
Love that!
xo
s
Mary says
This is so cool looking, $herdog! I agree–the bleed-thru actually “makes” the pillow (I think). I was totally thinking constellations too. Definitely a keeper (not that you weren’t keeping it already).
Maybe this can be an idea/inspiration for a new, YHL pillow line??! Do it!
Hayley Williams Pawley says
I fricken love it and I want one!! Sell it to me? :p :D lol
Lenora says
This is pretty super due to the ease of completing it and quick results. I am looking for more ways to bring pops of color into my house. Thanks for posting! I love it.
Tricia | 724 South House says
These are my favorite type of posts. That pillow seriously turned out amazing. You could sell that thing for quite a bit :)
Whitney says
Love it! And your colors! I now know the reason why I have been hoarding Martha’s paints every time I see them on sale too- thanks for the Christmas gift ideas!
Diana says
Ohhh…I love it! Great colors too!
I love that you also don’t pre-buy or stock toiletries! I hate having to store a lot and won’t buy toothpaste until we’re within a week of running out. Same for most toiletries and groceries! I do have 4 sets of sheets for our bed though… (2 summer and 2 winter)
Abbie says
Love it! I see a project in the future. I’m getting ready to move into a new apartment next month. Apartments translate into the need for me to find ways to add color on not so colorful walls without painting ;-) I’m working on ideas for inexpensive, colorful wall decor. My current landlord allowed me to paint the house I was renting however I wanted. I’ll miss that!
bfish says
I really like how the pillow came out! Had it been a “perfect” stencil job with no bleed it wouldn’t be half as attractive (IMO). You successfully married graphic exactness with the abstract.
Haley says
I stare at those grates every time I go to Home Depot, trying to think of a compelling enough project to go ahead and buy some already (they’re so pretty). And now you’ve given me two really awesome projects with the same supplies – gotta love a twofer! I can imagine using the painted grate as a magnet board after bordering it with some quarter round moulding or putting some twinkly lights behind it and using as a mood light.
Absolutely love it, especially the imperfect nature of it. It looks 100% intentional!
YoungHouseLove says
That sounds like so much fun!
xo
s
Emily says
I love how it turned out! I think it does have a constellation look, and the way the colors blended is just gorgeous!
Amelia R. says
Yeah! Very reminiscent of Hubble Space Telescope images. Looks like NASA’s site is down due to government closures, but I thought of those photos immediately when you mentioned constellations. I LOVE how your pillowcase turned out.
Larissa says
The girl is crafty like ice is cold.
YoungHouseLove says
Haha thanks guys! You’re hilarious and sweet and I’m so glad you liked my little pillow project!
xo
s
Maria says
This is quite possibly the coolest thing you’ve ever done.
Chew HuiTing says
It looks so gooood!! x
http://bobsyouruncle-x.blogspot.com
Kerry @ First Time Fancy says
I LOVE this! It turned out so great! The bleeding gives it a great look. I think it works especially with all of the colours and how some blend together and others don’t. Everything just works so well, so pretty and fun! :)
Sharee A says
Very creative! i bought that same grate from Home Depot and made an earring hanger with it. I cut it with snips to fit inside a painted picture frame. Secures it in place and my daughter can now display her pretty dangle earrings on it.
YoungHouseLove says
Love that!
xo
s
Ana says
supercalifragilisticexpialidocious!!!!!
Gina | The Julian Home says
Wow. Love this tutorial. Love the colors you chose. Love the grate pattern you picked. This seriously looks like some high-end designer stuff you’d purchase at a store. Pregnancy has had a very positive effect on your DIY skills girl!
Emily says
Too cute!
So is this going to be your “pretty” pillow to take to the hospital for baby #2? Or maybe Clara could help make another one when it gets closer to time? ;)
The bottoms of those plastic baskets that strawberries come in would be cool too!
YoungHouseLove says
Haha! I do need a pretty pillow for baby #2!
xo
s
Andree says
Funny you sad at first (I totally would have had the same reaction! Ah, perfectionism!) but my honest first look made me love it without a doubt! I loved the irregularity and first thought you’d found and bought the pillow!
Plus, my 6 year old’s reaction was “Aaaaahhh!!! I LOVE IT! I want one too!!!” So there you go, out of the mouth of babes :)