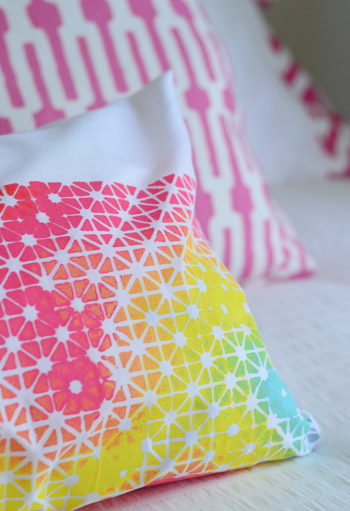
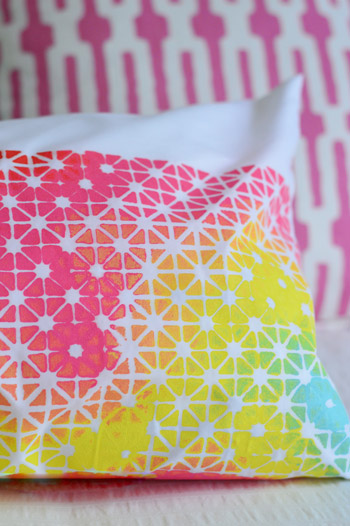
This is a heartwarming story featuring Ethan Hawke and Gwyneth Paltrow about getting crafty with a pillowcase, some fabric paint, and a metal grate, hence that pun-tastic title.
I don’t know about you, but I always seem to have one or two extra pillowcases around. We only have one set of sheets per bed, but I think since I buy two extra pillows for every bed (and therefore need extra pillowcases) I must see them on sale and grab them without making sure I really need them (hence the over-abundance). Really, it’s sort of a mystery to me since I’m the girl who won’t buy tomato sauce or toothpaste unless I’m sure I’m out, but maybe in another life I was short a pillowcase and it ruined my day so now I hoard them. Truly, it’s weird.
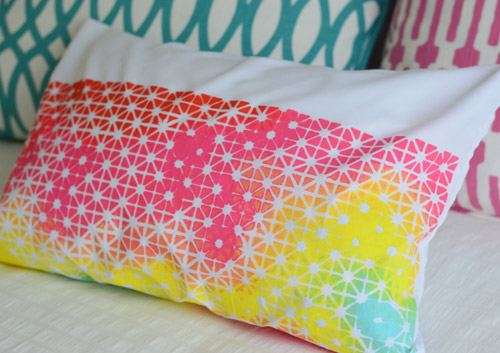
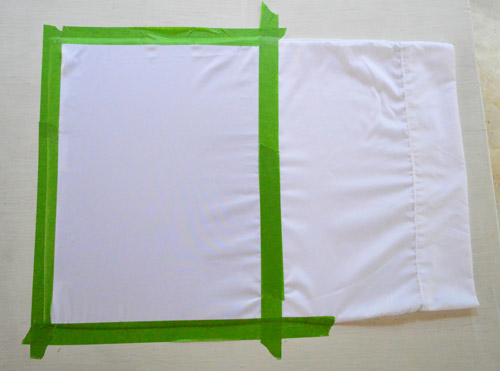
But anyway, I had this extra pillowcase so I thought it would be fun to use it as spare fabric and get a little crafty. And thus this project was born. First I taped it off in a rectangular shape using painter’s tape to hold the fabric taut. Oh and I slipped a piece of cardboard inside the pillowcase to keep it from bleeding or sticking together before taping it down.
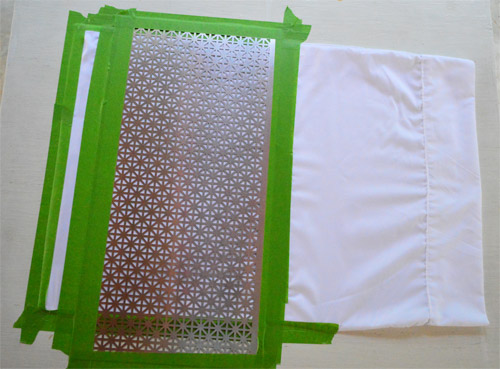
Then I taped this cute metal grate over it that I picked up at Home Depot for $9, which I immediately looked at and my brain said “um – STENCIL!” At first I debated doing this on paper to make some frame-able art, so you can go that route too, but then I thought using fabric paint on a pillowcase and stitching that up to make an easy little bolster could be fun, so I veered that way at the fork in the road that is Craft Street.
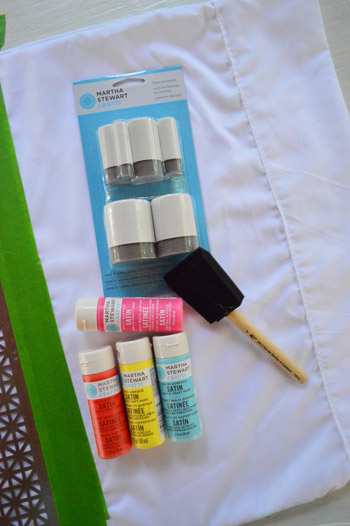
I raided my supply drawer for some Martha Stewart craft paints (they say right on the label that they work on fabric – and they’re only a few bucks a pop so I grab them in colors that I like whenever I see them on sale). I also had these stencil brushes (the ones in the blue package) in my craft basket after using a coupon to get them almost free a little while back from Michaels, so I was happy to finally put them to good use. All told, the only thing I bought for this project was the $9 grate, but if you had to pick up the paint and the brushes and the grate it would probably be around $20 as long as you have some fabric on hand. The good thing is that the grate is reusable, so you could make a few pillows or even a table runner and matching napkins and then make some art/stationery/gift tags with it. Oh man, now I’m thinking about the holiday-gift potential…
Next it was stamping time. I tried not to load my brush up too much (I worried from the start that things could bleed under the grate – and thick paint applications can make fabric crunchy) so I dabbed it on a paper towel a few times to get rid of excess paint before tap-tap-tapping my way around the grate. I tried to do sections of colors in sort of an irregular wave shape, just so nothing looked like obvious stripes and dots, but had more of a sand-art feeling. Oh yeah, who remembers sand art?
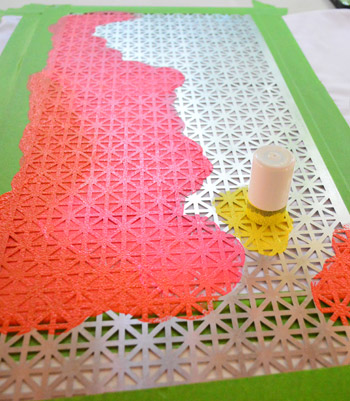
Occasionally I blended stuff using a bunch of extra dabs. This is what the blue did on top of the yellow after some extra pats in that area (see how it mixed to create sort of a yellow to green to blue gradient there?).
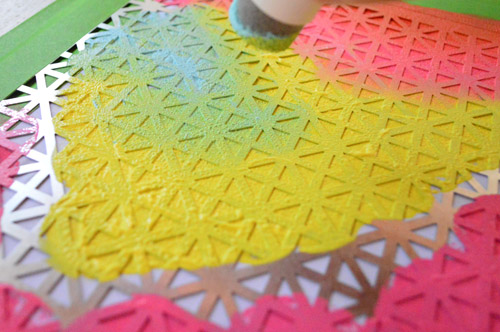
In other places I went with less of a blended edge and more of a defined color-meets-another-color border. It was fun and loosey-goosey and the whole thing probably took me around twenty minutes.
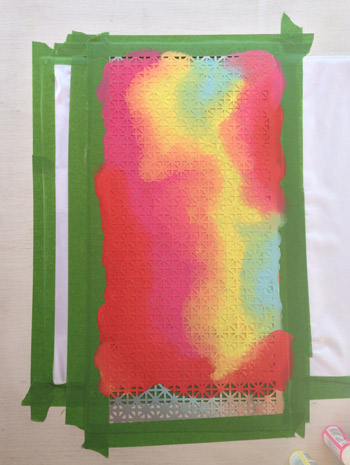
I waited a little while to remove the grate (maybe an hour?) just because I worried I’d shift it slightly while ripping off the tape and smear the whole thing. When it dried and I finally removed it… welp, there was some bleeding in a few areas. At first I was sad, but the more I looked at it, the more I liked the varied/imperfect pattern. It almost reminded me of constellations.
I think if you were going for a perfectly clean-lined look at home, using some stencil adhesive to stick the grate to the paper/fabric might result in a crisper edge, and using even less paint on your brush (and just dabbing it suuuper lightly) would probably cut down on the bleeding issue as well.
But in the end, I’m calling those imperfections a happy accident. Sort of like how you pay the big bucks for those hand stamped block printed fabrics that are cool and irregular… but that’s the charm. At least that’s what I’m telling myself.
Update: For those asking if this is washable, someone commented to say they had luck washing fabric that they painted with the same Martha Stewart product by following the directions on the container, so it looks like it can work! I’d just read the label first to find out what you’re dealing with if you plan to wash the item often (like cloth napkins for example) because other fabric paints might have simpler instructions.
Heck, I also think the grate is pretty great art itself. So you could always just paint the grate and not worry about any bleeding under it and then use a metal snip to cut it to fit a frame.
And now that I’ve mentioned the potential for reusing the grate, I’m kind of excited at the idea of a homemade runner or a matching set of napkins. Anyone else planning to try their hand at some grate creations? Will Ethan Hawke be invited? Will Gwyneth Paltrow bring the crudités?
Psst- Wanna know where we got something in our house or what paint color we used? Just click on this button:


rachael says
Yes!! Love posts like these!
Jessica says
Yes craft projects!!!! I have missed them on your blog so happy to see you bringing the smaller projects back :)
YoungHouseLove says
Wahooo! Sorry guys, the move and the morning sickness had me reeling, but I’m hopefully back in the small project saddle (still barfy, but feeling crafty none the less! haha!)
xo
s
Adina says
Michael’s also sells a pump spray fabric paint which would cause less bleeding, if you wanted to be more perfect for your runner and napkins. It’s also done in about 3 seconds and you can blend colors as well. You just don’t have as much control. I really love the pillow.
YoungHouseLove says
Thanks for the tip Adina! I wondered how spray fabric paint would work! If anyone tries it send pics!
xo
s
Sarah says
I think the imperfections are perfect! A happy accident, indeed.
We are planning a little grate-craft ourselves! My husband and I just celebrated our 5th anniversary…we like to stick to traditional gifts, and wood is the material this year. So, we decided to make a wood plank headboard!
I plan to get a couple of these grates to make little sconces…like this:
http://www.kaboodle.com/reviews/wire-lampshade
and use a tap light so we don’t have to worry about wiring anything, and attach them to either side of the headboard.
Hopefully it will look as good in real life as it does in my head… ;)
YoungHouseLove says
Sounds so pretty Sarah! Send pictures!
xo
s
Christina says
Thanks for giving me an excuse to run to Hobby Lobby this morning :)
Truth be told, I was looking for one anyways! This is exactly what I was missing in my bedroom pillows.
I hate to be that girl, but its spelled “Gwyneth.” I’m pinching myself for even typing this… ugh.
YoungHouseLove says
Haha, thanks Christina! All fixed!
xo
s
Reenie says
Very cute! Love how the colors graduate to the next. :)
Tanis says
I’m loving your crafty projects, the wreath, this pillow, fabulous! I think that the bleeding totally enhances the project. Definitely a happy accident. It makes it look kinda air-brushed and super custom. Love it!
Kimberly says
I’ll join the chorus and say that the bleed-through is what makes the piece. It mimics the fluid placement of the colors. Very nice! The pillow looks fantastic.(I say this as someone who normally dislikes bright colors)
Jess says
Look at you getting your paint on! And like, not the kind that covers up blue. A very cute project!! :)
Molly says
Sherry, not to be creepy, but in my next life, can I please be you? I love this project!!
YoungHouseLove says
Let’s merge and become Shelly. Or Mollry.
xo
s
Christie says
My husband and I saw that same grate at Home Depot last weekend and both immediately thought – stencil! Your print turned out so fun!
YoungHouseLove says
So funny!
xo
s
Mikki says
You know, it would be neat to make a simple frame for the grate, make cool magnets, and use it as a magnetic note board. You might want to put a sealer over the paint. OR, you could use it to hang earrings through the holes, and then use little S hooks to hang necklaces and bracelets. Would look super as a jewelry holder in your closet. It might look really cool in Clara’s room for a magnetic board, hung at her height! Or as a play jewelry holder for her dress up toys.
YoungHouseLove says
That would be fun!
xo
s
Roxanne M says
That is really beautiful! I love the colors. I love the idea of making notecards or something as well; I am big into paper crafts. Can’t wait to see what you make next!
Gena says
The pillow is super cute, but be careful washing it. To be sure it will wash, add the MS Fabric Medium to the paint according to directions, and then heat set it by ironing on the reverse side. I have done this with success on pillow covers and cloth napkins.
YoungHouseLove says
Thanks for the tip Gena! Someone else was asking if those paints are washable so it’s nice to hear you have had success, and the directions are crucial!
xo
s
Melissa says
I literally just used that same grate in a project this weekend. I cut it down and framed it to use as an earring holder.
YoungHouseLove says
Love that!
xo
s
Liz says
I love that idea!
Megan says
Love it! I too have extra pillow cases around but that’s because I buy Costco sheets and they come with four pillowcases. Everything in bulk, I guess. Definitely going to be trying this one out!
Tracy says
Do you ever worry you’ll run out of puns? P.S. I too am in favor of more of these quickie craft projects posts.
YoungHouseLove says
Nevvvvahhhhhh!
xo
s
AnnMarie says
Your ability to see the potential in things never ceases to amaze me. It happens once in a blue moon for me, but for the most part I’m a total pinterest idea robber.
Tiffany says
We just used this type of grating for a door on our liquor cabinet. My hubby painted it all flat black, then built a wooden frame around it and attached it to a built in shelf in our basement. It looks amazing. I must post pictures. We don’t even drink that much, so it’s kinda silly. When we had our friends over to see the amazing transformation, we had a 5 year old, dusty, bottle of cheap vodka and maybe some gin in it. But, at least it looks pretty!
YoungHouseLove says
That sounds really cool!
xo
s
Heather says
What am I missing? Aren’t all the progress/set up shots using a portrait orientation, but the final product has a landscape one? i’m confused.
YoungHouseLove says
It’s a little bolster pillow, so I just trimmed the right half of the pillowcase off (when you look at those progress shots it’s the right half) under the printed part so it had a strip of white on top and then a colored body and then stitched that cut closed to create the bottom of the pillow. In other words, the top seam and side seams are the original hidden pillowcase seams – but they were the side and top and bottom, but I cut it down the middle). Hope that makes sense!
xo
s
Carla B. says
I LOVE it! Might borrow this and make some fun pillows for my 2-year-old’s “big girl room”. Your colors remind me of a weather/storm map!
Ann says
I would buy that pillow. love it!
Penny says
It kinda looks like 70s disco lights. I dig!
Cara says
Holy gorgeous pillowcase, Batman! :O
Laurie says
I love the bleeding! It changes the pattern into beautiful flowers every once in a while. Very nice. I wonder how the fabric would take the paint if it was slightly damp. You’d probably have to leave more space between the color to allow for that kind of color creep.
YoungHouseLove says
Ooh that’s a fun idea!
xo
s
Geertrude says
Love that pillowcase! And I love the “imperfections”. I don’t think they are imperfect. Before you told us about the bleeding I was wondering if you handpainted those parts of the pattern to make it more interesting ;-)
YoungHouseLove says
Aw thanks Geertrude!
xo
s
Ali Burtt says
Guess what I was doing last night? Using Martha Stewart craft paint to stencil a design on a piece of fabric. Mine was a dish towel though.
My question is this: I read on online that the paint needs to cure for 21 days. I guess yours is a throw pillow and thus may not get washed for a while if at all, but do you think that 21 day curing thing is…negotiable? I suppose it would be better to just not use it for three weeks, but…sadness!
YoungHouseLove says
Woah, I didn’t read that! Anyone know? I don’t think I’ll be washing this since I sewed the bottom shut around a bolster, but does anyone have any tips for Ali?
xo
s
Jaime says
You could try to set it with an iron? Lay a piece of cotton fabric over the top and heat set it?
Ali Burtt says
Thanks, Jaime!
Katie says
This is fantastic! I’ve used those grates for all sorts of things, but never thought about stenciling…. and I love where your priorities are : no extra toothpaste around the house, but plenty of craft paint :-)
YoungHouseLove says
Haha, it’s true! I hoard craft supplies, pillows, ceramic animals, and pillowcases apparently. I’m going to be in big trouble in the event of a zombie apocalypse, but if there’s a random your-life-depends-on-it decorating challenge I’ll be set.
xo
s
Jess says
Love it! And you could maybe hang the grate somehow as wall art in the room where the pillow lives. Maybe as part of a collage or in a group (I’m thinking like in Clara’s room at the old house) which would sort of tie it together.
But it does sound like you have more plans for the grate/stencil. Super fun!
Kayli Schattner says
Wow! I love the idea of using a grate for a cute pattern on a DIY project and I think the way yours turned out helps make it look like a one-of-a-kind :) great job!
JenB says
Love, love this! Martha would be very proud of how you used her products. I also like these crafty posts as well. Not that I don’t love the big projects..I really do. But the smaller ones are so much fun. I totally copied your grapevine wreath last week. Pillowcases, next?
Anita says
What a “grate” little project!!! (Insert knee slapping here) I really love it though, at first glance, I thought you had tie dyed or batiked it. Can’t wait to see more tuesday projects. :)
Marianne in Mo. says
That came out GRATE! ;0)) If you want to be sure the paint stays thru washing, just place a towel or scrap of white fabric over the paint, then with a dry iron set to “cotton”, press over the paint for 10-20 seconds. Don’t slide the iron, pick it up to move across the paint. This will “heat set” the paint. Do that with dyes too. Hope this helps!
YoungHouseLove says
Great tip!
xo
s
Elaine says
LOVE this! Looks great! Thanks for the great inspiration!
Evelina says
That colour combo is seriously to die for. Esp the aqua in the corner! I also love the placement. A+!
J-Low says
THANK YOU!!!!!!!!!!!!!!!!! Seriously… I just bought a grate from Lowe’s and was going to paint it and frame it, then hang jewelry from it. Also, I’ve been looking for fabric to cover my Euros that would bring my color scheme together even further in my bedroom and now I know what to do! FABULOUS! The grate has a quatrefoil pattern to it, so I’m VERY excited to try this! EEEEEK!! Thanks, Sherry-bo-berry!
YoungHouseLove says
Go J-Low, go J-Low, go!
xo
s
Jennifer M says
Love the “imperfections.” Makes it look like it’s sparkling. I’ve been shopping for a throw pillow for my daughter’s room and can’t find the right color or style. I’m going to try this!
ELLEN TILLERY says
I’m usually such a stickler for symmetry and perfection, although I know it’s impossible to achieve, but I really like how the paint bled in random places. I can totally see the various stars and constellations you mentioned! So pretty!
Kim Freestone says
I like the bleed through -it looks starburst-y!
Megan @ Rappsody in Rooms says
Wow! What a fun pillow. I love how you blended the different colors. I love the potential of grates like that. They are just gorgeous!
Keegan says
LOVE this! This is totally going to be part of my next Pinterest nights with the girlfriends!
Michael Wurm, Jr says
You guys seriously rock my world. Such an awesome project!
xo Michael
YoungHouseLove says
Aw thanks Michael! You’re inspiring us on IG with all of your crafty goodness!
xo
s
Brittany says
This reminds me of doppler radar! Looks like a storm’s a’brewin’! You must’ve been a weathergirl in a past life!
YoungHouseLove says
Haha, my dad charts storms, so maybe he’s rubbing off on me!
xo
s
Karen says
Hi, my name is Karen, and I’m addicted to geometric pillows and rugs. I’ve spent a pretty penny on them, and I’m petrified that it’s just a passing trend. You think it’ll stay around awhile?
YoungHouseLove says
Heck yeah! They better… because I’m in love. Haha! If it makes you feel any better, we got our yellow geometric moorish tile rug from PB like 7 years ago and it’s still a pattern/style that’s sold a ton (in all colors of the rainbow) today, so that makes me feel like it’s not fleeting or anything. Hope it helps!
xo
s
Molly says
S,
I like Mollry. It’s unique & awesome.
Also, I hacked up my own 15-minute shade using stitch witchery and some Jo-Ann’s steals! I’ll try to snap a photo tonight :) The curtain rod? Oh, I thought you would never ask! I used a dowel rod [Painted it Black, Rolling Stones? Yes?] and two black command hooks. Works perfectly and looks like an actual rod and not some hokey DIY! Yay me!
YoungHouseLove says
Love it! Go Team Mollry!
xo
s
Julianne says
So cute & creative! :0)
Kaitlin says
I bought a grate similar to yours, ORBed it, and will hang it on the wall for an earing display. I like the fabric stencil and wall art idea too!
YoungHouseLove says
Love that!
xo
s
Kathryn says
For some reason the misuse of the word ‘whelp’ bothers me. I have seen it almost every day this week, which seems weird.
http://www.dailywritingtips.com/whelps-are-puppies/
The pillow looks awesome though!!
YoungHouseLove says
Who knew?! Thanks Kathryn! I love that it’s a real word (totally thought it was more of a sound effect like “yeesh!” or “womp-womp”).
xo
s
Laura C says
Just remove the “h”. “Welp” is what you’re looking for:
http://www.slate.com/blogs/browbeat/2012/11/30/_welp_slang_term_has_longer_history_than_you_might_think.html
YoungHouseLove says
Thanks Laura! Now I know. Off to fix that!
xo
s
mary says
Adorable. But I am anxious to see the patio progress, with ceiling fans and tile! I surrender my woman card.
YoungHouseLove says
Boy am I too! Haha! We can’t wait to be DONE with that room!
xo
s
Amy says
I know it would be work but this looks like something (sort of) fun I could do with my almost 5 year old and my 3 year old. As long as I made sure they dabbed the paint… But think how excited they would be to actually make something!! Now I’m thinking Christmas gifts from the kids! But can you please give a non-sewer some more detailed instructions about the sewing part? I’m just too visual!!! By the way I love you guys and all your ideas. I’m paying close attention since right now we are romodeling our laundry room and attic. :)
YoungHouseLove says
I love that idea! I did a painting project with Clara last week and we had so much fun!
xo
s