Continuing the recent trend in our house – Clara is the latest family member to get a ceiling fixture in her room. And methinks Sia might break out in song about it (“from the chan-de-li-eeeer!”).
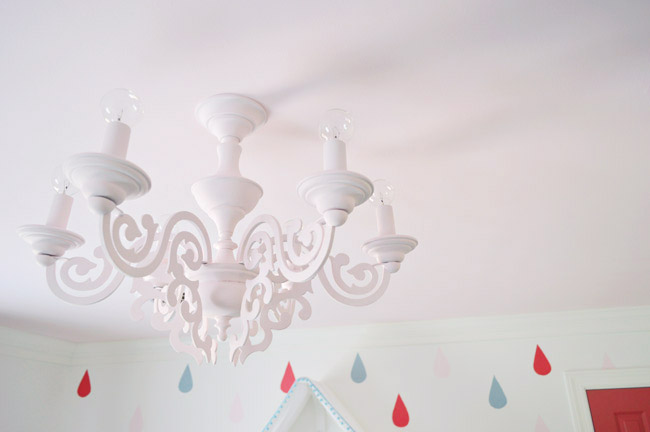
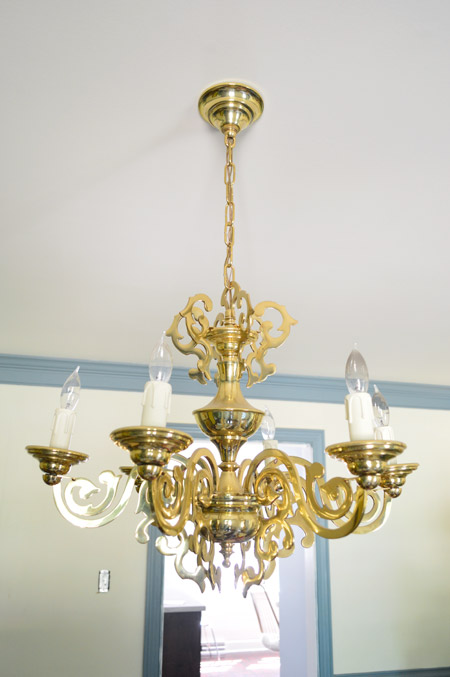
If it looks familiar, it’s because you’ve seen it before in our dining room. Well, a previous incarnation of it at least. We’ve always been intrigued by this chandelier, which was here when we moved in. The finish wasn’t totally our style, but the swirls and flat arms (it almost looks like an intricate paper chandelier) always made us think it could be a good candidate for Clara’s room.
The main problem was that it was too big. Even without any chain, it would’ve hung about 26″ down from her eight foot ceiling, putting it perilously close to her six foot father’s eyeballs. But since Home Depot has yet to carry shrink rays, I decided to take it down and see if I could shorten it myself.
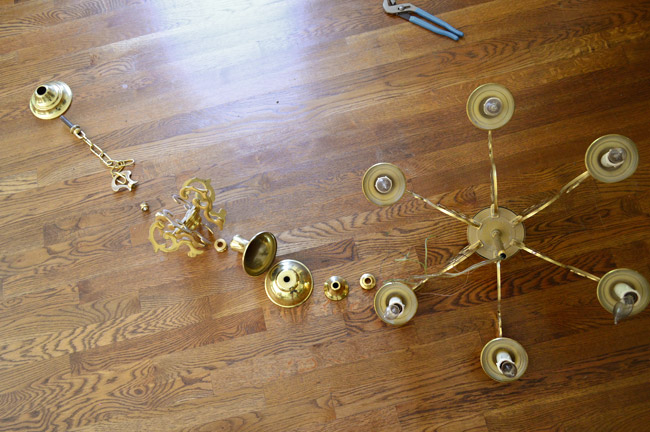
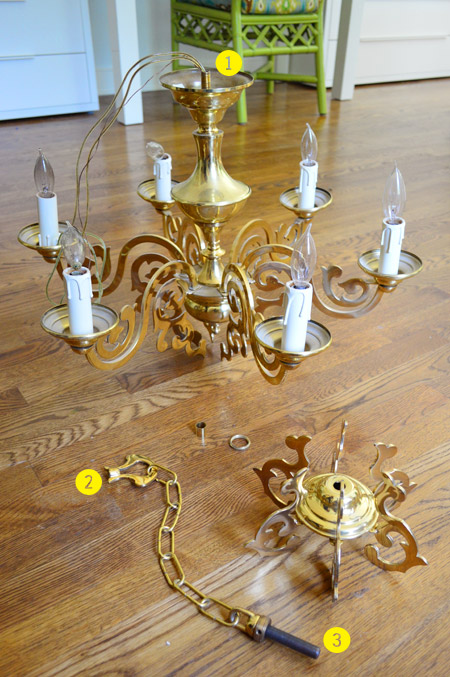
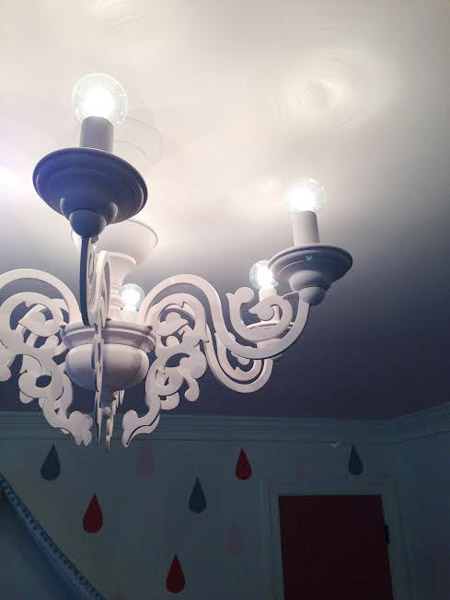
Just by loosening one screw at the top I was able to disassemble all of the nesting parts that create the ornate shape of the chandelier (I laid them out in the line above so I could remember their order). What it left was this long center post so I could begin spooling things back onto it.
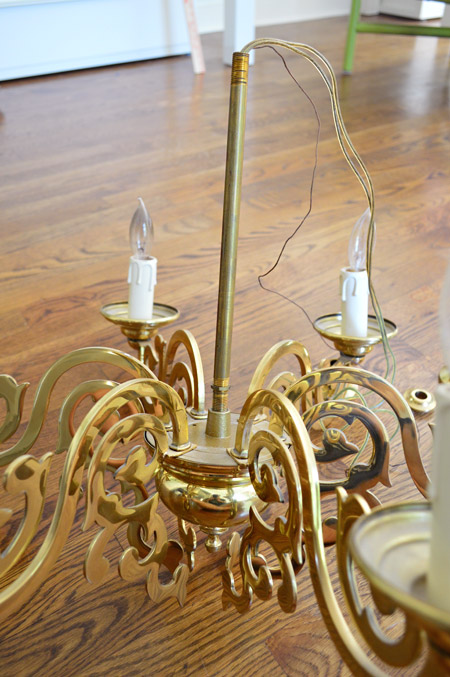
My goal was to reassemble most, but not all, of the pieces into something that still looked like a chandelier, but was several inches shorter than the original shape. That center post, however, was problematic since without buying a shorter one, I wasn’t going to be able shave much of the height off. I contemplated hacksawing it shorter, but then I realized I needed the threaded area right at the top of the rod to screw it back together in the end (hack-sawing it shorter would have removed that threaded area).

That’s when it struck me. Rather than use that threading (#1 in the pic below) to reattach it to the loop on top (#2) so that it could attach to the canopy piece that screwed into the crossbar (#3) to that loop, I could just screw that threading (again #1) directly into the crossbar itself (thereby shaving off the height of the large loop). That saved me quite a few inches because I could cut out most of the original hanging mechanism, but I knew that it would still be nice and secure. You never want to hang something this heavy by the wires, so threading the metal bar into the crossbar in the ceiling would safely and securely bear the weight.
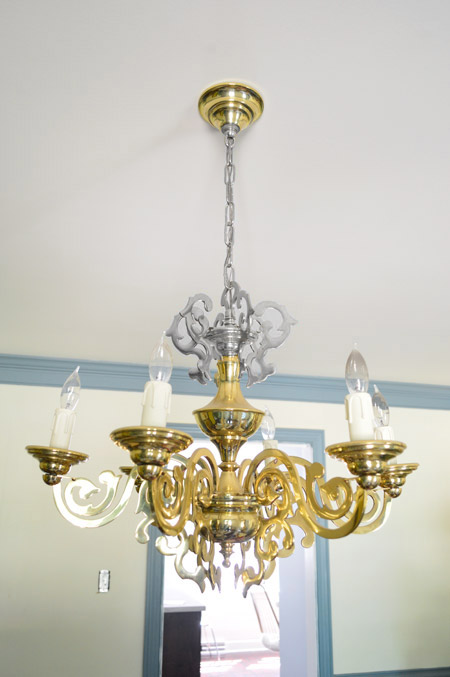
You can see which pieces I left out in the picture above, but for easier reference, here’s the original photo of it in the dining room below with the removed pieces grayed out:
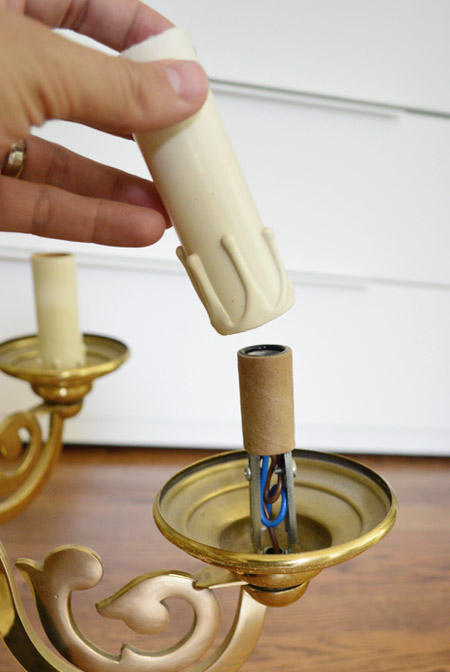
Oh, and we were going to buy new candle sleeves (the faux dripping wax wasn’t really doing it for us) but Sherry realized we could just flip them over and the drips wouldn’t be visible from below anymore (see the one in the background that has already been flipped).
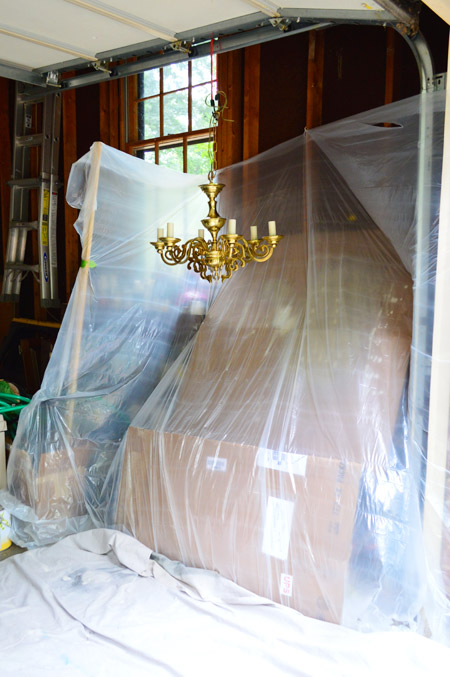
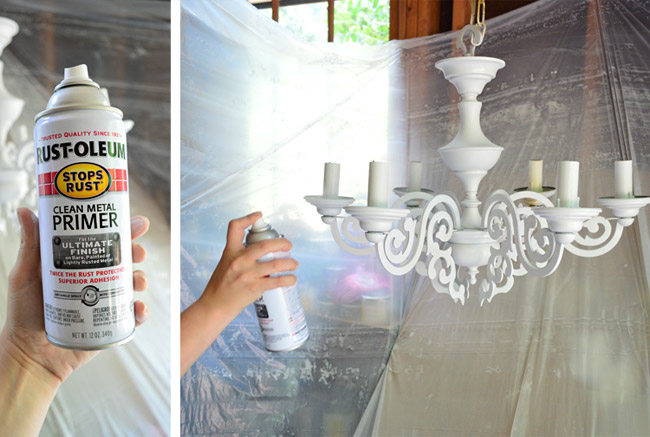
Next up came painting. I set up this little station in our garage using a plastic dropcloth, plus a bungee cord (and the original chain) for it to hang by.
First Sherry taped off the top of each bulb connected in each candle sleeve (don’t want to gum those up with paint) and then she applied a coat of Clean Metal Primer, which is our usual go-to base coat when painting metal.
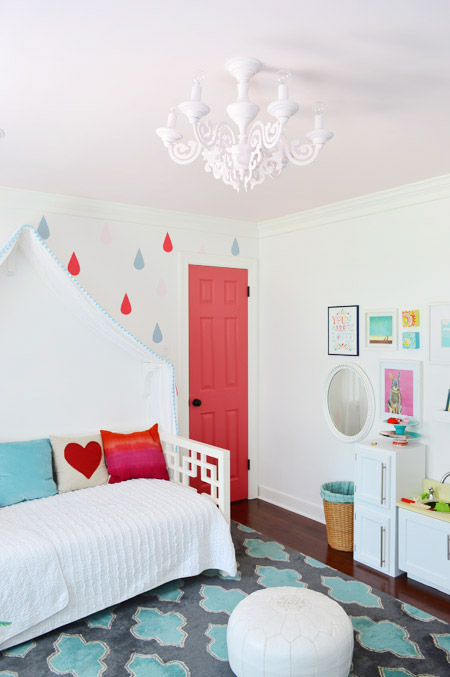
Although we both thought it looked pretty great in white after that round of primer, we were most into the idea of making it the exact same light pink color that’s on the ceiling (Pink Cadillac). Something about a pink ceiling that sort of melts into a chandelier in the same color felt very Alice-In-Wonderland to us, and of course when we asked Clara what color she wanted her light to be, she screamed “PINK!” without hesitation.
But to get it exactly the same color, we couldn’t buy spray paint off the shelf – and we knew our paint sprayer would leave something this intricate pretty drippy and gummed up (we’ve had luck using it on flat things like trim and doors, but even the curves in molding and the recessed areas in doors aren’t always covered that well) so we decided to give something we had seen at Home Depot a try. It’s a “Preval Sprayer” that we bought for less than $5, which promised to turn any paint (plus water to thin it) into spray paint.

Well, we had a difficult time with it. There isn’t much direction given about how thin the paint needs to be. It took LOTS of trial and error (and mess) to get it thin enough to finally spray at all and once it did, well, it was super runny and we ended up needing to add more paint to thicken it back up again. I wish I could tell you the final formula that worked, but we lost track along the way. I think it was somewhere in the neighborhood of 1 part water to 2 parts paint.
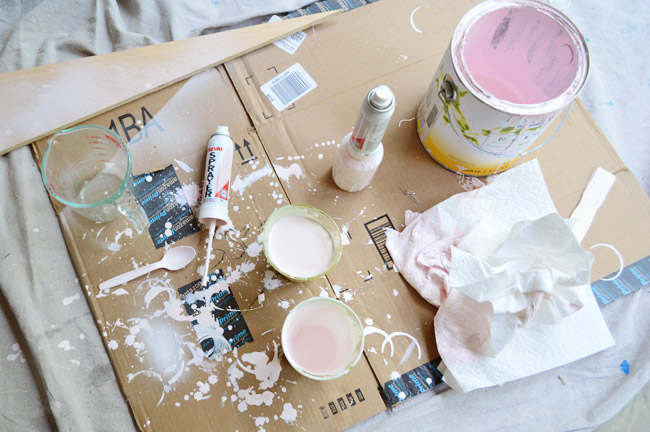
Spraying was still spotty and it would cut out or spurt sometimes, which required unclogging it somewhat frequently (putting your finger over the hole and pressing the spray button). So I’m pretty sure we never landed on the perfect paint consistency, but eventually Sherry got the job done. Once we got it spraying it was a lot lighter and more mist-like (like true spray paint) than our large Graco paint sprayer that we use for cabinets and doors, which seems to apply a lot more paint than a spray can, so it can get really drippy if you go over the same area twice or from a different angle.

The next morning we hung it up, but I didn’t get any photos of that process because it took both of us to get it in place (Sherry supported it while I did the wiring) and it wasn’t until we were both on the ladder that I realized the battery in my camera remote was dead.
But the gist is that I attached the crossbar to the ceiling fixture (which had a center hole with threading in it, like this one) and we were able to spin the whole fixture so that the long center post (#1 from that picture way above, if you recall) screwed directly into it. We had intentionally left just about a half-inch of it sticking out above the canopy so that it could catch that ceiling crossbar, screw until it was nice and secure, and hold the canopy snug to the ceiling.

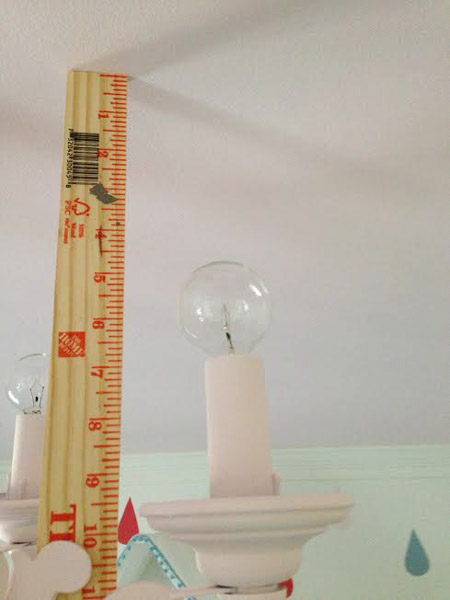
It’s hard to tell how much drop we have from the ceiling, but those bulbs are a good five inches from it, so they’re not right on it. It’s important to give bulbs breathing room on all sides (these have more than most chandeliers with shades on them).
We worried that the watered down paint would look lighter than the ceiling color, but if it is we haven’t noticed. In fact, it came out so nicely that we’re almost ready to forget the struggles we had with the sprayer which (beside the new round 25 watt light bulbs) was our only cost for the project (we spent $5 for the original sprayer and $4 for one extra air can).

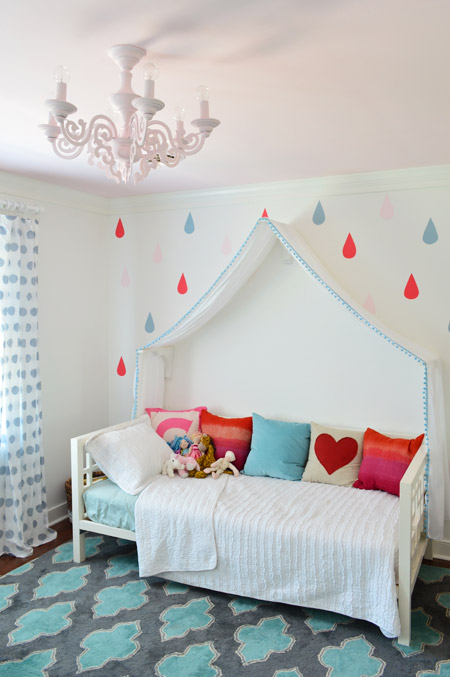
It’s nice to have a nice bright light to illuminate her room with the flip of a switch. And of course it’s always fun to take an old light that didn’t work for us in the dining room and reimagine it for Clara’s space. Here are those six 25 watt bulbs in action along with her fairy lights.

And a more ambient night shot thanks to the ol’ iPhone:
Since Teddy is too small to comment on his new light, it’s nice to know that Clara loves hers. Our favorite quote so far has been: “It’s all swirly like it’s from Belle’s castle!”
Of course this does leave us light-less in the dining room at the moment, but that’s kind of the least of our concerns in that room (I’m talking to you, blue trim). If anything we’re probably most focused on finding a light for the guest room, which is the only one upstairs that’s still ceiling fixture-less. And we’re expecting a guest next week…
Psst- Wanna know where we got something in our house? Just click on this button:


Sarah @ Sarah's Daybook says
Ooo aaaahhh. I didn’t even recognize it! Great job!
Oh, are you guys going to post any more Clara Conversations? I would love to hear how funny she’s being!
Sarah
http://www.sarahsdaybook.com
YoungHouseLove says
Yes, I’ve been WAY overdue with those (I have so many!). Maybe this Friday if I can get it together?
xo
s
Lauren says
+1 to Clara Conversations! They are the best!
Paige @ Little Nostalgia says
Me, toooooo! Your girl is hilarious.
Anele @ Success Along the Weigh says
Looks great! I never would’ve thought to flip those candles upside down! Bravo!
Mary @ The Dad Issues says
No freaking way. I suspect sorcery was involved with this makeover. I can’t believe the change.
YoungHouseLove says
Haha!
xo
s
Laura @ Rather Square says
Great idea to repurpose (and redesign) something you’ve already got! And I’m impressed with the seems-very-complicated process you went through to shorten the chandelier. Love the thin swirls too – when painted, they really look different than the original gold-brassy tone. Perfect for Belle’s castle!
Mina McLean says
Love reusing a dated fixture and re-imagining it! I did something similar with the builders basic chandelier in my home’s foyer. It got a coat of fun teal paint and began life as an outdoor (with candles) light under our arbor room. We were lucky enough to replace it with a beautiful chandelier from my grandmother’s house. It was an anniversary gift to my grandmother from my grandfather and I used to play with it (gasp!) as a child. The formal dining/living room at my Mimmie’s house was called the “no-no” room….I used to take the crystals off and put them on my teddy bears as earrings! Amazingly enough, it still has all the crystals!
Elizabeth says
So cute! My 5 yr old saw this and said it was the perfect princess room!
Nods at Daydreaming Bride says
This transformation is so awesome that I’m officially delurking after two years of reading the blog to comment!
Loving all your ceiling light updates
YoungHouseLove says
Thanks so much!
xo
s
susan says
So. Dang. Cute!
I love that you painted it pink to match the ceiling, such a nice touch. Did you need to sand or degloss the fixture first before priming (like when you painted doorknobs in the past)?
Good luck with the guest room light. We’re expecting more greatness like Clara’s and Teddy’s rooms!!
YoungHouseLove says
I wiped it down with soap and water to get rid of cobwebs, but that clean metal primer is awesome for petal without needing to sand it or degloss it first.
xo
s
Evie says
Hey Sherry, put the metal to the petal in your previous reply here. LOL
YoungHouseLove says
Haha! Metal I mean ;)
xo
s
Michael says
Pretty cool. I love how you guys re-purpose stuff. But I’m pretty sure that I saw that painting setup on an episode (or two) of Dexter. Just sayin’.
YoungHouseLove says
Ha!
xo
s
Willa says
This project is YHL in a nutshell. Bravo!
So smart to have more bedroom lighting flexibility, to re-use what you have, with imagination!
Karen Q. says
It looks amazing- love it!! Great job you two! :)
Lauren says
Goodness, the two of you continue to wow the socks off me with your enthusiasm and ingenuity! This chandelier looks awesome! Great job!
Jordan says
Looks great! I sprayed an old brass chandelier in my dining room a while back (thanks to the idea out of your book) and now this has me wanting to do another.
On another note–where did you find this white pouf in Clara’s room? I have been in search of an all white one.
YoungHouseLove says
That’s from Joss & Main a while back.
xo
s
Rosie S says
Perfect!!!
amy says
Love this!! It looks great. Very timely post for me as I am brainstorming ceiling light fixtures for my house and thinking of ways to use what we have.
Micalla says
Love how little Miss C is reading to her stuffed friends :) Great idea for the chandelier!
Rachel Steck says
I love it! And it does look like it’s from Belle’s castle.
Isabel says
Very ingenious! And love the sprayer tip even if it was a bit of a hassle to figure out. Our dining room chandelier was the same not-to-our-taste brassy color, and in pretty bad shape too, but its shape is simple and classic (not a good candidate for Belle’s castle sadly), so we ORBed it, ran the glass shades through the dishwasher and it looks brand new.
Liz || Shopping My Closet says
Love the transformation! That subtle pink is perfect for that color scheme in the room!
Liz @ http://www.shoppingmycloset.com
Style Me Wednesday fashion link-up
Joanna says
Hey! That was my idea!
Kinda anyway, I was the one who suggested on Facebook that it should be painted dark pink for Clara’s room. I was imagining the color of the closet door but I think you guys do have a better eye, as usual. This looks just great!
YoungHouseLove says
You’re so sweet Joanna! We have loved the idea of painting it and debated a ton of colors. Bet it would have looked awesome in dark pink too!
xo
s
pree says
Thats a centimeter scale not an inch scale. So is it that the space between the ceiling and the chandelier is just 5cm?
YoungHouseLove says
It’s a regular yardstick from Home Depot, so those are inches (they’re in inches here in the US – maybe they’re CM in the UK?). You can see how much drop there is when you see it from the side, like in this shot (definitely more than 5cm).
xo
s
Summer says
Her room just keeps getting more adorable! I am so ready to move so I can do more things with my daughters room! Great job guys!
haverwench says
You could always hang the old foyer light fixture in the dining room. Just ORB that puppy.
Stardancer says
I’m super impressed by this one, mostly because you had the vision to see past the ornate “gold” finish and “drippy” candles on the original. I totally would have Goodwill’d that ages ago. But in pink (or white, which I thought it was originally) it really does look like a sort of fanciful, modern paper art.
YoungHouseLove says
Thanks so much!
xo
s
HarmonyG says
This is way cute. My sister did this in Blue in her old house and i loved it so much.
Alyssa says
What a great way to recycle and be creative! I think it looks great. My husband and I actually built to headboards this weekend AND hung pictures for a new collage wall in our master this weekend, what a busy weekend!
Alyssa says
*two
Emily says
I’m so excited about this post because our phase 1 dining room makeover involves living with the 40 year old wallpaper but painting the area below the chair rail and the brass chandelier! I’ve been eyeing the various colors to make the light but what excited me about this post was that an ugly brass object could turn out so nice! And I’ve already got half a can of white metal primer in our basement! Score!
Did you know about the spray can handles? We were in Lowes and a very kind woman heard us discussing how many cans of spray paint we thought we would need to paint our patio set. She insisted that we buy the handle to save our fingers and it was magic!
YoungHouseLove says
I can’t wait to try one! Never knew if they were worth it, so thanks for the tip!
xo
s
Emily says
You’re welcome. They are worth it but they do drip a little more than just using the spray can itself. It could just be that we were spraying a table that was laying flat on the ground and not propped up in the air, but it was worth every penny of the $5 we paid for it.
Jaimee says
I am in LOVE with my spray paint can handle! Totally a life saver for my fingers, and I feel like the finish goes on smoother too! Totally worth $5!
Reenie says
Oh yes… the spray paint handle is great to have. :)
Such a cute chandy.
Sarah says
Great job, you guys! I love the way this turned out! Good to hear that others also struggle with spraying… I made over a lamp recently and it was pretty much the bane of my existence. :-)
Kelly H says
So cool! And I was glad to hear your experience with the Preval paint sprayer. I just bought one to try painting the AC return air grate to match the new gray paint in my entry way. I hope it comes out as nice as Clara’s new light!
Angel says
So pretty! I love a chandelier in a girls room.
I am really anxious to try the sprayer also. I have never seen those.
Thais says
Love this project! Totally worth making the dining room even less ready ha!
When I saw the first picture I don’t know why buy my first thought was “It reminds me of the Beauty and the Beast, but I don’t know why.” Clara and I are so on the same page!
YoungHouseLove says
SO FUNNY!
xo
s
Chantel says
This is awesome. Thanks for sharing!
kathleen says
We are in LOVE with that Sia song! Great work with that chandelier, we had one in our dining room when we moved in, and I tried to spray it black, but didn’t come out nearly as good as yours.
Stef says
This is a little off-topic, but does Clara sleep with all of those throw pillows on her bed each night, or do you take them off? If you take them off, where do you put them? Also, did you ever use a guard rail for her when you transitioned her from crib to bed? Thanks!
YoungHouseLove says
They stay along the back of the bed sort of like a bumper since it has an open wood frame. We never used a guard rail when we transitioned her since she wasn’t moving around very much, but I’ve heard a pool noodle under the fitted sheet can work – isn’t that smart?!
xo
s
Rachel says
Where’s Clara’s quilt from?
YoungHouseLove says
That’s from HomeGoods a while back.
xo
s
Ashley says
What color temperature light bulbs do you use in your house?
YoungHouseLove says
We usually like warm white or soft white.
xo
s
M says
Somehow I was so sure the lampshade with the funny “Burger” print would end up in Clara´s room. I think at least for the guest room you could use one of the lampshades you designed! ;-) What do you think?
YoungHouseLove says
We definitely have our eye on a few different spaces for some lights from our collection. Lots of rooms to go!
xo
s
Taya says
Love it! I think it’s so awesome that you were able to repurpose something you had.
Andrea Enright says
I can’t believe how clever this is! It looks like that chandelier was MADE to look like that. One of my favorite projects ever! (And loving the Sia reference! Now I’m going to have to watch the music video… AGAIN.) :)
YoungHouseLove says
Thanks so much Andrea!
-John
Manda Wolf says
Looks great! It is always such a pain to hang chandlers closer to the ceiling then they were designed. We had to do that in our dining room and kitchen. The pink chandler is so precious though.
Alissa says
Is she reading a book to her friends in that picture? Super cute. :o)
YoungHouseLove says
Isn’t that sweet?! She’s reading her new favorite library book to them (Too Purpley – I highly recommend it).
xo
s
Alissa says
I’ll have to add it to my queue! :o)
Michelle Kersey says
You should totally put her light on a dimmer switch. I mean. What’s a chandelier if it can’t dim!!? I’ve converted both my kids ceiling light switches into dimmer switches. They both are a teeny bit scared of the dark so they needed it. :)
YoungHouseLove says
Would love to! Teddy’s room is on the dimmer switch list too!
xo
s
Noel M says
You’ve inspired me to re-imagine the light I took down from my dining room for our bedroom. In one week I have this post and from Jenna Sue and yours to get my juices flowing! http://jennasuedesign.blogspot.com/2014/07/master-makeover-diy-chandelier.html
YoungHouseLove says
Love that!
xo
s
Anne says
Sweet! Nice makeover. So satisfying to reuse! Fave part was Sherry flipping the candles. :)
Heather says
You guys are the bomb dot com! (that really was my first thought when I started reading!) Seriously though this is a great idea! And it looks amazing!!
Allyn says
So cute! I would have loved it as a kid.
Side note: have you guys seen Jimmy Kimmel learn the Chandelier dance? Amazing. Those nude leotards….
YoungHouseLove says
Holy cow, how have we missed that?
xo
s
Amy says
That looks amazing! Are you going to do anything with the decorative piece that had to come off of the top in order to shorten it?
I have a question: Is the wiring in that room (or your house in general), or possibly the light fixture, set up to handle the 150 watts worth of light bulbs you’re using? I wondered because I put up a 5-light chandelier in one room in my house, and found that one of the bulbs was always burned out – it would only support 4 of the round 25-watt bulbs at a time. I found small round 15-watt bulbs (at Target, yay) which cured the problem, but I’ve wondered if it was my wiring, my fixture, or a problem other people would have…
YoungHouseLove says
So interesting! I’ve never heard of that but it makes sense! In our dining room it had 40 watt bulbs in each arm, so going down to 25 each hasn’t seemed to be an issue, but it’s a good tip for someone who has a bulb that’s always out!
xo
s
Wendy says
Most fixtures have maximum wattages although I’ve never heard of the wiring itself having a max. When you buy new fixtures now, it will tell you what the max wattage of the fixture is.
Ron says
Woah, I don’t mean to seem rude, but wiring most definitely has limitations depending on its gauge. With that, household wiring is usually more than able to handle typical household loads but consult a electrician if you’re not sure.
Jen @ The Decor Scene says
Damn you guys inspire me every day…now if I could just get my butt in gear and do some projects for our little girls room. I think after her 1st birthday I will have some time. ;) Really LOVE how you transformed this light for Clara’s room. As always…great job!!!
Lil says
Love it! Can’t beat the price. Do you have their lights on dimmers? We have dimmers on the chandeliers in our bedrooms. Love them. Sometimes our little likes us to leave the light on very dim as a “night light”.
Clara’s room always looks so tidy. I’m going to chalk that up to the magic of the internet.
YoungHouseLove says
Haha! We definitely had a cleaning session (Clara included) to clear the floor so we could get up on two ladders and hang that baby. And as for the dimmer switch, we’d love to add one. In Teddy’s room too!
xo
s
Reshma Sanjeev says
Wow..The chandelier would not have looked so nice anywhere else other than Clara’s room. It looks perfect.
~ Carmen ~ says
Wow. The chandelier looks like a million bucks after you spray painted it :] // itsCarmen.com ?