Here’s a simple little fan makeover project anyone can do. We decided our boring cheapo white fan in the den would look more high-end with a lamp shade on it instead of one of those generic and dated round glass bulb holders. All we needed to make a quick switcheroo was a nice looking white lamp shade with a metal interior loop that is held in place by a bulb (don’t get a shade that doesn’t have the loop to go around a bulb, or there’s no way your fan bulb will be able to hold it up).
When selecting a shade, we took size and proportion into account (as well as making sure it had that interior loop for hanging purposes). We didn’t want anything too tapered since a shade that’s only slightly wider on the bottom looks more modern and less granny than a big sloped triangular shade. Then all you need to do is remove your fan’s old glass bulb cover and unscrew the bulb. Slide the shade’s bulb loop through the bulb so that it is held in place when you screw the bulb back into the fan.
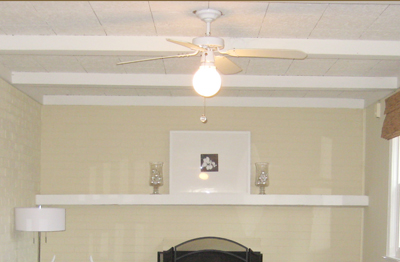
Here’s a quick before shot to clue you in on what we were working with:
And here’s the after:

This project literally took all of 5 minutes once we found the right shade. And anyone who knows me knows I’m always a fan of a quick and easy home improvement project. And a terrible fan joke or two. My apologies.
Update: Click the speech bubble in the top right corner of this post to see the comment section with additional instructions and another photograph.

Rosa says
Looks great! we have a few of those I’d like to change in our place….where did you get that shade? also I’m a bit confused as to what the shade needs to stay in place.
Thanks for your help.
P.S your site is fun to look at!
Rosa
YoungHouseLove says
Hey Rosa,
I know it sounds complicated, but it was a really simple project. Just make sure you pick up a few shades with the metal rods and center loop that come from the top of the shade. Anything with hardware that comes from the bottom of the shade won’t work. Buying a few shades in different sizes and shapes helps, and then you can just screw the lightbulb into the loop to hold the shade up on each of your test shades and pick the shade that looks the best with the fan. We found that boxy shades worked better than really triangular ones. Anyway, have fun and good luck!
xo,
Sherry
Monica says
Any chance you remember where you found the shade that worked?
I’ve been looking to do this after seeing something in an old issue of domino a million years ago, but have yet to stumble across the perfect shade..
YoungHouseLove says
Hey Monica,
We actually used the drum shade from a Target table lamp that we had laying around. The only thing we needed to do to retrofit it to our fan was to bend the metal hardware on the drum shade to make the shade sit lower in place (the shade was originally too high so the bulb popped out at the bottom and the top of the shade interfered with the fan blades. By bending the little metal arms inside the drum, it made them shorter and thereby lowered the drum shade (which rests in place on the fan’s light bulb) so it concealed the bulb and no longer got in the way of the fan blades. It sounds complicated but if you’re holding a drum shade and looking at your lamp it’s hopefully pretty straightforward. Hope it helps!
xo,
Sherry
Emily says
I’m really loving this idea! Could you possibly post a picture looking through the shade so the hardware is showing? I’m having trouble picturing how you made it work. All the shades I’ve seen don’t have a hole big enough for the bulb to screw through.
Thanks!
Emily
YoungHouseLove says
Hey Emily,
Here’s that picture for you. Hope it helps!
xoxo,
Sherry
Emily says
Thanks!
Allison says
That is amazing! Absolutely amazing. I love it.
Summer Smith says
Any ideas for an old fan with five lights instead of one? do you think there is a way to put a shade over all of them to make them look like one? (I hope that makes sense.)
YoungHouseLove says
Hey Summer,
Yup, that’s a great idea! I would measure how wide you’ll need it to be to accommodate all those bulbs and snatch up a few different ones to get the height/size just right (and then return the rest). Hope it helps!
xo,
s
Allie says
Darnit…I bought a white ceiling fan for the purpose of taking the bowl off and using your shade idea. Unfortunately, the fan I bought takes a candelabra base bulb and try as I might, I couldn’t bend the ring high enough to get around the base of the bulb. Oh well…at least the shade was only $4 at the Christmas Tree Shop. I tried!
Jess says
Love this idea. We have a ratty old ceiling fan in our “free” room and I wanted a cheap way to make it look better. You guys rock.
Molly says
Going with the 5-bulb style fan idea. Would you take off the glass domes over the bulbs and just fit the shade over the 5 bare bulbs? Does that make sense?
YoungHouseLove says
Hey Molly,
If you can make it work it’ll look great, we’re just not sure how you’ll secure the large shade around all the bulbs without having one central bulb to hold the shade up like we had in both instances. But if you can make it work it’s awesome- just be safe about not leaving hot bulbs right up against the shade since that’s definitely a fire hazard (ideally they’d all be at least four inches away or so and you can use CFL bulbs which burn less hot as well). Hope it helps!
xo,
s
Leanne says
Hi Molly, I know I’m over a year late on this train, but in the even this reply finds you I but was wondering if you had any luck placing the shade over the 5 bulb fan? I have a 3-bulb fan and have been wrestling with how to make it more attractive/less noticeable without removing it completely. It really is necessary, I don’t have central air and the fan cools my living room nicely during the warmer months. My only thought would be to wrap wire around the top of the shade and attach it to each light ‘holder’ – but then it might fly around when the fan is on.
And Sherry, THANK YOU for this idea. It may just be the answer to my ceiling fan prayers!
Jill says
This is a great idea! We are trying to make this work on a fan in a bedroom. Is there any chance you could post the inside picture of the lamp shade again? The link seems to be missing. My husband doesn’t see how you can bend the prongs without distorting the lampshade.
THANKS!
J
YoungHouseLove says
Hey Jill,
Here’s a post with an inside photo of the same method that we used in our basement with an overhead fixture and a regular lamp shade: https://www.younghouselove.com/tackling-the-basement-chapter-five/
Hope it helps!
xo,
s
Jill says
THANKS!
J
Robyn says
I saw this blog post a few weeks ago and after a few weeks of browsing various shops I finally find a perfectly size green vintage lamps shade to put over my kitchen ceiling fan for $18. Thanks for the idea!
Jean Carpenter says
Just what I need for my dining nook! I am definately going to make this one. Where do you get all these fantastic ideas??????
YoungHouseLove says
Haha- no idea. I think from staring at things I don’t like and thinking “how can I cover that?”
xo,
s
Gillian says
I know this is one of your older projects, but it is realy fabulous. Thanks for the easy update idea! I was able to do something very similar to pretty up our nursery ceiling fan I love the way it turned out. Keep bringing on the awesome ideas!
http://the2bedroomblues.wordpress.com/2012/02/13/updating-the-nursery-ceiling-fan-with-a-shade/
YoungHouseLove says
So sweet! Love it!
xo,
s
Krystel says
Wow! what a great idea. It really makes the fan pop! Additionally, if you are looking to safely install a ceiling fan, check out this link: http://www.delmarfans.com/educate/basics/how-to-install-a-ceiling-fan/
It teaches you step-by-step how to install a ceiling fan with the use of info-graphs and an easy-to-follow video.