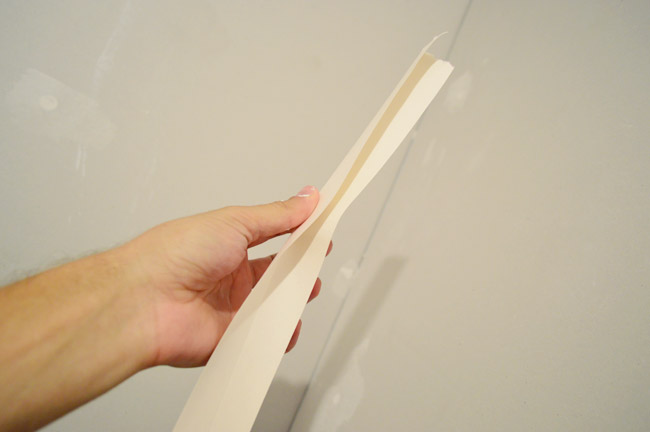
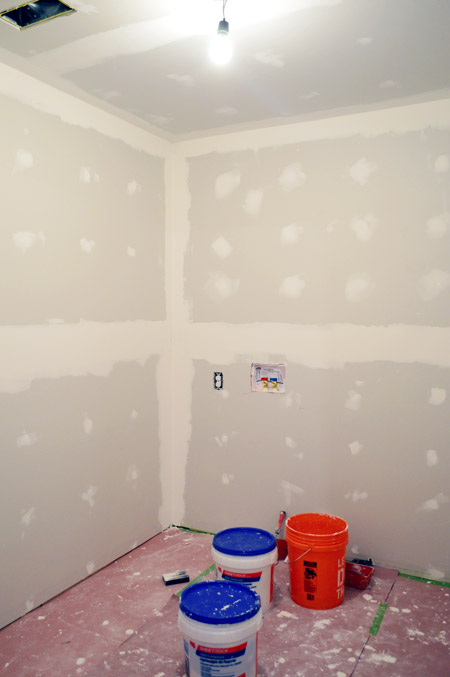
Over the weekend we wrapped up our how to hang drywall adventures in the laundry room. It was a humbling experience, but we’re feeling nothing short of glorious about how it turned out. In fact Sherry and I spent a few minutes doing this in there on Sunday.

Project Completion Euphoria. It’s a real thing. And it can make a grown man twirl.
Doing Our Research
We’re not ready to put “pro drywaller” on the ol’ resume quite yet, but I do think we’ll go into our next drywallstravaganza with a lot more confidence. We devoured YouTube videos and online tutorials for about an hour one morning, and quickly learned that there seem to be just as many variations on proper technique as there are opinions (reminder to self: never read YouTube comments). We finally decided to generally follow this video, since it was clear and seemed consistent with the most common advice. So this post will show you the process we went with, and what techniques seemed to be the most effective for us. We even threw in a couple of videos for you (although none of them have our Sound of Music reenactment).
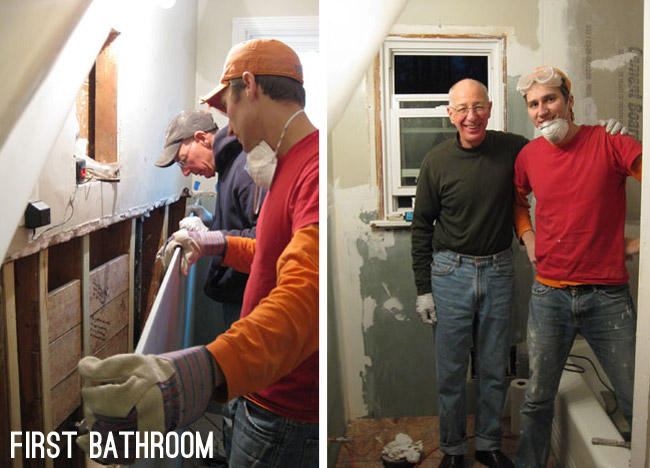
Before we started this reno, I was quick to tell Sherry that my vote was to heavily consider hiring out the mudding/taping of the drywall. It’s just a skill we have limited practice with (patching a hole here and there mostly) and it really is an art when you watch the pros. My biggest encounter to date was 5 years ago during our first bathroom gut job, but it was just doing a handful of seams. Somewhere along the line, I felt my opinion starting to shift, and as we decided to take on more of this renovation ourselves, I realized this would be a good room for us to build our drywall finishing skills. There would be lots of seams to practice on and if they didn’t turn out so hot, we would have various items like baseboard, crown molding, cabinets, appliances, and backsplash tile blocking some of them – and it’s not like it’s a major gathering spot (like a kitchen or living room for example).
Materials To Tape, Mud, And Sand Drywall
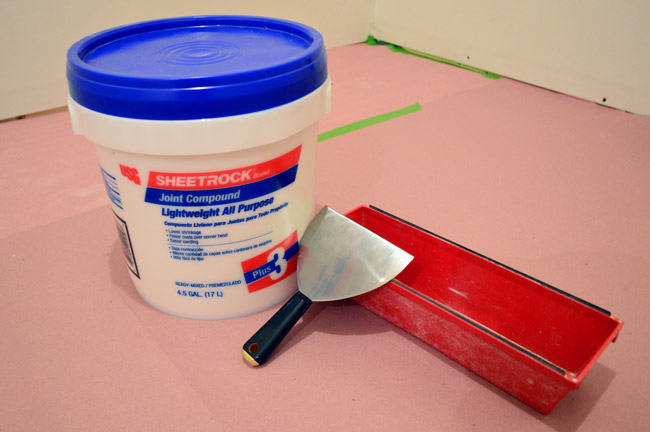
So let’s start with our materials, most of which should be available right in the drywall section of any home improvement store:
- Rosin paper or some other paper to protect your floor from drops, splatters, and dust (even if it’s just sub-floor, you don’t want it to get bumpy from dried joint compound)
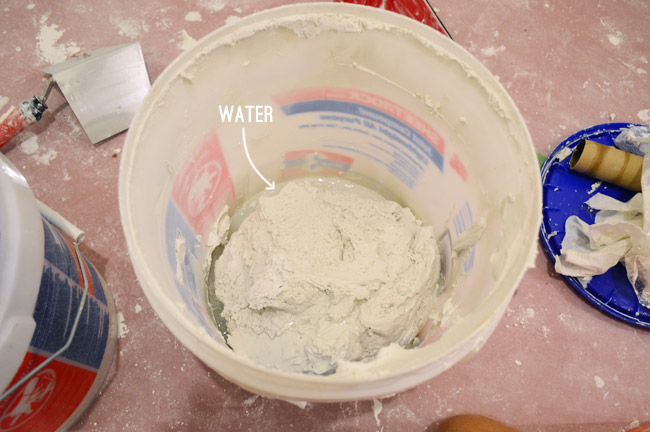
- Joint compound (i.e. Mud) – I used this based on reviews I read that warned against the “UltraLightweight” stuff. I heard you want 1 gallon for every 100 square feet of drywall. For me that meant 4 gallons, but we ended up using closer to 5.
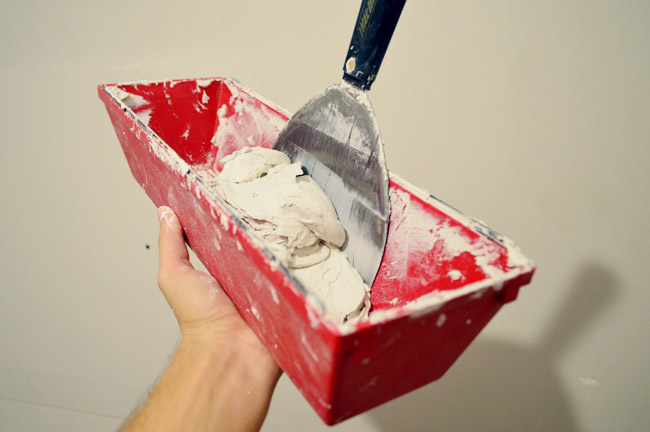
- Mud Pan
- Drywall Knives in various sizes – the one pictured is a 6″ knife, but we also used 8″, 10″, and 12″ ones (although the last was probably overkill)
- Corner Trowel (not pictured) – this helps you get into corners and was awesomely helpful (it’s in one of our videos below)
- Drywall Tape (not pictured)
- Bucket of Water (not pictured)
- Work Light (optional, not pictured)
- Stepladder (not pictured)
The mud pan is not only a handy way to not have to lug the whole bucket around with you, but it also has some metal edges so you can keep your knives clean and scraped off throughout the process.
Mudding Over The Screws
We started with the easy step: covering the screw heads. Having used a drywall counter-sink bit during installation, our screws were already set into the drywall slightly (kinda dimpled in there) making it quick and easy to slop on a bit of mud and scrape it flat.
There were lots of screws to cover, but Sherry took two sides along with the hallway and I got the other two and the laundry room ceiling so it went pretty fast that way.
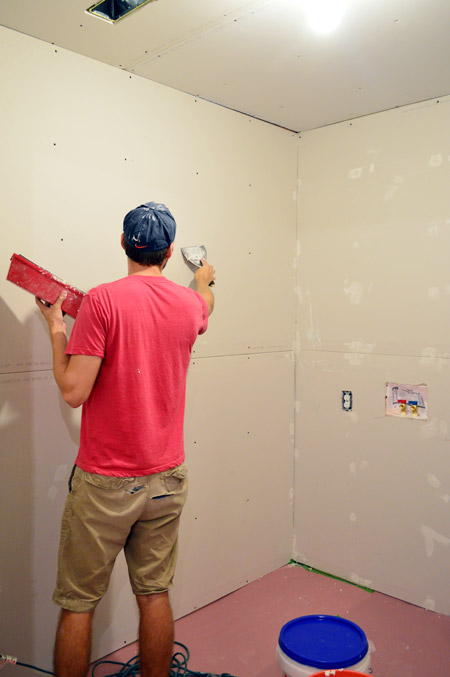
Taping The Drywall Seams
Next up was taping the joints or seams between sheets of drywall. There’s mesh tape that has an adhesive built in, which we’ve used before and found tough (if you sand too much, the mesh texture comes through easily), so we chose to use paper tape this time, which requires a bed of mud to stick to the wall. That application method was an extra step, but almost all of the pro tutorials that we watched used it, and it ended up being a lot easier to work with in our opinion (we didn’t have that mesh-showing-through issue – so it made for a smoother result).
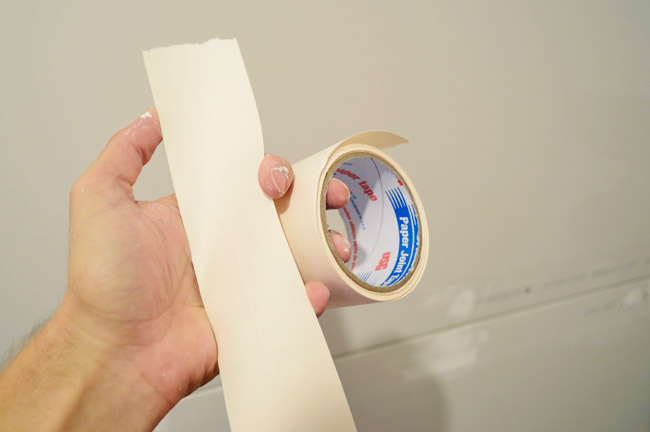
First I applied my “bedding layer” on the horizontal seams. The drywall boards taper slightly on the edges, so this whole process is meant to bridge the gap between boards and flatten the taper. Once I got a decent layer of mud applied, I dragged my 6″ blade across it to smooth it out.
Once it was smooth, I took my piece of tape (already ripped to the length of the seam) and lightly pressed it into the layer of mud. It takes just a soft tap for it to stick to the mud. Note: I saw some tutorials suggest wetting the tape first. I tried this once and didn’t find it any easier, just messier, so I worked with mine dry.
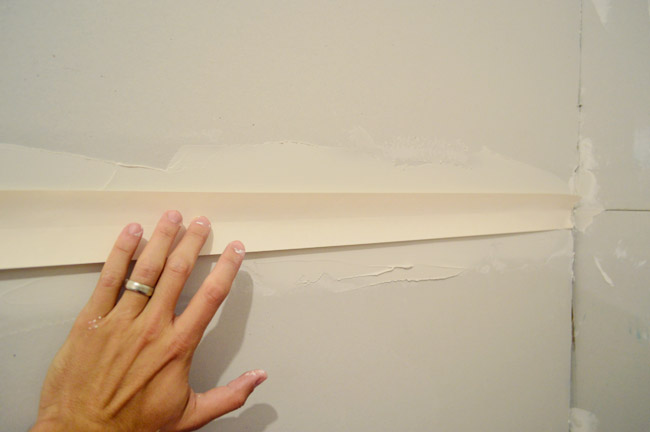
Once lightly adhered across the seam, I dragged my 6″ knife across the seam with a little bit of pressure to smoosh it down into the mud. It helped to start in the middle of the wall and work out to one corner and then repeat that on the other side. Since the tape may drag when you first start, it helps to put a finger on it to keep it in place when you first pull your knife across it.
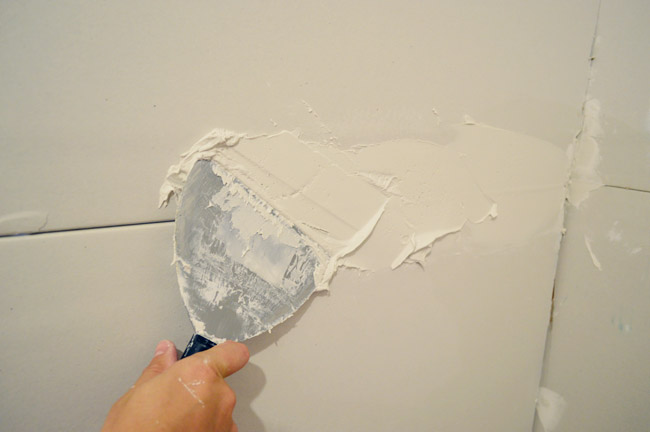
With the tape embedded, I then used a slightly larger knife (an eight incher) to put and smooth another layer on top. By using a larger knife it helps feather out the edges so they blend more seamlessly with the wall, all while disguising the taper of the boards.
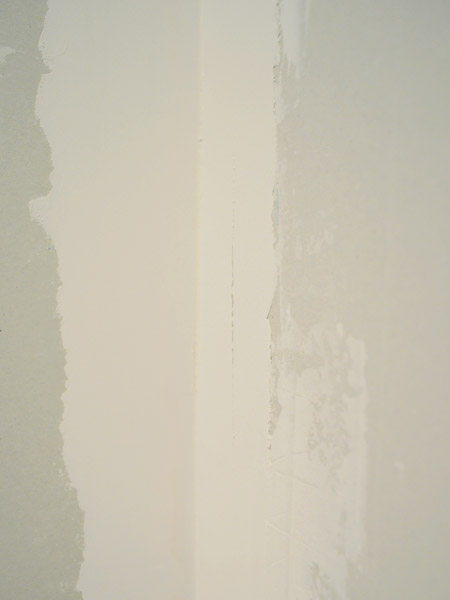
Here’s my horizontal seam after my first round. It actually wasn’t that hard at all, so it had me thinking I could do this all day…
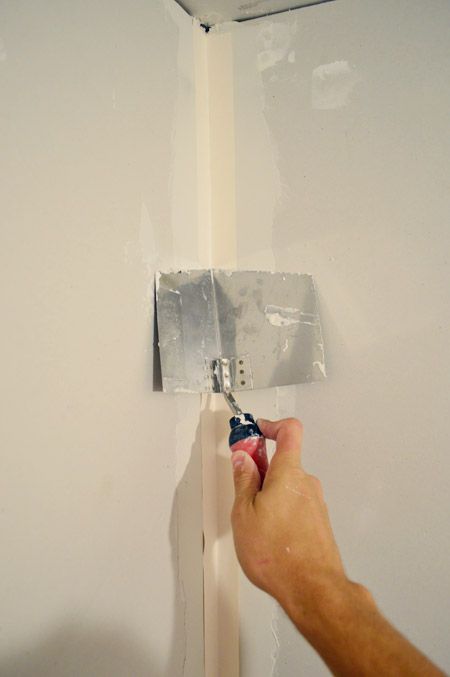
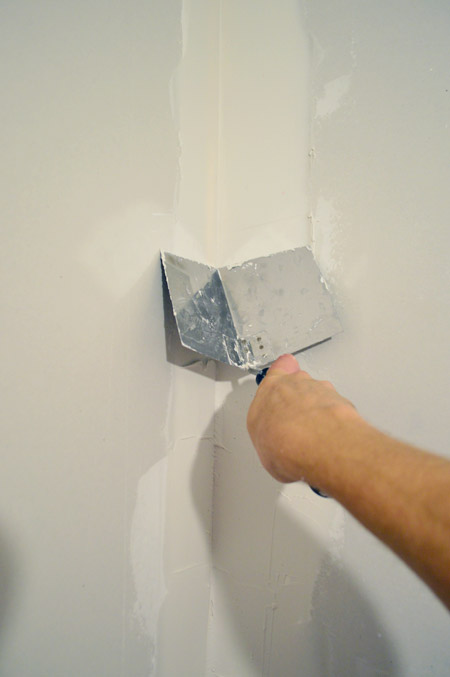
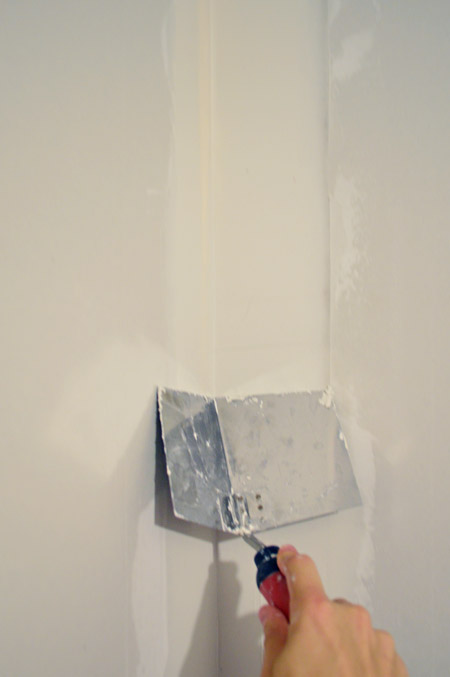
Taping The Corners
… and then came the corners. The added corner element definitely made them more of a challenge. I wouldn’t rate this step as a “panic and throw things and curse the DIY Gods” undertaking, but I think a “you have to concentrate more and it takes more time” descriptor is fitting for this part (I’d call it a 6 on the DIY difficulty scale, while the flat seams are a 2). The process started off pretty much the same as the flat seams. I could even use the same tape, since it comes pre-creased for corner applications.
Just like before, I applied a bedding layer first – which involved running my mud-filled knife down each side of the corner.
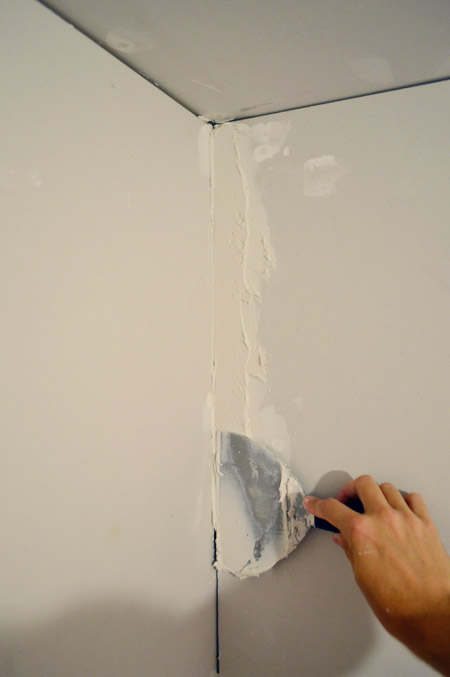
Once both sides of each corner were covered with a fair amount of mud, I broke out my corner trowel to smooth it out. The corner trowel is a lifesaver when it comes to getting a sharp angle in the corner and smoothing both walls simultaneously.
Then on went the tape with a light tap, just to keep it in place.
Next I pressed the tape into the mud with another swipe of the corner trowel. Since it was hard to get my finger and the trowel in the top corner (to keep the paper from dragging), I found it sometimes helped to dip my trowel in water first to glide along the tape more smoothly.
The corners ate up a lot more time than the flat seams since we had four vertical corners in the room, four horizontal corners around the ceiling, plus nine more around the doorways in the hall. But hey, at least we had 17 corner seams to practice on! Note: I’ll explain in a little more detail what else was challenging about the corners in a second, complete with a video to show you what ended up working nicely, so stay with me.
Oh and I thought it would be helpful to mention that my first round of mudding took longer than the 12-24 hours to dry that most tutorials suggested (Sherry started a second round after 24, but noticed it was pulling some damp mud up in a few areas so we decided to wait one more day).
Appling A Second Coat Of Mud
Once everything was dry (you can tell because the mud will be one consistent color) we put another coat on our seams, this time using a slightly larger 10″ knife to further spread the edges out a bit.
We also tackled another layer of mud on our screw holes together, since you could tell our first pass had shrunk a little bit when drying.
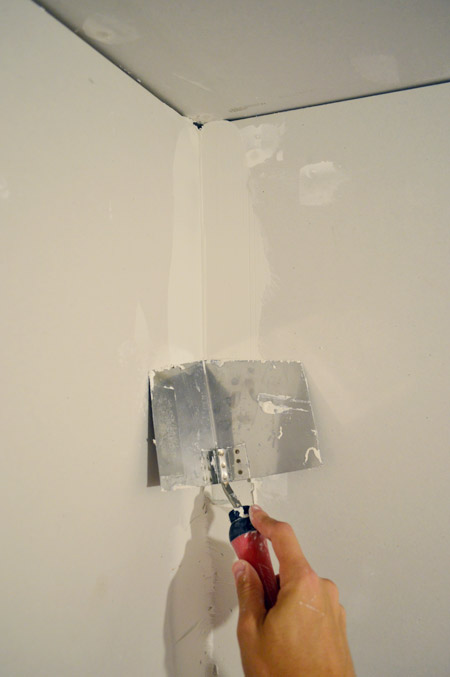
With that done, it was time to face the corners again. I actually watched a few more videos with tips before beginning, which seemed to help – and I even made a video to show the technique that ended up working for me in the hopes of passing it along to you guys. I didn’t let Sherry record me until my third (and final) round of mudding, just to be sure I had a good handle on it – so forgive the time jump. It’s also on a ceiling crease, but it works the same way on vertical wall corners.
Note: You can also watch this video here on YouTube.
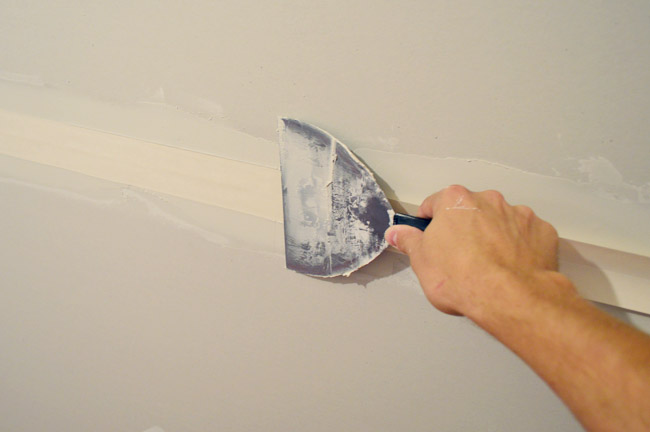
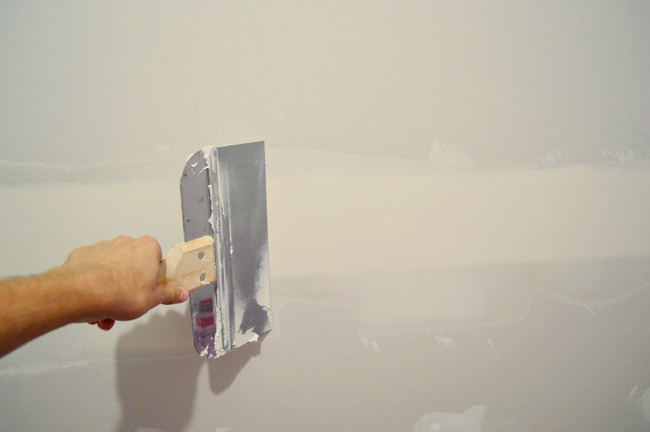
For those who can’t watch the video, I’ll do my best to explain it with photos. It started like I did the first time – slopping some mud on both sides of the corner with my 6″ trowel, followed by a pass with the corner trowel to smooth it out and wipe off excess.
The issue is that the trowel edge tends to leave ridges where the excess is pushed out, but not smoothed down.
So to take care of those, I used my 6″ trowel to flatten them and feather the edge better. The challenge here is that you risk creating another ridge with the trowel (in the case of the photo below it would be the left corner), basically creating a vicious cycle of ridges that are left behind. But if you hold your 6″ trowel at a slight angle, that can help you apply pressure on the outside edge so you can eliminate the first ridge without making a new one (or at least a very big one). This takes some finesse, so forgive yourself if you don’t get it right away, but once it “clicked” for me it was a lot easier.
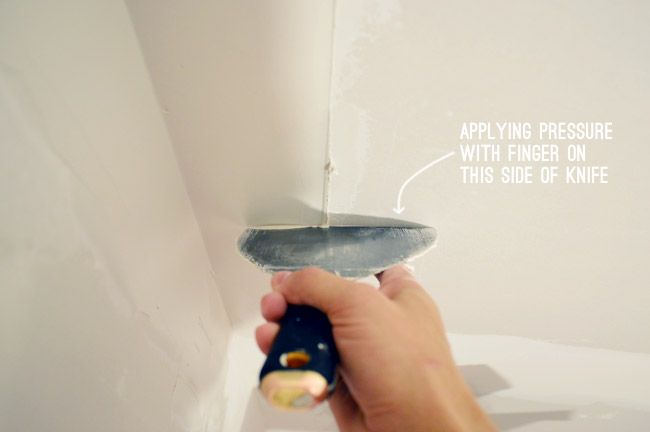
After eliminating (or greatly reducing) the ridge, then I went back and did one more pass with my corner trowel, just to be safe.
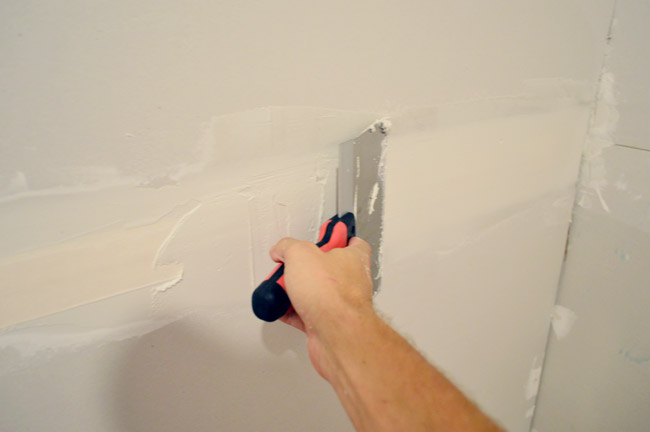
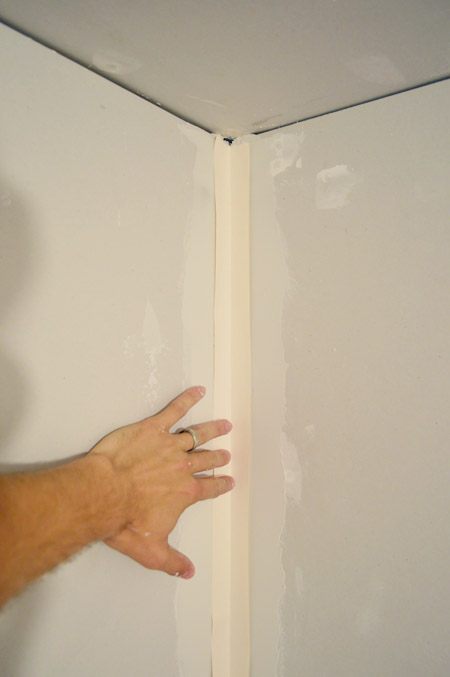
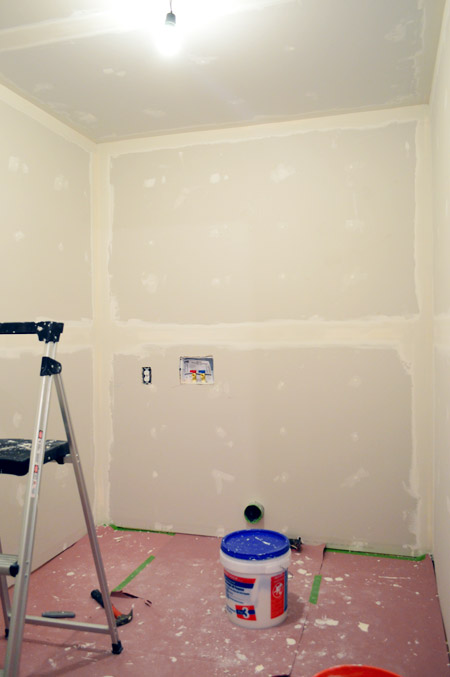
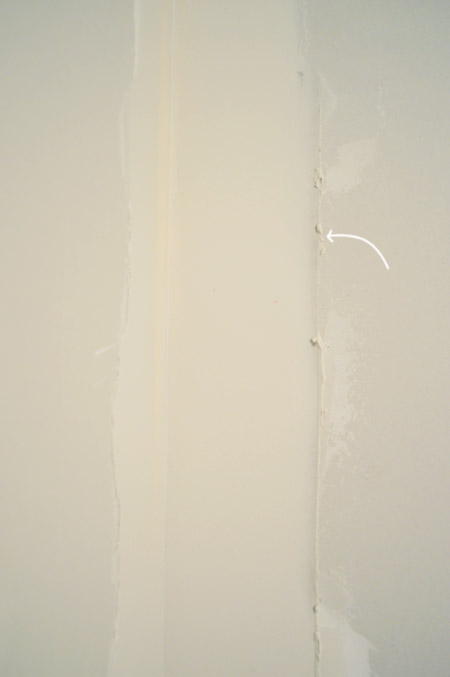
Here’s the room after two rounds of mudding. Fortunately, the second round was much faster since (a) we weren’t taping and (b) I was getting better at those corners (cue the Rocky music, guys).
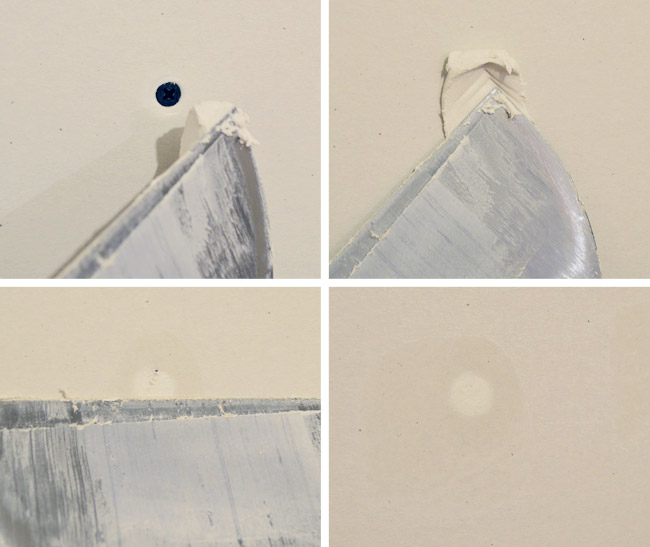
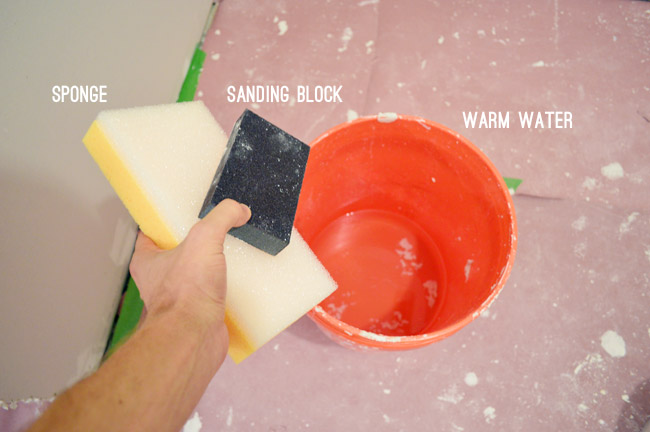
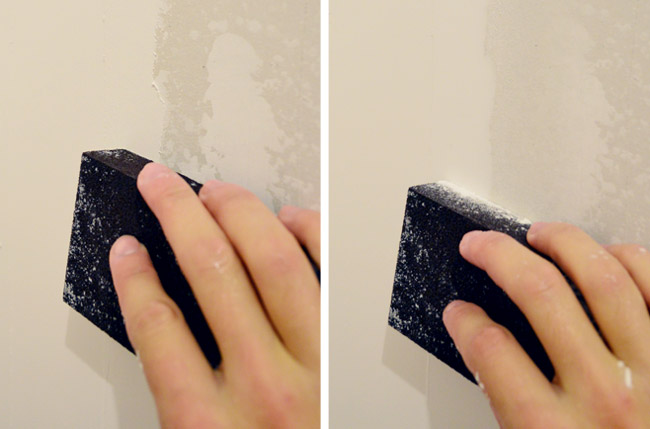
Wet Sanding The Drywall
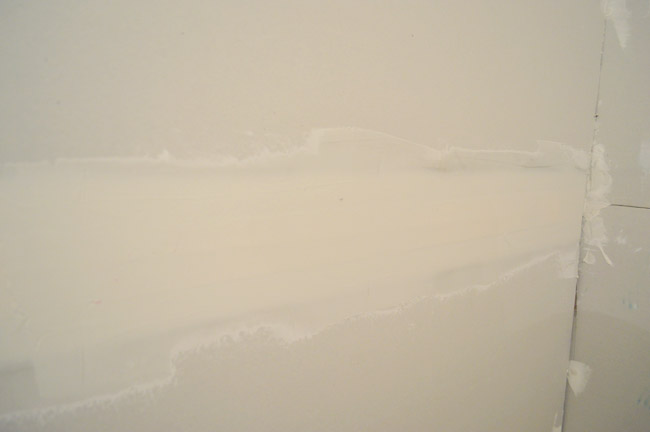
After 24 hours, it was sanding time. You can see in the photo below that my best efforts to smooth everything out with those trowels weren’t perfect and I still had some defined edges that needed to be smoothed out and blended into the wall better.
I was actually excited to try out the idea of “wet sanding” to help eliminate some of the dust that threatens to coat everything in a normal “dry sanding.” I’d heard people use everything from a sponge to a t-shirt for wet sanding, but I went with this sanding sponge that was sold alongside all of the other drywall sanding materials (since it has a coarser side for scrubbing). I also kept an 120 grit sanding block nearby for any tough spots.
Well, I have to say I wasn’t very impressed with the damp sponge. It did the job, but it took a lot more effort than I had expected.
So I decided to try something different – which I explain in the video below – that ended up working really well.
Note: You can also watchi this video here on YouTube.
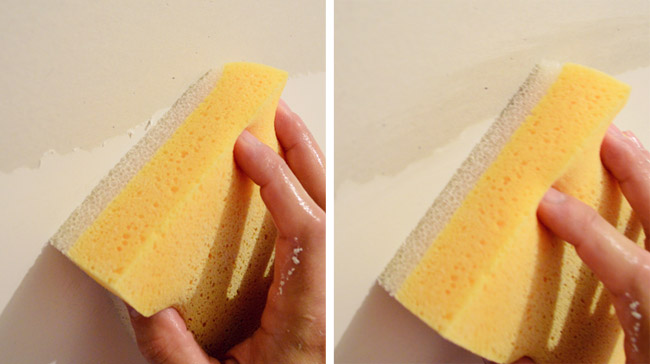
Again, if the video is a no-go for you. Here’s the gist – I used the 120 grit sanding block as a sponge, since it retained water AND had a little more scrubbing power than the plain sponge did.
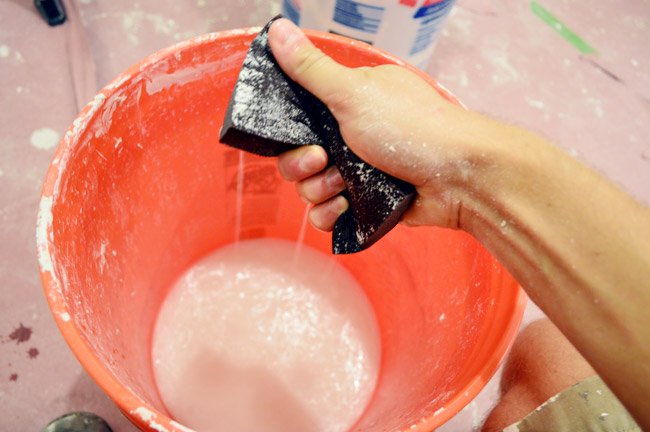
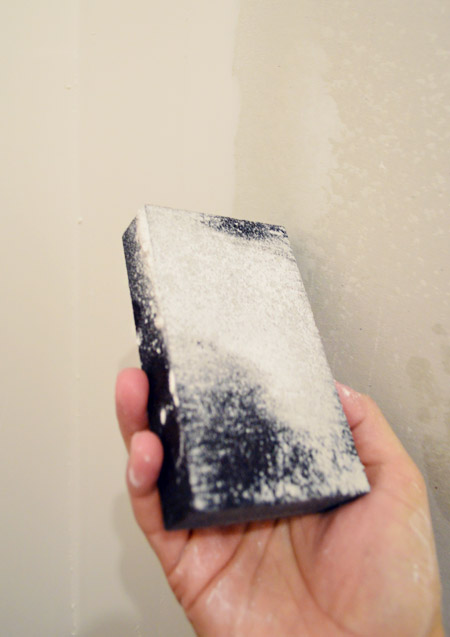
I didn’t want it very wet at all (that could rub off the drywall paper) but just damp enough to moisten the dried mud (and so that that the dust from sanding stuck to the surface of the block, which didn’t happen when it was bone dry).
I wouldn’t call this method “100% dust free” by any means, since once the block got coated with a layer of dust it started to toss it around a bit. The difference was that the dampness caused the dust to just fall to the ground right below whatever I was sanding, rather than becoming a cloud in the room. Once one side of the block got covered, I turned it over to get a more time out of it before having to rinse it in my bucket (it took a bit of massaging to get the dust coat off).
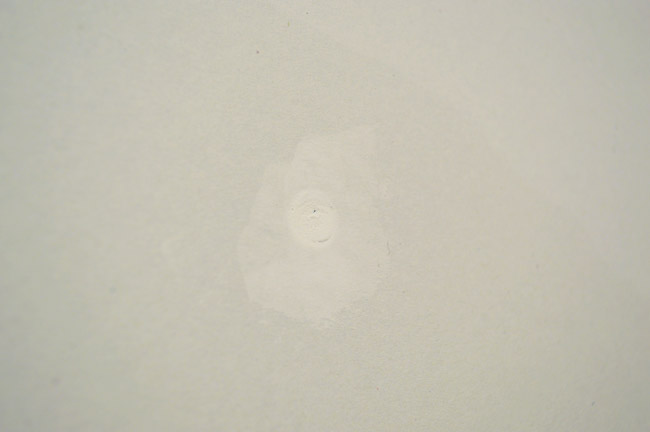
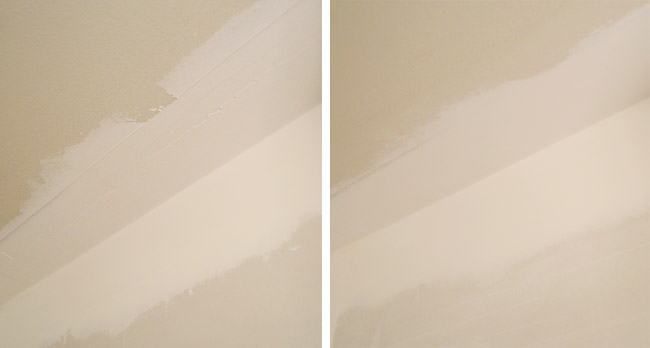
This step was a HUGE relief, because I was worried about a few corners where my application wasn’t as smooth as the others. Here’s one particularly rough spot and how well the wet-sanding step corrected my mistake.
Applying The Third (And Final) Coat Of Mud
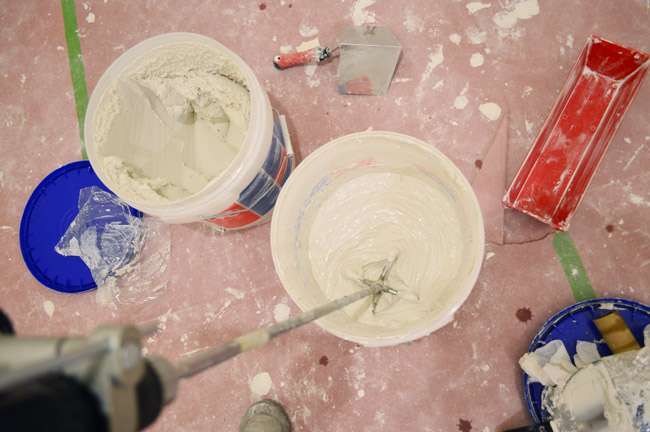
Once the sanding was done, we could put our third and final finish coat on the walls. A bunch of tutorials suggested thinning out the mud a bit so that it goes on even smoother, so I dumped a little water in…
…and blended it with a paddle mixer. You can see I did this in an empty bucket, so we weren’t diluting our whole stash. It didn’t make it too much thinner, just about the consistency of mayonnaise.
I’ll spare you pictures the photos of our third round of application and our second round of sanding (they were identical to the process I’ve already shown, and this post is already overloaded with pictures) – so let’s just jump to the after.
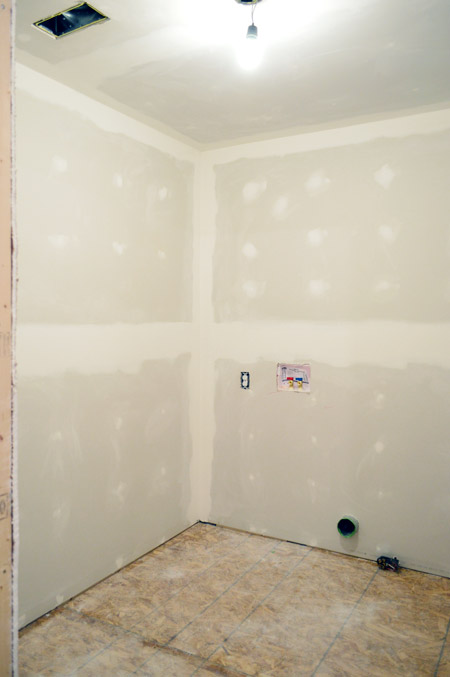
Priming The Room
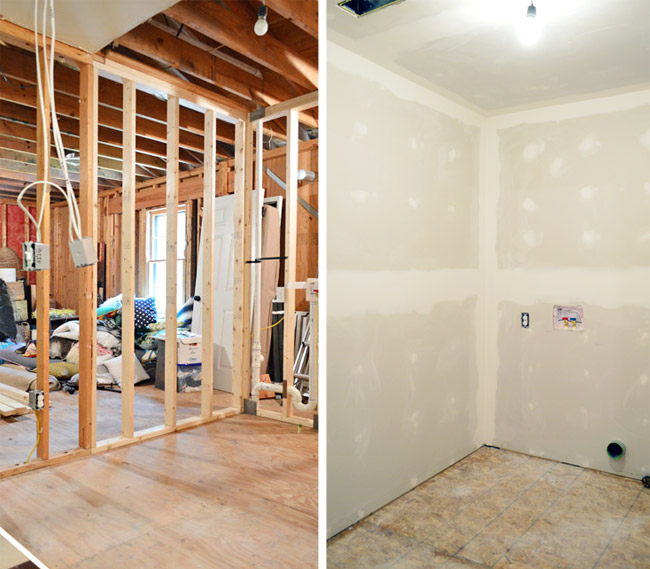
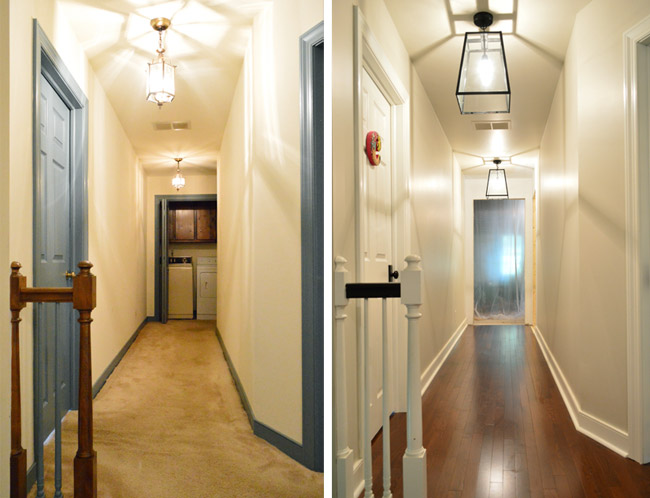
Since that’s not the most exciting picture ever, let’s jump one step further to the primed room. We were so eager to see how our taping, mudding, and sanding held up to the test of being coated with primer that we jumped right on it yesterday. And it looks like a real room, guys! A space that didn’t exist a few weeks ago is there now – and everything is smooth! We feel like having people over to stand around and look at the walls with us. Is that a thing? No? Ok, we won’t.
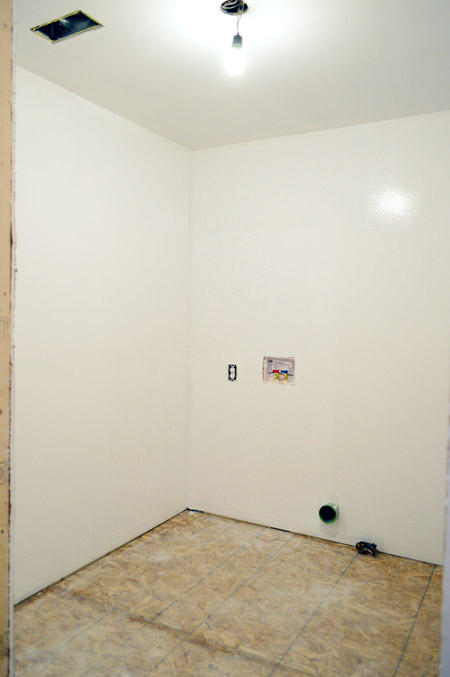
Here are a couple more before/afters for you. We’re really happy with how smooth the transition is in the hall too.
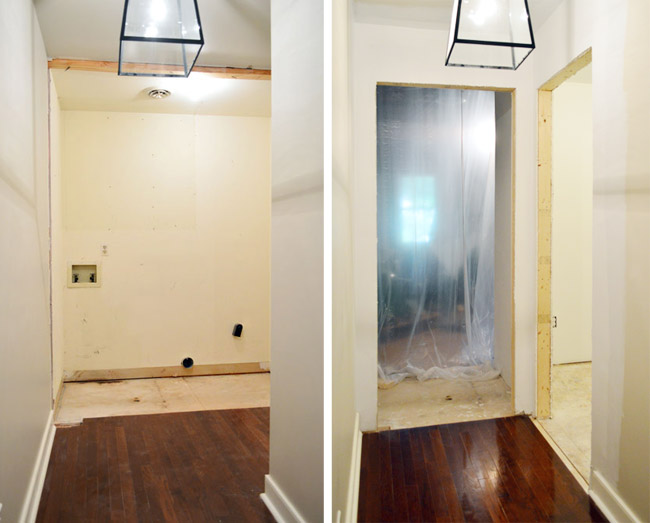
Here’s one last (waaay) before & after to show how this formerly dead end of the hallway has changed. It’s going to be funny to look back on old house tour videos and see a laundry closet there instead of a doorway.
Next up is painting and then installing the floor (we picked tile! more on that soon!). After that we’re debating whether we should roll the washer and dryer back in (at least temporarily) just to have them hooked up again, or if we should hold out to get a few more things done without them in the room, like hanging the doors and adding the molding. Decisions, decisions…

amanda says
I don’t think there’s a place to comment on teddy’s photo project – but I love when you incorporate holidays into the photo project Like when you had bunny ears for Easter for Clara / changed her circle on her onesie to a heart for Valentine’s day etc.. Was the star fabric on Teddy’s for the fourth of July?
YoungHouseLove says
Aw thanks Amanda! It was a red star swaddle blanket that we thought was a nice nod to the 4th :)
xo
s
Kirbee says
We are so far from any hard-core remodeling or building, so thanks for letting me live vicariously — and savor your triumph vicariously! I will be singing “the walls are allliiiveee!!” while I cut bagfuls of eggplant and cucumbers (freezer ratatouille and spicy fridge pickles are my life tonight).
Becca M says
First off, everything looks awesome! Drywall intimidates me for all the reasons you listed, so I really appreciated this tutorial :) My question is, how on earth are you getting this done with 2 little ones??? I have a 4 month old and I’m lucky to get a shower and 3 square meals a day. p.s. If the answer to this question is “our children nap for 4 hours every afternoon and then occupy themselves quietly til dinner”, go ahead and just don’t respond to me ;)
YoungHouseLove says
Haha, don’t you worry, that is not our secret… but wouldn’t that be magical? I feel a lot like you most of the time (there are days where all I’ve done is feed and keep the kids semi-clean, let alone staying on top of cleaning or getting to shower myself). It definitely helps that there are two of us (my full day job might be to take care of the kids so John can work on a project or book stuff, and the next day we might switch). We also really try to bang stuff out when they sleep (naps or for the night) – which might only be an hour or two when it comes to naps, and a few hours in the evening (like 8-10 after they’re in bed) but four hands are much faster than two, so we try to capitalize on those moments!
xo
s
Marissa says
I never have posted on a blog, but I just wanted to drop in and let you guys know how much I enjoy yours!! The writing is fun and interesting – and I love what you do to your home of course! Everything looks great and we just love using your ideas at our little house (a 50’s ranch – since I know you like those). Keep up the good work ( :
YoungHouseLove says
Thanks so much Marissa!
xo
s
Rebecca says
I can’t wait to see the afters! What a great upgrade this room will be for you and the new natural light…priceless.
Jamie says
Off the subject, what type of sheen did you use for your upper kitchen cabinets? I believe the paint was BM Advance. Love your blog!
YoungHouseLove says
Yes, it was BM Advance and we used Satin (it’s either that or semi-gloss and we like the satin look – also used that in our last house and it held up great).
xo
s
Sena dees says
Soooo I know all of this stuff is important, but it cannot WAIT for the fun stuff (flooring, painting, cute doors, etc!) ;)
Darlene says
Standing around and admiring your work is one of the perks of doing it yourself! I’ve done a storage room and part of a laundry area and will soon being doing some more in the family room. Like you, I watched lots of videos. Each time I start, I don’t feel like I know what the heck I’m doing but I dive right in and start to get the ‘mud mojo’ going and it turns out fine. Hats off to ya!
Erica says
I live in Texas and our houses texture is horrible! So bad it has scratched us! My mother in law has a scar on her finger that she got in the hall before we sanded down the hallway walls.
PS-I’m so excited to see how the other side of that room will look! Any ideas about the storage/future media room to share yet? Huh? Huh?
YoungHouseLove says
Yikes about that scratchy wall texture! So glad you sanded it down. As for the future media room, we definitely have been bouncing some ideas around (tv, big couch, bunk for sleepovers, storage along one wall so we don’t lose that function in there, etc). I can’t wait to get to that room!
xo
s
AshleyM says
Wow! Amazing! Do you go in there and just stand and stare? Because that’s totally what I would do.
Question for you- will your washer/dryer be taller than the hook-ups? Ours are at head/face height and I have no idea how to cover them. Maybe a wooden box/cabinet type thing? They are just such an unfortunate sight to have to look at all the time. Ha.
YoungHouseLove says
That stinks! Ours should be covered but in our first house they stuck out along with a bunch of plugs so we got to long narrow leaning mirrors and leaned them up against the back wall like sort of a mirrored backsplash. We had front loaders then with a counter so it was simple to just prop them up back there.
xo
s
Jeri says
Looking so good! I tackled wet sanding for the first time over the weekend. It’s in our bedroom and didn’t want to get dust everywhere. I used my grouting sponge and found it really easy, but the difference is I was doing it on walls that had already been painted (just patching). I’m theorizing that perhaps the pre finished surface helps it go more smoothly. Or I could be totally crazy.
YoungHouseLove says
Interesting hypothesis! I love it!
xo
s
Amber says
Looks great guys! Sooooo inspiring! That last pictured cued that song…”Leeeeeeeeeet the sunshine in, let the sunshine in, the SUUUUUUN-SHINE iiiiiiiin!” for me! Such a bright happy difference!
Carolyn Kelley says
I love these posts about the laundry room! I get so excited reading them because I secretly hope that someday I’ll have the confidence to try such a big project. My hubby and I became home owners for the first time in June and have put a lot of work into our home this summer. Thanks to your blog we have had the confidence to try a lot ourselves. Thanks for all the inspiration!!!
Christina says
Hi Guys!!! The laundry room is looking great! On a completely different topic I need an objective opinion. I KNOW you guys are kinda busy…like, a couple of kids, a blog, a book, etc ;) but any help would be greatly appreciated!! We are going to be building a new home, with a national builder, and have the option of getting an allowance for the flooring. The $2400.00 provided would barely cover our living areas with hardwood flooring (what we want), much less provide flooring for the entire house. So we have to make a choice and I can’t seem to think straight with all of the advice being thrown at me. First option: let the builder install their standard flooring options (carpet and vinyl- as we can’t afford to pay them to upgrade the flooring to hardwood)?? Second option: take the $$2400 and hope we find a great deal on hardwoods, install them ourselves and live with plywood flooring in the rest of the house until we can build up enough cash to install flooring in the bedrooms, etc??? Which would YOU choose? We are very tight on budget. Don’t want to be house poor and it would take us quite a long time to save up for new flooring. BUT…this will be our home for many, many years….whatcha think? Thanks guys!!
YoungHouseLove says
This is SO hard and I’m sure everyone will tell you to do something different, but we’ve found that once you move all your furniture in if you’re not happy with the floor it’s a HUGE bummer. We still regret not refinishing the floors in our second house before we moved in (we never got around to doing it afterwards). In your case if it’s possible to go with Option2, I think you’d save the money you would have spent on finishes you don’t even like (and get to put that towards hardwoods). Plus you’ll end up with a result you love, even if it takes longer and involves more legwork. Good luck! Oh and we have had good luck with Lumber Liquidators for inexpensive solid wood flooring.
xo
s
christina says
Thanks, S!! Really appreciate your input. Have a blessed day!
Natalie says
I know this question was for J and S, but I vote for Option 2! It would be so sad to spend a bunch of money on something you know you don’t love (like carpet and vinyl flooring). I think putting the money in hardwoods for one space and saving up to do the rest is a great idea! Plus, there are so many neat DIY painting tricks you can do with plywood floors in the meantime! Here are a few of my favs:
http://www.pinterest.com/pin/141581982010836376/
http://www.pinterest.com/pin/141581982010583374/
http://www.pinterest.com/pin/268597565249121588/
You should post pictures of your new place as you start building! Good luck with everything! :)
Natalie
SherryB says
wow! all those corners! just wow! you guys rock.
Sassafras says
“Maria, THESE WALLS were not meant to shut out problems. You have to face them. You have to live the life you were born to live!” ~~Mother Abbess, Sound of Music
THESE WALLS THESE WALLS!!! wOO-hoo!!!!
“The Baroness: Why didn’t you tell me?
Max: What?
The Baroness: To bring along my harmonica.”
Those walls and the light at younder window??? CERTAINLY von TRAPP TOE-TAPPERS!
Sassafras says
Younder??? ha. Yonder window, but I mix my theatrical quotes. Just looking at the hall photos and wondering…will Teddy stay in the nursery as HIS big boy bedroom or will it be reserved as nursery and he go onto the bunkroom??
YoungHouseLove says
I think we’d love the bunkroom to be a joint space for kids, TV, sleepovers, toys, etc :)
xo
s
Natalie says
Yay, walls! You guys are good!
Quick question: What do you do if you’re moving into a house in which they clearly had NO IDEA how to install the corner tape, leaving the 1″ of wall by the seams all bumpy and crazy?? :( Is this something I could sand and respackle? Hellllp!
YoungHouseLove says
Oh no that stinks! Maybe you can sand and then skim coat (spackle, sand, spackle, sand) until it’s smooth? Anyone have tips for Natalie?
xo
s
LisaOK says
Looks great! Did you need to get permits? If so, how did that work since you played the role of general contractor. I’d love a post on that subject!
Thanks!
YoungHouseLove says
Oh yes, permits are necessary for this type of work! Thankfully when you use subs you can negotiate who pulls them, so we had our licensed and insured electricians, framers, and plumbers pull the permits they needed. Some sub-contractors are more likely to make you do all the permit work (we did them ourselves when John built the deck, so you can read about that experience here and here). You can usually check your county’s website for a list of things that require permits and give them a call if you have any questions.
xo
s
StablWall Carbon Fiber says
Wow, what a difference in that last pic of your hallway. Incredible! You guys did an awesome job :)
Jill says
Silly comment…in one of the pics, it looks like John’s wedding ring is sliding up to his knuckle. I work for a jeweler and that’s why it caught my eye. I would hate for you to loose it. If it slide around a lot and bugs you, you can have beads put inside that help it slip over the joint and stay put around the finger. If it doesn’t bug you or slip off, no worries.
Thanks for all the great info. I didn’t do as well of a job as you did on our bathroom, but will keep this post in mind as reference in the future.
YoungHouseLove says
Thanks Jill! We’ll look into that!
xo
s
Heather MacFeather says
OK, I LOVE the photo/caption. I might have to print it off, frame it, and hang it on one of my newly isntalled walls that I built myself. Do you charge royalties?
YoungHouseLove says
Nope, have at it!
-John
CrystalB says
I think it’s funny that you were so afraid of drywall. We live in a 1950’s house and all of our exterior walls are plaster while our interior walls are mud over wire. None of the walls in our house are straight or perfectly smooth, so I don’t really care about ridges and such. We recently redid our bathroom and added new moisture resistant drywall. I enjoyed the mudding and sanding WAY more than the painting.
Robin says
I have been looking at framed walls for months… you make this seem so easy! ( I kid, I kid)
Anne says
I can’t remember seeing this step here in Norway (could be wrong though), so I just have to ask: what’s the main function of the paper tape? Since you have a layer of mud both under and over the tape, it seems like the mud really is doing all the work on it’s own? I would get it if you glued on the paper tape with something other than mud, before you put on the mud. I’m really curious about this step!
YoungHouseLove says
Tape is an important part of the fusion process. I wish you could just mud, but the tape stabilizes it and keeps it from flexing/cracking/flaking out over time. Sort of like the spine that holds everything together :)
xo
s
Bianca says
I was wondering if you guys have to get a permit for this project(maybe you addressed this in a previous entry and i just missed it- if so, sorry). My husband and I are doing a big kitchen remodel and going through the whole permit process. It has been kind of nerve wrecking. Just was wondering what your experience was so far with the building safety department. I know you got a permit for your deck you did at your last house.
YoungHouseLove says
Oh yes, permits are necessary for this type of work! Thankfully when you use subs you can negotiate who pulls them, so we had our licensed and insured electricians, framers, and plumbers pull the permits they needed. Some sub-contractors are more likely to make you do all the permit work (we did them ourselves when John built the deck as you remember). So sorry yours have been nerve-wracking! The deck was kinda scary but when it was done it was such a relief!
xo
s
Bea says
This post is fantastic, especially the tips re the wet sanding. I can’t wait to try it as I am repairing 1974 walls before new painting. Plus you have given me so much MORE confidence about tackling mudding/taping. Had drywall put up with a new wall for a closet earlier this year and the contractor did the mudding, etc., and there are so many flaws, I try not to get sick about it any more. Now I know more tricks of the trade. Will only hire real drywall finishers to do that from now on but I can tackle the repairs myself with more confidence. Love smooth walls. Hate orange peel or texture. My house is 1974 Seattle and it’s all smooth wall. Only need for texture, IMHO, is to hide imperfect drywall jobs and imperfect drywallers LOVE that choice.
Tara S says
John, I’ve been following this project like crazy. You seriously have done an amazing job in this room. It looks professionally done. My husband and I are renovating our master bedroom right now. We are trying to do as much as we can ourselves (demo the popcorn ceiling, painting, put down hardwood floors) and contracted out some major things (install new drywall on ceiling, build 2 walk-in closets). Its coming along really well and I’m very excited. Also very grateful to have a guest bedroom to live in during the renovation.
My question for you is what did you do to prep the newly sanded drywall before the priming. I’m sorry if you covered this. Did you just use a dry towel? Did you use a slightly damp towel? Vacuum? This is the point we are at right now. I’ve vacuumed the walls like crazy but it still feels like there is dust. How clean did you get it before you primed? Thanks for the advice.
YoungHouseLove says
We did two damp towel wipe-downs and then went straight to primer. Once the primer dries there’s no more dust – it’s amazing. And once the paint goes on it’s even smoother and more finished. Hope it helps!
xo
s
Tara S says
Great! Thanks, Sherry. Now I know what I will be doing tonight. Wiping down the ceiling is the hardest part.