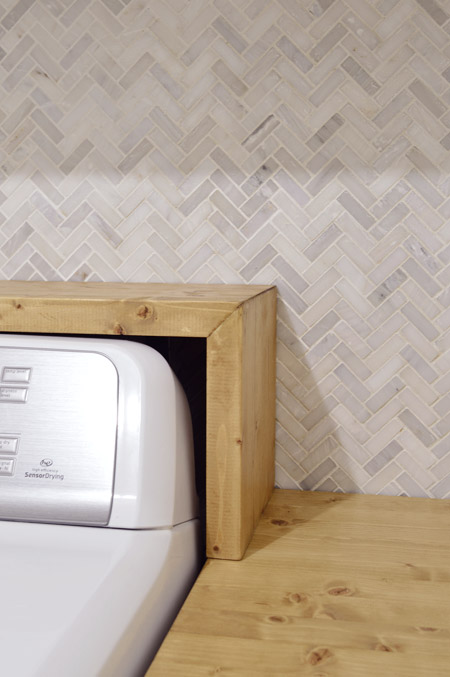
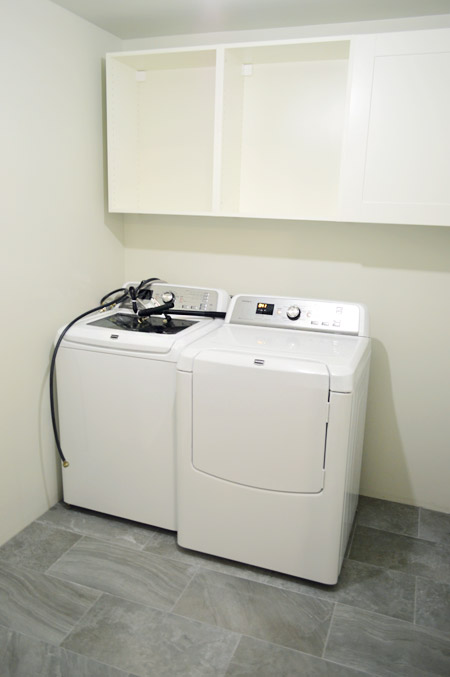
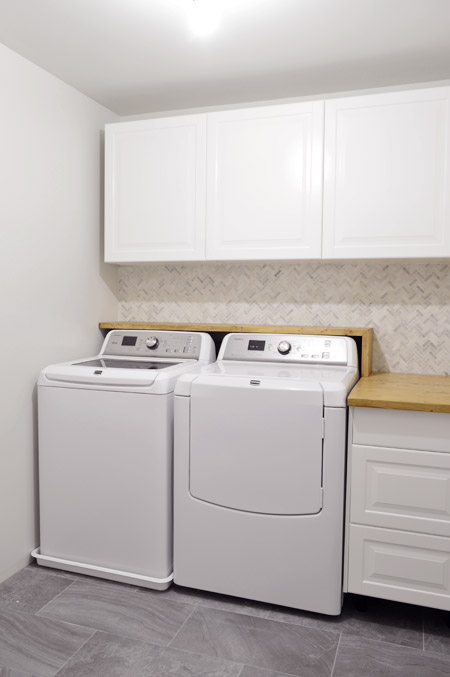
That’s right. You can call me T-Boz. Let’s talk about our new shelf in the laundry room, which is sporting a sweet arm band waterfall edge and some light natural stain. It was a simple DIY project involving some wood and some stain/sealer for a butcher block like effect.
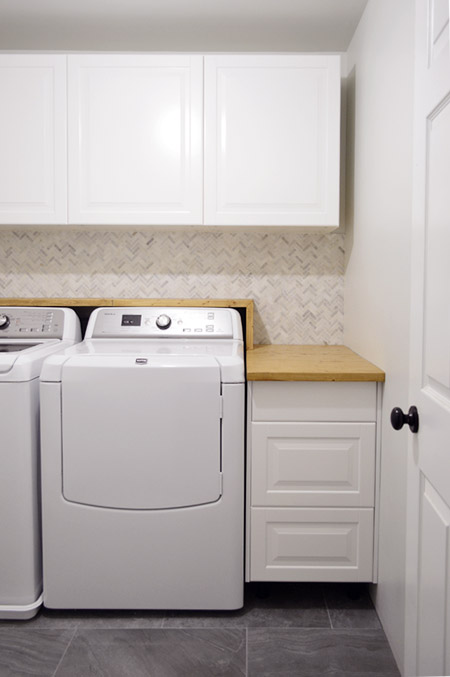
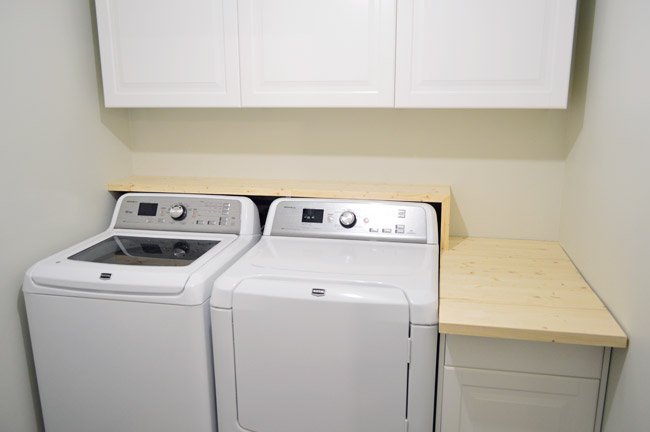
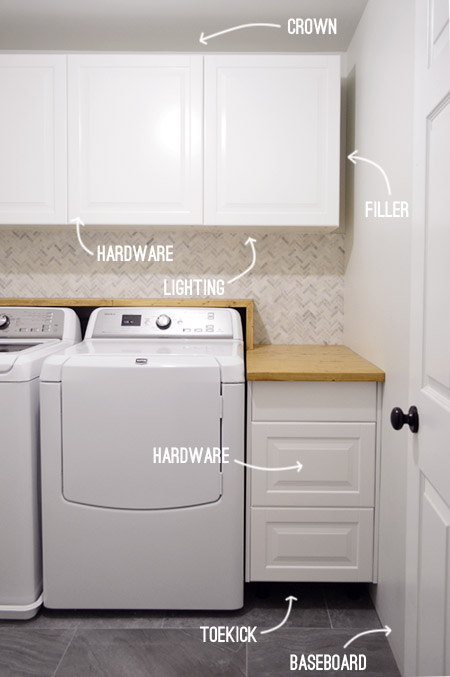
We deviated from our usual mocha stain choice because we were inspired by a few rooms we’ve seen with light cabinets and tile mixed with with natural wood to add some texture and warmth. Here’s a wider shot for you. Ignore the missing filler/crown/toe kick/baseboard/hardware situation. We’re also chasing that stuff (you know, along with the waterfalls).
But first we have to talk about installing our appliances since I meant to cover that a while ago. It wasn’t all that big of deal since it was just re-attaching what I had unattached during the demo process. But one challenge was setting the washer pan under the washer and attaching it to our new overflow drain, so I thought I’d talk through how we did it (we couldn’t find many detailed tutorials about that step). The washer pan is the thing that usually sits under a washing machine when it’s on the second floor – that way if it springs a leak, the water hopefully won’t flood your upstairs, rot the floor, and send the washer plunging through the joists onto something valuable below. A nightmare scenario, no doubt, but in my head it always plays out like some Wiley Coyote cartoon. Either way, it’s not something I want to experience.
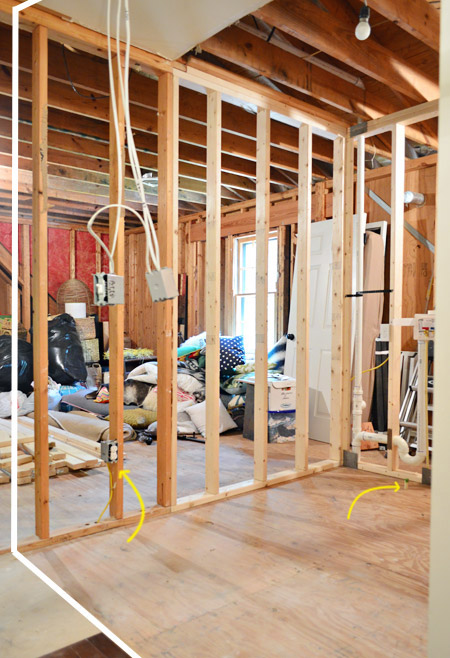
All of the contractors & plumbers we talked to actually said it was an optional thing to have a pan and an overflow drain (there’s no code dictating it in our area). One even told us that he wasn’t sure it made much of a difference (his opinion was that if your washer’s gushing water, a pan and a drain aren’t going to do much). We heard from others that it can save you a ton of trouble for those slow leaks you might otherwise miss, so we decided to be better safe than sorry, and had the plumbers put one in when they were here moving all of the other hook-ups (it was included in the $375 plumbing fee). Note: a few folks have asked about the outlet situation in the room, so you can see the extra pair we added in this shot too.
Some of you noticed that we cut around that overflow drain as we laid various levels of flooring (for example, you can see it poking up in this thinset shot from this floor tiling post). The drain was set in a way where we could gently raise or lower the pipe in the garage ceiling below, which came in handy so we weren’t constantly tripping over it.
When the plumber left us the washer pan, he shared instructions for attaching it ourselves. But first we had to figure out the exact placement of the appliances so we could precisely set the pan.
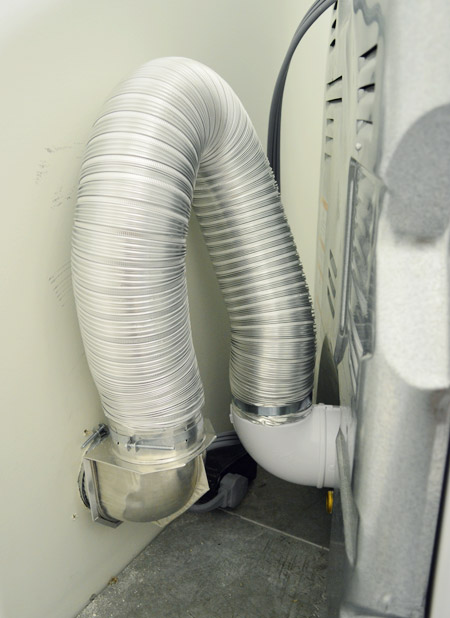
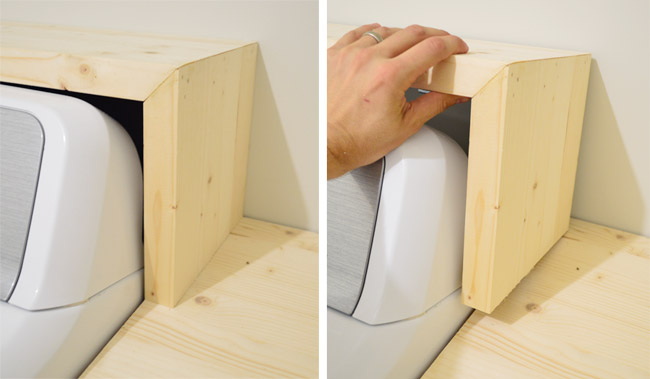
The washer would’ve happily sat nearly flush to the back wall, but the dryer’s a different story. During an installation, leaving some excess semi-rigid ducting behind the dryer is recommended so you can easily pull the dryer away from the wall without violently yanking the duct out of the wall every time it comes forward. That ducting takes up some space obviously (it’s pulled out below to show you it a bit more clearly, but even when it’s nested more closely, the dryer sits out about 8″ from that back wall). Note: they sell systems for sinking the ducting into your wall (between your studs) so it doesn’t protrude, but all the systems we found called for a vent that went up to the ceiling and ours goes straight out under the attic stairs (more on that here) so they weren’t compatible.
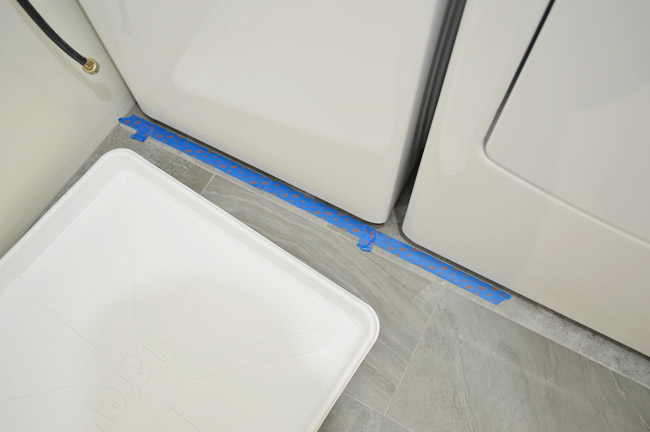
Thankfully that vent-space behind the dryer wasn’t a big deal to us since we expected it and had already planned the shelf. And after finalizing the dryer placement, we could finally determine where the washer should sit so it matched that depth exactly (didn’t want the washer pan sitting too far in or out). We marked the line on the floor with tape so that when we pulled the washer out again, we knew exactly where to place the pan.
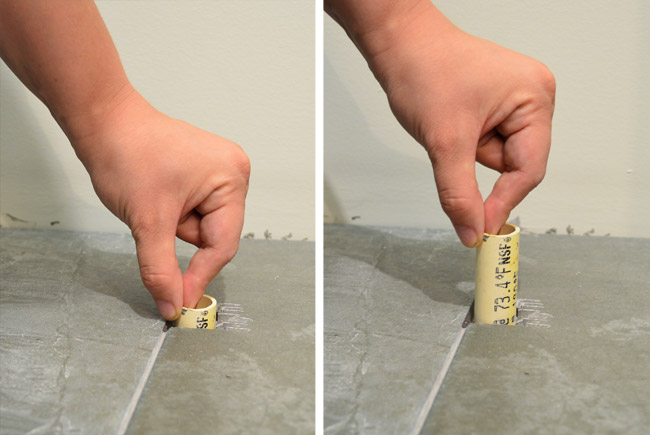
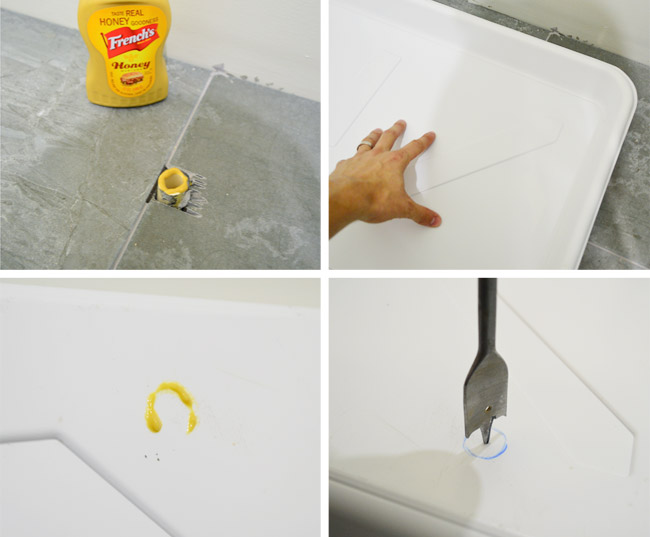
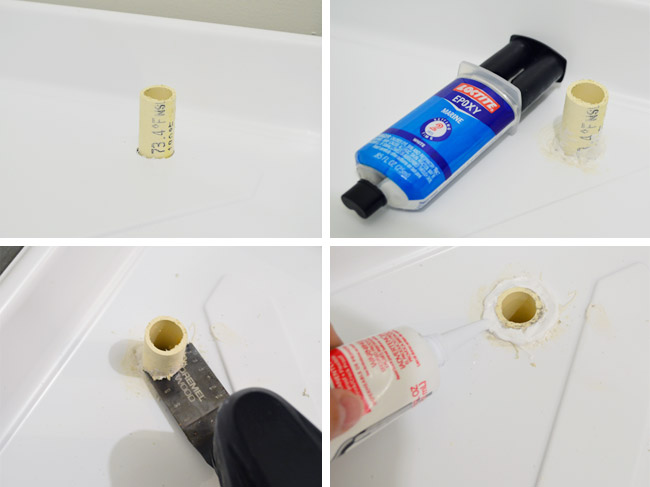
To cut a hole in the pan for the drain, the plumber recommend this suuuuuuper scientific method that involved mustard. Squirt some on the drain pipe, press the pan into it (while using the tape in front as a guide for where to place the pan), and then drill where the mustard left its mark. I marked over our mustard circle with Sharpie, since the “real honey goodness” was a bit overpowering odor-wise (at least when it wasn’t accompanied by a hot dog or something).
Once the pipe was in the pan, we had been instructed to “silicone caulk the heck out of it.” I didn’t feel totally comfortable relying on caulk as our only adhesive (silicone caulk has some flex to it and we worried the weight of setting the washer down in the pan could flex it loose right off the bat) so I talked it over with another plumbing guy and an employee at Home Depot and they both suggested an expoxy, like this Marine Loctite (marine = crazy waterproof). So I glued the pipe and pan together, let it dry overnight, cut off the excess pipe with my dremel (you need the pipe to be as flush to the pan as possible so the water can drain down it) AND THEN silicone caulked the heck out of it – just to be safe.
Then it got interesting. I don’t have any pictures of Sherry and I hoisting the washer over the lip of the pan into place, but I’m sure our faces were super attractive. Somewhere in the vicinity of strained and extra veiny.
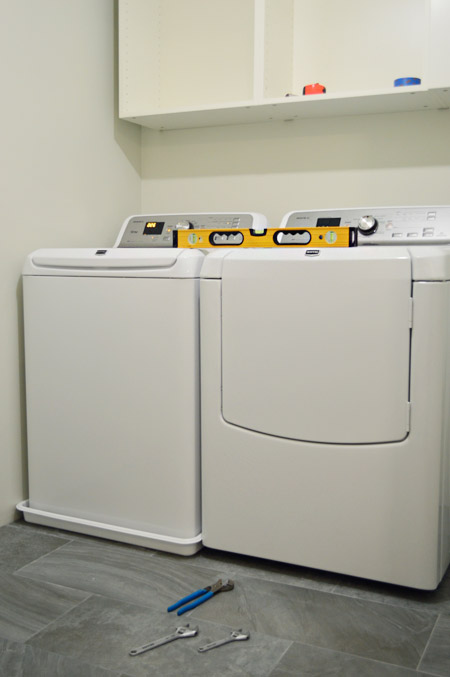
There was also some adjusting of the dryer feet to get it level with the washer – not only did we want the front of both appliances to line up, we wanted the tops to be the same height as well (hence the level and those wrenches you see one the floor in the picture above). And when it did it was sort of like we hit the jackpot. There was celebrating. We finally had a washer & dryer again.
Speaking of other small adjustments – in our post about the Ikea cabinets a few of you recommended getting the soft-close drawer and door add-ons, so we planned to grab those the next time we were near Ikea. Then, in an exciting hinge-related turn of events, about 12 hours later we happily realized the Ikea lady must have added them to our order, because they were in the bottom of our bag with all the under cabinet lighting stuff. I’d estimate the drawers and doors are now approximately 35 times less slammy. Well worth the upgrade.

But back to the shelf. You may recall that we built it before tiling so that we knew exactly where our tile needed to go.
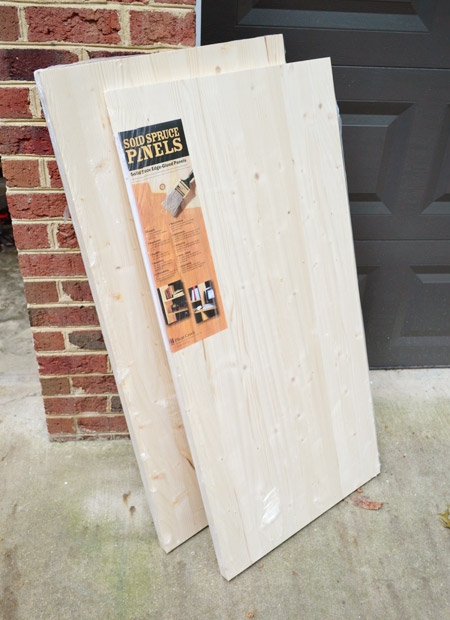
We constructed the shelf and counter out of two of these solid 2 x 4′ panels from Lowe’s. We liked ’em because they were chunky (1.5″ thick) and had that nice butcher-block look to them.
We used one panel for the shelf and one for the counter. For the shelf I cut one panel into two 9″ wide boards and then we Kreg jigged them together into one long shelf. The counter involved cutting the other panel into two 18″ wide pieces and jigging them together. I didn’t cut off the excess counter until after the tile was installed since I wanted to be sure to get the overhang right (so you can see it hanging over too far in this picture).
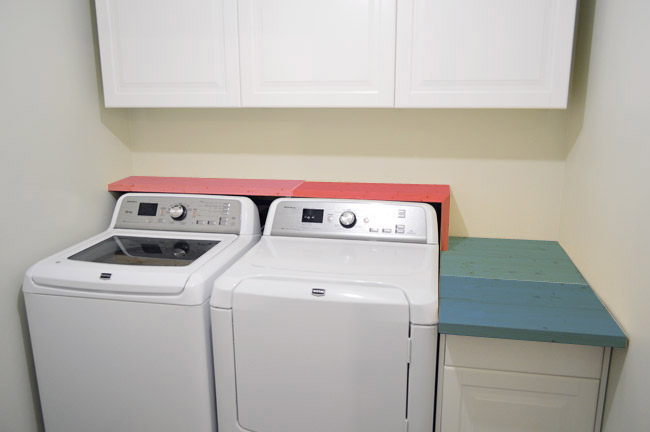
The waterfall edge came from cutting the end of the shelf off at a 45-degree angle and then gluing & nail gunning it together again at a right angle. Since it’s attached to the shelf (which we made removable so we have easy access to the appliance hookups when we need them), I just measured carefully so that it would rest on the counter and line up nicely on the left edge, to make it look like one piece. The top of the shelf doesn’t rest on the appliances, it rests above them on four heavy duty brackets, which you can see better in this post (three of them were screwed into studs to make them extra strong). We didn’t want the washer to shake the shelf and knock things off as it ran. We’ve done three pretty big loads of laundry and so far, so good.
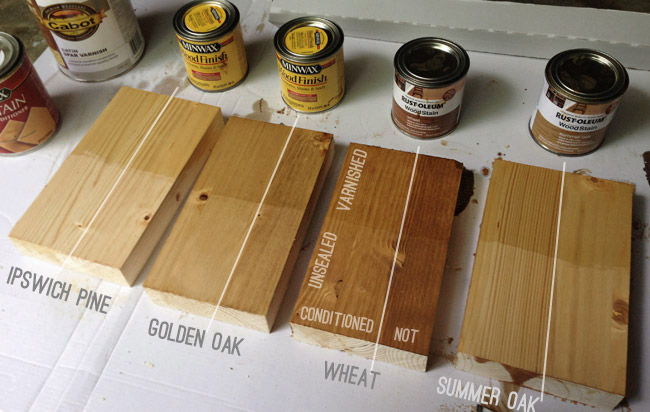
Since we don’t have a go-to lighter stain preference, we tested out a bunch of options on some scrap pieces from the shelf/counter build. Sherry pre-stained/conditioned half of each, then stained the whole block with one of four colors (two by Minwax, two by Rustoleum). Once dried, we pained some varnish on the top half of each – but it made them more yellow than we wanted, so it quickly got nixed. Of course the nuances are easier to see in real life, but we thought Ipswich Pine and Summer Oak looked a little too light and Wheat was a bit too dark/red for us. So Golden Oak was a pretty easy choice.
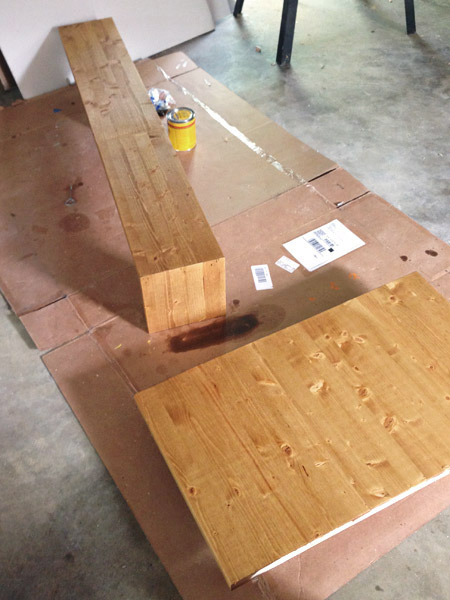
We applied one coat of stain, followed by three coats of Safecoat Acrylaq, which is what we used to seal the wood vanity top in our first house’s bathroom (it held up so well to water in there that we knew it would be great in a laundry room).
I’m stoked with how it turned out. I think it’s exactly what the room needed, and it’s exciting to start layering things in over the light & bright foundation of the cabinets and the tile. Admittedly our shelf looks a little lonely right now, but we’re just getting started…
So we still have some loose ends to tie up on this wall (here’s my visual checklist of sorts), but on the bright side – we got the door hung!
And the fancy glass one that leads to the future bunk-room is in the works, so we’ll hopefully finish that up and have the details for you next week. It bears mentioning that we’ll also be adding things like a laundry sorter, a pull-out drying rack, and a wall-mounted ironing board on some other walls of the room, so those details should be coming soon too.
This feels like a good moment to do a budget update, so here you go:
- Framing (labor & materials): $360
- Electric (labor & materials): $400
- Plumbing (labor & materials): $375
- New dryer vent: $87
- New HVAC vent: $59
- Drywall & insulation: $298
- Drywall mudding: $84
- Sub-floor materials: $30
- Tiled floor: $451
- Ikea cabinets & under-cabinet lighting: $862
- Appliance re-install: $15
- Tiled marble accent wall: $281
- Shelf & counter (including stain testers & stain): $97
- TOTAL: $3,399
The two contractor estimates that we got for just the framing, electrical, plumbing, and drywall stuff came in at $3,250 and $5,000, so it’s incredibly comforting that we’re still on the low end of that range after adding a marble backsplash, tiled floors, cabinetry, and a shelf/counter (including some upgrades like soft close doors and under-cabinet lights). That being said, we’re almost exactly double where we were at our last check-in because we hit our big ticket items like tile & cabinets. But hopefully once we’re past the door and trim/crown installation we’ll be at the end of our major expenses. Dare I say this new room of ours (and reconfigured bunk-room entry) might clock in under the $4,000 mark?
That sounds like a jinxy thing to say. Maybe I should play it safer? I’m certain we’ll come under the $100,000 mark (now I really hope I didn’t jinx myself).

jen says
Just like the purses at the Emmy’s I wanna know what you keep in laundry room drawers. I get the cupboards, not getting what you do with drawers in there.
YoungHouseLove says
We’ll bare all soon! I love drawers for everything from stain pens and lint rollers and dryer balls to a little pull out trash bucket for dryer lint.
xo
s
Julia [Chris Loves Julia] says
Just wanted to pop in and say I love the way this is coming together! And fresh stain choice! We are experimenting with different stains besides Walnut and I find myself loving so many options and loving them even more that they are out of the ordinary. I’m strangely excited to see what hardware you choose. I have a thing for hardware.
YoungHouseLove says
Thanks Julia! I always love your stain choices! Those floating shelves in the deep green room = amazing.
xo
s
Sam says
Long time reader, first time commenter here.
I see you’re copping flack for the light stain today. I personally think the stain looks good, but I’m not loving the waterfall edge. I think it would look better to just have it as a stand alone shelf rather than giving it that semi-connected look.
I’m also from Australia (land of the laundry sink) & just had a question regarding clotheslines. I know the Hills Hoist was invented here, but do people in America not use them at all? I’ve read lots of USA home blogs & many comments about how nice it is to have the laundry upstairs. As someone who puts everything on the clothesline outside I think that would be a hassle, so it’s got me thinking that it’s not standard for you guys.
YoungHouseLove says
Here a lot of people have drying racks and stands (I have seen a few clothes lines but they don’t seem too common). I love the smell of things dried outside though! I used to lay things out on the daybed at our first and second house, and have done it a bit with the new outdoor sofa here too! Cloth diapers end up in windowsills sometimes too ;)
xo
s
Anita says
Gosh, I’m so impressed! You created something (beautiful! useful!) out of nothing! So inspiring.
Also just wanted to say that you both are so classy and well-spoken in responding to critical comments, or comments from readers who disagree with design choices. You never fail to be positive and graceful in your responses. Again– I’m impressed.
xo, Anita
Laura says
I have an IKEA kitchen and laundry room.
Be aware that any moisture will cause the shelves to lift (split, delaminate?)..ie a dribble of water that gets into an edge causes them to swell and delaminate.
I love them. But had to tell my cleaning lady to stop cleaning them every week.
I also have IKEA Pax wardrobes. I an a huge IKEA fan, but you can’y get anything wet.
YoungHouseLove says
Thanks Laura!
xo
s
Lisa says
Just wondering if you considered installing just a regular drain on the floor, instead of doing the pan + drain. I think this was in my parents bottom-floor laundry room growing up–is this an option with second-floor laundry rooms? I agree that the pan isn’t my favorite look. With the floor tiled, I imagine a regular drain would address any flooding concerns and require only minimal clean-up if a leak occurred, but maybe it isn’t a viable option for some reason.
YoungHouseLove says
All the plumbers we talked to installed pan + drain systems, so I’m not sure if a floor drain would be a lot more complicated (involving some slope to the floor or something).
xo
s
Megan says
I like your laundry room as well as the timber that you’ve used and it’s stain. One thing that I thought would look great in there is peg light you had in you previous house. I think the pegs and the natural timber look would work well together. Can’t wait to see the room all finished. xx
Bonnie says
Hey there! I love what you have going on with your laundry room. Tremendous job, as usual.
By the way, did you know that your book is “featured” on Anthropologie’s website in one of their bookend pictures? I loved the whale bookend and then started to read the titles they were using. At any rate, I had to let you know in case you weren’t aware. :-) So fun. Here’s the link:
http://www.anthropologie.com/anthro/pdp/detail.jsp?&navAction=jump&id=27210285&color=040&cm_sp=PRODUCT_DETAIL-_-RECOMMENDATIONS-_-27210285#/
YoungHouseLove says
Ahhh, isn’t that crazy!? You’re so sweet to share the link, Bonnie!
xo
s
Kat says
Hi! Love love love that tile – this room is coming along beautifully! Question about the shelf tho- it was always my understanding that a ” waterfall edge” meant that the material in question went down to the floor. See here:
http://ths.gardenweb.com/forums/load/kitchbath/msg0822093316804.html
So not sure what makes your shelf a waterfall edge? Way interested in design so I’m just curious!! Thanks guys!!
YoungHouseLove says
Thanks Kat! We hear that when stone or wood wraps over something and down the side (like a kitchen island) they call it a waterfall edge – but I’ve never heard that it needs to touch the floor to meet that description (always thought since the term has “edge” in it, the 90 degree turn of the same material is the distinction). For example, the island in this kitchen is described as having a waterfall edge but it doesn’t reach the floor. I’m certainly not an expert on the term though :)
xo
s
Kate says
Did you ever think of bleaching or whitewashing the wood? I think that would achieve a less yellow look and still keep the warm/textured vibe. (Sorta like your breakfast nook table). Kudos to something new and less predictable. Keep up the great work.
YoungHouseLove says
We did debate the vinegar aging or bleaching/whitewashing but thought it might still be too cool. I’m hoping once we layer in other warm things (woven baskets, etc) it’ll be a nice mix of cool stone and sleek cabinetry with honey tones to keep it cozy. We’ll see how it goes…
xo
s
rashmi says
Just a suggestion, Why don’t you add a drawer on wheels instead of a toe kick, just enough space to keep stuff like dryer sheets etc.
YoungHouseLove says
Didn’t even think of that! Not sure if we need more storage after the uppers and those drawers but if we do that would be fun to add. A little secret stash spot!
xo
s
kimi says
LOVE the stain color!!! Ive been really digging light stain!! Great choice!! Its all looking so very beautiful!!
Chris says
Many many many years ago my Grandmothers lived in Astoria NY and had drying racks in their bathrooms much like this one I just found on line.
https://www.thegrommet.com/the-new-clothesline-company-lofti
Maybe this could work for your laundry room.
YoungHouseLove says
Really pretty!
xo
s
Evie says
I love the look of this room that didn’t even exist a short while ago! I have a smoke alarm question that until today I’d never considered. Do they make smoke alarms that live one place and ring two places? I mean, you’re going to have one inside the laundry room, but wf the door is closed you’d never hear it downstairs.
I clean my dryer filter every load, and my vent is short and through the wall, but in a month the opening on the outside is caked with packed lint that I dig out by hand. Tp be/feel safer, I disconnect the vent inside ans check it there, too, but the packed lint is always at the last few inches where the vent exits the wall. My friend’s neighbors’ house burned due to their dryer vent, and I’m very cautious since then and have been shocked at how fast the lint packs and narrows the vent.
YoungHouseLove says
We really love our alarm system since every fire alarm is hard-wired into the system (if one goes off they all go off). It’s even connected to the local fire department which gives me really nice peace of mind when we’re gone. I don’t know if they sell individual smoke detectors that are all connected like that without being wired into an alarm system though. Anyone know?
xo
s
Jennifer says
Off topic but when you guys were posting like superhumans before Teddy’s arrival you would often write “no post tomorrow” or “to send you off into the weekend” etc in your texts and then I would know I didn’t need to check the next day. I love your blog and completely understand posts why posts aren’t posted at the same time or always on the same days but I keep checking back and it’s definitely easier knowing if there won’t be anything new to expect.
YoungHouseLove says
Sorry to leave you hanging Jennifer! Our new schedule for the past few months has been to post on Mon, Tues, Wed, and Thurs (and no post on Friday, with a giveaway in the Wednesday spot). Of course for holidays (like Monday) we try to spend time with the fam, but that has been the tradition since BT (before Teddy, haha!). And very rarely there’s a bonus Friday post (like a Clara Conversations one). Hope that helps!
xo
s
Jen says
Just wanted to add another vote of confidence for doing something less predictable stain-wise. If, once everything is done, it doesn’t fit with the room exactly how you guys want, it’s an easy change to make. But in the meantime, hurray for experimenting :)
Tiffany H. says
I love that color. It makes me want to pet it. Making a dedicated washroom is on my “list” of things to do. I think it might have to move up the list. Right now our washer/dryer is in the dining room. Not in a closet either. In a little “cubby.” So you can see them. All…..the….time. I’ll never understand how that could make sense to a builder. I can imagine the conversation going something like this:
“Hey Fred! I don’t see a washroom. Where do you want me to install the washer & dryer?”
Fred looks at the blueprints for a minute, “Put it in the dining room. That way they can fold their clothes at the table.”
Not sure, but that has to be the ONLY good reason for putting it there. Thanks for the inspiration!
Heidi says
Not sure if this was mentioned but the song was influenced by Paul McCartney’s song Waterfalls from 1980. Sir Paul apparently decided not to sue. https://www.youtube.com/watch?v=sYstxLoOnYA
YoungHouseLove says
Never knew that!
xo
s
Christine says
First time poster, long time lurker!
First of all, love the way the laundry room is shaping up! I know it will all come together once you guys accessorize the space – it always does!
We just moved into our first home and I’ve been using the blog and your book like my bible haha. My husband will say “is that what Young House Love would do?” (he isn’t on a first name basis with you guys like me haha!) when I suggest something or pick up a certain product.
I’m employing the list method (Sherry-style) for putting all of the projects we want to do in one place – so overwhelming! How do you guys keep from freaking out about the very, very long list??? Even if you do break it up into small, manageable chunks? We’re furiously trying to get a lot done now when it’s all exciting and we have the “yay our house!” motivation, but I’m scared once we settle in a bit it will be hard to complete the list!
YoungHouseLove says
Hide the list! Make it and then circle the next ten things you’d like to attack and rewrite those on a short list. Makes it easier :)
Our first house took us 4.5 years, so that helped us realize it doesn’t happen overnight and it’s easier to let go of that expectation.
xo
s
Kelly says
I for one ADORE the stain color. I know the current trend is to graywash EVERYTHING, but that just gets to looking institutional in small, utilitarian rooms with no windows (like laundry rooms!) I also feel like mixing cool and warm tones is much more sophisticated design-wise than following current color trends to the letter. Remember when people redecorated their ENTIRE houses with turquoise and chocolate? And remember how many of those people had to redecorate their ENTIRE house when the trend changed? Mmhm.
Christina says
I think I’m in the minority here when I say that I like the natural stain for the counters. It’s unexpected. And I think that’s why we all love you guys so much: we get a definite sense of your style but you always throw a little curveball for some excitement. This is the middle of the process and I think once you layer in more pieces, a natural wood something else, it will all make more sense.
Also, maybe I missed this, did you seal the counters somehow to protect them from moisture?
Christina says
Never mind, I spoke too soon. Hurrah for Safecoat Acrylic!
jenny says
Personally I like the natural tone of the wood. I think it just needs something to help it tie in to the rest of the room…maybe some wooden frames on the wall? I think I already saw a picture of a woven laundry basket somewhere, that will help too. I’ve doubted you before too when I’ve seen in-process pictures, but you always do a great job so I’m sure it will look nice no matter how you do it.
Also, this isn’t really related, but have you considered doing a rock box again for teddy or are you going to try something different? I was browsing some past posts and happened to notice a mention of it. How do you decide which things you want to carry over from past houses and which are worth changing up? Do you ever find yourself not posting about things or not wanting to do things because of your blog and because you’ve already done it/written about it elsewhere (this is your job afterall, I can understand pressure to keep it fresh!)
YoungHouseLove says
We typically redo whatever we love and sometimes only mention it in passing (like creating a compost pile at each house or installing a water saving dual flush function to the toilet). We were chatting about the possibility of a rock box here but John really wants to build/adapt a play-set, so that might top the list.
xo
s
Susan Jacobs says
I’m going to chime in along with the rest of the folks who would have preferred a different shelf color. In the picture it calls too much attention to itself. Maybe it’s different in person? I will suspend my full judgment until you add all the finishing touches, and maybe everything will tie together in that way that only Young House Love can foresee.
Jennifer says
I had some extra time and skimmed your comments to this post. I just want to say thanks for blogging about your home, DIY projects, and important events in your life. It takes a lots of effort to complete all your projects, write the posts about the projects, and give us insight to why you choose option A opposed to B or C. While not everyone will love every design choice, it’s YOUR beautiful house! Thanks for handling all the criticism with grace!
Deodua says
Wow, that is a cool and clever concept which is also very handy.
stacy says
The light color doesn’t look finished to me. But…this may be the first thing EVER in all of these years of following you, that I didn’t like!
Christina says
Hey y’all… just wondering if your cabinets really do match the Benjamin Moore Simply White. That is the color we are using for our trim in the house. This would certainly seal the deal for Ikea cabinets if it were to be a perfect match.
YoungHouseLove says
We haven’t hung any painted crown against them yet, but we hung the door (which is Simply White) and it’s extremely similar!
xo
s
Tiffany says
I think it looks great! But, I haven’t been able to stop singing ‘don’t go chasing waterfalls….’ for the past 30 minutes! haha
Lane says
The lower part of the cabinet is dark. Why? the washer and dryer are white, the darker gap off the floor draws too much attention. The top and bottom cabinets are not aligned.The top cabinets need filler strips. The wood counter doesn’t work because it sticks out from all white background and it’s too deep. If the counter didn’t have all that woodwork around the washer and dryer it might work, but it doesn’t work, unless you plan to add color in the decor to balance out the irregularities of the counter. Pretty, but the proportions are lacking.
YoungHouseLove says
The lower cabinet is the same color as the uppers, so maybe it’s just the pics? We mentioned filler pieces are coming as well as a toe-kick for the lower shelf, crown molding, baseboards, etc (see the picture that John drew words all over?). We’ll also be adding color and more of that wood tone with functional items & finishing touches. This room is only partially assembled, so there’s lots to come! Can’t wait to see it all finished up :)
xo
s
Ashlee Olson says
I just wanted to say how much I love that you have a top load washer. Every laundry room you see now days in the magazines all have front load and it makes me feel like I can’t have a lovely laundry room without front loaders. But yours is gorgeous! So thank you for giving me a little hope.
YoungHouseLove says
Aw thanks Ashlee! We love our top loader!
xo
s
Jen says
Longtime YHL reader and bookowner here, first time commenter. As someone who usually opts for darker stains, I was surprised at how much I like the lighter stain. It reminds me of the West Elm mango wood pieces that I love! Can’t wait to see this all put together.
Also re: the boards used to make shelves. I’ve not looked at these at HD before, but am now considering them to use as floating shelves in a small bathroom; the chunkiness is about what I had my eye on. The dimensions are weird (10 5/8 d x 32 3/8 w) and ideally something like this would allow us to cut to specific measurements, wtihout the wierd innards that come with hacking IKEA Lack shelves. Any thoughts on the weight of the spruce panels (to be loaded down with towels, toiletries, other fun bathroom-y things)? Is it totally nuts of me to convince my boyfriend that, “Yes, we CAN figure out how to hang these unassuming boards as perfectly sized floating shelves in this tiny bathroom!”? He may tell me to stick to the rivers and the lakes that I’m used to.
I did search and found the “Build it with Ana” post with the hollow shelves. Perhaps that would be an alternative if the spruce is just too heavy. Thanks in advance for any input!
YoungHouseLove says
Hmm, the hardest part would be supporting them (we have four heavy duty brackets to hold them up). Maybe try using some thin metal brackets and painting them the color of the wall so they blend in under the shelf? That way you’ll get that chunky floating look but they can bear weight? Otherwise I’d do it the Ana way, since they hold themselves up without needing brackets.
xo
s
Jen says
Thanks so much! We’ll see what we can find in the bracket dept/do some experimenting/try our hand at the Ana way and see what we come up with. :)
Amanda B. says
Wonder why the pro recommended mustard here instead of the similar trick with paint you used when doing the drywall? Seems weird to grab something out of the kitchen instead of the toolbox. Why not use grape jelly?? :-P
YoungHouseLove says
Or peanut butter! Mmmm!
xo
s
Angie says
I LOVE the light stain. It looks so pretty!
Is there a product # for the spruce panels? I have been looking for something like them, but can’t find them in that size anywhere around here in Canada. Im about an hour and a half from the Lowes in Ogdensburg, NY and would make the drive if I knew they had them. If you could provide me a product # or something, so I can call that would be amazing! Thanks!
YoungHouseLove says
So sorry, we don’t have that on hand. Anyone have any info for Angie? Maybe try calling the Lowe’s and describing it to see if they have it in stock?
xo
s
Cathi says
You mentioned you had run a couple of big loads and that none of the regular spin vibrations were causing issues with the shelf. When I looked at the pictures the first thing I thought of was the unfortunate situation with the unbalanced load. I’ve found myself running downstairs when you hear the bang bang bang and find your washer’s moved four inches. The shelf looks like a pretty snug fit. Any worries about potential damage?
YoungHouseLove says
We worried about that so we set the shelf a bit higher than the washer & dryer on those brackets (it doesn’t rest against them). So far we’ve done a bunch of laundry and nothing bangs or vibrates against the shelf. The realization that we could just build up our shelves a little bit on those brackets if we had an issue (like with small wood blocks that would be hidden, but raise it slightly) comforted us, but so far we haven’t needed to do that. Will keep you posted of course!
xo
s
Stacy {Woodsy Weddings} says
I love the tile on the wall! I was thinking dark for the wood, too, but the more I look at the photos, the more I really like the lighter stain color.
Ashley B says
I’m all for the stain you picked. Going with the predictable, “in” stain might be fore most people but I like splashes of the unexpected. I think it’s great!