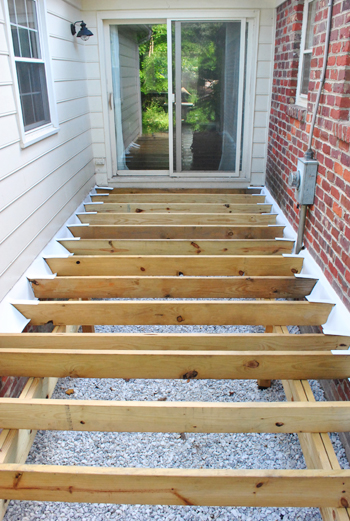
“Can’t we just lay some decking already?!” That quote’s an homage to this kitchen post from last December about all of the little annoying prep steps we had to squeeze in before we could get down to painting cabinets – and I feel like we just hit the same stage in the deck project. Which means we’re making progress, but we’re impatient little DIYers. After getting all of the joists set in place we were soooo excited to finally lay down the decking… until I realized I had a bunch of nitty gritty details to take care of first. Womp womp. But not to worry, you’ll actually see decking going down at the end of this post (and that process continues – wahoo!) so we’re a lot closer to the end of this project than the beginning. Whew.
The first item was actually getting an inspection. A voluntary one at that. Shocking, I know. Technically our next mandatory inspection from the county was a final one, once everything was complete. Call us insecure, but the idea of finishing the whole thing only to find out we’d made a mistake at this stage (and thus having to undo lots and lots of stuff) gave us cold sweats. So Sherry called the county and found out we could have an optional “framing inspection” just to make sure we were on the right course. Yes, please.
I’ll spare you the suspense – we passed. Though technically I made a minor error by notching my 4 x 4 posts (see below). Our county only allows notching of 6 x 6 posts. If you use 4 x 4s like me you’re supposed to attach to the top of the post with special bracket. But this inspector (a different guy from the first two) was sympathetic to the fact that I had already done it – and acknowledged that their instructions aren’t 100% clear on this point. I guess it’s more important when the deck is bigger, higher, and will be holding more weight, but since ours is just a few feet from the ground and only 8 feet wide he wasn’t worried at all. I’ll share a quote from him (probably my favorite thing I heard all day): “this thing’ll hold up five elephants and about 500 of those (points to Clara through window).”
In short: assuming we’re not planning on hosting the circus anytime soon (or a party with 499 of Clara’s closest toddler friends in attendance) he was happy to give us the okay to proceed. These inspectors seem to be getting nicer each time. Maybe the next one will bring me cookies?
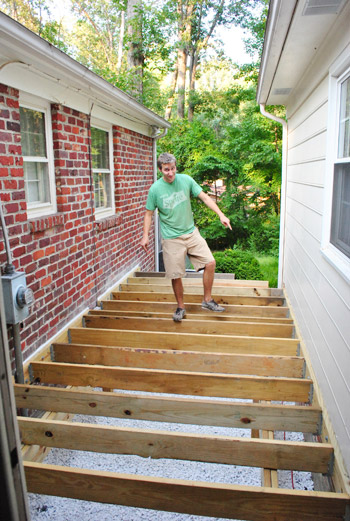
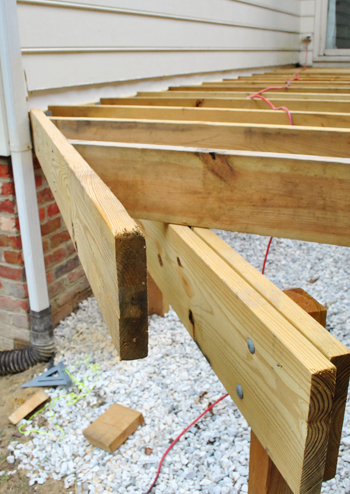
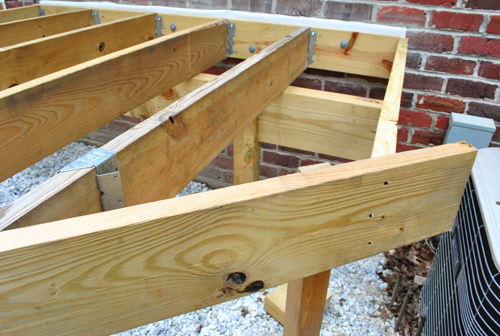
So proceed I did. My first task? Completing the framing around my joists by adding the two band boards that would finish off the exposed edge of the deck that currently sported some uneven joists just dangling over the edge.
This is the angled portion of our deck (where the stairs will lead down from it) so it took some special attention – and more than a few miter cuts. My first task was to cut off the excess portion of the two joists so that I could attach another 2×8 to the end. So I held a nylon string in place to help me mark where my 45-degree angle would go.
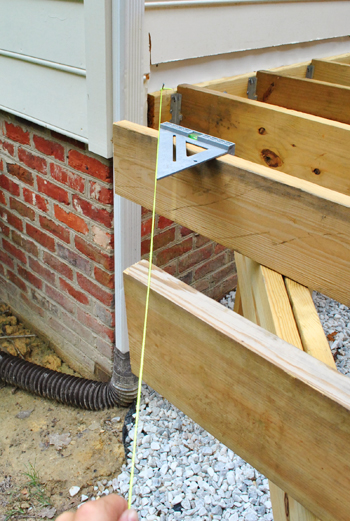
With my tops marked, I used my “Ross Gellar” Pivot ruler to mark where I needed to slice my joists at an angle.

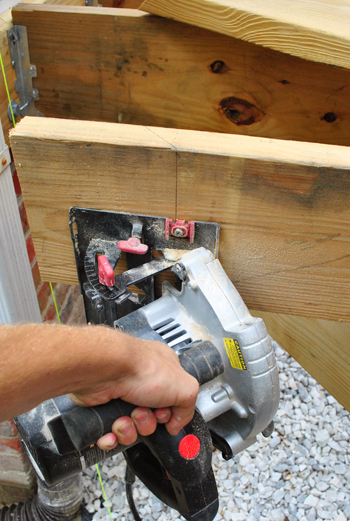
My circular saw can do angled cuts just by adjusting the saw’s table, so I was able to cut these two joists in place. Note: this isn’t actually how I hold the saw when I cut (since my hand is nowhere near the trigger) – it’s just the only way I could hold it and take a picture at the same time. So yes, let’s call this a bad reenactment.
Here are my two boards cut at the angle.
Then I took the 2 x 8 that would act as my band board across the two cut joists and cut it to size – including an angled cut on one end where it would rest against the house at an angle.
Here it is all in place. To actually get it there I balanced it on one hand while I temporarily hammered it in place with the other (using some nails I set in place before holding it up). Once the nails had it in place I secured it with screws.
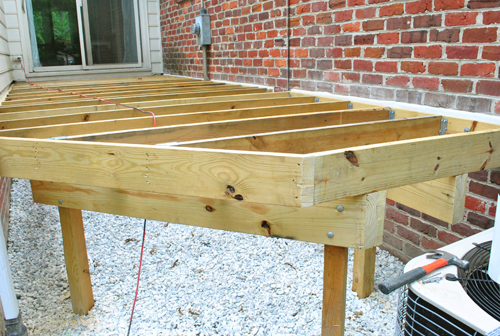
So that was all fine and dandy for finishing one edge. But I still had this open end that needed a board of its own.
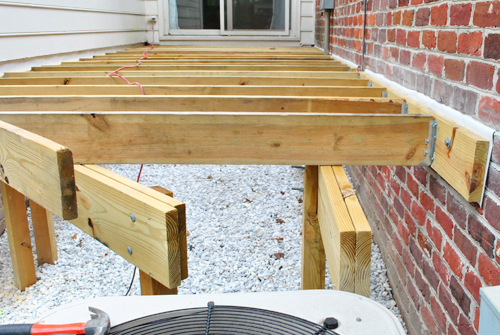
So I started off by cutting another 2 x 8 to size – once again with a mitered cut on the end so it would rest flush with the board I just finished attaching. It’s just resting loosely in place in this shot below:

Because before I attached it I realized I needed to trim the girders that it was resting on because they were too long and they stuck out the edge. I did this intentionally when putting the girders in because I knew I could always cut off excess inches, but adding it back would be tough.
I used my circular saw to cut them most of the way through, and then finished off with my reciprocating saw (since my circular saw doesn’t cut deep enough to go through two 2 x 10s).
Then I was able to set my board in place (resting on the edges of girders) and screw into the rim board against the brick and the angled band board.
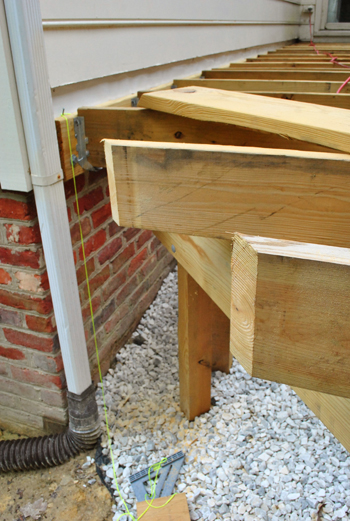
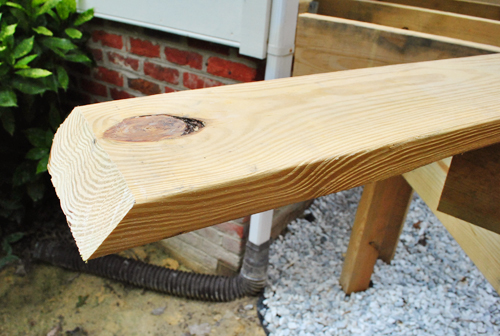
And once I cut the excess off of the angled band board I was finally getting the finished edges that I was looking for.
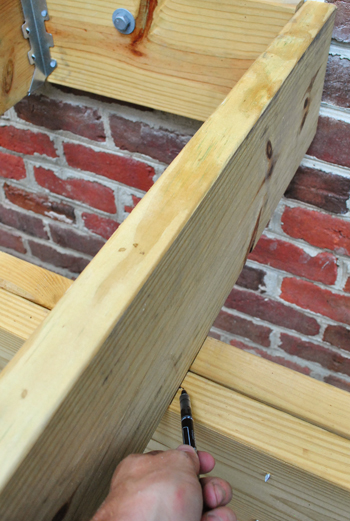
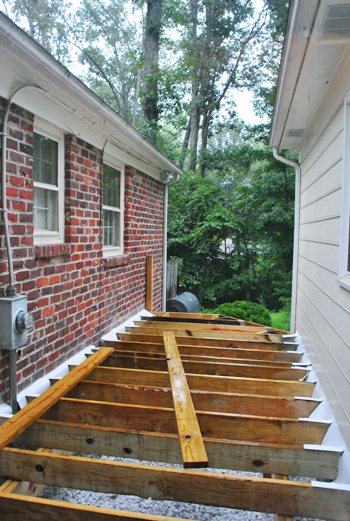
With the end of the deck looking better, I turned my attention to my next nitty gritty task: adding counter flashing. If you recall, one of the conditions of leaving my ledger boards (the ones that caused me to fail my first inspection) was to add this additional flashing over the tops of the boards.
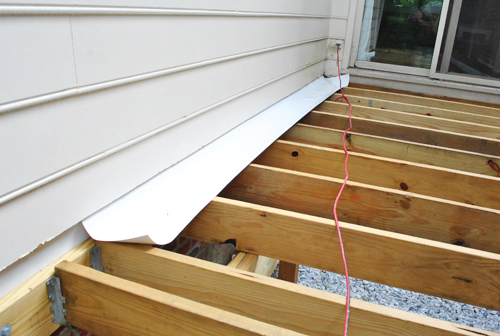
On the siding side, I just slid the flashing up under the bottom piece of siding and nailed it in a few places like before. On the brick side I also repeated my process of folding over a small piece and then stuffing it into the crevice I cut in the mortar (the same crevice the original flashing also went into).
Once this was in place I used scissors to cut the vinyl to go around the joists. The idea here is that the counter-flashing will further protect moisture from damaging the ledger boards and the house by directing water away from both. And you can see on the far right how I folded up a small lip at the bottom of the flashing to be sure the water drips away from the brick.
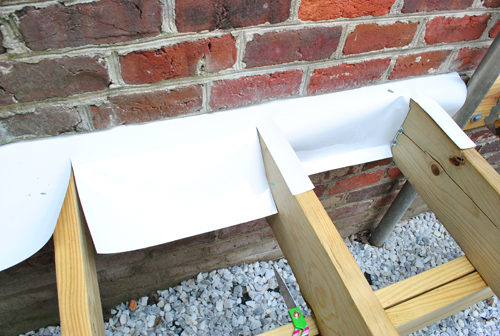
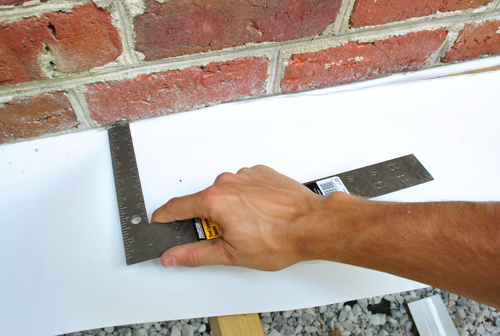
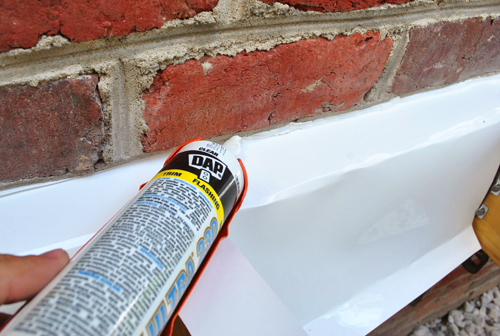
To keep the flashing in place on the brick side I also ran a line of clear silicone caulk in the crack. Not only does it act like a glue to keep the flashing in place, it also keeps moisture from collecting in the crevice.
The flashing was more tedious than it was difficult, but I was still happy to have it done and be one step closer to putting in my deck boards.
I was just about to start on the deck boards when I realized one other task that was worth thinking through while the “bones” of our deck were still exposed: the stairs and railing. This whole time I’ve sort had a “I’ll cross that bridge when I come to it” attitude towards the stairs and railing. And suddenly I found myself at that bridge. After all, if I was going to have to add any special reinforcements or attachments to secure the stairs or railings I figured it was easier to do that now.
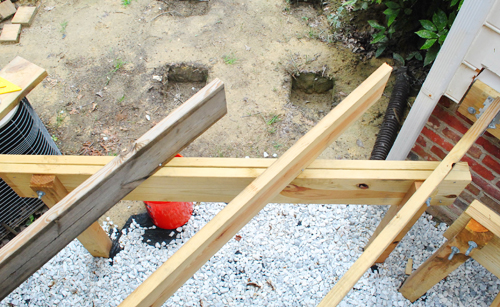
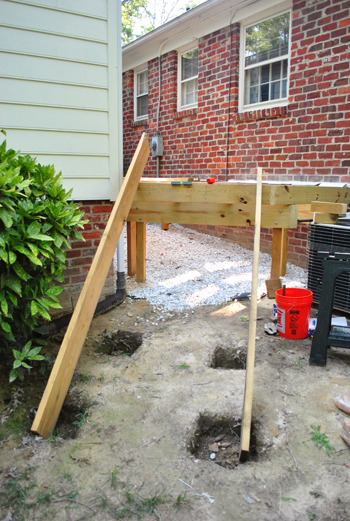
So I started off by figuring out where the stairs would attach and where I’d need to put in guard rail posts. I borrowed two spare 2 x 10s to act as my stair placeholders (based on the placement of the already-dug holes for my stair posts).
That helped me determine where the posts needed to go on the deck itself. I’ve decided to do the stair railing “inside” the stair stringers so that the steps kind of wrap around the posts a bit.
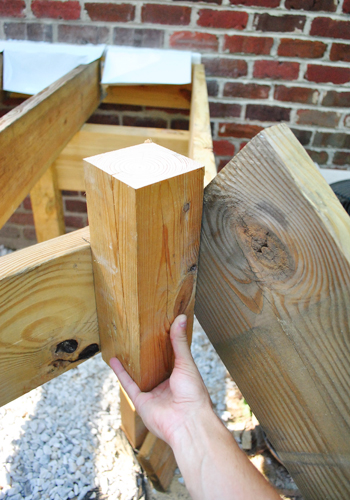
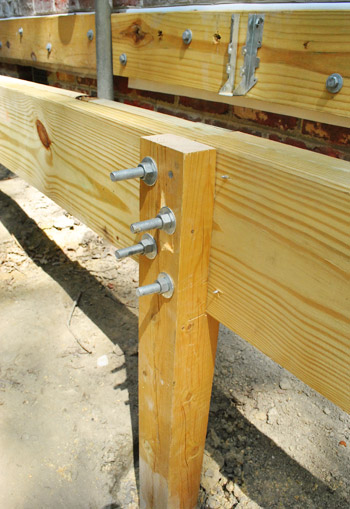
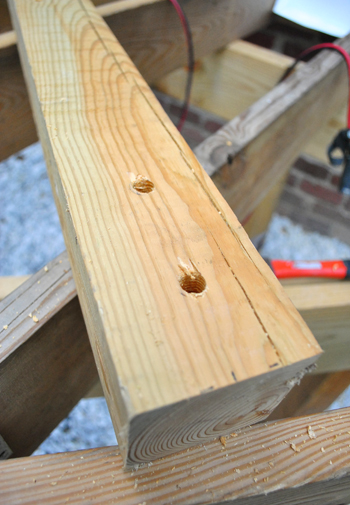
Once I was able to mark where each of my 4 x 4 rail posts would go, I had to determine how they’d be attached. Fortunately, the instructions provided by my county were super easy to understand.
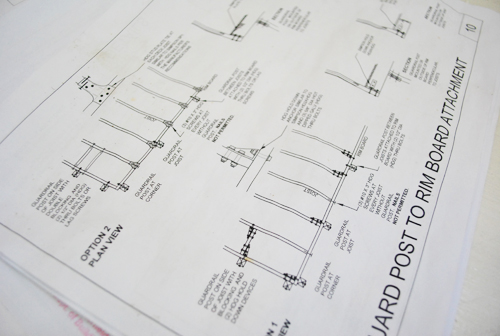
I can not emphasize enough how sarcastic that last sentence was. I stared at the page for what seemed like days trying to figure out what it was telling me to do. Then I called Sherry over who was just as confused as I was. Part of our confusion came from the fact that nothing indicated what to do with the angle we had. And we couldn’t find any of the products they suggested on the sheet.
But we finally found these Deck Tension Ties on our third trip to Home Depot (after overlooking them on the first two) and this Deck Magazine article that gave me some sort of indication as to how to deal with my angle situation.
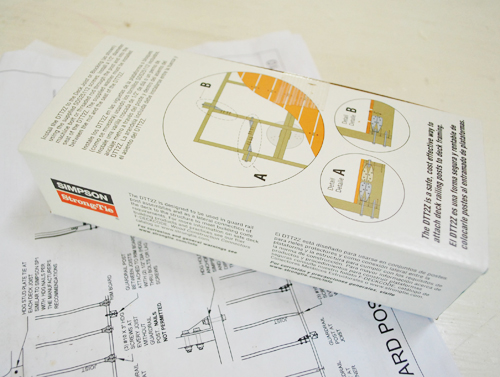
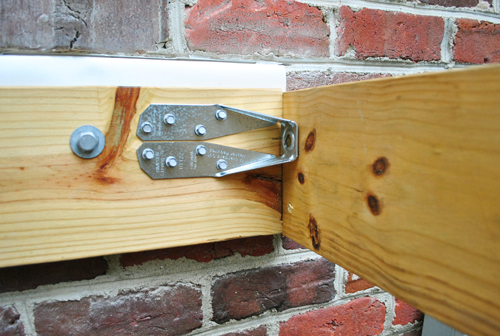
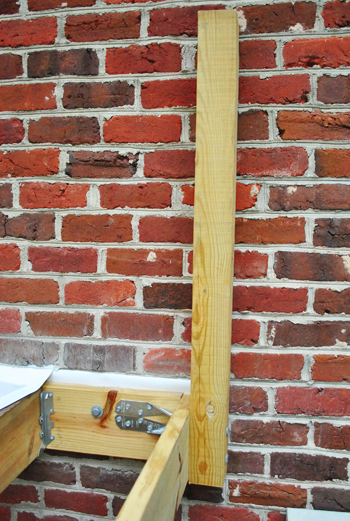
My understanding is that the old system of just bolting a guard posts to the outside of your deck is no longer considered as secure as it should be. That same Deck Magazine article explains it better than I should attempt to (there’s a reason I’m not an engineer) but I just trusted that these would help me pass inspection and keep my railing from folding over when we lean on it. You can see below how it got screwed to the rim board against the house.
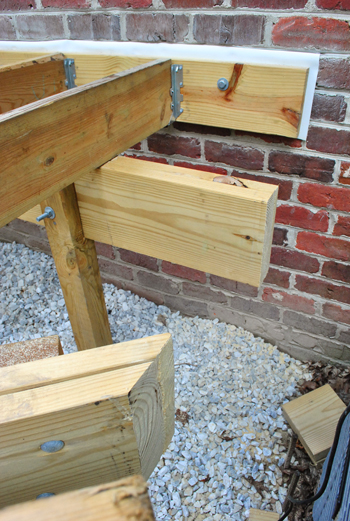
Then I drilled a matching hole in my 4 x 4 post (which I had already cut to meet the 36″ railing height requirement in our county) along with a second hole below it.
Then I used two 1/2″ bolts to attach the post to the deck – the top one going through the tension tie. It felt very secure, so I’m thinking (hoping?) this is an inspection-passing guard rail I’m starting to make.
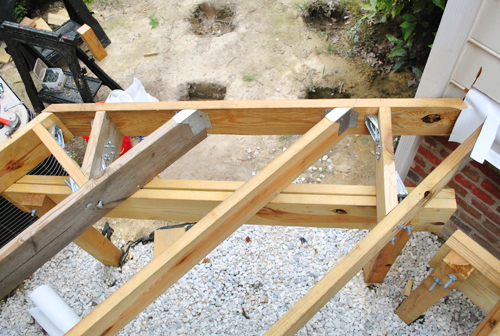
But of course I have more than one post to install. And the others – which wouldn’t be right against the rim board attached to the house – required some additional blocking. You can see below how I added a piece of scrap 2 x 8 between the two joists (which I secured with screws) and then bolted a tension tie to either side of it. That’s known as additional blocking.
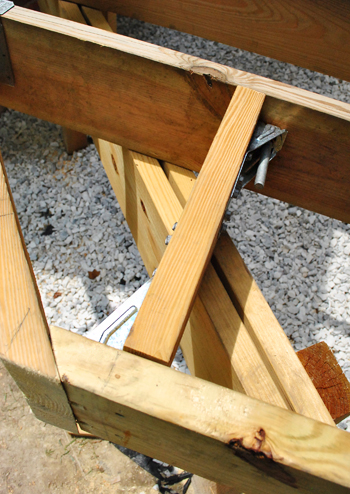
I decided not to actually attach any more posts yet (since I though they’d only get in the way as I install deck boards) but I wanted to get all of the hardware in place while I could still easily access everything from the top. So without bolting the next post in place, I moved on to adding the extra blocking and tension ties for my two posts on the angled portion of the deck.
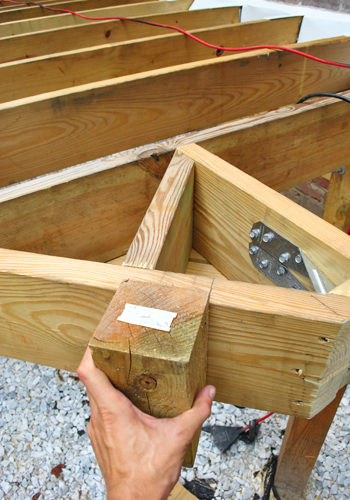
Here’s what it looked like by the end of it all. You can see I also added some hangers where my joists met the angled band board. I’m not sure they were necessary, but they made me feel better about it. Maybe now this deck can hold six elephants?
I realize my glossed-over description of making these preparations for the guard rail may make it seem like an easy, speedy task. But it actually took me two days of work to complete. Partially because none of my power tools would fit into the small spaces, so I had to do a lot of the screwing and bolting by hand. But it also took so long because of the weather. Yep, just when I had become accustomed to working in extreme heat I now have been enjoying pop-up thunderstorms that have cut more than one afternoon of work short. And although we’d be faster with Sherry on the case, we have lots of book stuff due, so when she’s not blogging and watching Clara (for example, when the bean’s napping) there’s book proofing and a pretty detailed resource section at the back of it to compile.
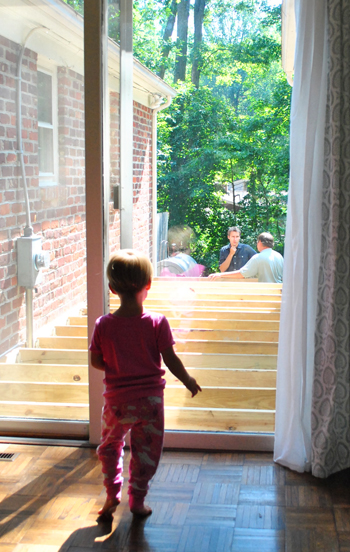
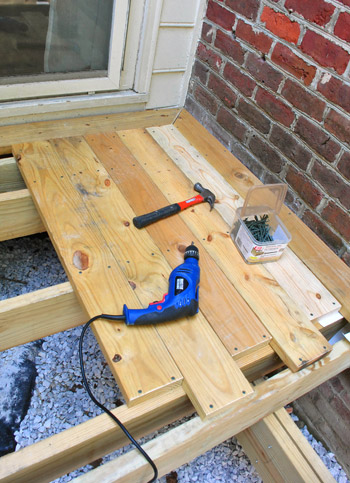
But even though the thunderstorms are delaying my progress, they’re definitely not stopping it. In fact, I’ve finally gotten some actual deck boards down. And since you’ve patiently endured this otherwise not-very-exciting post, I give you a little bit of visible progress to hold you over until I can make more progress and come back next week with some more oooh-and-ahhh-worthy photos. Oh yeah, we’re going all out when it comes to the board layout. Not only are we mitering the corners to create one big frame around the entire deck, we’re also adding a few zipper-like seams with the boards (first mentioned here). So far we love how it’s turning out. Can’t wait to get more done and share the pics!
Now that we’re finally getting somewhere, all this work is starting to pay off. It’s about time, right?
So what nitty-gritty / annoying / unglorious tasks have you tackled recently? Have you finally done those paint touch ups you’ve been putting off? Switched all the batteries in your smoke detectors? Weeded your patio? Replaced your air filters? Oh man, this is starting to sound like my to-do list…

mary says
I get dizzy just reading this. John, your TJ teachers would be proud — the math! the geometry! the physics! the engineering! Maybe you could present a workshop at your next reunion??? :-)
YoungHouseLove says
Haha, sounds like fun.
-John
Krissy says
I’m so jealous of your zipper layout! Nate didn’t go for that on our deck and our neighbor wanted all his boards on a 45° angle. I’ll just have to admire your deck instead!
Catherine says
You all are crazy! I’m so, so impressed with your DIY prowess. Seriously, WOW!!
Heather Gearhart says
That is looking great guys! I can’t wait to see what type of patio furniture you use and all of the final touches when it is finished up! We just began tackling the gardens around our house… unfortunately the previous owner decided to have 6 rather large ones throughout the yard, they look pretty, but are full of weeds. Needless to say, I have many weekends of weeding gardens ahead of me!
Ashley@AttemptsAtDomestication says
It’s really coming along! So excited to see this space transform!
Bonnie C says
We bought a lake house mid June, and have spent every weekend (6) laying 460 square feet of tile. (After ripping up carpet, vinyl and glued down plywood in one area – and then laying our own luan over the entire area). Hopefully grout this weekend and then we’ll be done! Tedious doesn’t begin to describe it.
Kait H says
Congrats on passing the inspection! Love what the inspector said too! You might have to put a small elephant statue (or 5) on the deck once you are ready to furnish it! ;)
Jess @ Little House. Big Heart. says
I think I’m going to love the zipper seams! I can’t wait to see it all finished up. Oh, and you can send all those thunderstorms to Texas. We could use them.
Really, this is making me want to get started on our backyard! We just have to wait until September/October when it’s no long 100+ everyday!
Gabriella @ Our Life In Action says
Wowsa! I never realized how much work goes into building the base for the deck. You guys are so close – can’t wait to see the end result (as are you, I’m sure).
liz @ btb says
piiiiiivooooooooot piiiiiivoooooot …. best show ever.
I’m loving the ‘zipper’ design in the layout. Can’t wait to see it all done!
Kim says
Sometimes your posts inspire me to take on a project–and sometimes your posts (like this one) help me decide to hire someone instead. Great info, though!
John says
Nice work! Yes the deck will shrink and open up a little just like my wood fence. Looks like you have enough room to get under the deck between the stringer and the condenser unit.
Amy @ PaintWineRepeat says
Looks great so far! Always better to be safe than sorry… I would have done the optional inspection too!! Good luck with the deck boards :)
Paige says
Holy moly! You rock! I can’t wait to see more progress. I think eating dinner out on the deck is a fabulous idea. We are on Long Island and do that often.
Sayward says
PIVOT!!! I’ll never hear it enough. I hope they yell it one day as they maneuver my coffin into its hole in the ground. (to the horror of my mother and the delight of my best friend)
YoungHouseLove says
LOL!
-John
Elizabeth says
OMG Sayward – hilarious! PIVOT! Now I have to go watch that Friends episode!
Dawn says
My boring and tedious job this summer has been to remove all our doors upstairs (7), sand and paint them, put on new hardware and put them back up. This also included painting the trim around the door which means, you guessed it, STICKING! As careful as I was with sanding and painting thin coats, one door is totally sticking. We’re going to have to take it off, sand and plane it, paint, blah, blah, blah. And it’s just a closet! Oh well – they look so much better, particularly since the bulbous gold scratched door knobs have been replaced with brushed nickel. Good luck on your deck!
YoungHouseLove says
That sounds like so much work but totally worth it!
xo,
s
MJ says
All your deck posts make me more and more convinced if I ever need to build a deck to call someone and not DIY that one! You guys are so brave and patient with your projects!
Jessica says
haha! I agree! John is awesome at getting this done. My husband and I could never build this!
Carly says
Hey there,
Love the progress so far! Just a handy tip that you’re probably already aware of, but I saw you’ve used the nylon string method for straight lines throughout the project, which of course works just fine, but have you ever used a chalk line? I’ve used one in past building projects, and they’re lovely little doodads! Best wishes on the finishing steps!
YoungHouseLove says
Love those! I didn’t have one on hand, but if I did I’d be all over that.
-John
Laura says
PIVOT! Love a good Friends reference
Thanks for sharing
Diana says
I’m very impressed with how complicated it is to build a deck! My mind started to glaze over like when I was in college calculus. I’m sure John would be an excellent engineer!
Staci @ My Friend Staci says
Oh man! The end is in sight? More or less?
We’ve been painting the exterior side of our windows… the wood between each windowpane, etc. Talk about tedious. We keep asking why we waited so long to “get on that already” instead of now, when it’s over 100 degrees out. Well, we’re almost done, though, and hope it helps the house sell!
Emily says
ugh, I can relate. We’re laying our tile backsplash in a herringbone pattern. Three trips to HD and three full work days later there are still just a few tiny pieces missing (I seriously hate electrical outlets). Slow and steady right?
YoungHouseLove says
That sounds amazing! It’ll all be worth it!!
xo,
s
Karyl says
Loving all the useful information on your deck build…and so glad it’s not me slogging away in the heat and the storms! We just refinished our deck and we used SW acrylic semi-transparent stain in Chestnut. LOVE it. It’s such a perfect blend of richness and dark yet still lets the wood tones through— I think of chocolate every time I look at it.. It looks scary going on, but the color it dries to is pretty cool. A second coat makes it perfect. I saw that you said you needed to let the deck cure for a few months before you stain, but keep that one mind!
YoungHouseLove says
That sounds so pretty!
xo
s
Jenny C. says
This may have already been mentioned or asked, so my apologies ahead of time if thats the case. But do you plan on placing any type of varmint/rodent cloth around the perimeter of the deck and the ground? I like a little neighborhood wildlife like the next person but some of the more undesirable creatures (skunks, racoons, opossums, etc)may make a home under that deck if the right precautions arent taken.
My suggestion is a 1/4″ hardware cloth thats attached to the underside of the deck then extended into the ground by at least 6″. You can pick this up at any of your home improvement stores or online.
Just thought I’d mention it. From someone who’s been in the ‘undesirable-creature-living-under-the-deck’ situation before.
YoungHouseLove says
Thanks for the tip! We haven’t done that yet but we’ll have to chat about whether we should add that to the list!
xo,
s
Trish says
OMG I feel the same way and I don’t even live there. Super excited to see finished result.
Trish
http://www.mash-upchic.blogspot.com
Kate D says
It’s so funny you mention the slowly-but-surely annoying tasks – I feel like my entire house ‘to do’ list has been filled with them lately! Basically everything you mentioned above – paint touch ups, weeding, replacing my smoke detector and CO batteries – is what I’ve been doing. I’m getting antsy to tackle a project with a big ‘wow’ result so I can actually see some substantial progress! But the little things add up too – I just have to remember that. Ha!
Joanna says
Gosh, this all seems so complicated. Love the attention to detail with the mitered framing and zipper seems. I wouldn’t have ever thought of that. On our end, we have been adding a closet to our bedroom since January. We ran into a major snag when we couldn’t find trim to match the antique trim in our house. So while it’s currently functioning as a closet, it’s not so pretty and we have 2 4x? foot holes peering into our duds. When we finally found some that was similar enough at a local salvage warehouse, it had 5 coats of paint on it. We wanted to go as natural as possible with the paint removal by using a Soy Gel paint stripper, but we are ending up having to use a heat gun. Which requires wearing an annoying mask because it’s lead paint. We should have used the heat gun in the first place as it’s much faster….you live, you learn.
April says
I was wondering what the deck was going on! Sorry, I just commented to make that atrocious pun!
YoungHouseLove says
Bwhahaha.
xo,
s
Julia says
We started painting the kitchen & dining room this weekend (they’re attached, so same color). We had to remove wallpaper, wash walls 2x, caulk, clean, sand, patch holes, prime…all before even painting the real color. Too much work!
Jamie says
Hooray for an almost party ready deck! Who knew building a deck could be so much work and stress!
Jenni says
I am enjoying watching your progress on this project. I asked for a miter saw for my b-day this month, so our deck is at the top of our priority list with the new tools…although this does look terribly intimidating. We have a medium sized deck, and then a separate deck where the stairs go down into the backyard. They are only about 8 feet apart and not connected. So annoying!! Good luck, and looking foward to the reveal!
Jessica says
I started cleaning our deck last week. The wood was really dirty and green from lichen. I can’t power wash it, because it is screened in on all sides, so it was Cinderella-style with a scrub brush. I used a wood cleaner and brightener. It looks awesome. Now to decide was semi-transparent color to stain it. I really wanted to stain it dark, but people said it will get so dirty since we use it all of the time. So, it looks like I am going to leave it natural and simply seal it. I am DYING to see what color you decide to stain yours. However, I know that actually is probably months off because you are supposed to let your shiny new wood weather first before doing anything to it. Any hints as to what stain colors you like would be greatly appreciated. : )
YoungHouseLove says
We always love a rich-ish mocha tone. Not sure what specific color yet though!
xo,
s
heyruthie says
this project is IN.SANE!!! I am so proud of you guys! i have to tell you, sometimes your DIYs serve to show me that “I can do it too!” and sometimes, they serve to show me that, “NOOOO WAY! Save my money and hire a contractor!” This is one of those. And I am SO.GLAD. you did it, because I was seriously considering building our own deck. And now I know that it is way beyond what we’ve got time for these days–with 4 young kids. Thank you, for showing the “easy” jobs, but also the “hard” ones.
julianna says
So, what happens if the final inspector is a different person who thinks the notched posts aren’t okay? Is there an official rule that the earlier inspector’s approval overrides it?
YoungHouseLove says
Since we have a signed doc that says we passed the framing inspection all the next inspector will comment on will be deck boards and the stairs/railing. That way no one has to undo what they have done (and passed) if a different inspector comes the next time.
xo,
s
Laura says
Ha! Just reading that post was exhausting! But good work, John! My husband and I are in the process of building a shed. He works full time and I take care of two (very) little ones all day so we only have weekends (kind of) and evenings after the kids go down. It has been exhausting! And the worst part is, we found plans we liked and were ready to get started but all the lumber bids we got were over $1600!!!! When did WOOD start costing so much? So we had to buy a precut shed kit to stay in our budget ($700) and it seems like way more work trying to piece together poorly designed, not quite square, ill cut osb! But we’ll get’er done! Hopefully we’ll be painting by this weekend. Good luck to all of us!!
Heidi says
Am I looking at this wrong, or are the joist hangers in the third from last photo installed on the TOP of the joists? I believe they are supposed to go on the bottom of the joists, so that the cradle portion holds the joist. Maybe it doesn’t matter since they aren’t actually supporting anything.
Also, if you are ever doing anything that involves joist hangers in the future, I highly recommend using a palm nailer rather than a hammer. I used a really inexpensive one I bought at home depot (it was in the neighborhood of $20, although you can spend lots more on the professional tools)on several deck and porch projects, and it saved so much effort. You’ll need an air compressor to run it, but it made the joist-hanging go so quickly it was like magic.
YoungHouseLove says
Yes they are supposed to go on the bottom and are for all the deck supporting ones, but those two angled ones needed to be placed that way because we could only find hangers angled in that direction, so they only fit on the top. Thankfully since all the others are cradling the wood it’s all good and secure (and ok by the inspector).
-John
Nicola says
What date is your book coming out? Can you tell us the title yet? Can I pre-order it somehow?
YoungHouseLove says
Wahoo! It’s out November fifth or six. Right when Katie Bower’s baby is due – haha! It’s available for preorder on sites like Amazon and Barnes and Noble.
xo,
s
seansmom says
Great job John!! All the prep work on stuff like this can be a pain, but will pay off in the long run when, years from now, your deck will still be good looking and usable.
Around here, we’re finally getting around to putting the base cabinets in our library(no hurry…it’s only been six years since we built the house..ha ha!). With the bases in place, stained and sealed, we can work on the upper book cases this fall and winter….and who knows???…Maybe by next spring we’ll have it all done!
eileen marie says
Color me impressed, John. You building your own deck is a-maze-balls!
PS: Can’t wait for the book!
Linda says
Great post! I’m really excited for your book. :)
Annemarie L says
Great job, John! I am so impressed with the deck! I can’t wait to see pictures of y’all out there enjoying it. P.S. I pre-ordered the YHL book and I can’t wait until it’s here!!
YoungHouseLove says
Aw thanks for ordering our book guys!
xo,
s
Peggy says
That looks amazing! I can’t tell from the pictures (viewing on my phone) – are the deck boards butted up against each other or is there a bit of a gap between them to help with draining rain water?
YoungHouseLove says
There’s a bit of space and over time the wood should shrink a little to make a little more.
xo,
s
Col & Kate says
Can’t thank you enough guys for the awesome level of detail (both written and photos). Will come in handy next year when I am tackling a “small” job like this !! ;o)
YoungHouseLove says
Happy to help!
-John
Kara J says
This has nothing to do with the deck post but I just had to share my dream from last night. I must have been on your blog right before I went to bed or something because in my dream you guys and Clara, plus my family (husband and baby boy), and parents AND siblings all went to this home goods/water park together!! It was bizarre!! haha I thought it was hilarious. It may have something to do with the fact that we have a Home Goods opening up around the corner from our house that I’m SUPER excited for. But I’m pretty sure it won’t have a water park in it.
YoungHouseLove says
Hilarious. Someone has to open one up stat.
xo,
s
Sara C says
Ok, I know everyone is saying this, but I’m so impressed that you’re taking on such a huge project yourselves! Especially in this heat we’ve been having! (Things have been no better in Nashville, by the way…we had heat advisories all week last week!)
I tackled some garden box construction this past weekend. Wouldn’t have been so bad except my back yard is graded to direct water to a run-off stream, so I had to dig into the grading to make a level spot for said garden boxes.
The pictures aren’t terribly impressive as the garden boxes are still empty of plants, but you can see them here:
http://inglewoodgardener.blogspot.com/2012/07/building-new-raised-beds.html
YoungHouseLove says
They look awesome! All that work totally paid off.
xo,
s
Benita says
Great job! I’m fascinated that you have to go through all those inspections albeit this one was voluntary. Over here in Sweden we just go ahead and build our decks. There are some height restrictions or you’ll need planning permission but the construction’s entirely up to you.
YoungHouseLove says
That’s so interesting Benita! Sometimes I like the checks and sometimes I fear them- haha.
xo,
s
Olivia says
I know you jokingly comment that maybe your next inspector will bring you cookies… but ironically enough, when we got our house inspected prior to purchasing it, our inspector actually DID bring us fresh baked cookies. Definitely one of the best things to happen during a stressful home-buying experience EVER. :)
YoungHouseLove says
That’s awesome! Seriously, amazing.
xo,
s
Jill says
I love that you keep referencing the “pivot scene” from Friends. Every time my husband and I have to move furniture (anything heavy really), we end up saying “pivot” at some point. Too funny. I’m glad we aren’t the only ones to appreciate that scene. :)
vicky s says
You guys are doing an AMAZING job! Talk about perseverance! The building department really needs to take some cues from the guys who make the instructions manuals for Ikea furniture! :)
Nat says
We’ve been working on my parent’s front porch and did some window action last week.
http://greennackeacres.blogspot.com/2012/07/window-shmindow.html
My dad has also been doing some flashing this week. Heehee. Ok I’m two years old and still get a giggle out of saying my dads been doing some flashing :)
YoungHouseLove says
Hahahah, now I’m giggling. Looks awesome!
xo,
s