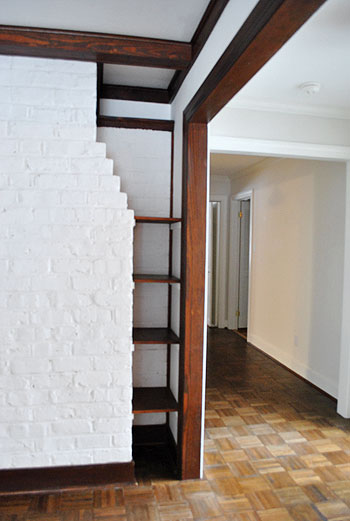
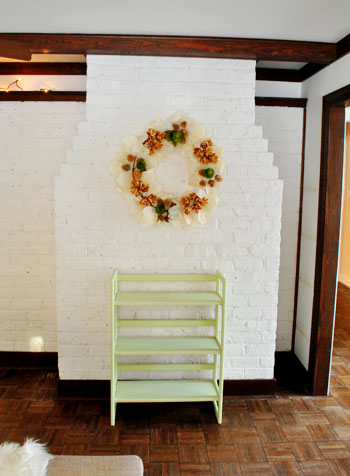
Let’s talk about breathing room. One thing we learned from our last house was that we prefer to let rooms “breathe” a little. Which means resisting the urge to fill every corner and span of wall with furniture and plant stands and coat racks and storage baskets and everything else that you can stick in there to crowd the perimeter of a room. So after a bit of deliberation we decided that letting the previous shelf-riddled corner of the fireplace breathe was the best choice for us. I actually attacked them after only a few days of living here and realized I never shared the pics while writing my list post– so here they are.
We’re planning to add storage ottomans and to build or buy a new media cabinet with lots of storage space in other areas of the room, so we’ll still have a nice amount of stash spots in there without potentially forgoing the whole balance thing by keeping those shelves.
See balance is key to us because it seems to keep spaces feeling more inviting and relaxing. And we knew that a shelf full of baskets, books, and stuff on one side of the fireplace would make that small niche feel heavier while the longer bare expanse of wall on the other side would feel, well bare and unbalanced by comparison. And we didn’t want that wall to feel lopsided. Especially since it’s such a small nook. You know how you wouldn’t try to stuff the smallest corner of your bedroom with the largest piece of furniture (like a floor to ceiling bookcase?) and instead you’d save that for a larger expanse of space (and would probably leave that smaller corners well enough alone)? That’s why we thought those shelves had to go.
Different strokes for different folks though- I’m sure some people would have loved to keep them around. I, on the other hand, couldn’t wait to break out the ol’ screwdriver-as-chisel method:
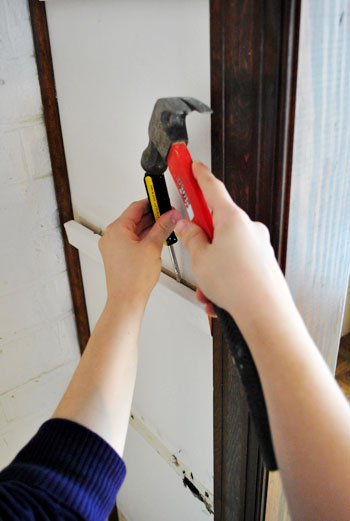
The wood shelves lifted right out, but the shelf supports turned out to be tough cookies thanks to super long nails holding the shelf supports in place on each side. But I was still able to get ‘er done all by myself while John was on Clara duty. Girl power (why do I always picture the Spice Girls when I type that?).

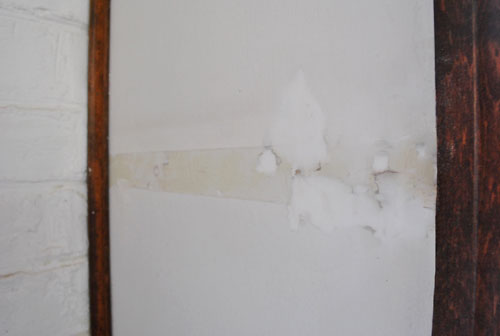
The walls were looking a little rough in some areas due to some particularly clingy nails. Yikes.
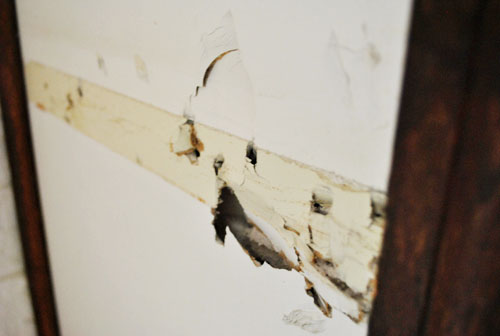
… but it was nothing a little spackle couldn’t solve. And the previous owners had sweetly left behind this lightweight kind so I gave it a try for the first time in my life (we always get the heavy duty traditional stuff, also by Dap).
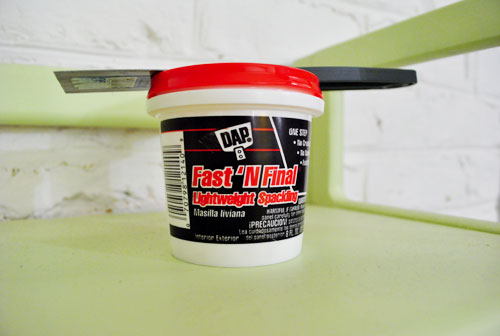
The verdict? I loved it! It’s really airy and whipped, like shaving cream. And it’s easy to get a super smooth skim coat over every hole in the wall – even that insanely large one pictured above. Look how easily it cleaned up:
I just used a flexible metal putty knife and smoothed it on. Unlike the heavy duty spackle that I’m used to, this lighter stuff said that it didn’t even need to be sanded. But I gave it a good once over with some high grit sandpaper after it was fully dry just to make it as smooth as possible. I’m in love with how easy it was, so I already have a big tub of this new lighter spackle stuff on my shopping list. Now all we need are a few paint touch ups to make all evidence of those shelves a thing of the past.
If only we had the wall paint around to touch things up. Wop wop. We haven’t come across that yet (although it might be hiding in the basement somewhere) but if we don’t find it we could always bring home a bunch of white swatches and try to make the closest match. Or better yet, we could get our butts in gear and paint the entire room in the soft gray color that we have yet to settle on (and take the trim to a nice glossy white color while we’re at it).
That little corner might not look like much now, but we promise to share pics of the whole room from that angle as it evolves and we take on more projects (like painting, hang more stuff on the walls, and adding in more furniture). That small breath of uncluttered space in the corner will be a welcome break indeed. Plus we picture kiddos hiding there with their eyes squeezed shut who fully believe that they’re invisible. Ah youth. Remember when you’d close your eyes and hide somewhere totally obvious and fully believe that nobody could see you? Those were the days.
Pssst- We announced our random winner for this week’s giveaway. Click here to see if it’s you.

Erin says
My guess (and it is very much a guess) is that those shelves held the fire wood at one point. Of course it would have been two-sided for it to make sense.
It looks great and airy now. You gave made great progress! Give yourselves a pat on the back :)
Jenn says
I’m good at filling space not making it — and thats no bueno! I love the idea of “breathing room” and GOOD CALL on the shelving removal — those babies had to go! =)
xoXOxo
Jenn @ Peas & Crayons
Katie J. says
Just curious. Any idea how many people once lived in the house (family of 3, 4, 5, etc.)?
I’ve run into “unique” storage solutions like the one you removed when it seemed like the last/past owners needed more space due to how many more people where living there. I once took down a wall of shelves made out of apple crate wood scraps(!) when past owners had 5 people in a 2 bedroom house.
YoungHouseLove says
Hey Katie,
The previous owners were a couple with one son (he grew up here and is now an adult). The three of them lived here for the past 22 years. We agree that sometimes a bigger group necessitates more shelving and storage, and we definitely have plans to be more than a group of three (well four if you count Burger) so we’ll just probably choose to use the space in different ways and squeeze out extra storage by other methods as our family grows. Should be fun…
xo,
s
beth says
Looks so much better! Those small changes really do help!
Since you are planning to paint the woodwork, I have a question for you. We’ll be painting darkish 80s trim on the colonial we just bought. Do I need to use an oil based paint or primer? What do you recommend to keep the stained trim from bleeding through? Do you use the same approach as you would use on cabinets? I know you’ve detailed that in the past, so no need to repeat it if that’s the case.
YoungHouseLove says
Hey Beth,
That’s what the experts would recommend (oil-based primer). For VOC reasons we might try using the low-VOC primer & paint stuff (in a white semi-gloss finish) and see what happens. We’re risking possible bleed through but we could keep the air quality a lot better if it works…
xo,
s
MichelleG says
@Dawn SC, we ran into a similar issue in our rental. we just took a chip of drywall with the paint on it over to Lowes and held it up to a bunch of paint samples to get the best match (brand doesn’t usually matter but level of gloss does). i know if you have a large enough sample (read: chunk of drywall with the old paint on it) the folks at Lowes can scan and color match it, like what John and Sherry do when they want the Olympic NO VOC paint but with a Benjamin Moore color. good luck!
J and S,
If one wanted to keep the dark stained beams, what color do you think would compliment best? Like a toasty cream or a super light greyish white? I know its not your taste, and I LOVE me some crisp white trim as much as the next gal (can’t WAIT to see your moody gray with white in the LR!), but there’s just something so refined but casual about that whole California mission look that i am loving (it just feels like a PB catalog or something, you know?)
thanks!
YoungHouseLove says
Hey MichelleG,
I always love the look of soft celery-gray with rich wood beams. Or something warm and goldy-wheat. Hope it helps!
xo,
s
Amanda says
Hi Sherry!
I could see how many people would have left those shelves there as bonus storage space but I totally agree on the balance and the need to breathe!
Maybe you have already but I would LOVE it if you guys shared a video house tour of the house as it is now before all of your changes are made!!
Thanks for the daily inspiration to get off my butt and keep improving our home:)
YoungHouseLove says
Hey Amanda,
We’ve been meaning to make one of those for ages (well, for weeks, we haven’t exactly lived here for ages). It’s definitely on our list!
xo,
s
Patti says
Good call on removing the shelves, it puts the focus entirely on the fireplace now. Speaking of soft gray colors, I just used Sherwin Williams Fleur de Sel in my dining room, it’s a beautiful light gray which, depending on the time of day, skews blue-gray or green-gray but it’s so soft and lovely.
Lauren says
I’m all about having some breathing space to allow your eyes to rest in a room! I always wondered about the lightweight spackle, so I’m glad that you liked it. Might have to get some the next time we have to patch a hole!
beth says
Thanks Sherry! I’d prefer to go low voc too if possible! Maybe I’ll let you guys tackle that one first on an experimental basis ;)
Julie says
I did NOT “get” why you’d take them out from the first picture, but once I saw the picture taken from further away so you can get a better feel for the space I like it.
Katie says
Glad to see you making the house your own!
Jason says
Hrm…my fireplace is in a nice floor to ceiling bump out from the wall and leaves a nice covy on the right hand side in a corner that I thought should have shelving and lights, but you know I was worried about the same lop sided issue. Ponder I must.
Your Casa 1 bath closet is on the Apt Therapy organized bath round up:)
Cheri@IHeartOldHouses says
It’s amazing how a small change can make such a big difference…it looks so much more open and balanced now. By the way, I love that wreath! Most wreaths seem too holiday-ish to me, but yours would be lovely year-round.
Cynda says
Letting rooms breathe looks and feels nice! And you’ll be extra thankful if you ever decide to pack up and move from this big house. I got married in September and we’re STILL sorting through my husband’s 3 bedroom house to get it empty to be sold. He accepted every piece of hand-me-down furniture that was ever offered to him!
P.S. I heart all of YHL. Good job. :)
Melissa @ HOUSEography says
Great call to take down those shelves. I know you are planning to open up that side of the fireplace, but if you don’t convert it to gas, might be a nice spot to put a few pieces of firewood in the winter. And, as you said, it’s a sweet hide-and-go-seek spot!
Dayna says
If you end up making that a double sided fireplace, you could use that small corner to stack your wood in!
Ashley @ sunnysideshlee.com says
Love it! It does make it more airy and John-and-Sherry-esque! haha! What are your plans for turning that fireplace into a double-sided one. I know you’ve mentioned that in previous posts, but have you entertained what that would even cost. I’m sure you wouldn’t be able to DIY that by yourself. Or, would you? :)
YoungHouseLove says
We’d definitely need to work with a professional mason to protect the structural integrity of the chimney so we’re planning to get a few estimates in a month or two. Don’t have any money to spend just yet, so we’re saving and tackling more affordable stuff in the meantime.
xo,
s
Hilary @ My So-Called Home says
It’s amazing what a difference a little demo can do. Do you plan to keep the dark trim or paint is a crisp white? (I think I know the answer, but you guys are full of surprises these days!)
YoungHouseLove says
Crisp glossy white all the way!
xo,
s
michelle says
We used light weight spackling to fill in nail holes and to fix some not so perfect trim work and it tends to shrink a little so waiting to paint isn’t a bad idea! Some of ours as fine, others shrunk a lot. The ease of use makes it worth it though!
Stephanie says
Instead of *wop wop*, why not try Sad Trombone?
http://www.sadtrombone.com/
Enjoy :-)
YoungHouseLove says
Haha, love it!
xo,
s
Jessica says
Ok, so I’ve been in love your blog for awhile and I just realized that now, with the new house, it’s like my favorite tv show has a new season and I can’t wait for the next episode/post!!! These commercial breaks are FOREVER long but worth the wait!!! I’m sooooo excited and loved everything so far and can’t wait to see it all come together!!!
Shannon says
I just wanted to let you know that I LOVE your work and blog. I saw y’all on the Nate show and thought you were darling! I “liked” your facebook page…does your blog come through each day on your page, or do I need to subscribe to your blog? Unfortunately I don’t really understand exactly how blogs work (or twitter for that matter!)
Thanks again.
Shannon
YoungHouseLove says
Hey Shannon,
Thanks so much! So glad you found us. Our posts usually come through on Facebook but the best way to be sure you don’t miss a thing is to subscribe using the button up near our search bar in the right hand corner. Hope it helps!
xo,
s
Jenn the Pen says
Can you knock out the piece of the door way and really open up the space or is that a supporting wall? If not, I like the idea of firewood storage. Or line the back with mirrors and add SOME shelves back.
Alyssa says
I always feel the need to fill up everything that has a shelf or wall space. Its really nice to see that an airy feeling can work in a room!
YoungHouseLove says
Hey Jen,
We’re considering a number of ways to expand doorways down the line. Right now we’re favoring the idea of widening the doorway on the other side (the left) of the fireplace so there’s a bigger pass-through to the kitchen, but you never know…
xo,
s
Sarah says
“I always love the look of soft celery-gray with rich wood beams. Or something warm and goldy-wheat.”
Got any warm goldy-wheat grays you’ve been looking at? Is that an oximoron? But that is what I want in my home! A brownish gray so that all my brown tones mix will with it! What do you suggest? Anything? :)
YoungHouseLove says
That’s probable an oxymoron since goldy-wheat is warm and most grays are cool. Maybe stroll the paint aisle and see what you can find though. We always just bring home a ton of swatches and see what works. Good luck!
xo,
s
Laura @ Starting Out Fit says
Great choice removing those shelves! I like the airiness that comes now without them there.
Carol N. says
I laughed when you talked about hiding your eyes and thinking you are invisible. Our first cat used to do that when we took her to the vet. I remember once sitting next to someone with a huze lizard on a leash (yes!) and my cat would look at it, then hide her eyes behind my hand, then look again. It was like she could NOT believe how big that lizard was and it kept running it’s tongue out at her. It was really funny. I accused her of playing peek-a-boo with the lizard. Love the new look without those shelves there too. They must have held bricks to have those large nails in them!
Jeanne says
I’m always late to the party attempting to make a comment, as everyone has already said it all! lol But I used to be the “only use authentic old-time spackle” type and switched to the light weight stuff and have never gone back. I just used the pink-turns-white as it dries kind, and that works too!
I admire your energy. I was gung-ho like that once, but now middle-age and sixth house to decorate has slowed me down some. I’m hoping once I’m done with this one I can sit back a relax for a change. It’s taken me two years to do the living room/hall and now working on the dining room. haha.
Love your blog, though!! I can always count on new posts everyday. I like that. :-)
Laura C. says
If you want to keep the room white and if it’s even possible to get some sort of paint chip from the walls, you can always try to color-match it. A lot of bigger hardware stores now have a spectrophotometer. I’m not sure how fine-tuned it works, but it might be worth a shot.
Oona says
Ha! I just watched the Spice Girls movie last Saturday! I hadn’t seen it in years, I forgot how funny it is.
Johnna says
Sherry!!! We have some laying on the top of our kitchen cabinets. They look like a clear rope with the lights inside of them.
I think they are called tube lights or rope lights….they are something like this and they are a GEM! they lay in a straight line and work PERFECTLY for the small molding gaps!!!!
Check this out:
http://www.homedepot.com/webapp/wcs/stores/servlet/ProductDisplay?storeId=10051&productId=100143324&langId=-1&catalogId=10053&ci_src=14110944&ci_sku=100143324&cm_mmc=shopping-_-googlebase-_-D27X-_-100143324&locStoreNum=6175&marketID=373
good luck!!! You guys are AWESOME!!!
johnna says
I mean about the lights – btw!!!
YoungHouseLove says
Thanks Johnna! We’ll have to check them out!
xo,
s
Carrie says
What are your plans for the beams? I think they’d look awesome glossy white with the ceiling a lighter or darker shade of grey than the walls (wish I was brave enough to paint a ceiling something dramatic).
YoungHouseLove says
That’s the plan (glossy white beams and trim, gray walls, softer gray or maybe even gray-blue ceiling). Can’t wait to settle on the actual colors though…
xo,
s
KK says
Hey, kids. Even though there is no fireplace there, I think those bricks would look amazing with a reclaimed wood mantel hanging there to showcase a future piece of art. :)
YoungHouseLove says
Ooh that would be fun. Especially when we get around to making it double sided!
xo,
s
Tab says
For the commenter looking to get paintedor stripped screws out. I use a pliers and just unscrew them out. If that is to hard cut the heads off with a recip. saw.
candace @ thecandace.com says
I love that you took out the shelves – the space looks nice and freed up. And I forgot to mention in my last comment – I thought it was a totally brilliant move on John’s part to take out one of the shelves in the other room, leaving a funky and airy pattern to work with. Good job, YHL!
Shannon (in VA) says
I am so hooked on your new casa updates! I’m so excited at the prospect of those beams painted a glossy white…you’d think it was my living room, lol! (Go Team “Paint those Beams”)
Theresa says
Maybe Benjamin Moore’s Sag Harbor Gray might be the warm gray your lookin’ for. I can’t beleive how much you guys are getting done and with a baby. Things are shaping up great already.
Hugs,
Chelsea says
Love the change! I am also a huge fan of letting spaces breathe.
Leigh Healy says
I agree it looks much better with the shelves gone. Only thing I though of was (and someone else may have already said this) it would have been a perfect spot to stack all that firewood you’ll be burning once you break through that fireplace into this room. Still, looks much better now!
jeni25 says
“If only we had the wall paint around to touch things up. Wop wop. We haven’t come across that yet (although it might be hiding in the basement somewhere) but if we don’t find it we could always bring home a bunch of white swatches and try to make the closest match.”
Did you know you can chip off a piece of the old paint & they can match it at a paint store?
Cooking accident in my kitchen well…kind of left me with a white ceiling in places & a charcoal ceiling above where the skillet was! Uhhh..Ohhh!!!
Couldn’t believe it was aperfect match & keep me from having to paint the entire ceiling!
Maybe it will buy you a bit of time until you want to repaint.
Thanks for sharing your journey with us!
YoungHouseLove says
Wow! We always thought it had to be a big enough swatch that it would mean chipping off a hunk of drywall. Good to know!
xo,
s
tosha says
Losing the shelves was definitely the right call in that room, I think. It looks lovely! We just painted our living room gray with white trim and it actually is quite warm – love how it can look bright in the day and warm at night. Can’t wait to see what yall do with this room!
mary W. says
1. love your demo action! 2. love any color painted brick! 3. love that your holiday wreath is still up! do you have any DIY for wreaths or any links of your faves as we transition to spring (hopefully soon)? my front door is now looking lonely!
YoungHouseLove says
Hey Mary,
We can’t think of any DIY wreath links off the top of our heads. Anyone have any to share with Mary?
xo,
s
Monica says
I remember thinking the placement of that shelving was odd when you guys first posted pictures of the room. But I love that you decided to take them off. And hooray for light spackle! You guys are making great progress with all the little tweaks you’ve been making! Hopefully it’s starting to feel more and more like home every day!
Devon says
Two things:
1. To remove things like the shelf supports (or trim, etc.) without busting into the drywall, I’ve had great success with a small cat’s paw-type crow bar and a shim. I hammer the side of the crow bar with the 90 degree turn into the space between the trim and the wall, then wedge the shim into the space between the crow bar and the wall so that, when pressure is applied, the shim protects the wall from being punctured. You still get the fun of spackling…just fewer, and smaller, holes.
2. Hardware stores sell a screw extractor drill bit that you drill right into the head of a stripped screw, in the direction that you would normally use to remove a screw. It grabs on and pulls the screw out. Genius.
I don’t mean to sound like a commissioned tool salesperson (which I’m not), but these are two tools that I seriously couldn’t live without.
Mollie says
It took me about 15 paint samples before I finally found THE color. I was looking for a medium tone, warm GRAY. Not taupe. Not beige. Not a weird snotty greenish color. Not slate. Warm…gray. And the second the paint touched my wall, I knew it. I was in love. The winner was FASHION GRAY by Behr.
And six months later, I’m STILL in love. It goes with everything. I really feel like I’ll never have to repaint.
The kitchen, however, is a different story. I don’t know why I ever thought mint green was a good color, or would flow with the rest of my house.
Stephenie from Decorating Addiction says
I love it so much more without the shelving. It looks balanced. Great job. I’m soo bummed I didn’t win the giveaway! :-( But congrats to the lucky winner!
Carrie says
For Mary W –
Emily @ Jones Design Company has a couple great wreath tutorials… coffee filter, book pages, burlap ruffle wreath and my fave, the Nonna wreath.
http://jonesdesigncompany.com/tutorials/
Nicole Jenkins says
I wonder if the family you bought the house from… or your new neighbors…are now reading your blog?? I wonder if it will inspire (like Curb Appeal the Block) lots of home improving in your “hood”…and if the old owners have moments of… “hmmmm, we should have done that when we lived there!”… Best wishes!
YoungHouseLove says
Hey Nicole,
As far as we know the new owners of our house aren’t blog readers (although we disclosed it to them just so they knew pics of their house as it looked when we lived there would be online) while the old owners of our new house do seem to read quite often- which is really fun because they’re just as excited about the upgrades as we are!
xo,
s
Drea says
You all are busy peoples! :)
I couldnt find ur email , thought I had it – but I wanted to share these with you, cause it made me think of you when I saw it.
http://www.etsy.com/listing/63593275/pinky-novak-8×10-fine-art-photograph?ref=fp_treasury_3 – you should re-create this with burger HEHE
and then this: http://www.etsy.com/listing/62119008/cast-iron-bathtub-couch?ref=fp_treasury_1 – CRAZY EXPENSIVE!!! and not even that cute imo – but the pillow reminds me of one you had up on ur blog not to long ago :)
YoungHouseLove says
Love it! Thanks for the links!
xo,
s