For the last six years, having one bathroom worked surprisingly well for our family of four. But this year, as part of our recent renovation, we finally added another bathroom – and boy does it feel luxurious after so many years without it! Today we’ll share why, where, and how we finally added a second bathroom to our smaller home.
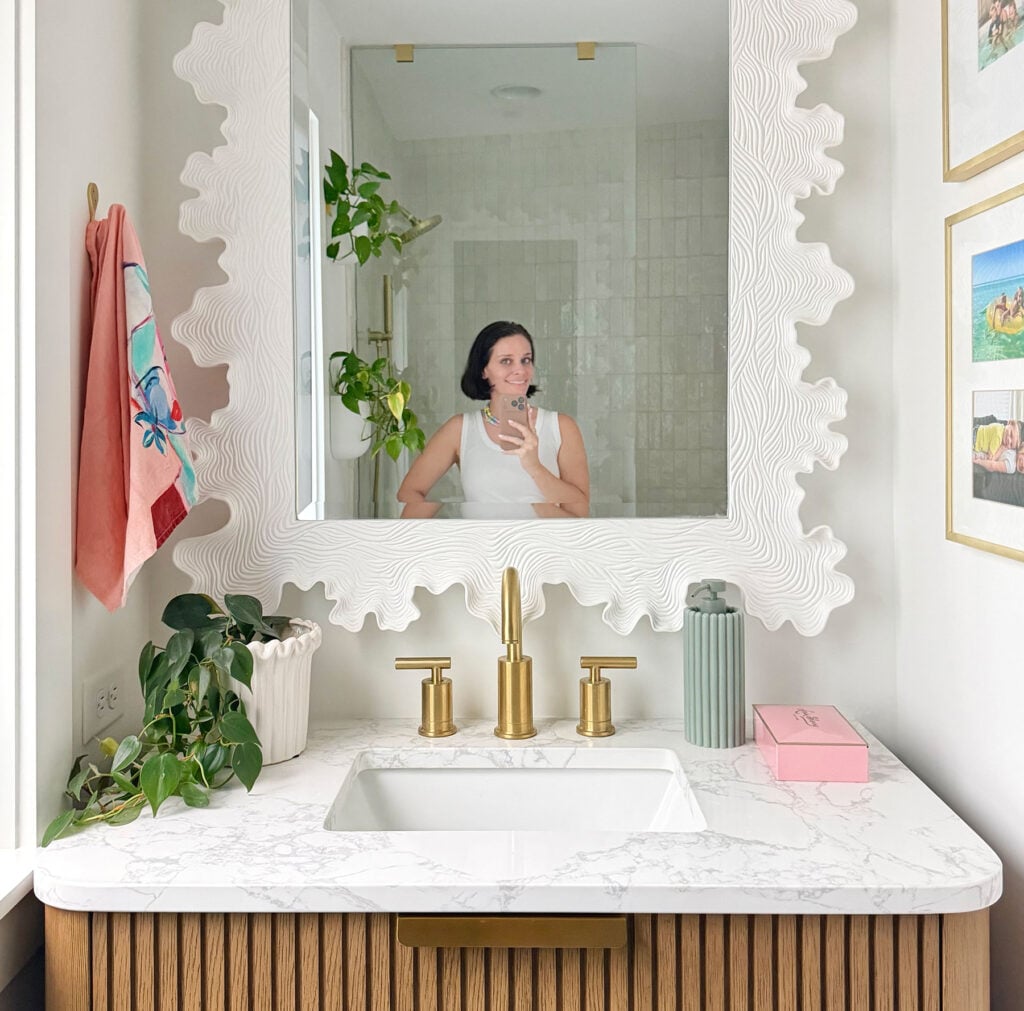
We’ve also got not one, but TWO video tours below. There’s a quick walkthrough of the bathroom (plus a peek at the rest of the downstairs renovation). Plus a longer, no-detail-spared tour Sherry recorded for Instagram.
New Bathroom Video Tours
Before we dive into the process of adding this bathroom, let’s walk through the finished space. The first is a quick spin around the bathroom to orient you, (filmed by steady-handed John). It starts in the new “lounge” area (which was the main part of our recent renovation) and leads you into our new ensuite bathroom.
Note: You can also watch this video on YouTube.
This second video is one I posted to Instagram that’s a more detailed look (and admittedly less steady handed – sorry!), along with some yappy explanations of how things work and why we made certain decisions. Some of the same info is covered in text below, but this video is certainly the easiest, most thorough way to experience it!
Note: You can also watch this video on YouTube.
Now let’s cover some backstory before getting into all of the after pictures.
Why We (Finally) Added A Bathroom
We assumed that adding a second bathroom would be super high on our priority list when we moved here in 2020. We’d never lived in a one-bathroom house before, let alone as a family of four. But the pandemic deterred us from rushing into it, and we quickly realized that having one bathroom wasn’t a big deal at all… especially with an outdoor shower that we all loved.
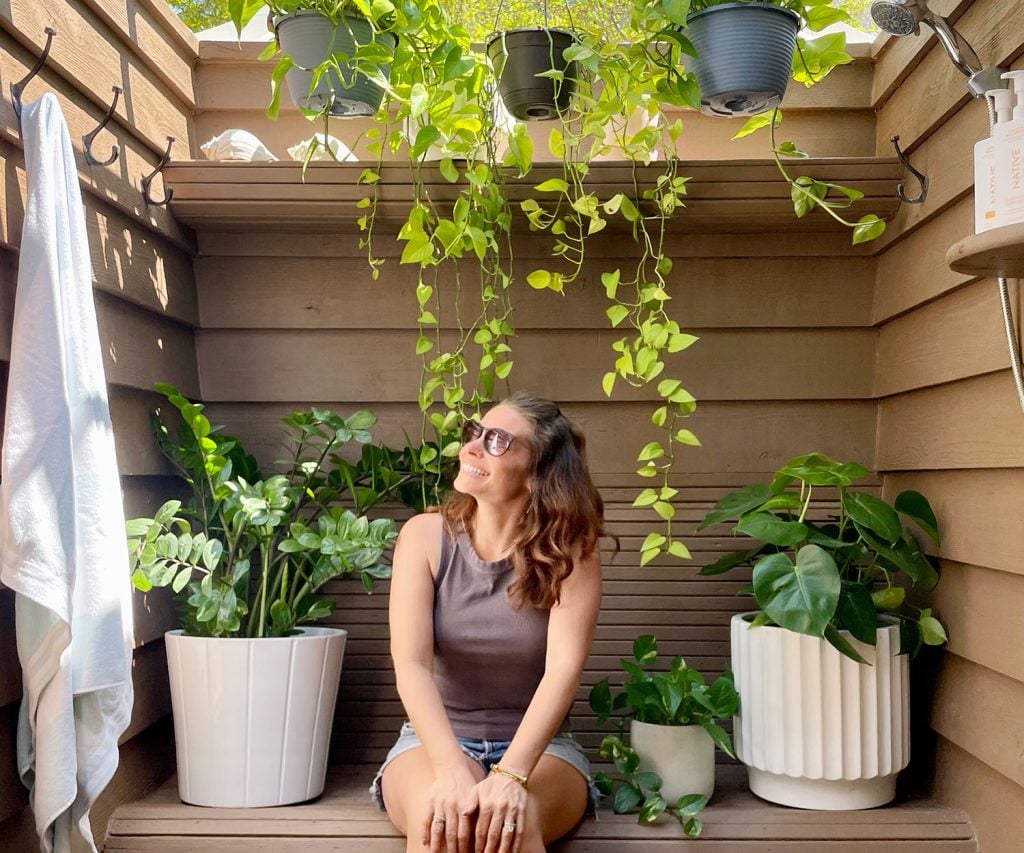
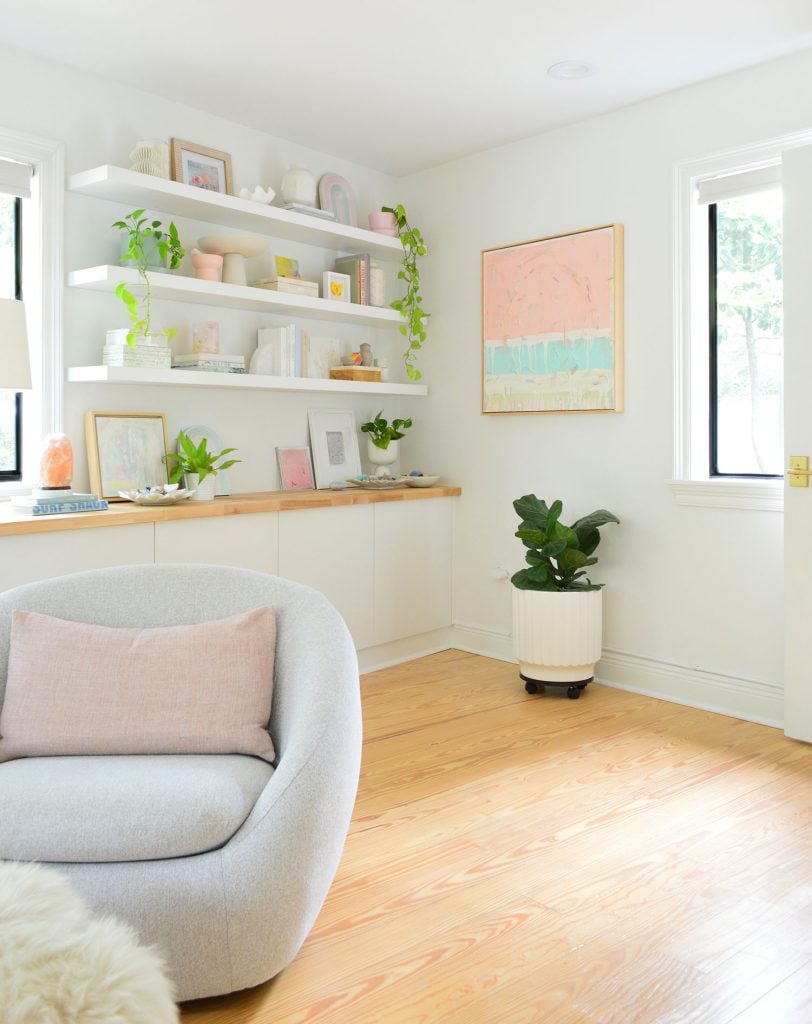
Then things changed last fall. Not because we were desperate for another bathroom, but because we decided to renovate a large part of our house’s downstairs layout. The main goals of that renovation were to (1) give us more access/visibility to our backyard pool and (2) make our son’s room bigger. The bathroom wasn’t even on our radar at first!
But in talking with our contractor, we decided it made sense to tackle the bathroom while the house would already be torn up. Plus, it would be more cost-efficient because framers, electricians, drywallers, etc would already be on site and a whole lot of walls would already be open. The contractor even said “the bathroom will be easy and cheap” because of a very simple pipe-run that he could add under our raised deck out front. Music to our ears!
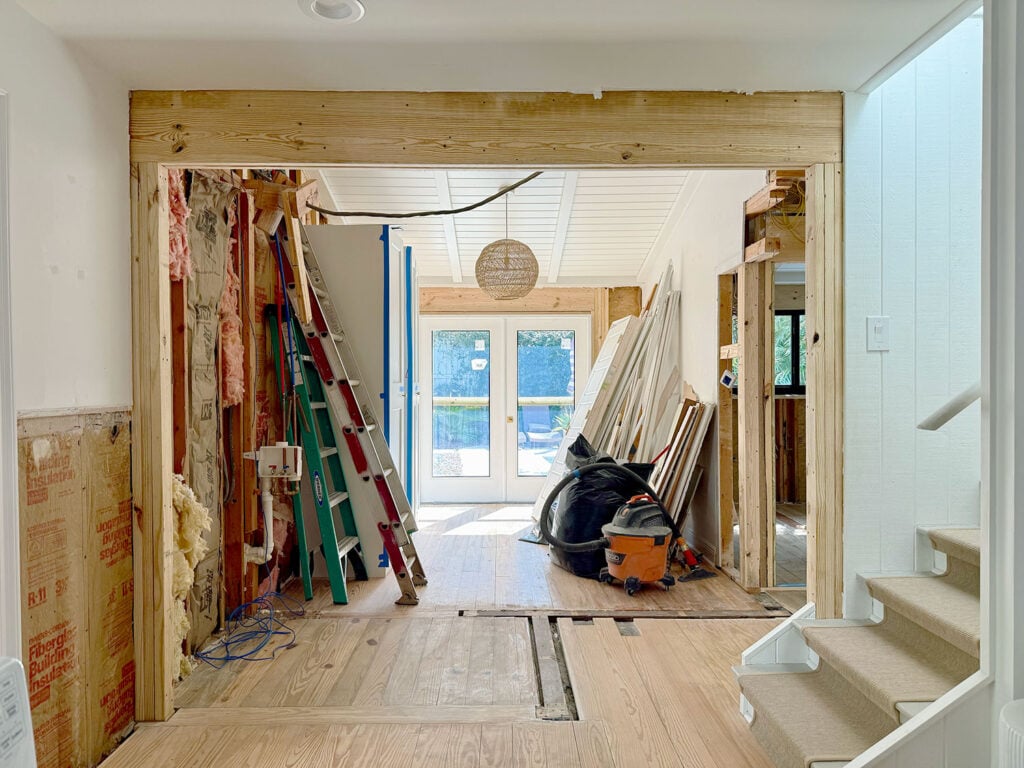
The last thing to do before officially adding it to the to-do list was to pin down where to put everything… which proved harder than expected! Let’s just say we considered EVERY SINGLE POSSIBLE WAY you can lay out a small bathroom… maybe 10 to 15 times each.
Laying Out Our Second Bathroom
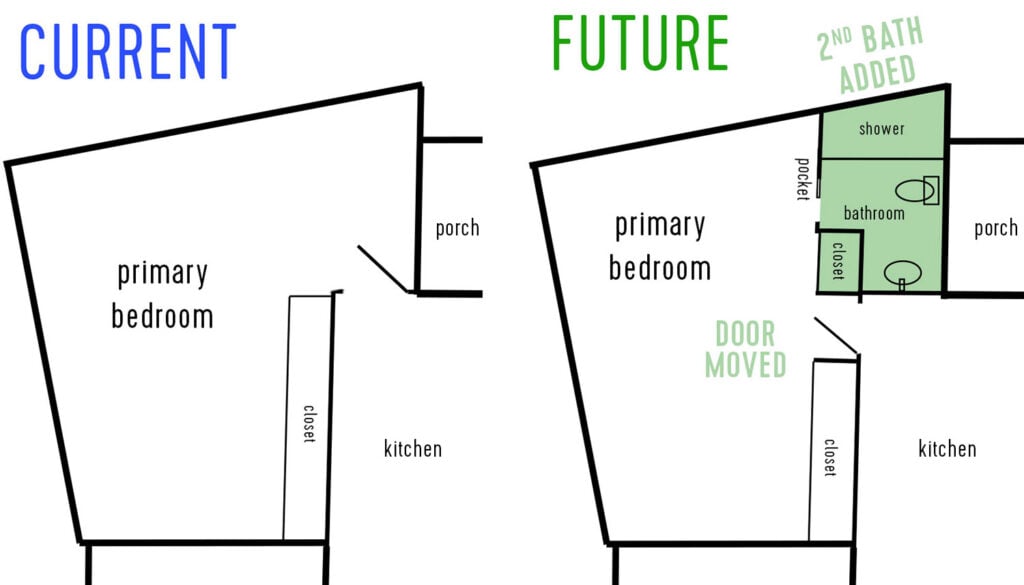
The decision about where to put the new bathroom was easy: this corner of our bedroom. It was a natural spot to create a full, ensuite bathroom from existing square footage without impacting the bedroom’s function much at all. We’d basically just lose the storage & display space below and the room would become a bit more of a rectangle instead of an L shape, which always was a little quirky.
This is the rough floor plan we showed our contractor when he was bidding the job. You can see where the bathroom was going (at right, in green) and how it would require relocating our bedroom door and shifting one of our Ikea closets. You can also see how weirdly shaped our bedroom is – so many angles!
The contractor liked the general plan, but identified a few code requirements to consider – mostly clearance around the toilet and the door swing. So before he took our ideas into his CAD software, Sherry and I used Photoshop to map out just about every possible arrangement we could think of – toilet here, sink there, maybe a pocket door? These are just a few, but we considered literally EVERYTHING that was possible with code considerations and all that jazz.
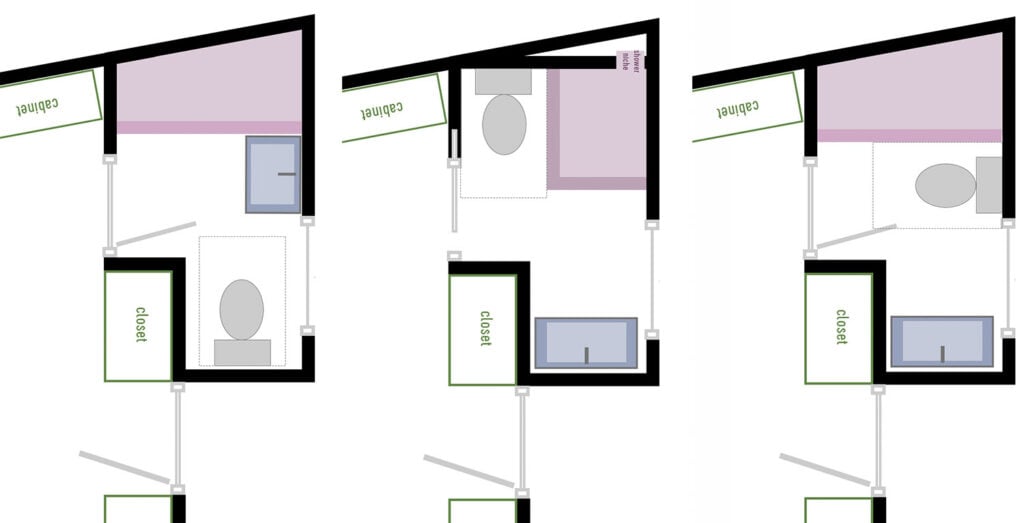
This small space was QUITE the puzzle. Changing one thing (like widening the door to meet code) impacted something else. Now is the shower too cramped? Are we creating a clusterfug between the toilet & open door? In fact, our big idea of a pocket door wouldn’t even work because that door was required by code to be wider than the space we had next to it for it to recess into the wall. Womp-womp. So it was back to a wide traditional door that would have to swing in or out.
Not to be deterred, we continued to brainstorm (just John and I for days with graph paper and tape on the floor, along with our contractor and his son, who had lots of ideas to throw into the pot. Finally, we landed on two solutions that helped everything click into place:
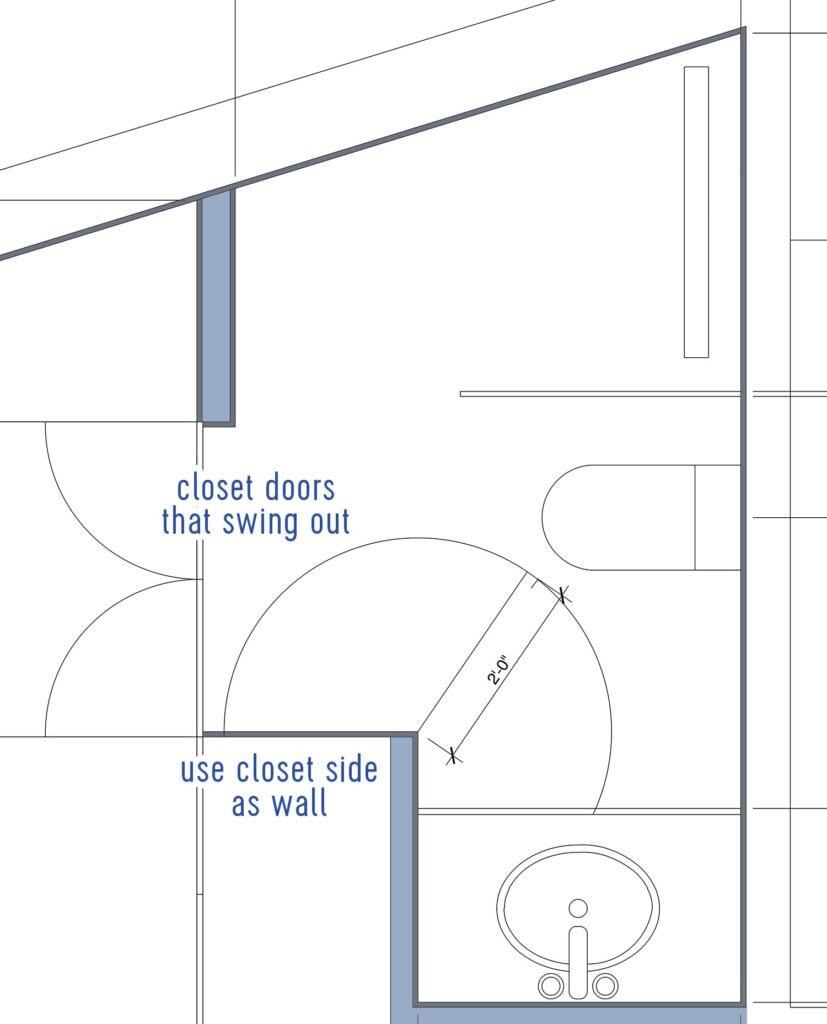
- Swap out the wide traditional door we assumed we had to have (which requires bulky framing & jambs as well as a ton of space to swing out or in) for a matching set of Ikea closet doors, which can be mounted to a thinner side panel, earning us space inside and outside the bathroom that isn’t “used up” by door swing, as well as a really cool seamless closet look from outside the bathroom.
- Use the side of the Ikea wardrobe as the “wall” in the bathroom, rather than adding extra framing & drywall around it, which also saved us a fair amount of floor space we thought we’d be losing.
The second one was a pretty unconventional solution, but it would give us a few crucial inches to help us meet code in all the important spots – thereby creating a bathroom that’s not too cramped or tight feeling (in fact it’s ADA compliant with a zero entry shower!). Our contractor laid it out in CAD to be sure, and those two tweaks really made all the difference. The shower got bigger, the clearance around the toilet increased, and the whole thing felt more open and spacious.
To be totally sure that we liked this plan more than the 274 other ones we considered, we taped everything out on the floor before demo began and “walked” our new floor plan for a few days. We actually did this for some of the previous iterations as well. This was the first version that felt – dare we say it? – spacious. I know you’re laughing because it looks insane in this picture, so you’ll just have to trust me that actually walking it and living with it was enough for us to say: this is the one.
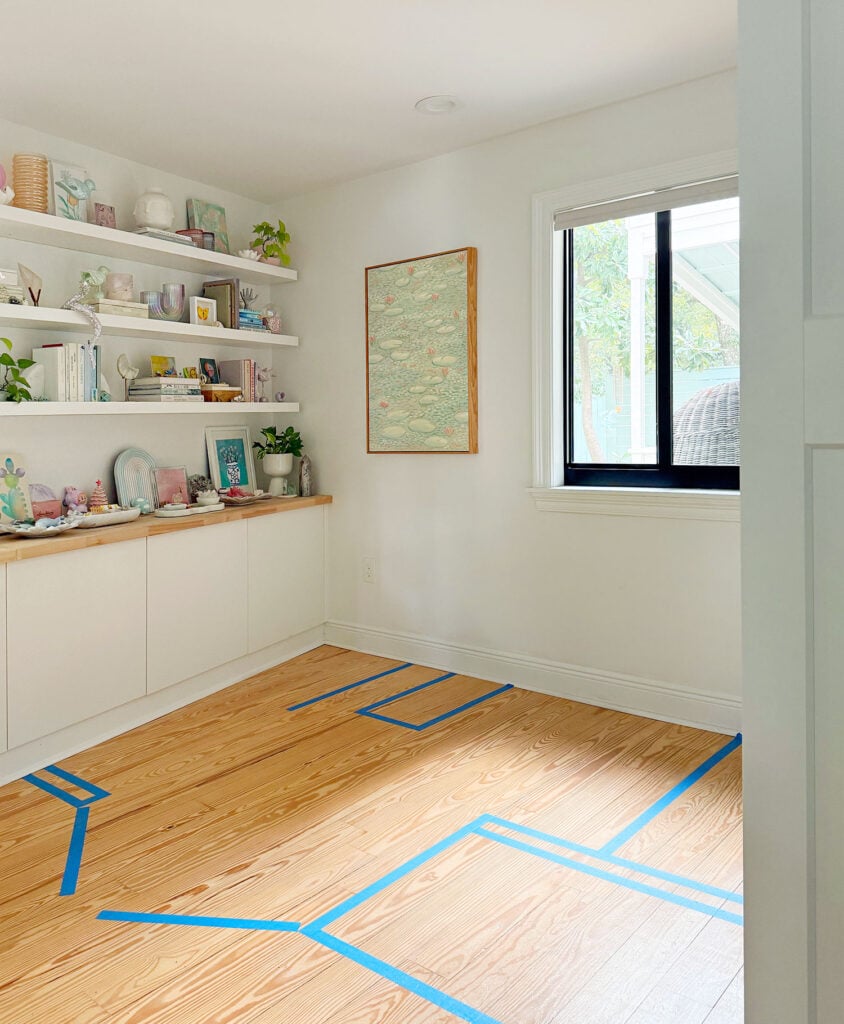
One last consideration was how this would all look from the bedroom. Sherry and I took to Photoshop again to render what it might look like. Forgive this hasty “before” photo I snapped using my 0.5x lens. You can see the bathroom taped out on the left side. You can also see why we thought that was the perfect spot for our ensuite bathroom though. It totally makes more sense of the room’s L shaped layout.
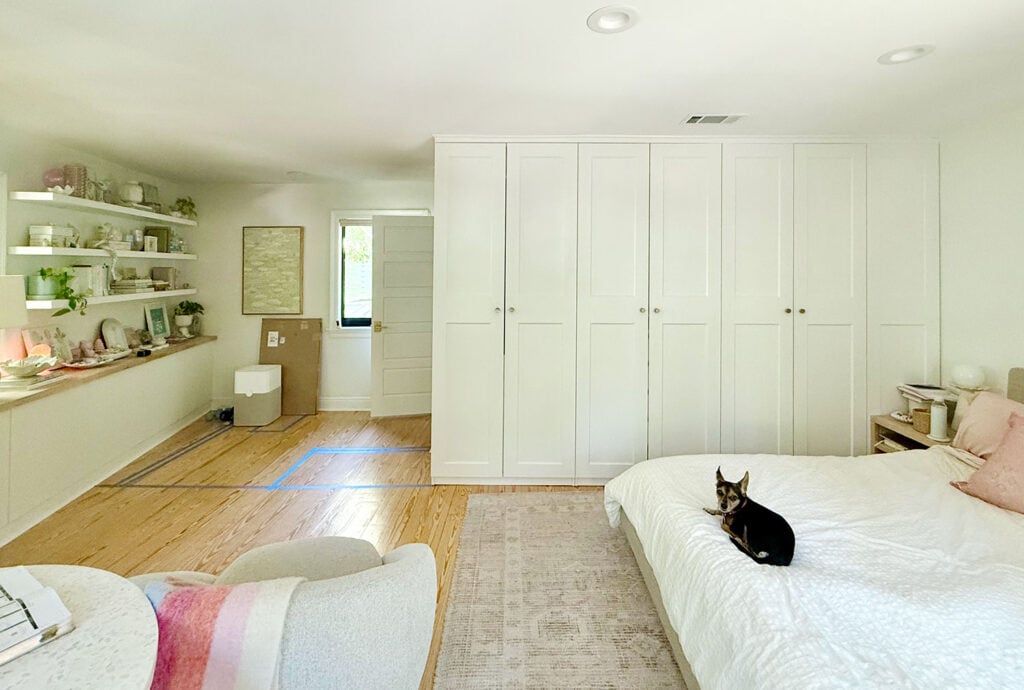
First, we mocked up the new bedroom door location, the shifted closet, and a “traditional” door to the bathroom (far left) just to make sure it wasn’t the only solution that looked good. We assumed it would balance the door really well, and feared we’d be back to square one because we were pretty committed to the double door concept at this point. Thankfully we both hated it. The door to the room being shifted back about 2′ from the door to the bathroom (thanks to our wall of built-ins) made it look dumb. We were thrilled! (Note: we wouldn’t want to shift the bathroom door back to where the bedroom door is because our bathroom would literally not have room for anything and wouldn’t come close to meeting any sort of code requirements for clearance).
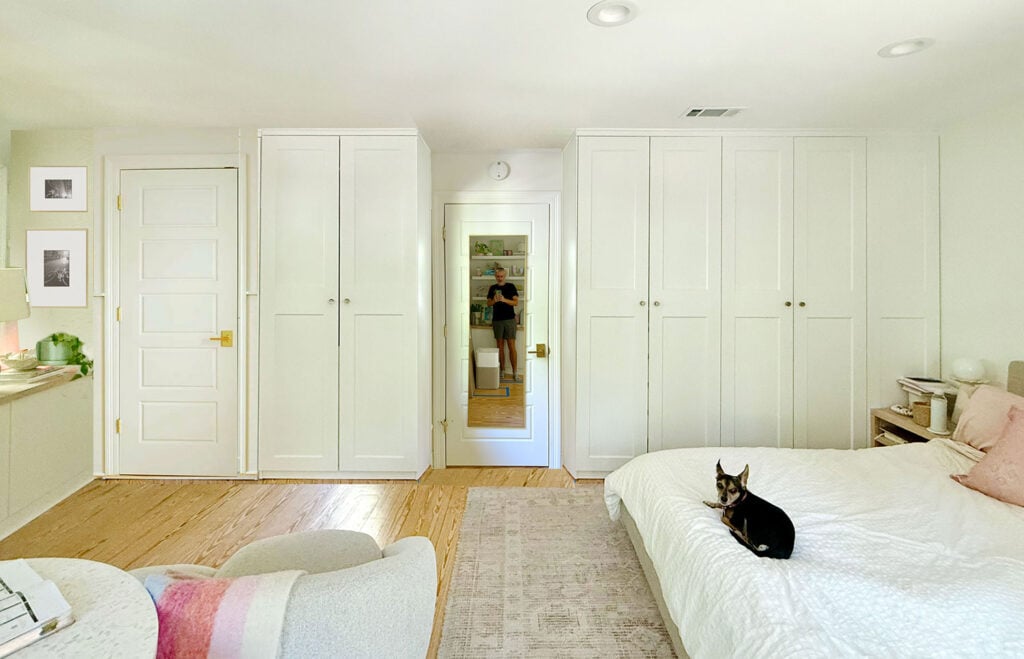
So yes, we were downright jubilant that we didn’t like that rendering. The mix of doors looked more chaotic and off-balance than we expected. It was actually a relief when we mocked up the closet-doors-as-bathroom-door version, which remember: at this point was basically our only workable plan. It instantly made the room feel more symmetrical, which is incredibly hard to achieve with all of the weird angles in this room!
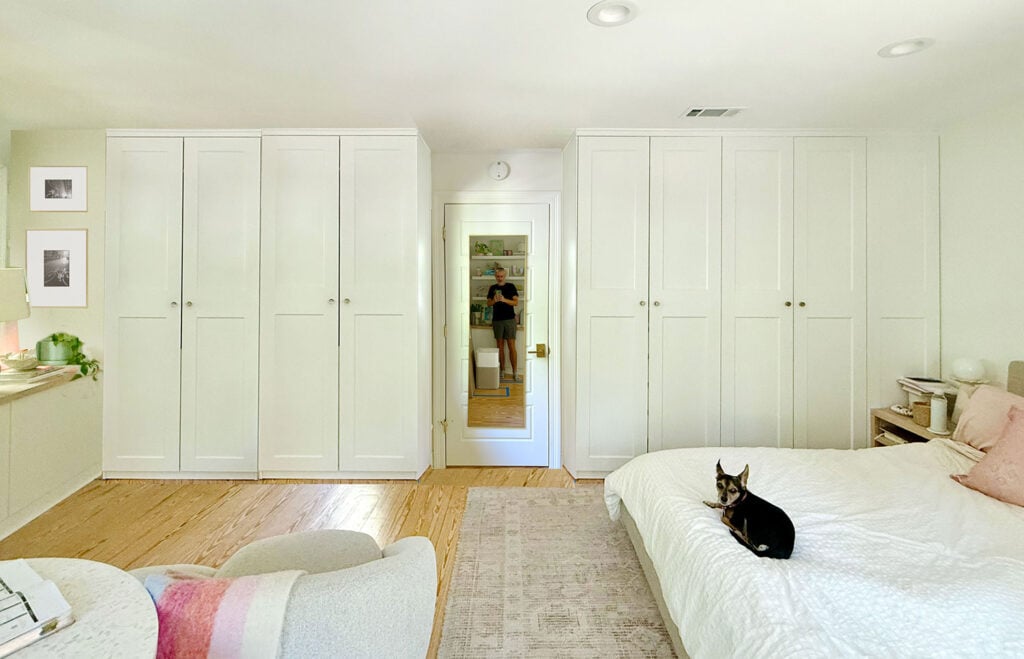
We even had fun mocking up a cabinet above the door…
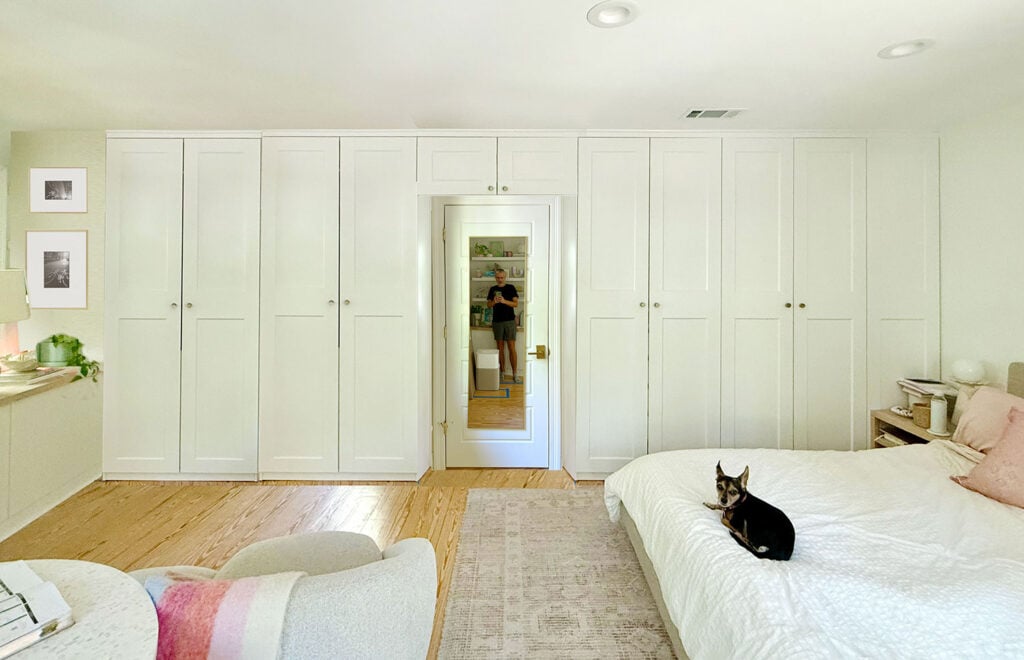
… and then settling on a shelf because it felt less “wall of cabinets everywhere” and added some nice dimension.
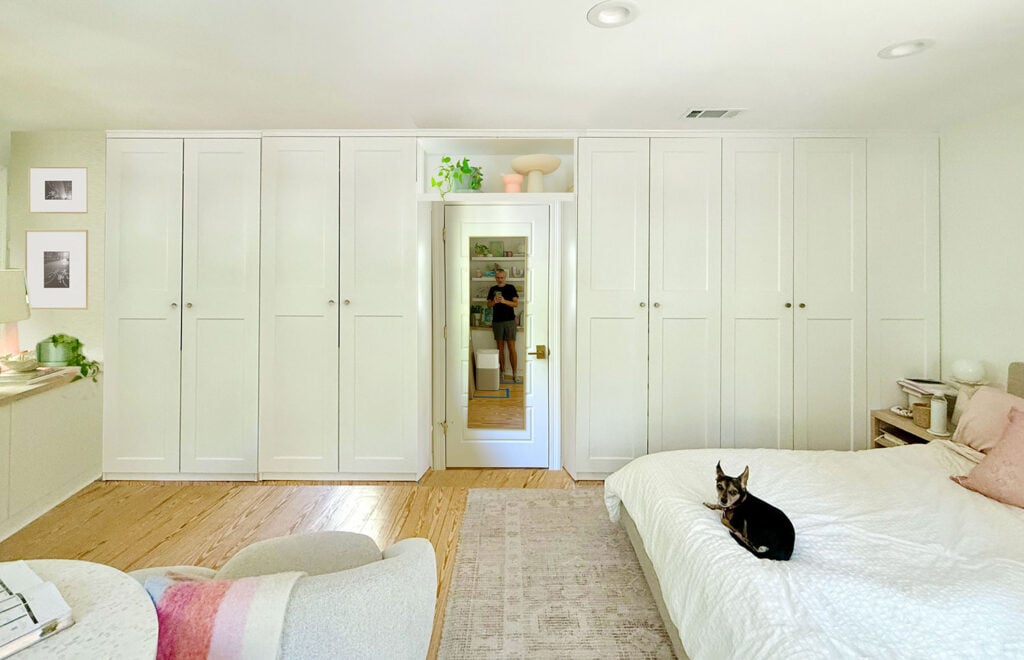
So between the CAD drawings, the tape on the floor, and our photo mockups, we finally felt confident about our plan. All that was left was to… make it a reality. Easy, right?
Bathroom Construction Progress
Construction actually was very straightforward, thankfully. It was all handled by our contractor, and the few curveballs they encountered were pretty small and easy to resolve. But here are a couple of “in progress” shots to help you better understand the layout.
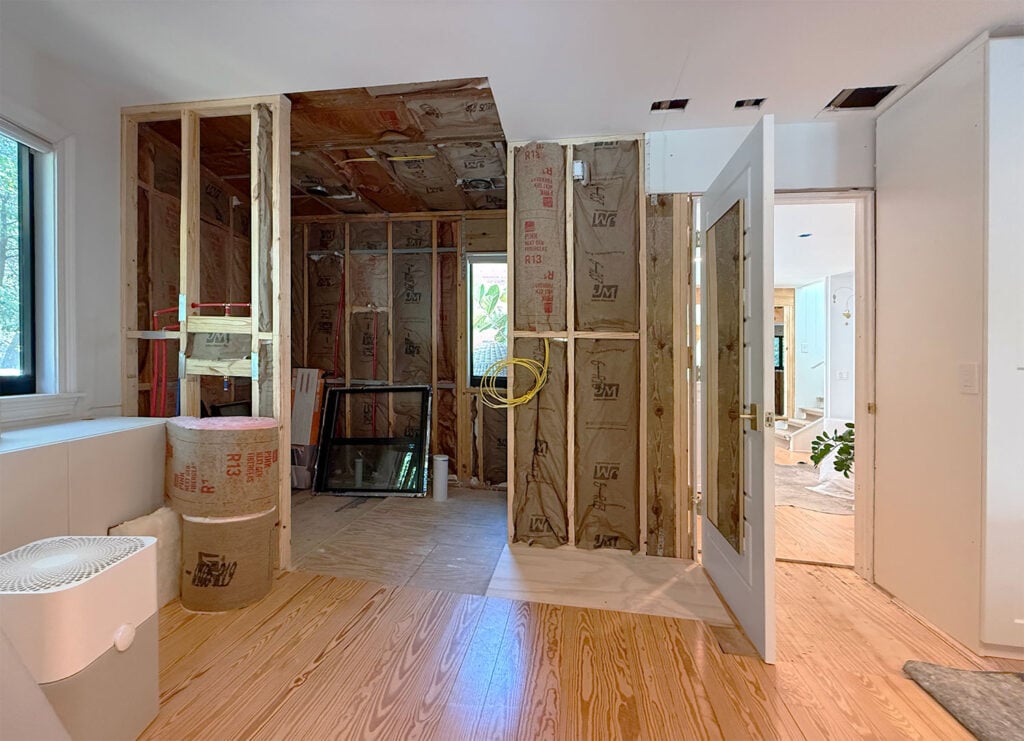
See that section of blonde plywood on the floor in these photos? That’s where the shifted Ikea wardrobe would go (which used to be in front of where our new bedroom door was placed). You can see how there’s only framing behind it, not on the sides. A wall is about 5″ thick, so not framing the sides saved us nearly A FOOT of linear space on that wall (!!!). We did have the contractor add some 1/2″ wood panels to the exposed wardrobe sides to give them a bit more finish & strength, though. You’ll see that in our after photos (and it can be seen in the two videos we shared above as well).
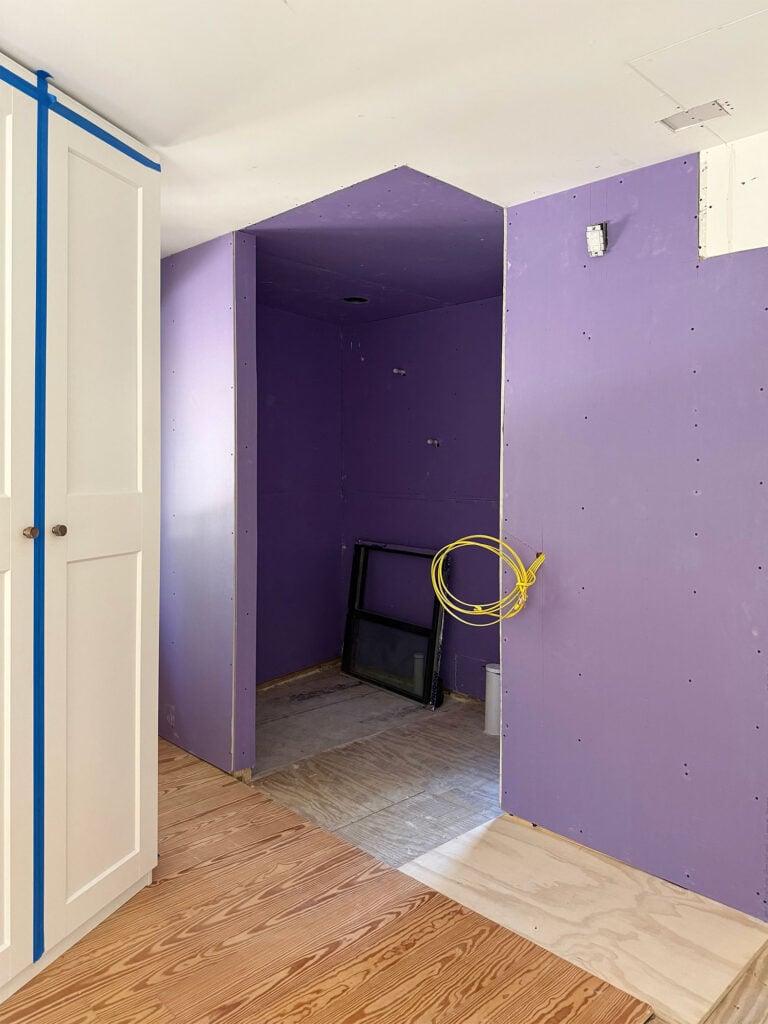
Let’s skip ahead to the after pictures, since it will be easier to talk about some of our material selections and design decisions. Plus, those are the fun part anyway!
Bathroom Afters
I know you’re eager to look inside the finished bathroom, but let’s stay outside for one more second to show you how the doors turned out. Here’s an angle similar to the one above.
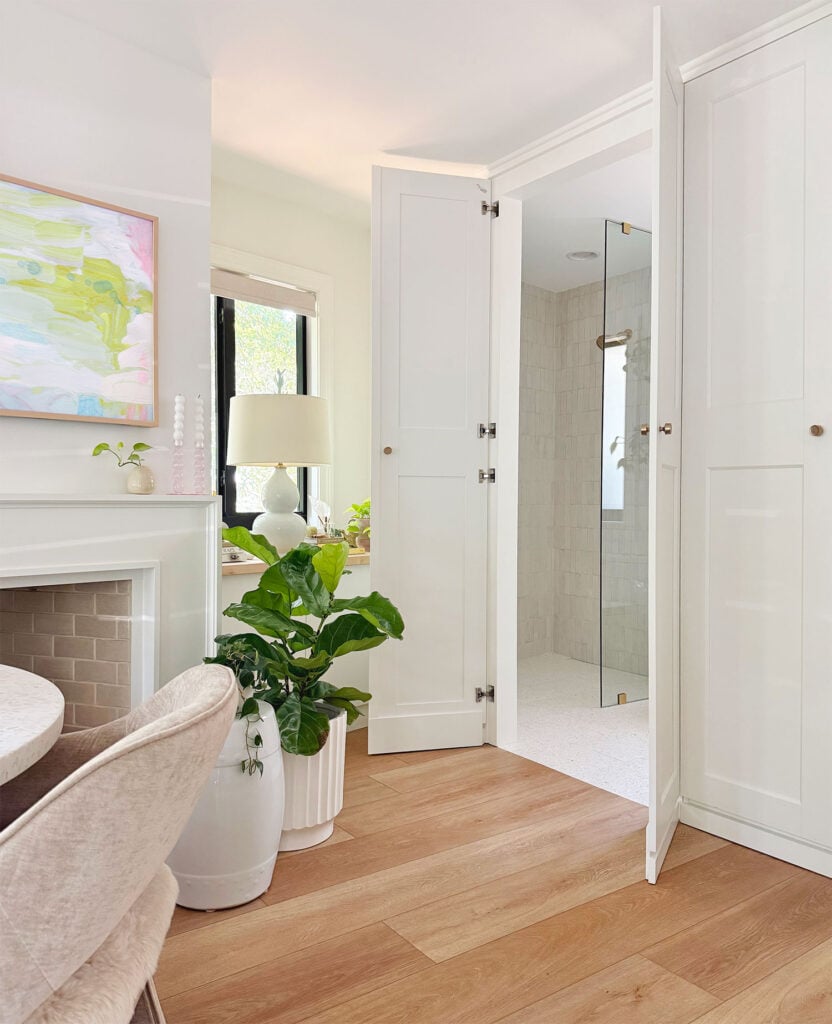
We’re SO RELIEVED that the doors worked out as well as they did. Not only did they solve our floor-planning challenges, but they also created this cool “secret room” effect. It’s almost like the bathroom is hidden among our closets!
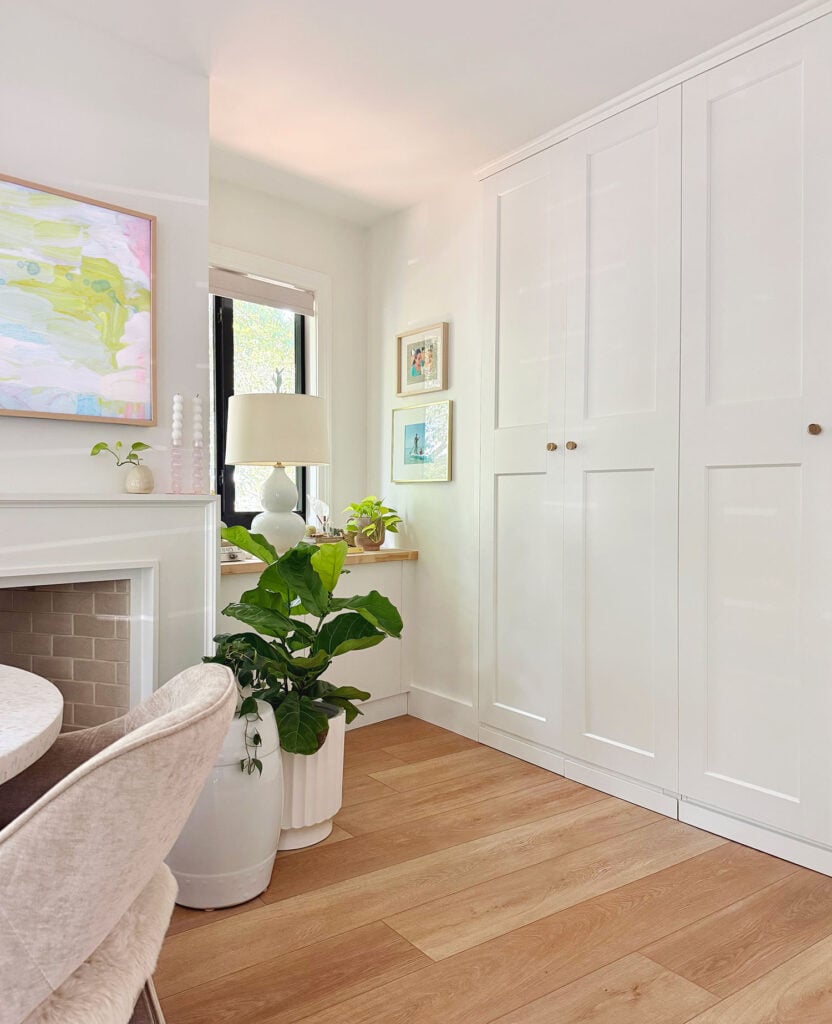
It’s a little hard to get a good picture of this whole wall (without breaking out that weirdly-warping 0.5x lens again), but this shot (and the video at the beginning) gives you an idea of how it all connects. Plus, you can see the little display shelf John built over the bedroom door to break up all of the closed closet doors. It adds some nice dimension and color up there.
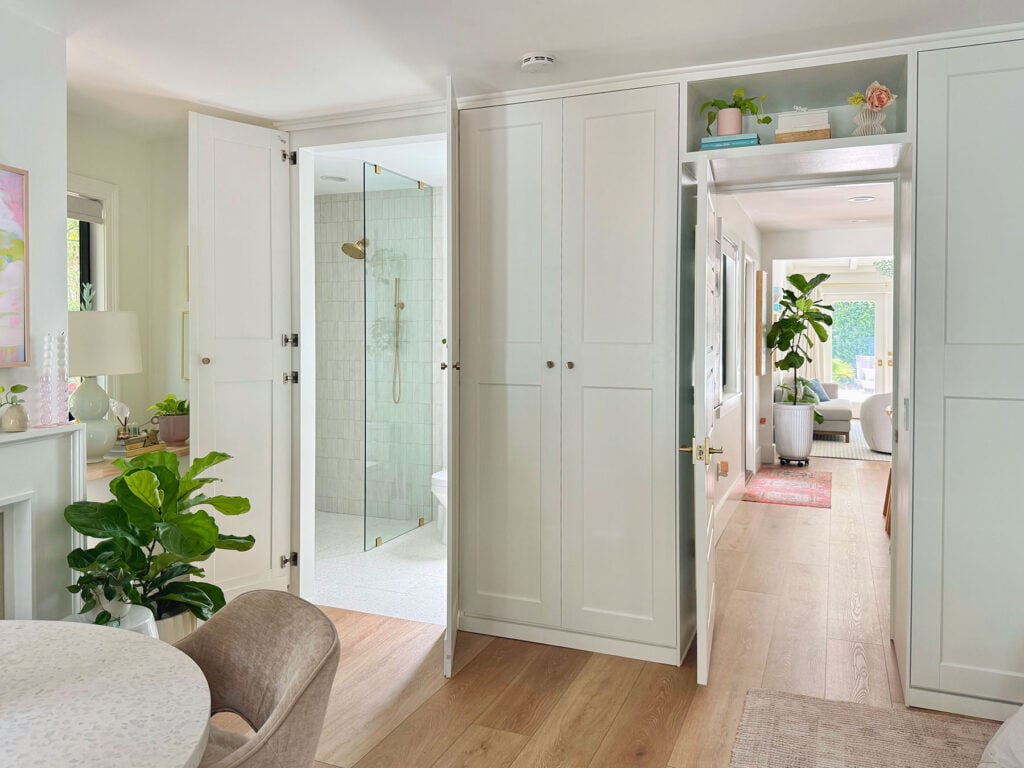
Our blend-in-with-the-closets door solution really helps the bathroom feel much more spacious than it is. The outswing keeps the doors from cramping the bathroom AND the actual opening is wide & generous – nearly 35″ across! Here’s John (and Penny) for scale.
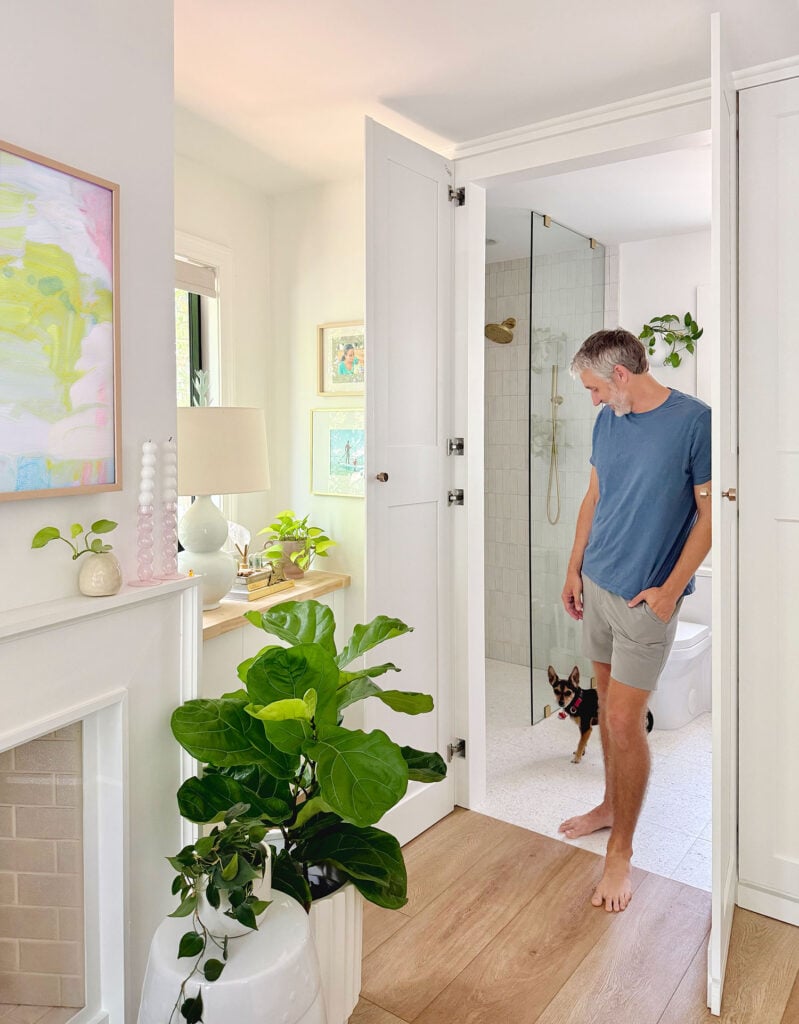
John actually did a lot of finish trimwork on these doors after the contractors installed them, including the surrounding “jamb” that gives the passage a more finished look. It also conceals the hinges better and gives the doors something to rest against when closed (keeping them flush with the closets). He also added faux baseboards and a center strip to the doors to give us full privacy.
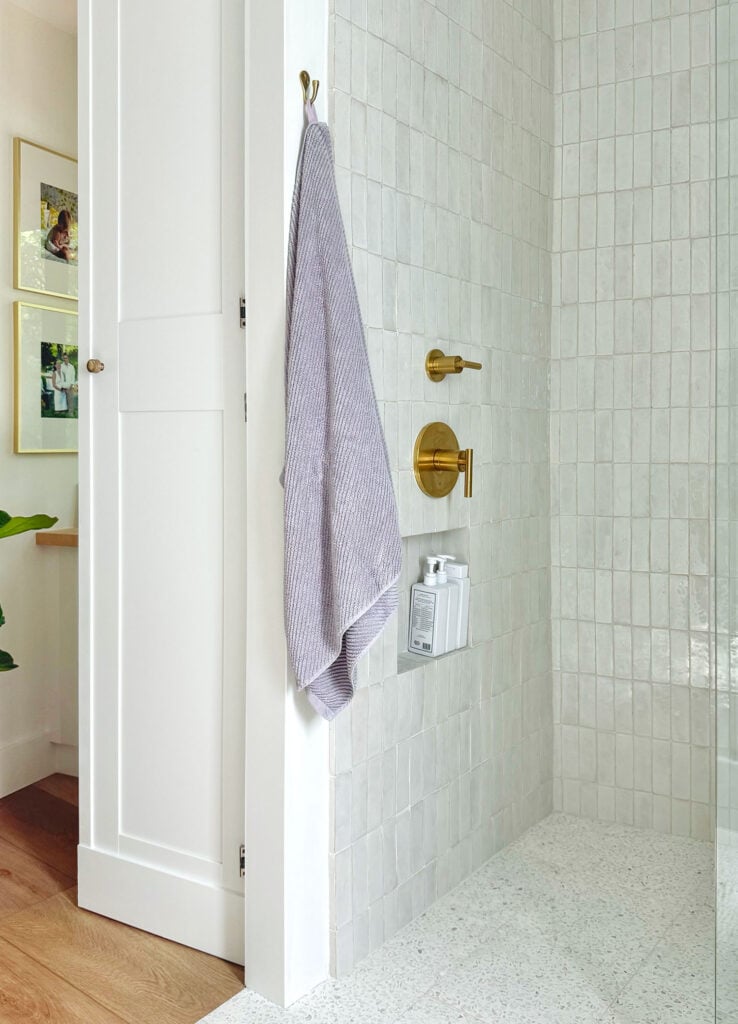
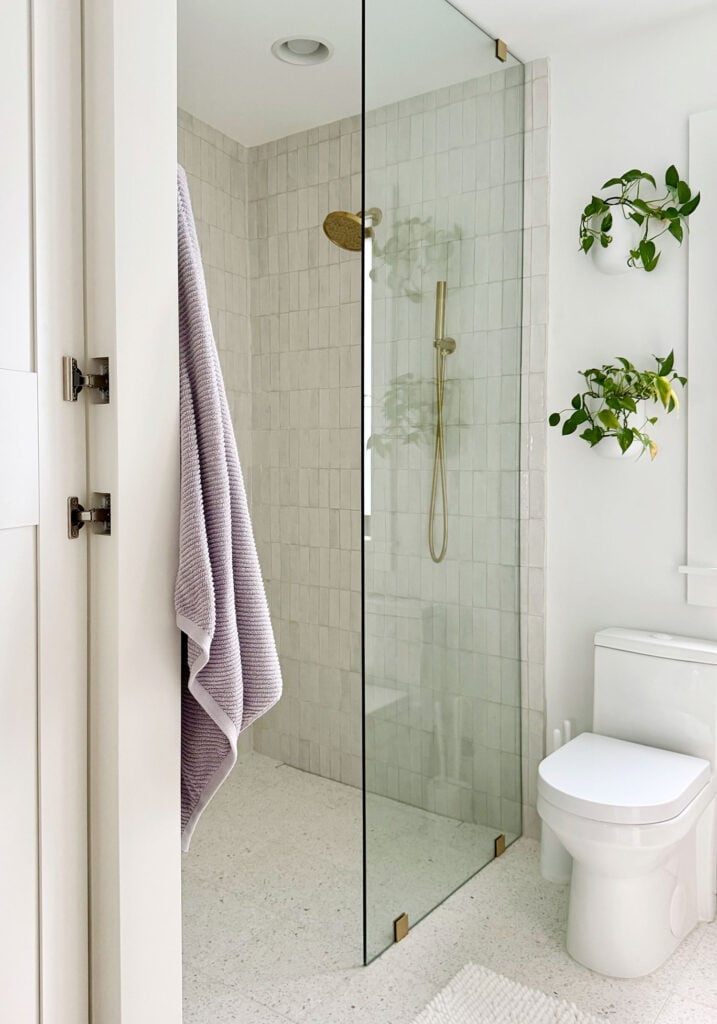
But enough about doors – let’s move on to the shower, which turned out bigger & better than we expected. During the floor planning process, we were always a little nervous it might feel tight or cramped (and it was hard to “stand in the footprint” when we taped it off because a wall of cabinetry ran along that back wall before – sort of cutting the shower footprint in half). The fear of it feeling cramped and tight is one reason we chose light, shiny wall tile, a glass divider, and a doorless/curbless entry. These were all tricks designed to make the shower feel spacious, seamless, and bright – and it worked! We knew we could always add another piece of glass if we wanted a door, but we both really like it this way. We also had an open glass shower at the pink house – just with a side wall but no back wall or door – so we should have known we’d like it! But it was a relief to each take a few showers and say: we do not need that door!
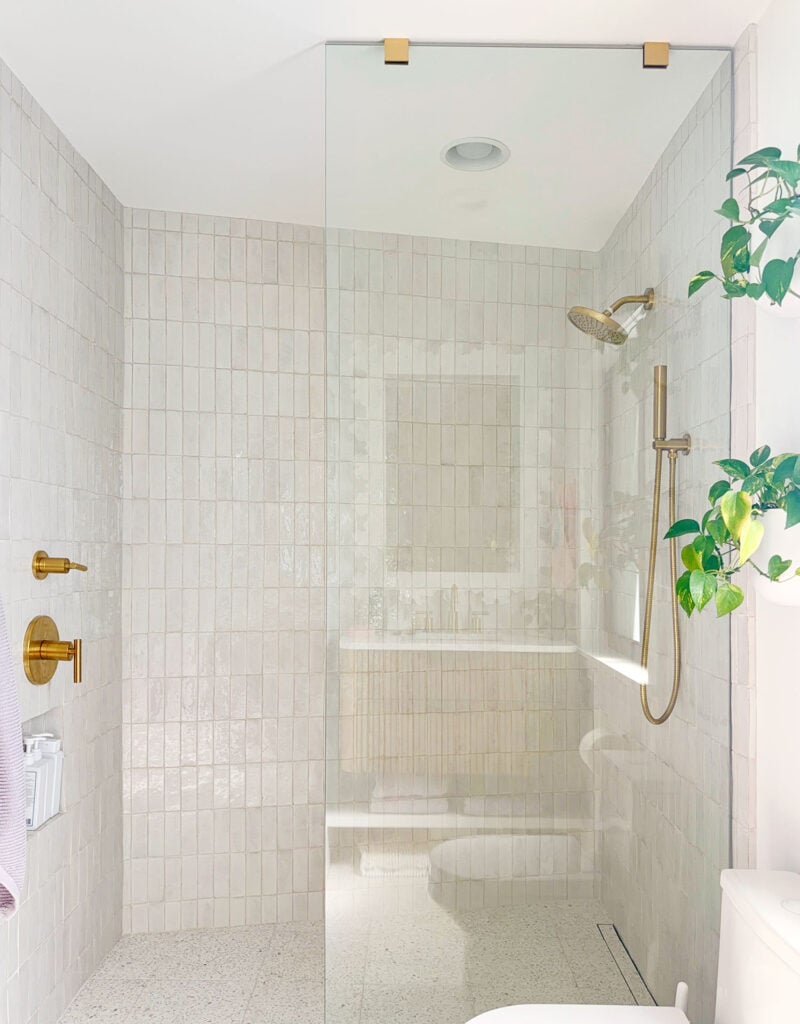
Placing the shower on this wall also gave us the biggest shower possible in this space. It’s 5′ across and, because of the angled wall, it flares from about 3′ wide on the open side to 4′ under the shower-head. So for once, the weird angles in this room worked to our advantage because it’s the widest where we actually stand to shower (as I demonstrate fully clothed below).
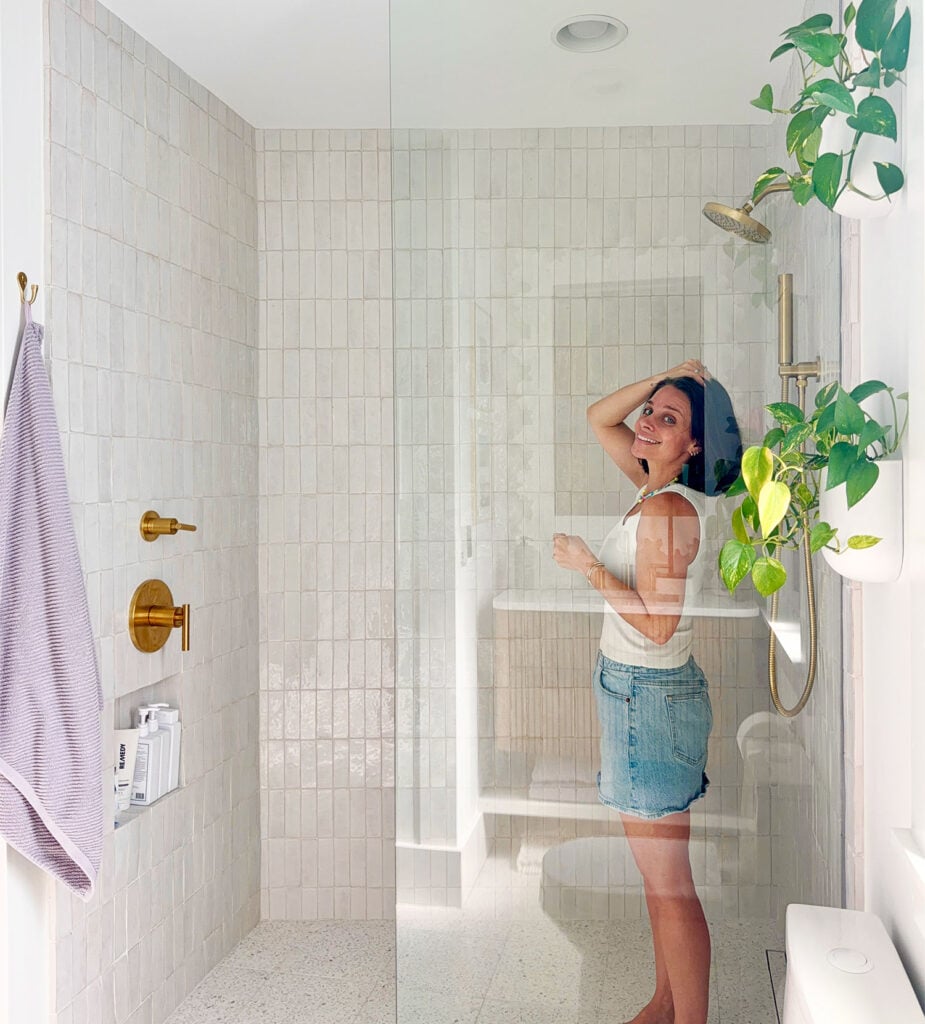
When I’ve shown video of the shower on Instagram, people have worried that water must get everywhere because there’s no curb and no door, but it’s totally fine. The opposite wall with the controls doesn’t get wet, and the floor slopes down to direct water back toward the linear drain under the shower-head. It’s hard to tell from the photo below, but that side pane of glass is very wide (see above) so nothing splashes out beyond that wall.
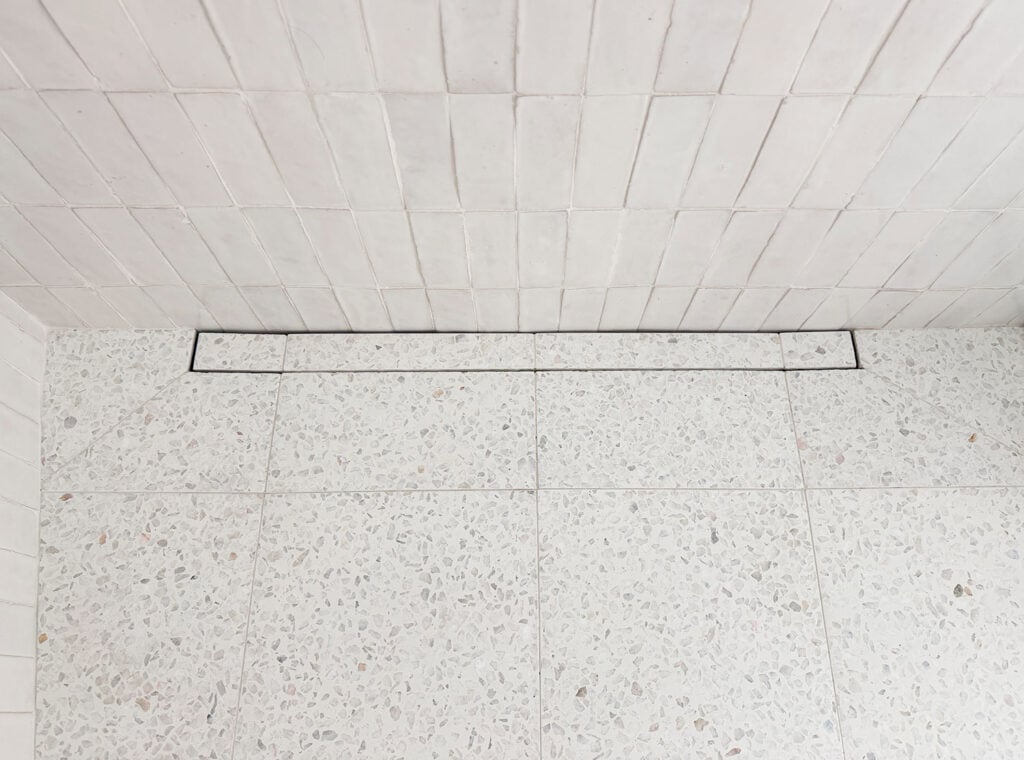
Speaking of the linear drain: it was a solution to one of those little curveballs we encountered along the way. We originally planned for a traditional center drain, but there was a floor joist right where it needed to go in order to be centered. Our contractor immediately suggested a linear drain that they use for all of their projects (apparently some have issues, but this one has been great for the five months we’ve been using it) and it allowed us to offset the pipe. A linear drain also meant the floor only had to slope in one direction (toward the wall) instead of sloping in on the sides too, which is nice. We’d never used a linear drain before, so we were pleasantly surprised that you could inset your floor tile right into the drain cover itself! So it has a pretty clean look. And the whole thing pops out easily if you have to access the actual drain cover.
We kept the shower controls pretty simple, with just a shower-head and one wall-mounted hand sprayer. We mostly wanted the sprayer to make cleaning easier, but it can be nice to have both things spraying on you at the same time too. I actually use both all the time when I shower in here and John’s taller so something about his height makes him like all the water coming from the shower head instead.
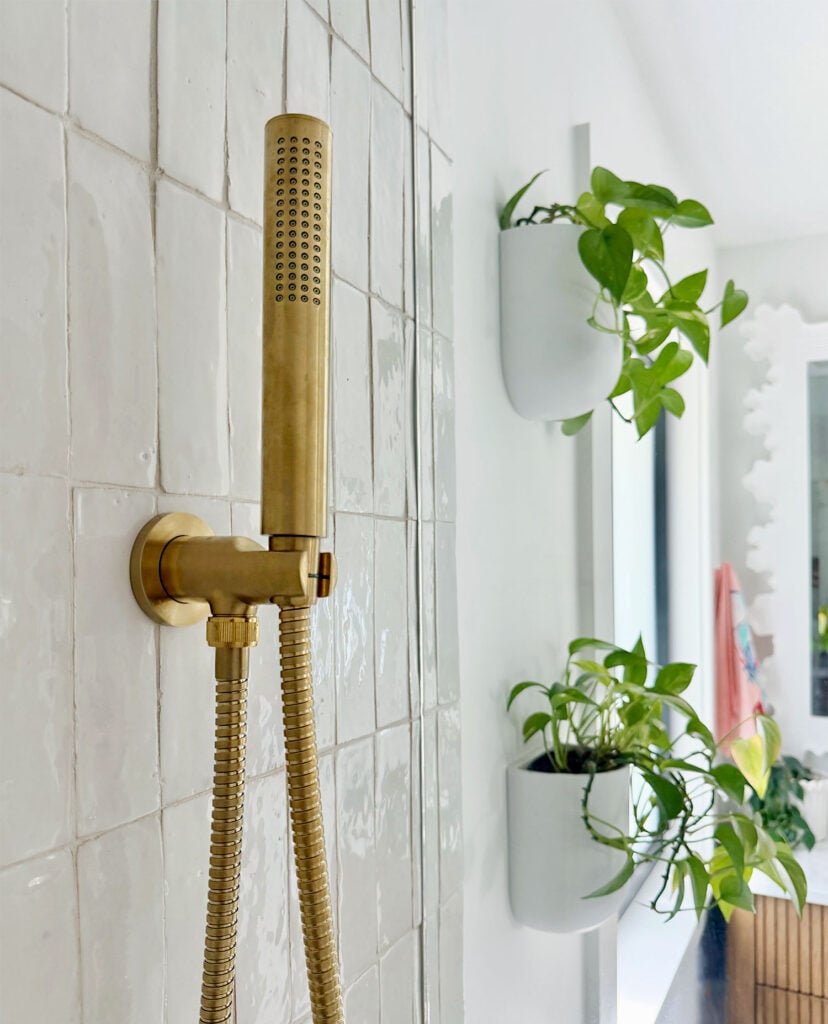
And as you’ve seen above, we had them place the shower controls on the opposite wall so you can turn everything on without getting wet. We also added a simple niche under them so it’s not visible when you enter the room, but holds all the shower things we need in there. We debated doing a ledge like our last shower, but we didn’t want anything bumping out or cramping the usable space at all. And as for the placement, we wanted the bottom of the ledge to double as a shaving ledge – which I demonstrate for you in the video tour towards the top of this post. It worked out so well!
I also explained in my yappy little video above that, for now, we only have that one towel hook in here. We considered putting more on the backs of the doors, and we could always add them – but it turns out that one has been working great (our entire family uses the outdoor shower most of all, so the indoor bathrooms are more for the sink and toilet than anything else). But again, we can just add a hook or two to the back of the doors if we ever feel like we need more.
Enough about the shower! Let’s spin to the other side of the room where we have the floating vanity and storage shelf we built under it. You can also see how we frosted the window for privacy (without blocking the natural light). This is the frosting film and application kit we used.
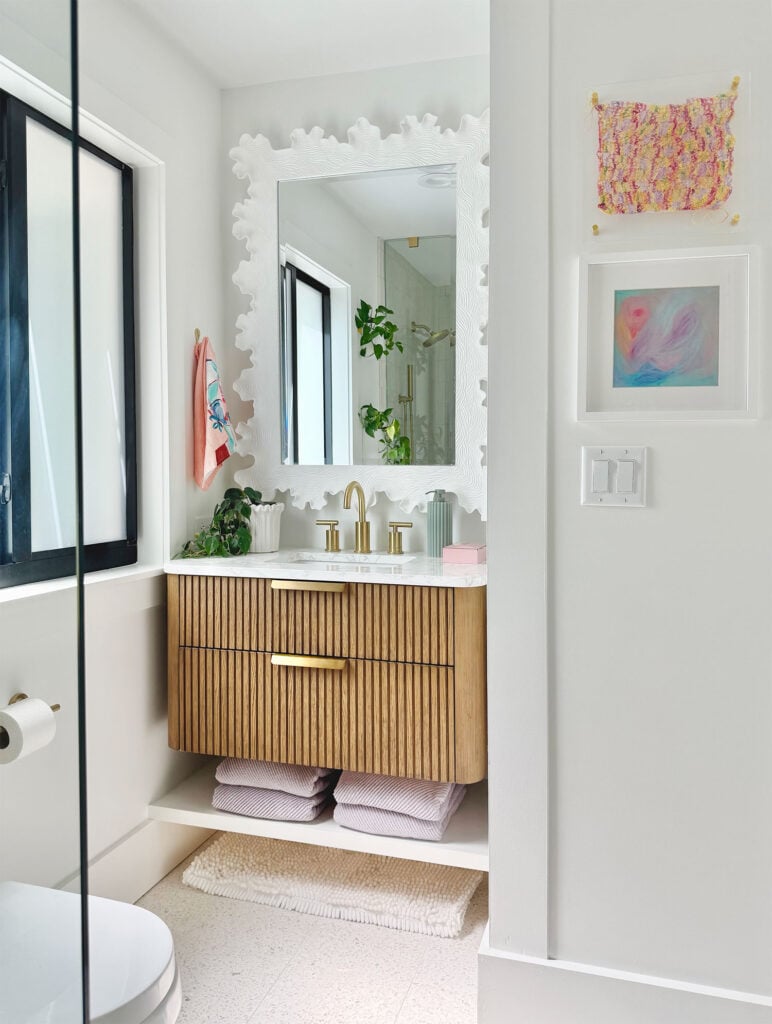
We chose a wall-mounted, floating vanity to maximize visual floorspace and this wood vanity fit perfectly, had great storage, and came with the engineered marble top and brass hardware. All we had to supply was the sink faucet, which is the same line as our shower fixtures. We feel lucky we able to so closely match the brass finish on the fixtures, the vanity pulls, and event the brackets holding the shower glass!
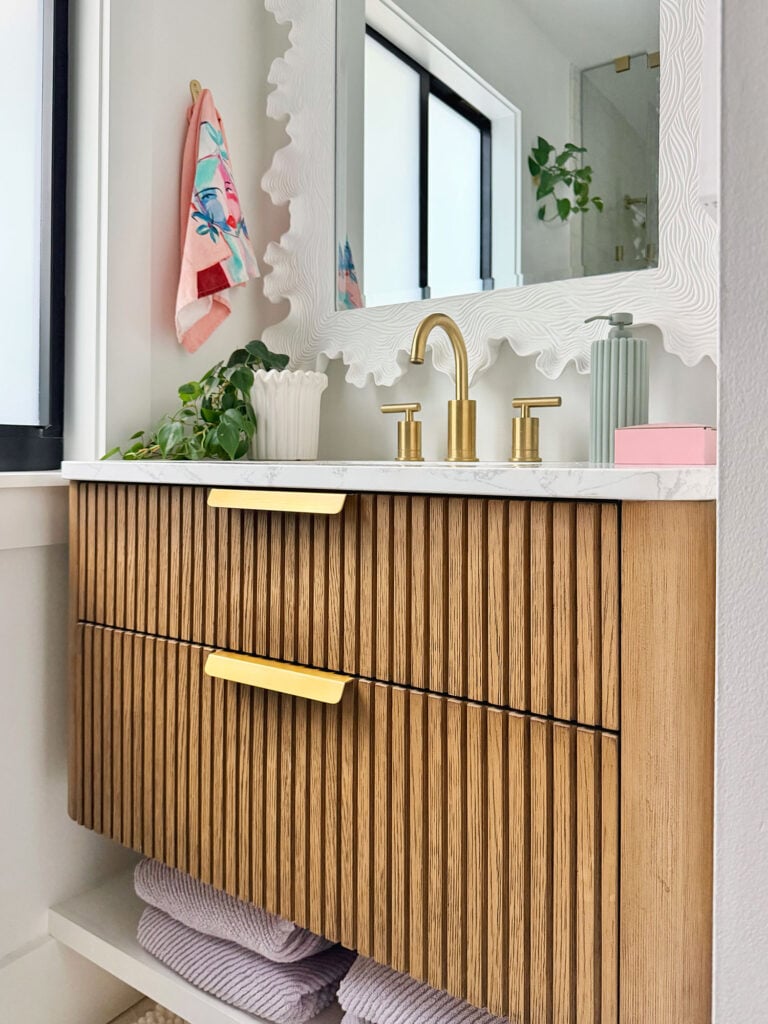
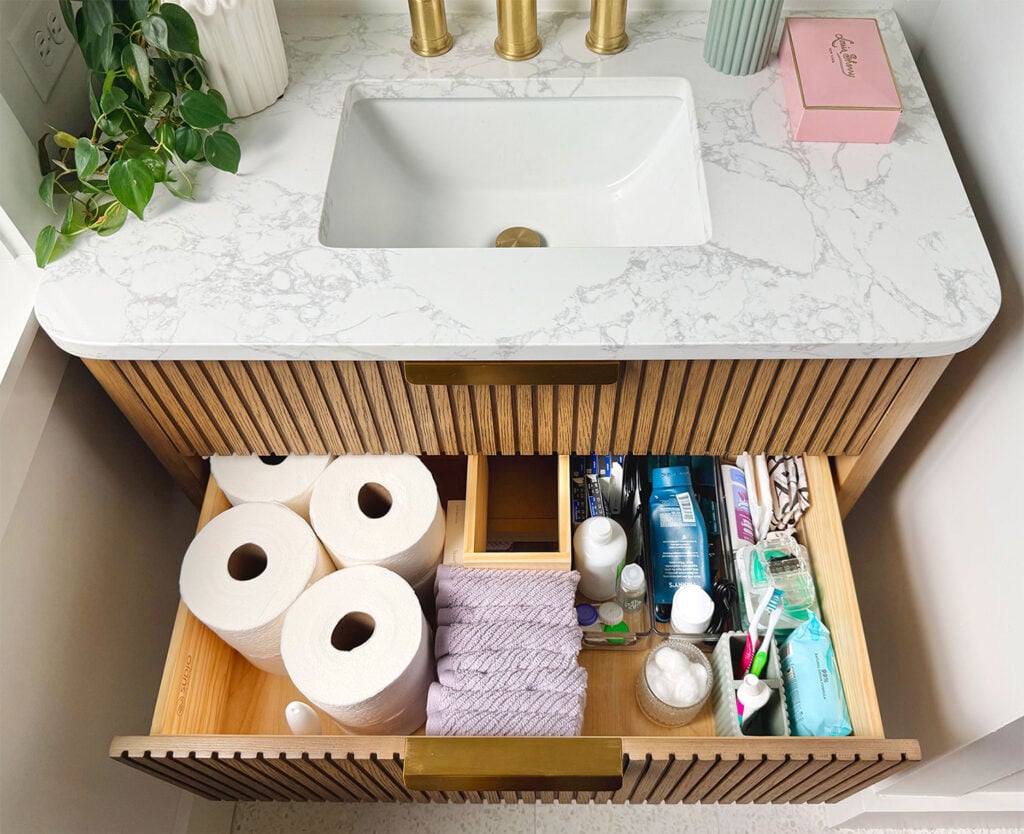
I realize this might not look like a lot of bathroom storage to some people (ok, or many people), but remember that for the last 6 years we were sharing a similarly sized vanity with our two kids. So this is practically the Taj Mahal to us. John also loves that the top drawer flips down to store his contacts and glasses.
The mirror over the vanity used to be above the fireplace in our bedroom. We were SO excited that it fit here perfectly, because we’d already decided to splurge for a bigger Frame TV for movies upstairs and put the upstairs Frame in our bedroom (no more watching TV on our laptop in bed!). And since this mirror needed a new home, we love how it fills this wall so well. There’s nothing like an oversized mirror to bounce light and make a room feel bigger.
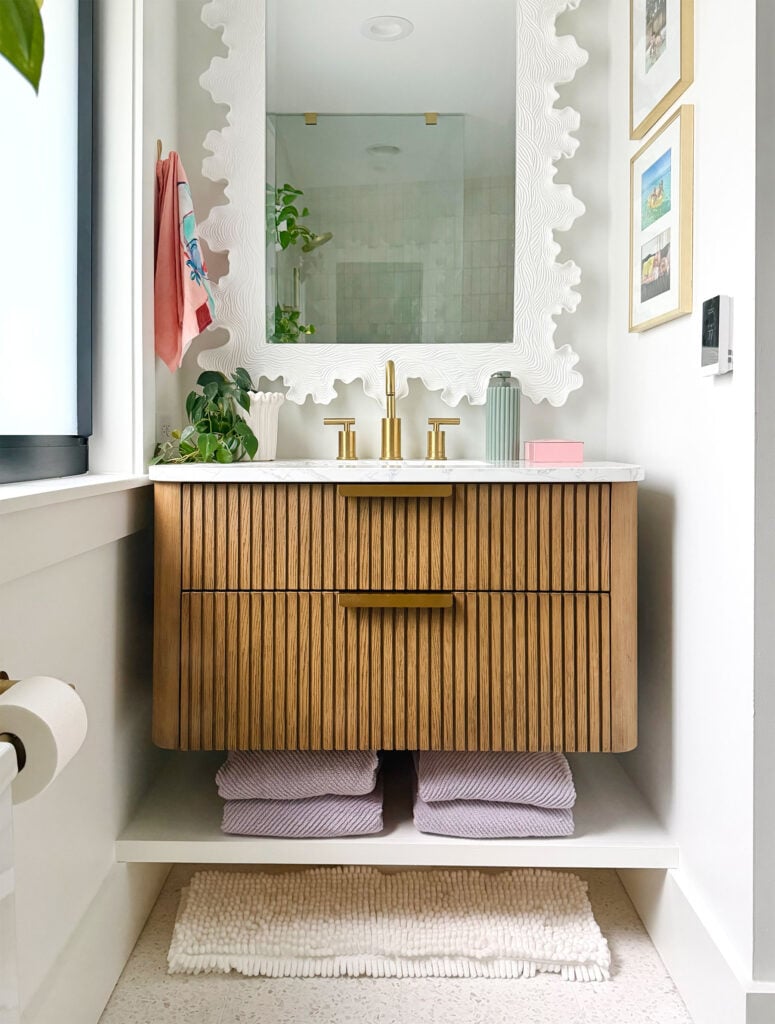
You can also see the thermostat for our heated floors on the wall above. We’ve never had heated floors before, but we had our contractor add them because there was no way to route an HVAC duct to this room and the floors would get SO COLD in this corner in the winter (even when they were just wood). We had no trouble keeping this corner cool in the summer, but we worried about cold tile floors in the winter months (no thank you!).
We obviously haven’t had to used much them yet, but we’ve gotten lots of encouraging DMs from people who use heated floors as a primary heat source for their bathrooms, so we’re very excited. In fact I cranked them up to 85 the other day, just to see how it feels and I LOVED IT. Also both pets loved it.
I’m sure I’m forgetting about 100 details, but the last thing I’ll mention is that my FAVORITE THING is adding colorful art and accessories and textiles to a bathroom as well as some fresh greenery.
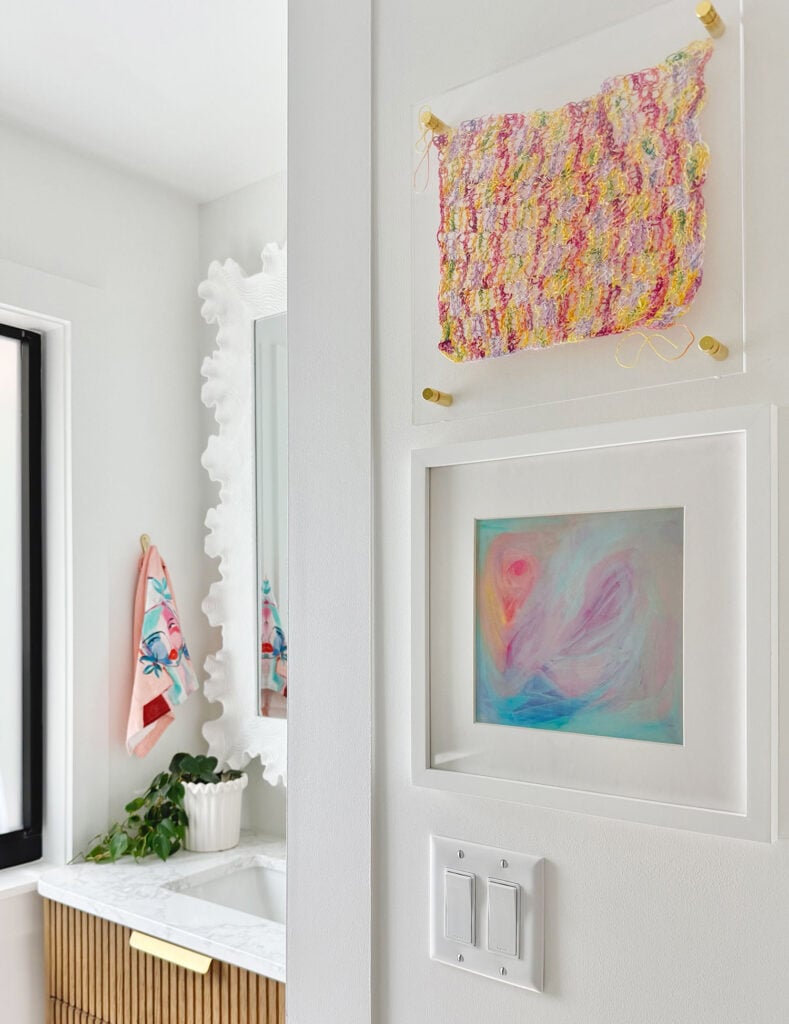
The towels, framed prints, a cute soap pump, a glossy pink storage box, some family photos, even a crocheted creation by our son – it all makes it feel so fun and cheerful in here. And the texture from the gleaming tile and the wavy edges of the mirror (and the soap pump and the plant pot) along with the sculptural wood front of the vanity make me so happy.
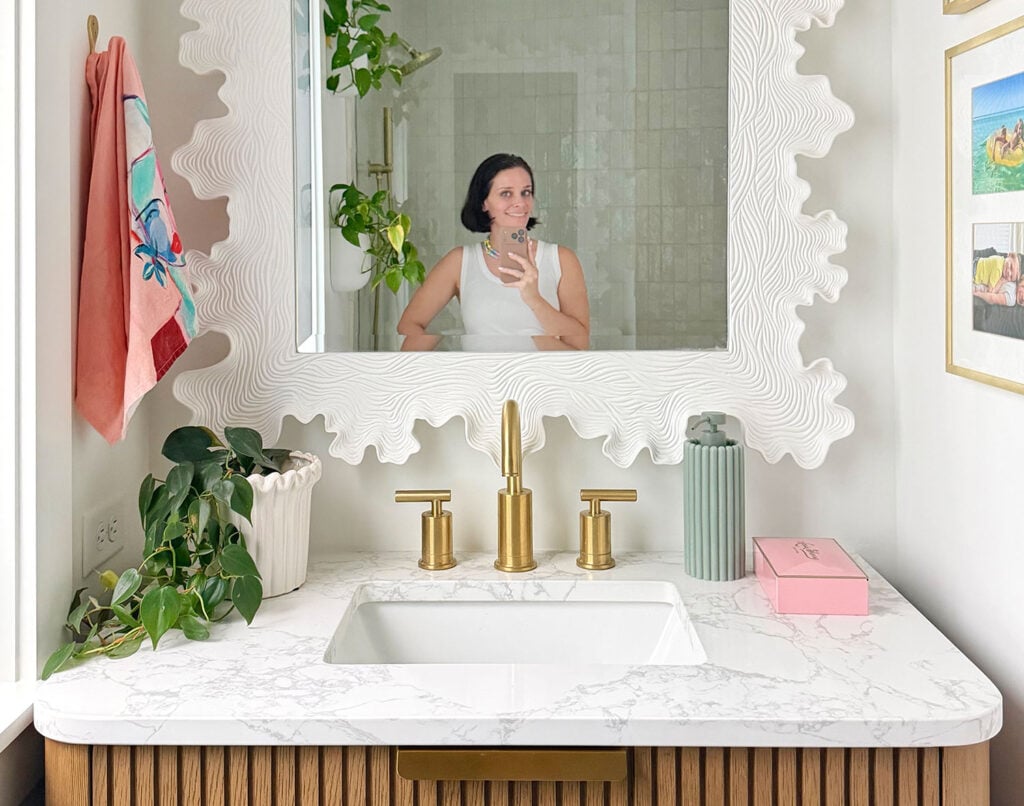
We’ve lived here six and a half years (I know! the longest we ever lived in a house before this one was 7 in our last Richmond house!) and we’re absolutely savoring the fact that we’ve slowly and thoughtfully turned this 1-bedroom/1-bathroom house (truly, that that was the original house’s listing!) into a functional 3-bedroom, 2-bathroom home for our family. So grateful. Renovations can feel like they take forever and stretch you so thin to want normalcy again, but when they’re over it’s amazing how immediately worth it they can feel. We’re just so happy we took this on and it all turned out so well.
Bathroom Sources
For convenience sake, here are all of the bathroom sources linked in one spot for you:
- Floor Tile: 12×12″ Dew Drop Terrazzo
- Shower Tile: 2×6″ Snow White Zellige
- Vanity: Floating Wood Vanity With Top
- Sink Faucet: Contempra Widespread Faucet
- Shower Fixture: Contempra Showerhead w/ Sprayer
- Toilet: Deer Valley Compact Toilet
- Hand Towel: Leslie Weaver Towel
- Gold Picture Frames: Thin Metal Frame
- Brass Knobs: Champagne Bronze Drum Knob
*This post contains affiliate links, so we may earn a small commission when you make a purchase through links on our site at no additional cost to you.
