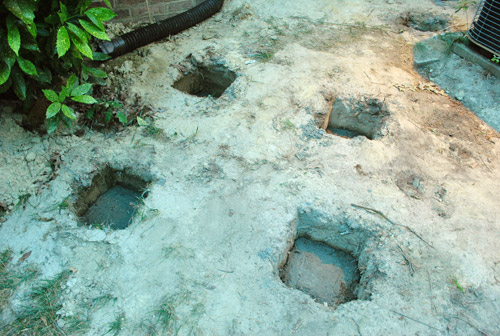
With my deck holes dug and officially blessed by the county inspection office it was now time to – well – fill them in. There must be some irony in there somewhere, right? As I had done when setting my fence posts last year, I started off by putting a couple of inches of rocks in the bottom for drainage since the deck experts in our area unanimously recommended it under the concrete that we’ll be pouring to hold the posts in place (we dug the holes at least 21″ deep, so that by adding 2-3 inches of gravel at the bottom, they still met the 18″ required depth for our county).
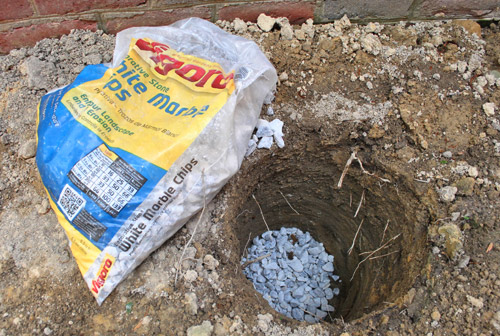
Imagine my surprise when my cascade of rocks caused some of the dirt to start hopping around. I guess some tiny frogs had gotten trapped and were so well camouflaged that I didn’t see them until they hopped to escape being crushed. But have no fear, I rescued them before continuing with my rock pouring.
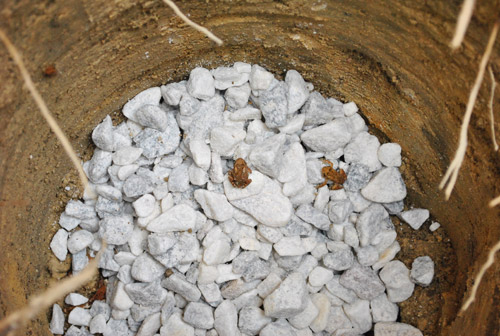
I took extra care to spot any frogs in my other holes before I started dumping rocks – but apparently my animal vision needs some work as I managed to miss this whopper of a toad.
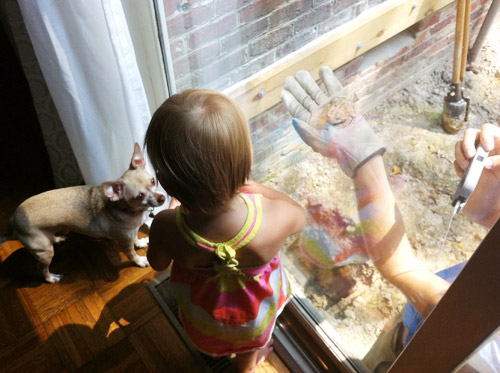
But after he made himself known I was able to rescue him (with my own bare gloved hands). It provided a nice impromptu nature lesson for Clara, who watched intently from behind the sliding glass door.

I love this picture (not because you can see me playing iPhone paparazzi) but because I imagine Clara giving Burger a little biology lesson: “See what we have here, young chihuahua, is called a frog. It goes ribbit ribbit.” They both were equally interested.
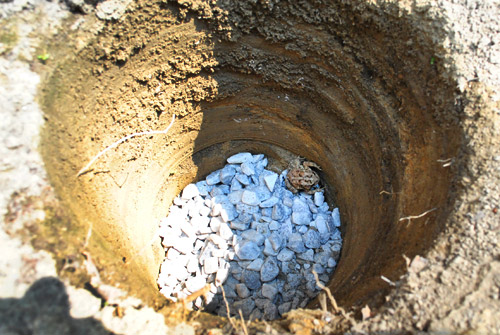
But enough about frogs. Let’s get back to our deck posts. Once my holes were all de-frogged (I only found one more) and had about 3-inches of drainage rock on the bottom, it was time to put the concrete footing in. A lot of you have suggested pre-cast Dek-Blocks, but they’re not allowed in our county. However, we are allowed to use these other pre-cast concrete blocks.
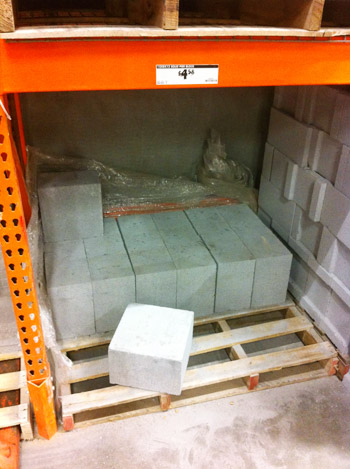
But I opted to go with mixing my own concrete. As straightforward as the precast blocks initially felt, I realized it would require each of my holes to 12 x 12 inches square to get the darn thing all the way in (most of my holes were round, so I’d have to do more digging). And I’d have to make sure the bottom of the hole was flat and level so the block would sit level. So I figured mixing my own concrete would actually make my life easier because it would fill any shaped hole and sort of level itself. Plus concrete had already come with my lumber order from 84 Lumber.
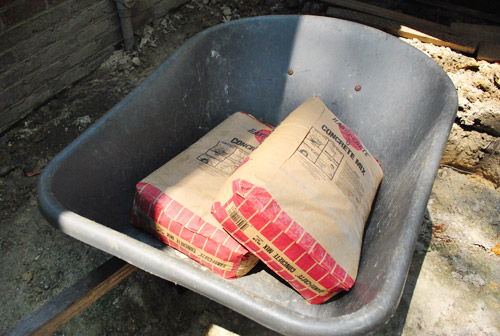
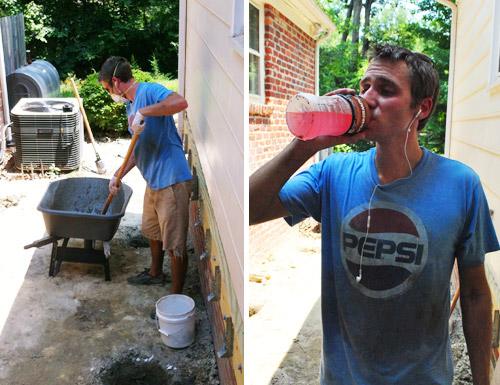
To mix it, I opened each 60lb bag in my wheelbarrow and added water until I got a creamy consistency.

I stirred it with a garden hoe. I won’t blame you if you giggled at that sentence.
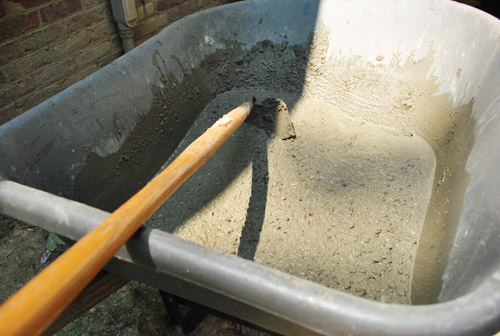
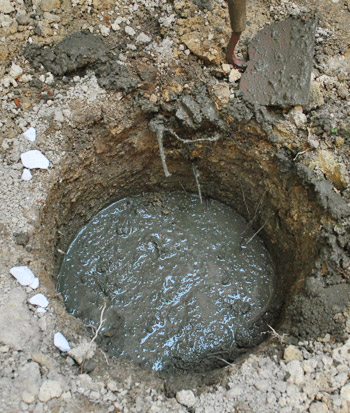
This batch that I photographed (my first) was a little soup-ier than I had intended, so in subsequent batches I didn’t use quite as much water. It still dried just fine though. And you can see how it sort of naturally flatted itself to be nice and level on top. Pretty perfect for setting posts on!
Mixing and pouring the concrete wasn’t really that interesting of a challenge. Nor would it have been that challenging had it not been a bazillion degrees outside. See that orange exclamation mark? That’s it warning me about the Heat Advisory for our county. You know, the kind that warns against being outdoors and doing any kind of physical labor?

So yeah, it pretty much sucked. I was a sweaty, dirty mess within about zero-point-one seconds of starting the project. I did my best to stay on the shaded side of my work area and I drank plenty of fluids (sorry that picture on the right looks like some weird cross between a Powerade and a Pepsi commercial).
By the time all 12 holes had their 8″ of concrete in them, I was too hot to remember to take any pictures. So here’s one I snapped later that evening once the fire in the sky had gone down a bit.
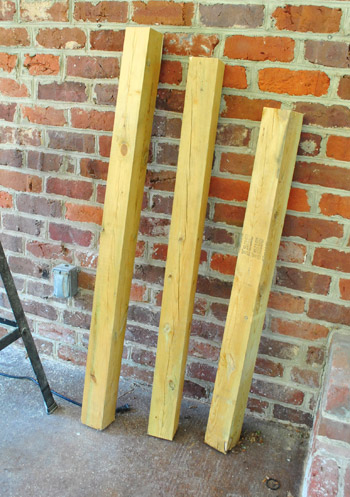
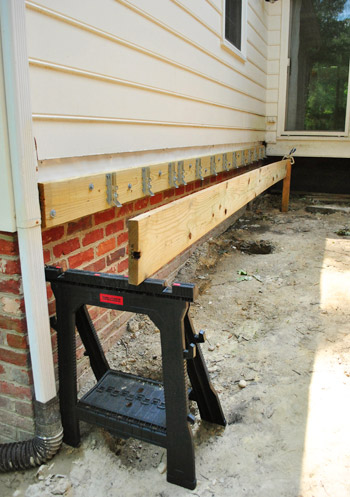
The next day my extra materials from 84 Lumber arrived. This is the stuff I had to order when my county made me revise my plan to include more posts and girders after giving me the a big fat F. Pretty measly compared to my first order. But at least now I had the 4 x 4″ posts for my next step of the project.
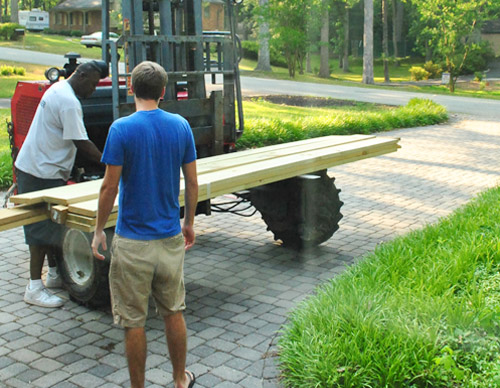
I had purchased some 12-foot long posts which – thanks to my barely 4-foot tall deck – meant I could get 3 posts out of each one. Score.
I staggered their sizes a bit since the ground slopes away from our house a bit.
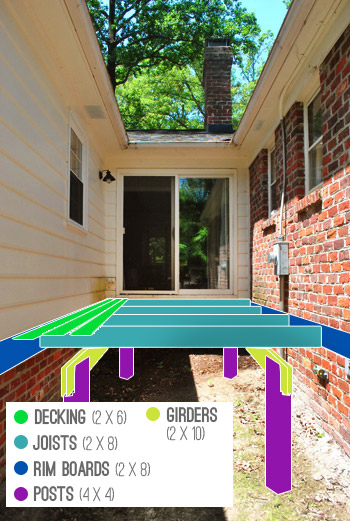
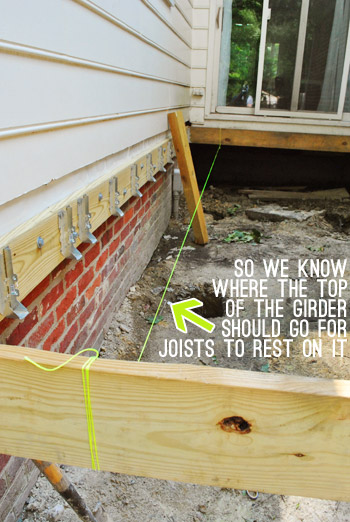
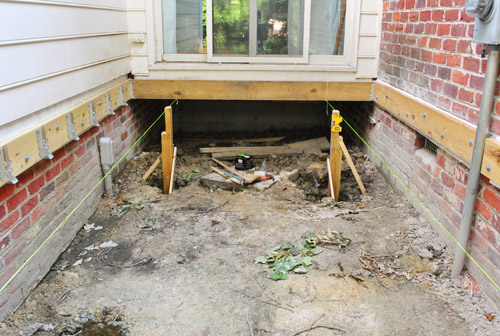
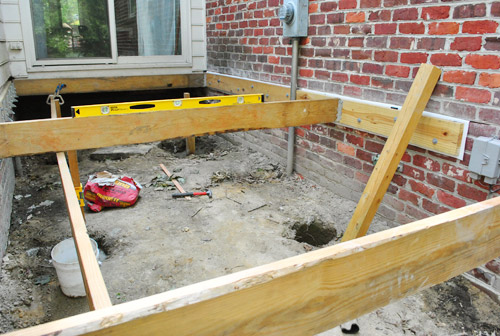
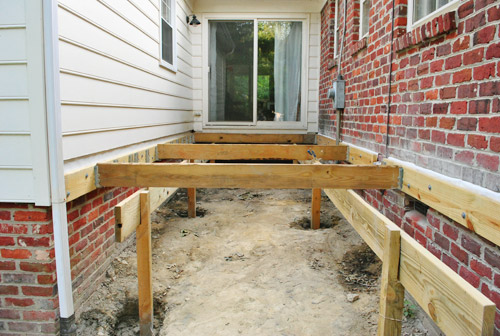
Setting these posts was going to be a bit more complicated than my previous experience doing fence posts because this arrangement is, well, a bit more complicated. Basically my posts would support big 2 x 10″ girder boards that run the long way below the deck. The joists (the boards that span the short way across the space) will rest on the girders. The joists need to line up with the ledger boards already attached to the house (which I will now call rim boards, since they won’t support the weight of the joists as originally planned – instead they’ll just provide extra stability side-to-side). This picture might make a little more sense of that description:
So before putting any posts in, I set up a few guides to help make sure I was staying in line with the rim boards that I had already attached.
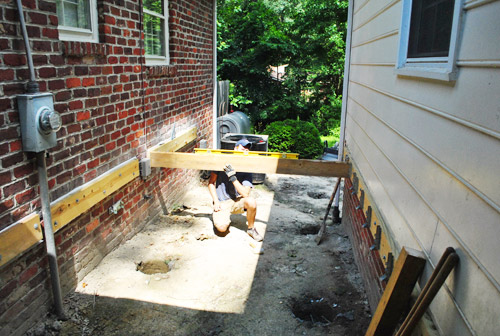
After temporarily hanging joists on each end of the deck, I tied some nylon string to connect the bottoms of each – this would represent the top of my girder beams where the joists would eventually rest. The string was much easier than trying to temporarily hold up a 18-foot-long 2 x 10″ board.
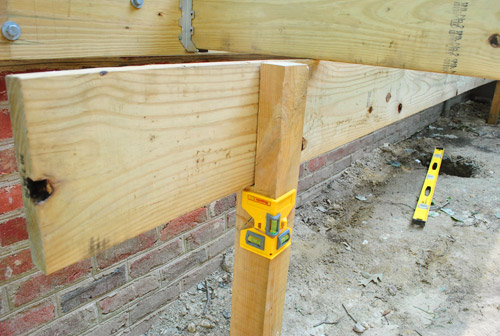
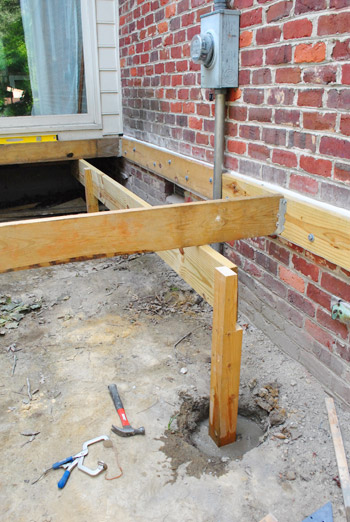
With string pulled taught, I rested a post in the hole and held it pretty straight (double-checking it with my post level) while I marked where the string hit it – thus indicated where the top of my girder would eventually be.
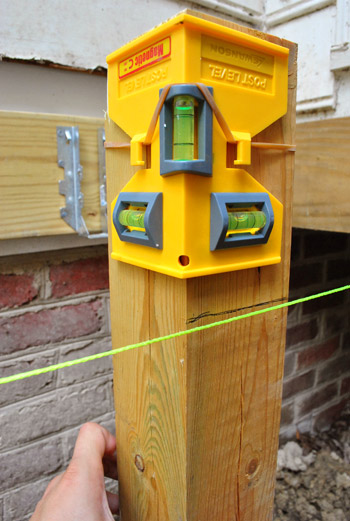
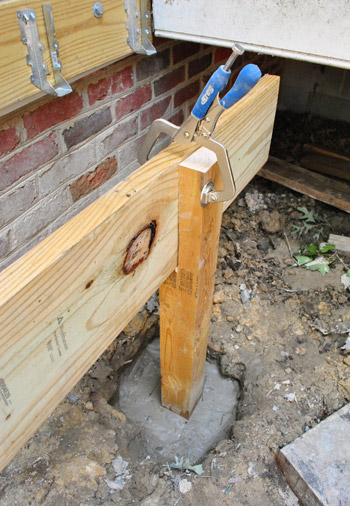
Our county gives us two options for attaching girders. You can buy a metal post bracket that sits on top of the post, or you can cut a notch into the post for the girder to sit on. I chose the later option, primary because it’s what I had seen done here. And it felt a bit more secure than the alternative. So I used my top mark to then measure and draw where I’d need to cut my notch so that one 2 x 10″ would sit at the perfect height.
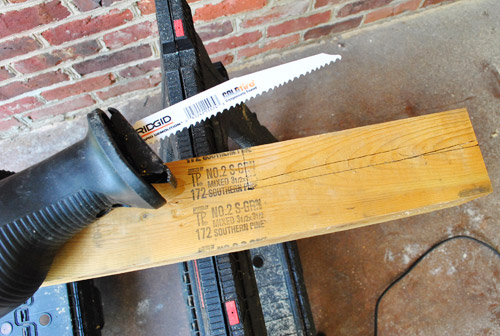
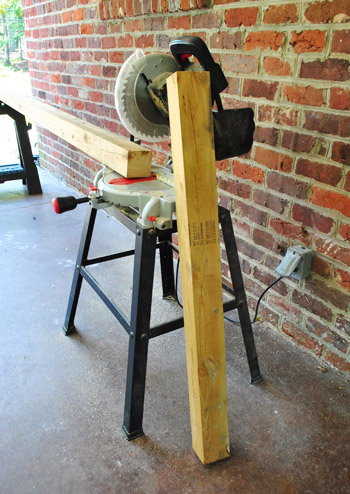
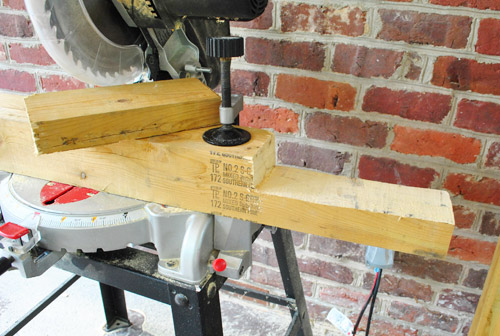
I used my reciprocating saw to cut the notch. I have no pictures of this because it took everything in me to keep the saw steady on my lines. But here’s the result below (ignore the miter saw, I just used it as my work table because it had built-in clamps).
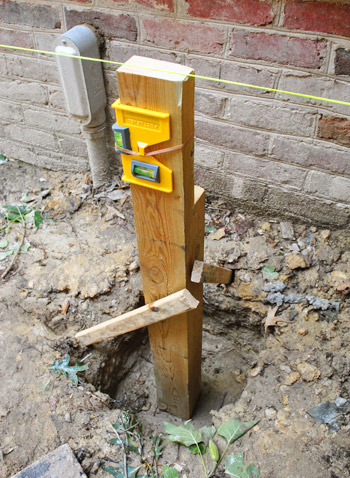
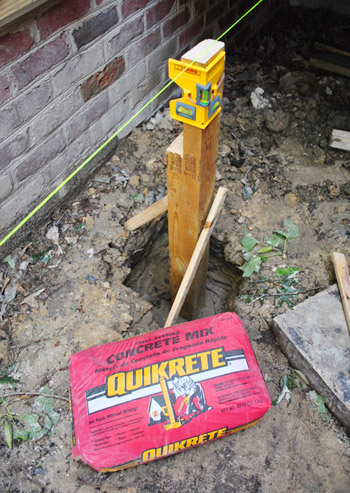
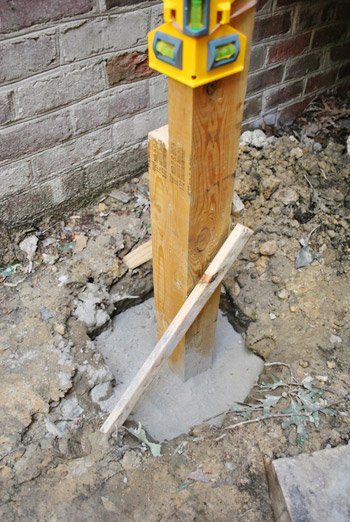
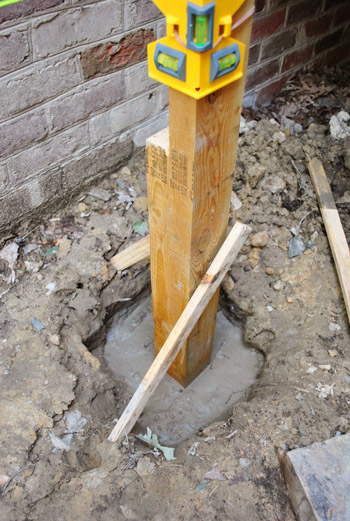
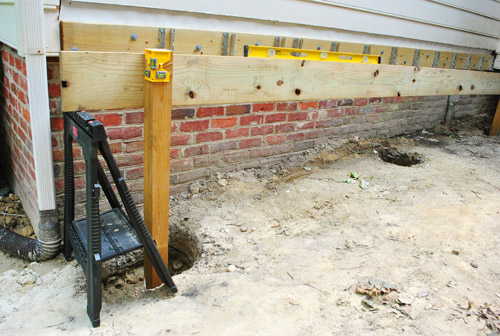
With my notch cut, I moved the post back into place, checked my cuts against the string, and then used some stakes to hold the post perfectly straight up and down.
To keep my posts in place for the long run, I could’ve just packed dirt in around the edges. I didn’t really trust that method, so I defaulted to the same method I used for my fence: Quikrete no-mix concrete (which is also an approved method in our county).
I love this stuff because you just pour in the dry powder…
…add water…
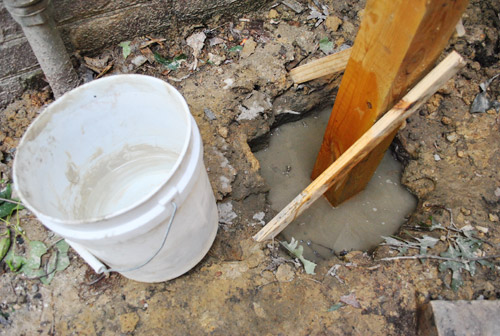
…and it soaks in and dries hard. It’s certainly easier than the stuff I mixed before (which I used instead because it’s what 84 brought me, so I didn’t want to waste money or materials).
I then repeated the whole string-mark-notch-stake-cement process for another post on that end. It really wish it had been as fast as typing that sentence just was, but it was actually a fairly long process (maybe three hours from setting the joists ’til finally putting cement in) and this day was not much cooler than the last so I was pretty spent. Fortunately I couldn’t do anything more until my cement was fully cured, so I had a good excuse for stopping.
The third deck workday was girder day. I would’ve loved to have had my dad’s help for this step, but alas he was visiting my grandma in West Virginia so I was stuck setting this 18-foot-long board all by myself (Sherry was inside taking care of Clara, keeping up with the blog, and doing last minute book-proofing stuff, but was available to come outside for a few moments as I went to confer/lend a hand).
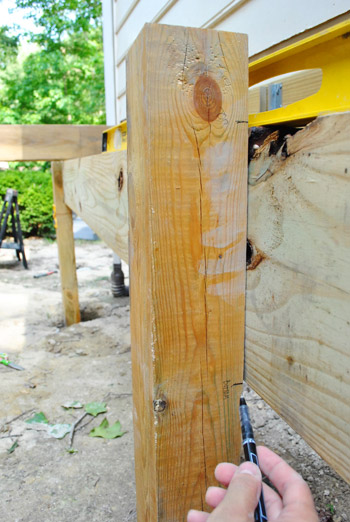
As much as I enjoyed my nylon string method, I figured using my actual girder to set my additional posts would be a more trust-worthy method. I clamped it in place on the already-notched post from the previous day…
…and used a sawhorse to help me keep it up on the other side. At this point I was trying to mark my post (which was just resting in the hole at this point) with where I should cut my notch. The sawhorse made the girder a bit high, so I performed quite the juggling act moments after snapping this photo: holding the board up, checking that it was level, and then marking my post with a pen.
But I got my mark made, cut my notch with the reciprocating saw, and brought the post back into place so that I could double-check everything: that my post was straight up and down, that my girder was level (well, sloping down slightly for water run-off actually), that the joist that sat on the girder was level, that my post was as far from the house as my other post, etc…
Once that was all checked, I was able to cement the base of it (using the no-mix Quikrete again) without having to secure it with stakes. The weight of the girder board actually held it in place quite nicely.
And speaking of the girder… since it was now held up on both ends, I was able to mark my middle post with no trouble at all (each of my two girders is held up with three posts). Dare I say it was actually easy?
With one side of posts all done (and my girder held temporarily in place with nails and clamps), I was able to move on to the other side. This side was a bit trickier because it was too long (21 feet) for one girder board – so I’d actually have two separate girders that would butt up to one another at the middle post. So I decided to temporarily set another joist across the middle so I’d have a reference point for the height.
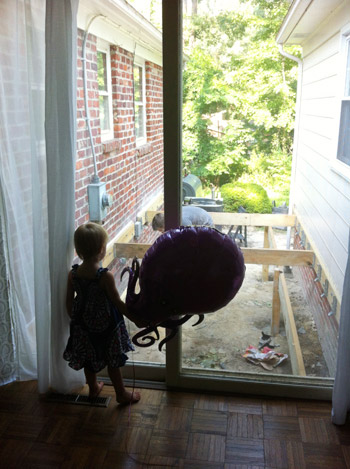
In case you’re not convinced as to how truly exciting this whole process is, just look how engrossed Clara is. I’ve become her favorite new spectator sport. Heck, it was so thrilling that she even brought this octopus balloon over to see all of the action while Sherry caught it on camera.
So here you can see how the girder board will share the middle post with another board that will span the rest of the space.
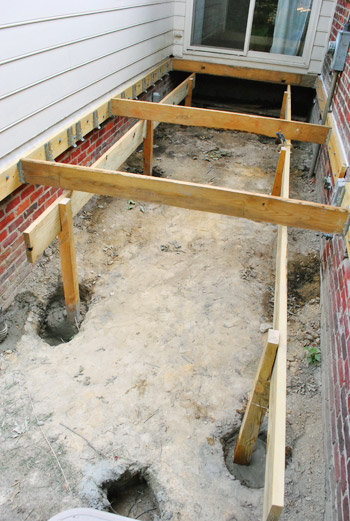
By the end of this (again very very hot) afternoon I had all six posts set in concrete and all of my girder boards temporarily held in place. Why temporarily? Well, the girders have to be doubled up (i.e. two 2×10’s thick) but that was a process I knew I’d need another set of hands for, so I had to wait for my dad to return from my grandma’s house since we knew it would take longer than Sherry could provide while taking care of Clara (aka: it was a longer-than-a-Clara-nap project).
Then once that step is done, I have to add two more posts and a girder to create the angled edge at the end of the deck (you can see the two empty holes towards the bottom left of this picture – one of which is shared by another post). But I figured I’d wait to get these first girders set before I tackled that step.
Sorry for such a long post, but it’s been a productive few days on the deck. I know it’s just barely starting to look like a deck – but I think big visual rewards are just around the corner. Once these girders are up I can install of the joists (which should be pretty speedy), and then come the actual decking boards. Woo hoo! I’m working up a sweat just thinking about it, but that’s probably just because my sweat glands are on overdrive lately.
What have you been sweating over lately? Are you doing any outdoor projects out in the blazing sun? Or just enjoying the outdoors in a more relaxing method – like by taking a beach day?

Jessica says
This looks great! Are you planning on putting some sort of weed/grass deterrent down?
YoungHouseLove says
Yep! That’s my next step after getting all of the girders and posts up.
-John
Alicia M says
Bravo to you John for taking on this project! I had no doubt you guys could do it, but man it’s impressive!
One question that came to mind while reading your post, do you guys plan on doing anything to the dirt below the deck to prevent weeds? Ie: add landscaping fabric, rock, etc? Or don’t you think weeds will be an issue?
Can’t wait to see the finished project!
YoungHouseLove says
Yep, we plan to do exactly what you said – landscape fabric covered with rock (just to be safe).
-John
Amanda P says
Love you guys and all your DIY awesomeness. But I gotta be honest here… this whole deck project sounds exhausting and really time consuming! We just had a deck built this spring and, while my husband can build and fix most anything, we gladly paid the professionals for this task! Just curious if this is one job you’d rather have paid to be done? (I don’t mean offense by this, just curious!)
YoungHouseLove says
Some days, yes. But most of the time I’m really excited about all that I’m learning through the process. My dad built the deck at my house growing up so I think I would’ve regretted hiring it out.
-John
Staci @ My Friend Staci says
JOHN! YOU ARE A ROCKSTAR!
Aaroohii says
Feels like 110 degrees! whoaa, definitely fire in the sky!
Erin @ One Project at a Time says
Nice work John! We’ve been sweating it up inside the house working our our staircase project. We may be inside the cool house, but for every cut we have to go down and back up 8 half flights of steps to go cut the wood out in the garage and bring it back. Its been a ton of work (especially for this 6 months preggo mama), but its already starting to look fantastic! (IfIdosaysomyself.) http://oneprojectatatime.blogspot.com/2012/07/3-part-3-covering-floating-steps.html
YoungHouseLove says
The steps are looking great!
-John
Kari says
2 biggest differences between deck building in Virginia and Utah (we just did 2 of them this spring). No frogs or toads in our holes (and certainly nothing we would ever experience at an outdoor pool in the summer), and even though we did ours in the spring and the weather was cooler, even if we were doing them today in 100 degree weather (which we’re having, and it’s HOT!), our humidity is “up”–right around 30%. No way is it as miserable as it is back there!
Joanna says
It looks awesome! You are a trooper for doing it in that heat. I don’t even want to strip paint in our 98 degree heat. You guys are inspiring us to do a deck project, too! Can’t wait to see the finished project!
Danielle says
What I’ve been working on lately: repairing bathroom and kitchen walls after the plumbers had to cut massive holes in both to access and replace a really old cast iron drain pipe that developed a 4-foot long crack!
Megan Geneva says
So glad to see all the progress. These deck posts make me giddy!
Kelly says
Ripped the deck out yesterday, and Henrico County came to pick it up today. Was supposed to all be completed by this week, but the heat+no power+holiday week meant we got a late start. Posts go in today, and am hoping for a positive inspection!
Suvi says
Amazing! You guys are so inspirational!
gina says
I’m impressed with the deck but also with the post. I love how detailed they are so I really understand the process. thanks!!
Kristine says
Whew. I am overwhelmed just looking at this. Well done guys. This will be something to be very proud of!
Michelle says
Those little frogs were so cute, I’ve never seen them that small. And Tate has the same dress that Clara was wearing, it’s one of our favorites for summer.
Jessie says
We’re building a deck too (or well I hold the tape measure and look essential while my hubby builds it). It’s SO much work at least we’re where it’s cool(ish) here in Seattle.
Shannon S says
I think that little guy is a toad. :)
Kelly H says
Hi John-
My husband I just finished a deck with my dad at our cabin in Nor-Cal. I’m sure you are aware of these, but we used the simpson strong-tie inserts for the posts on our deck. That way if the wood posts ever have an issue we can easily replace them. Here’s the link to their site. http://www.strongtie.com/deckcenter/index.html?source=category
Your deck looks like it is coming along nicely! Can’t wait to see it finished.
YoungHouseLove says
Thanks for the tip! Maybe next time…
-John
ANdrea says
We’ve been sweating as we’ve been loading up our moving pods to go from the midwest to Boston.
Sophie says
Wow, John, you are are a trooper doing all that work in crazy heat!
I wish it was warm enough for a beach day here in England, but the temperature has barely brushed the low 60s here recently, and during the night it’s been dropping to 50 degrees where I live.
Crazy how there’s so many fires and awful heat waves everywhere in the US, and we have torrential rain and so many floods!
Heather says
Is John for sale? I’d like to buy me one!!
YoungHouseLove says
Ha! I’ll have to get back to you on that one…
-John
Michelle says
Random question for John- Is your family originally from WV? I live in TN now and grew up about an hour south of Morgantown. Oh how I miss it!
YoungHouseLove says
My mom’s side is from Huntington. She and two of her siblings went to Marshall and my grandma still lives there. My grandpa was born in Morgantown though!
-John
Michelle says
Wow, small world!
Megan says
I was actually in Doswell, VA for Kingsfest the last weekend of June with heat advisories all weekend! It was pretty unbearable. :( My shoulders are finally peeling from a blistering sunburn. Good luck with the rest of the deck project and the weather. :)
Jo @ Let's Face the Music says
Proof positive that if we ever want a deck we’d have to hire someone to do it. Building a deck seems more difficult than building a house. I was in the theatre so everything we built had a short shelf life and was supposed to come a-tumblin’-down. Jo @ Let’s Face the Music
New Mom on the Blog says
You should know, I am TERRIFIED of frogs (totally irrational, I know) and I tried to use this post as exposure therapy, but instead freaked out and now may avoid decks for the rest of my life.
Fortunately, this process seems so complicated, I think it will be years before we attempt to DIY our own deck, so maybe by then I’ll be over it…or heavily medicated.
Thanks so much for sharing this journey!
Erin says
Holy smokes! You have been busy. Made me tired just looking at the temp. Sheesh.
I wonder if Clara will be more adapt to frogs than worms now?! :)
Teresa @ wherelovemeetslife says
I feel like an old woman saying this: but bless your heart going out and working in that heat!!! I live about 4 hours west of you and it was so unbearably hot. Kudos for sticking it out and getting it done!
Christa @ a*typicaljourney says
I’m really finding this deck building series fascinating. I work in the Construction industry, but have never watched something be built from start-to-finish. I don’t mind the long posts because I’ll take all the detail I can get!
I never realized how much work goes into simply building a deck. Color me impressed by your construction skills :)
I *kind of* worked outside over the weekend when it was approximately 115 degrees after factoring in the heat index…if you consider a garage outside. It was a quick sand/ staining pine boards for our headboard though, so it took like 2-ish hours is all :)
susan says
Decks are WAY more work than most people realize…until they build one, LOL
I’ve helped out on a few over the years and I find they are always worth the work. Yours will be the same I’m sure.
We are finishing the rebuild of a fence in our backyard-but adding to it. It was a ( crumbling) concrete knee wall but we’ve stuccoed and are adding lattice panels on top.
It’s a work in progress but we should be finished this weekend.
Here in the PNW summer just arrived last week-so I am still hi-five-ing the weather guy on TV when he says it will be a high of 90 :)
I DID live in TX for a while though-so I know your heat index issues. Keep cool!
Sabrina says
Frogs! We are digging all throughout our yard right now. They seem to be everywhere. It is taking us forever to dig up because I really don’t want to cut one in half or something lol My husband laughs at me because I keep saying ” I don’t want to kill anybody” everytime I slam the shovel down. You guys are doing a great job with that deck! We are living vicariously through you, because we are thinking about adding another level to our deck, as soon as we dig out the frogs!
Dianne says
Great job with the post setting AND your descriptive post. Look forward to seeing more and watching you celebrate with the deck’s completion!
Karin K says
Did you guys see the RHONJ episode where Juicy was prepping for putting in a carport, and the girls found toads in his footers? Juicy is not nearly as nice as John…he said, “Yeah, dere gonna be dead frogs when I pour concrete on ’em.” Maybe PETA was watching and staged an intervention at Casa Giudice.
I live two hours east of you, and that was a miserable time to be outside. Carry on!
YoungHouseLove says
Oh yeah I saw that and I thought “save them!!” – it was hilarious when Teresa said they give you warts. Think she really believes that or she was just saying it so they wouldn’t touch them?
xo,
s
Leah says
That heat was here in MN last week… The good news is that when the temp drops to 85 it feels cool.
The deck is coming along great. Its a long project but totally worth it- I know from experience :)
Micha says
Wow … it sounds so complicated, it’s making my head hurt. Or maybe it’s the heat :o)
Any kind of outdoor activity that doesn’t consist of eating ice cream in the shade or floating in the pool is relagated to early morning or evening/night these days. It’s just too hot!
Penny Smith says
That’s weird-don’t they have those metal deals you set in the concrete, then the wood gets bolted into that, for footings? I would think that would be easier in the long run to replace wood long term than wood sunk in concrete? Did I not read enough? (Yeah-that can be a problem of mine-all about lookin’, not about reading the details. LOL!)
YoungHouseLove says
You’re probably right that it would be a smarter long term solution. Maybe next time!
-John
Penny Smith says
LOL! Well-I am surprised it isn’t code, honestly. I have never seen the footings WITHOUT the bolted brackets… but I live in the midwest…
YoungHouseLove says
We’re definitely reading every last word on all county documents to make sure everything we do is to code, so this method is just what they clearly outlined as the way to get it approved, so we’re going for it!
-John
Krystle @ Color Transformed Family says
You are a very patient man to have saved all those frogs. I’m sure Clara appreciates it though. Who knows, she may want frogs as the theme for her next part.
onthedesignlane says
The picture of Clara looking at the toad is cute!
emily says
ho.ly.cow. how on earth did you get that far being only one person? your poor back!
Stephanie B. says
We’ve recently been putting flower boxes up on all of our windows. 110 degrees in Grand Rapids, Michigan makes that about as fun as it sounds like the deck was for you! Whew – at least it pays off in the end!
Morgan says
The deck is coming along nicely, and I’m really looking forward to seeing it come together. I’ll have to remember when we’re ready to redo our deck to not pick the middle of summer for the project, because it has been brutal out. Makes me glad we finished up our last big outdoor project, a terraced fire pit area, early last month, before the heat wave hit!
Tina says
I haven’t finished reading the post yet, but your conversation between Burger and Clara is super freaking adorable.
jeannette says
thank you john. you know the macro on these posts is that you can move a mountain by yourself, one teaspoon at a time. it’s heartening to think so.
plus, there’s nothing like a good process story. i love knowing how every step of the way works.
you are the man.
Amy says
I didn’t read all of the comments above…but I was wondering if you had plans to lay landscaping paper or rock under the deck? Without it you may end up with lots of weed growth which draws in bugs and critters.
YoungHouseLove says
Yep, we’re gonna put weed block fabric and gravel down.
-John
Deb says
Moving right along! It looks great! I really appreciate the link that you attached in this post with the deck build that you referenced. I was thinking of doing something on a diagonal and this is perfect! I can’t wait to see more of ya’ll deck process. You guys rock!
kate says
Hi! I just wanted to drop a note that Williams and Sherril had an identical turquoise stool to your kitchen ones. Amazing!
beth lehman says
love you all – they are all toads, not frogs! but it’s fun learning the differences! my son is OBSESSED with them and noticed them right away while over my shoulder. http://www.kidzone.ws/lw/frogs/facts8.htm is clara too young for this?
YoungHouseLove says
Maybe – but I enjoyed it!
-John
Nicole S. says
Definitely inspiring! I can’t wait to see the whole thing finished! How do you plan on keeping weeds and stuff from growing under your deck, though?
YoungHouseLove says
We’re going to be putting down some weedblock fabric and gravel to help deter the weeds.
-John
Rebecca in WA says
This is looking really amazing. Great job!
KathyG says
I can’t believe you have the chicklets to do this alone! But as someone above said, you will have a special place in heaven for helping blogland see what one man, perserverance (and a lot of sweat) can accomplish if he just keeps after it. I suppose that’s also a testament to your dedication to the blog, and why it has thrived when others fail. Amazing. Great Great Work, John. I hope you get a HUGE reward for yourself when this is over.
Annemarie L says
Great job, John! I loved the long post. Looking forward to seeing the end result!