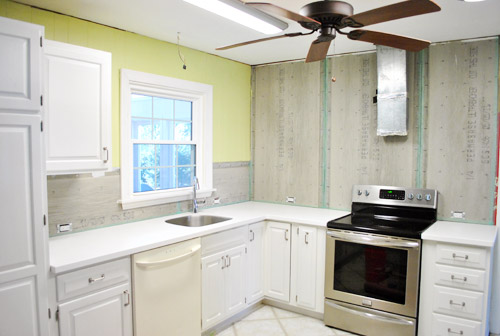
Monday’s backsplash post kinda dove straight into the middle of the project, so we thought while we were back to share our progress we should rewind a smidge to explain a bit more about the process for anyone else out there who wants to tackle something similar. First we had to prep the room. So everything came off the counters.
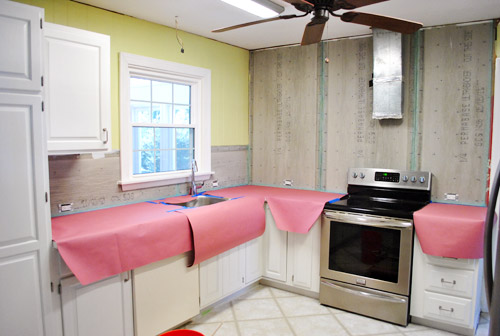
Then down went the rosin paper (from Home Depot). It was recommended by our counter installation guy when we mentioned we were doing a backsplash. It’s basically like brown construction paper, but with an added moisture barrier that keeps any thinset drips from seeping through. We covered each of the counters with cardboard (for extra protection against sharp trowel corners) then taped rosin paper over it, with the painter’s tape going right up to the wall.
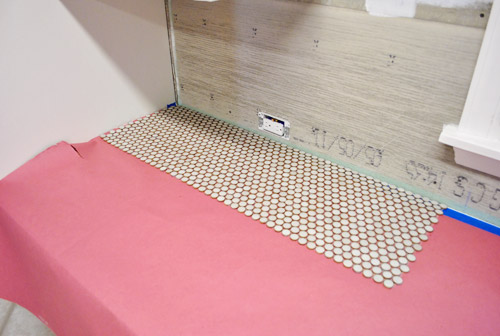
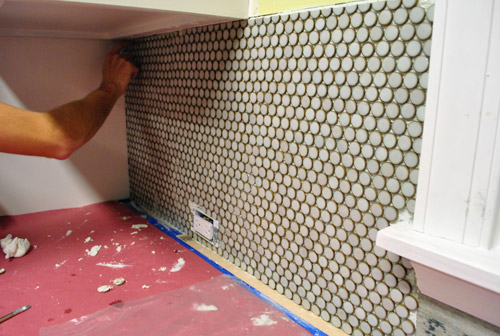
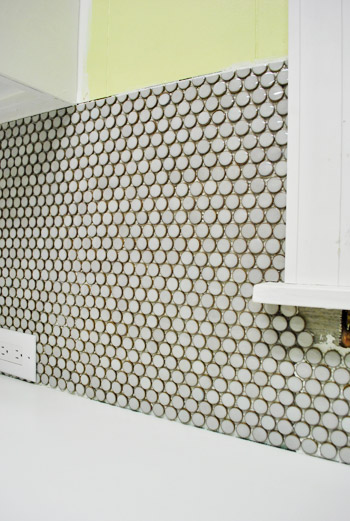
Finally we got to start planning our tile placement. We decided to start in the corner under the microwave because it felt like a nice fairly inconspicuous spot to learn the ropes. And it was basically three sheets wide in that area, so we took it as sign that it’d be an easy way to get our feet wet.
Not knowing how long it would take to make cuts, we didn’t want our whole batch of thinset to dry out while we fumbled with the nippers for an hour (which happened, as you know from Monday’s post). I’m glad we took it slow to start, but we later learned it’s MUCH faster to put up as many full sheets as you can and then just backfill with cut pieces along your edge (even if you have to use some freshly mixed thinset to place those).

The staggered pattern is to help disguise the seams by alternating where they lie. So instead of your eye catching one long horizontal seam, things are mixed up a little so there’s hopefully a more seamless effect once it all gets grouted.
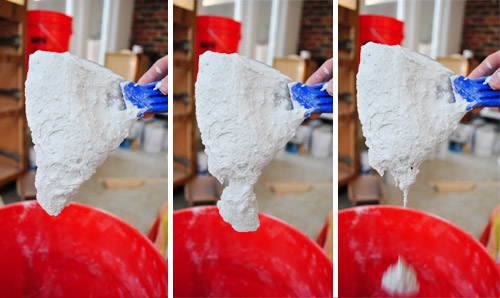
Anyways, now that we were FINALLY ready to put some tile on the wall, I had to mix up the thinset (we got this kind from The Tile Shop). Not gonn lie. This step made us nervous because we ruined a whole bag of grout during our first house’s bathroom project by misreading the label and pouring in too much water. Oops. So we read the bag about ten times and then found this Ask The Builder video on YouTube. And we’re happy to report that we had no trouble getting our thinset to the right consistency.
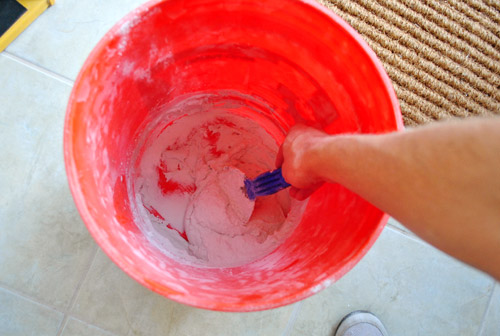
As we’ve heard, the thickness is supposed to be somewhere in the neighborhood of toothpaste or pancake batter. It should hold together, but still be loose enough to spread – and fall slowly off your putty knife like so:
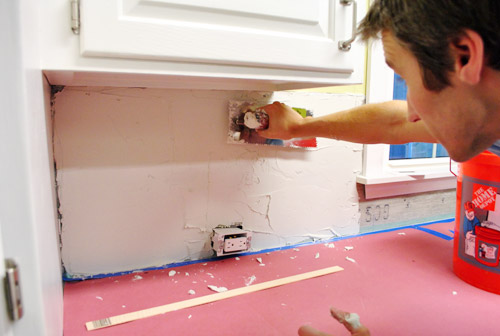
With the thinset mixed, we spread it on the wall using the flat side of the 3/16″ notched trowel (from The Tile Shop). I also used the putty knife sometimes since it fit better in the tight space.
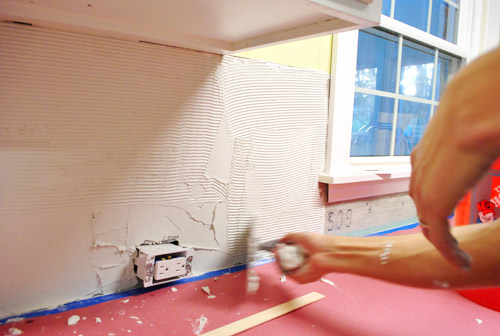
Once it was on and fairly even, we held the notched edge of the trowel at a 45-degree-ish angle and scraped along the thinset, creating little grooves to grab the tiles (we used a small 3/16″ trowel notch since we’ve got small tiles).
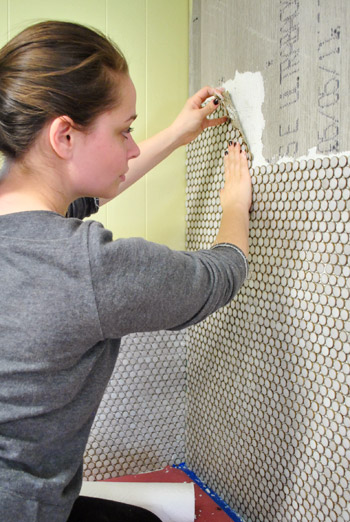
And at last, the first tile sheet was pressed into the wall. It was scary and awesome all at the same time.
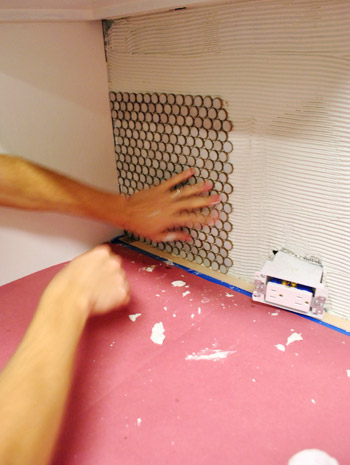
Oh, and we used a veryveryvery thin piece of scrap wood as a spacer against the bottom so that we’d be sure to leave some room between the tile and the counter for caulk (you don’t want tile resting right on your counter, so a tiny smidge of space akin to the spacing between each tile is ideal). So our wood spacer was about as thick as a paint stick if that helps you picture it. Maybe even a little thinner.

These pieces were fairly easy to lay because there was a lot of stuff (counter & cabinets) to help keep things straight. So once we actually started tiling, it didn’t take us too long to get to the point that you saw on Monday (maybe an hour and a half?). We had just spent so much time prepping that we were too spent to continue on into the night…
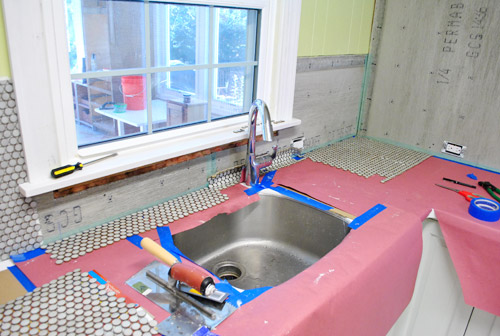
… but the next day we had our mojo back and made our way along the sink wall with renewed energy. We even removed the piece of molding under the window so we wouldn’t have to do any tile cuts around it (we’d just place the molding on top of the finished tile for a seamless look).

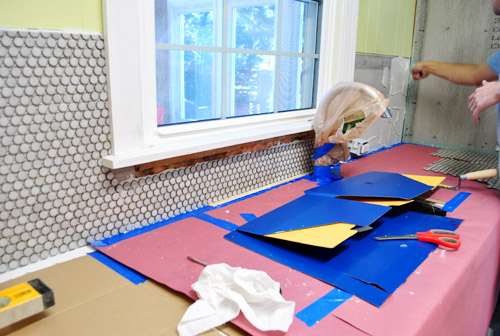
This time we were a bit less type A and didn’t plan out all of our cuts ahead of time… we just removed the full tiles that would interfere with the disposal switch before mixing up thinset and back-filled the rest as we went (popping off half and full tiles and sticking them wherever we needed to fill those in).
So this whole part went pretty quickly, especially in comparison to the day before.
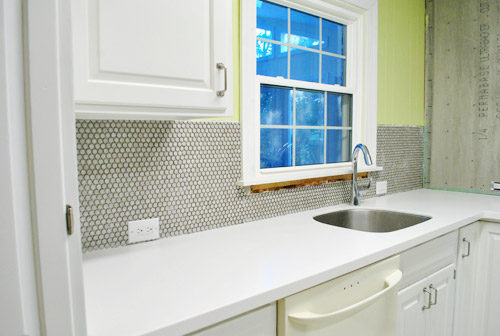
But Clara didn’t give us much of a nap, so we had to call it quits and clean up before we could move our tiling party onto the big back wall. Sigh. At least we got one side done! It’s the easy side, but still. Oh and see how the widow looks off center? Once we add the open shelving to the stove wall there will be 14″ of space on either side of the window so it’ll look nice and balanced again. Note: we’ll share how we’ll be “capping” those 14 inches of tile on either side of the window that won’t be under a cabinet or shelf as soon as we can snap pics to explain things better.

We’re hoping the back wall goes relatively quickly. On the one hand, it’s a huge space to tile. On the other, we’re sort of getting the hang of it now AND the wall is pretty much all full tiles (aka: fewer cuts).

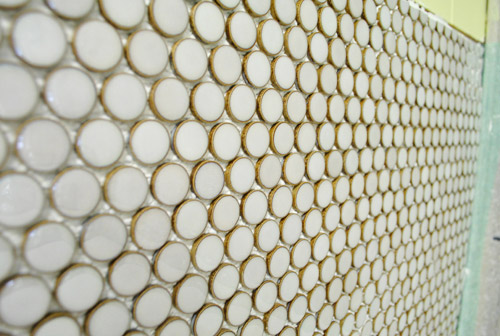
Until then, we’re just enjoying the work we’ve already done. We’re pretty much obsessed with it actually. The weirdest thing is that our favorite thing to do is look at it in the dark. I can’t explain it, but it sort of gleams at night. Like it’s wet. We love that fancy shine. It definitely elevates things like our white Corian counter and our painted cabinets. Can’t wait to grout it and see the finished result. And replace that dishwasher with our stainless guy (just waiting to get the floor down so it runs under it).
What penny tile lacks in quick application points, it makes up for in looks-good ones. We read so many things online about folks having issues lining them up and hiding seams but ours seem to be pretty easy to slide around in the thinset until we like how it’s all lining up.
So we just stand there and keep noodling until we get nice even rows. So as tedious as it can be, the result is 100% worth the finished result in our humble opinion.
In writing this post I also realize we mentioned that we’d make another video and completely spaced on that. Next post for sure! We wanted to show you how we spread and scrape the thinset and set (and scooch around) the tile. Good thing we still have an entire wall to do. Haha.
But wait, you don’t think we stopped there, do ya? Late last night we got a chance to start some of the back wall. Slowly but surely is the name of the game here (we wish we could snap our fingers and be done, but… we tried and there was still a whole wall to tile). Our goal is to be completely finished by the end of this weekend. We’ll just inch along through the weekend and hopefully be back with some wide shots of a fully-tiled-monty post on Monday! Look how serious Sherry is about it. Hah.
Anyone else doing tile stuff? We went into this project not knowing if it would take us three weeks or three days, so I’d say that we’re pretty excited if we get to share a completed tile job around a week after starting it. Not too bad for just stealing evenings and the occasional nap time to chip away at it. So if you’re wondering if you can do it, penny tile can be slow going, but it’s definitely not the hardest thing we’ve tackled. It’s probably not even in the top ten actually. So… you can do it.

Jaz says
Beautiful! Love the penny tile choice – very modern and classy.
btw – Thanks for keeping it real by sharing that you used to/still do eat peanut butter straight from the jar! Ha! I think that is ONE – because there are MANY – of the reasons why your blog is so enjoyable to read…I can relate to so much of what you do/share. Thanks, as always!!
YoungHouseLove says
Aw, you’re sweet Jaz.
xo,
s
Kimberj says
Hi Guys :) This posting brings back memories of when I tiled our kitchen backsplash with 2×2″ cut stone. It was sooo much easier than I thought. My only mistake was not sealing the stone before grouting. Took me forever to get the haze off. My last project was tiling the walls and ceiling of a root cellar with 18X18″ to make a wine cellar and let me tell you, it came out b*tchin!!!! We are selling our home and downsizing so I think we’ll be redoing another kitchen so thanks for all the inspiration past, present, and future!!!
YoungHouseLove says
Wow- you sound like a tile expert! I love it! Haha.
xo,
s
Kathryn Griffin says
That is so impressive! Looks lovely! Hope you’re having a grand evening. Toodles, Kathryn @TheDedicatedHouse
Robin says
wow! so eager to see the finished product!!! Can you two get on that tonight?! and post pics bright and early tomorrow?!! :) pleeeeease?
YoungHouseLove says
Haha- we’re on it every night until it’s done! But it’s a big wall- we’re thinking Monday morning is going to be the day!
xo,
s
Kay says
You mean totally completed on monday, grout and all?
YoungHouseLove says
Oh I don’t think so! I think we’ll just be done with tile and thinset by then. And after a nice long nap or two we’ll tackle the grout! Haha. We definitely move at real-time over here, as much as we’d like to be super speedy like HGTV!
xo,
s
Becky says
I will be the 355th person to tell you GOOD JOB! You two are such an inspiration. I have even worked up the courage to tackle some touch-up caulking on my crown moulding.
YoungHouseLove says
Aw thanks Becky!
xo,
s
Jenna at Homeslice says
Ah, when I saw your title I thought these might be AFTER pictures. Oh the disappointment! I guess that would be crazy-fast though, so I’ll look forward to them whenever they come. I’m sure you guys are ready for it to be done! It looks AWESOME so far, so hang in there!
Staci says
Love it! I am contemplating a cupboard project…we’ll see!
My coworkers and I have been wondering….are you no longer posting twice a day?
YoungHouseLove says
Our posting schedule for the last 8 months or so has been two posts on Monday, Tuesday, and Thursday and one post on Wednesday and Friday! Of course there are also random posts on Young House Life going on too! Hope it helps!
xo,
s
Sarah says
I did a backsplash with subway tile, and a full shower… I did the shower with thinset and then got tired of mixing and cleaning up thinset and used tile adhesive for the kitchen backsplash — its kindof like toothpaste. Definitely can smoosh around. Sooooo much easier to use, soooo much easier clean up. Just pop the top on the bucket and put it away until you’re ready to use it again. More expensive though.
It might not be a good choice for a bathroom (though that is what was used to put up the tile that was there) but for a backsplash its just fine. I’ve had it for a while now and haven’t noticed a difference.
YoungHouseLove says
Thanks for the tip Sarah! We think we have enough thinset left to do the whole wall so we might just use it because we already have it on hand – but we’ll have to look into tile adhesive for our next projects!
xo,
s
Cheryl says
Saw these floating/open shelves over on houzz.com and thought of you guys. I’m admiring the aqua tile for myself…
http://www.houzz.com/photos/66894/Divine-Kitchens-LLC-contemporary-kitchen-other-metros
YoungHouseLove says
Beautiful!!
xo,
s
Katherine @ Keep Smiling Home says
We just finished tiling our bathroom floor with one inch hex tiles and we turned a closet into a walk-in shower with subway tile and let me tell you…this post sends shudders down my spine. If I never mix another batch of grout in my life, it will be too soon! I hope you guys have much better luck with the grouting, it was not the best experience for us. Looks great, though! I’ll keep reading so I have some pointers for our kitchen when we do it someday.
YoungHouseLove says
Aw thanks Katherine! I know what you mean when you just hit that point of fatigue! So glad your hex tiles and subway tile look great – I love that combo for a bathroom!
xo,
s
Megan says
Wow, I love this penny tile! It looks really good :) My husband and I had to look high and low here in Vancouver, Canada for a small white hex tile to do on our bathroom floor so these posts are going to be really helpful! In the meantime, we’re working on a tiling project right now (first time I can actually says ‘why yes! I am doing the thing they asked about at the end of their blog!” We are retiling our really bad mid ninties aqua greenesque fireplace surround. It’s been arduous because we decided to buy 12×12 tiles and then cut them to look like subway tile, but fingers crossed it’ll look great! I’m always surprised by how many different buckets, clothes and spacers you need when tiling!
YoungHouseLove says
Wow- that sounds like quite a job! Wishing you lots of luck! Would love to see pics when it’s all done!
xo,
s
Jackie says
I can’t wait to see it all finished! Looks great already. Am I weird for actually gettin’ all excited about this? I’ve been waitin’ to see it!! Thanks for sharing!!
YoungHouseLove says
You’re totally not weird. We’re crazy excited and I think my mom might be the most excited of all, all the way up in NY!
xo,
s
Georgia says
I missed Monday’s post- you guys post sooo much! I found doing the penny tile quite easy. I only did one row as a back splash, but once it is grouted, you absolutely can’t see any seams, so not sure if staggering the tiles is needed. I also was totally unable to get a brand new pair of tile snippers to cut through my penny tile. It wouldn’t cut, wouldn’t even shatter, so at the edges i just filled in those gaps with grout and it looks absolutely fine. I did use lovely blue grey penny tiles and a grey grout, so maybe that’s why. But yours looks fantastic. The grouting really makes them pop!, so can’t wait to see that (i will have to check back here really often- any chance you could put one of those previous post title things at the top of your blog?…..makes it easier to keep up when checking blogs from a tablet)
YoungHouseLove says
I think when you do more than one row the staggering is recommended (we have heard from others who have seen visible seams or even had pro tile installers leave seams because they didn’t stagger – eeks!). As for a previous post title thing at the top of our blog, we’re not sure what you mean but would love more description! Maybe that’s a smart phone app? We’ve tried that but it keeps crashing our site, but we’ll keep trying!
xo,
s
Antigoni says
I just love the fact that Sherry is placing tiles, with such style and perfect color on her nails!!! You rock girl!!
greetings from Greece
YoungHouseLove says
Haha- don’t look too close! They’re all chipped and coated with thinset!
xo,
s
Kathy says
Looks great kids! Keep up the good work.
natasha says
delightful kitchen!!! you must be itching to have it completed!
i am hoping you will be doing a grout post next!
(even though you’ve done one previously ..)
i’m about to attempt to re-grout my 1960s mosaic bathroom floor tiles (pastel green might I add yahoo!!) and i’m terrified to give it a go.
perhaps seeing you guys grout your mini circles will give me the final boost i need!
YoungHouseLove says
Oh yes, I don’t think we’ll be done grouting by Monday (the goal is to be done tiling though!) so hopefully the post after that will be all about tackling that grout!
xo,
s
Lori KM says
I seem to recall having problems mixing up the thinset from The Tile Shop as well. Perhaps the instructions are tricky for those like me who are math challenged? Would you mind quoting the instructions and recounting how you interpreted them for your mix?
Thanks!
YoungHouseLove says
I had the most luck just eying it and not measuring anything exactly. After watching the video I linked to in this post, I was just adding a bit of mix and water until it was the right consistency (adding more powder to thicken it and more water to thin it out). My experience has been that there’s not an exact science to it, so it just comes down to getting something easy enough to spread (not thin and runny and not so thick that it falls right off the wall). Hope it helps!
-John
Kristina Gulino says
Oh my gosh it’s going to look so amazing! It adds so much to your already-gorgeous kitchen. One of my resolutions this year was to put away a small bit each month for our future home – cause you never know when you’re going to want a backplash!
Kristina
Something 2 Write About
Lo says
You guys are doing a better job than the professional tile guy I hired to install my penny round backsplash! Cutting down the sheets so the seams are staggered is genius…. too bad my tile guy wasn’t that genius. And his was the 2nd attempt at installing my backsplash. I had to have the first guy’s job scraped off because it was so bad and uneven. You guys are doing such a great job!
YoungHouseLove says
Aw thanks Lo!
xo,
s
snosie says
I’m on standby for the ‘how to grout’ lesson!! I was rying to clean my mosaic tiled bathroom floor I realised it’s not so much dirty (though it was), it’s actually shadowing, cause there’s less grout in some places than others… Sigh, joys in a new home!
R says
I’m really liking your progress on the kitchen. We just re-did ours and added a bar as well. I love it!
Now that the counters are in, backsplash is going up, cabinets are painted, etc., are you still loving the wall color in there? I feel there is too much contrast with your finishes and it doesn’t allow them to really shine. I think they are competing with the wall color instead of the wall color enhancing the finishes. Does that makes sense?
I just wondered if you guys are re-thinking it at all?
YoungHouseLove says
Oh no, in person the wall color is totally awesome- at least to us. Haha. But some monitors can make it look funky. It’s definitely one of those personal preference things too though!
xo,
s
JEN says
Ya know what? I kinda like it.
Evelyn says
I wish you lived close to Indiana, I mean our kitchen needs some major renov! We just moved into our 1948 ranch style last October and the kitchen is driving me coocoo. Anyways you guys keep me motivated soo keep up the goodwork, this FTM in good ole’ Evansville is definitely learning from you.
Michelle says
Love it! We’re actually doing the aqua color penny tiles for our kitchen after the great ideas from your blog. After seeing the install I think I know we’ll need some outside help but we’re tackling the cabinets using your process in a week. Can’t wait!
Alice says
I am loving watching your kitchen reno, its starting to look fab! We have just bought a house (yay!) and our new kitchen looks similar to how yours used to. It has a newer granite on top of the older dark wood cabinets. We really don’t like the granite (brown & dark) but everyone thinks we are mad to get rid of it. Did you have a similar dilemma? Yours looked like it was granite as well…Also how did you create your mood boards? I want to get started on mine for the new house! I appreciate your comments as I see you have kerzillions to respond to! Alice x
YoungHouseLove says
We knew we’d have to buy more of our granite for the peninsula we added (about 40% more) so we decided it didn’t make sense to put money (lots of money, haha) into granite we didn’t really like, and decided to sell it on craigslist so it wouldn’t be wasted (we made $350 and put that money into our newer counters). Hope it helps! I also make mood boards in photoshop, but have heard that sites like mydeco.com and polyvore.com are free and fun!
xo,
s
Alice says
Thank you! Excellent, more reasons to ditch the granite ;-)!
Jacalyn says
Thanks for this post…. My fiancé and I chose penny tile (in Biscuit) from the Tile Shop and I was excited tonread about your experience before we started ours today. While he prepped the workspace, I snipped somentiles in half to get started. At first, I tried your slow squeezing method, but quickly became overly ambitious and overcome with power from my productiveness that I snipped more quickly. Lucky for me, not a single tile shattered, and we have finished one whole wall. Perhaps it had to do with the tile cutters I used (which belonged to my grandfather and have no marks on them…figures) or maybe I am just super strong. I couldn’t believe how quickly I finished one wall once I got in the groove (fiancé had plans so I did most solo). It was nice to be able to shift the tiles after you put them up, too. I think that penny round is relatively easy to work with….can’t wait to see your finished room and can’t wait to finish mine!!! Thanks for the tips!!
YoungHouseLove says
Glad to hear you had better luck with snipping the tile than we did! We also wondered if we had slightly larger nippers (that were as wide as the tile) if we might have a better result. Would love to see pictures when you’re done!
-John
melissa says
Do you need to you backer board behind the backsplash? Did you?
YoungHouseLove says
Yup, we used cement board for ours! Seems to hold the weight well and keeps things nice and straight (the paneling is sort of wavy in some parts whereas cement board is really nice and thick and flush).
xo,
s
Amber says
looks amazing! We are hoping to do some tiling of our own and were having problems using the tile shop coupon code? There doesn’t seem to be a field to enter it into – sorry to bother, just thought you might have a suggestion?
YoungHouseLove says
Hmm, this is the first we’ve heard of that. Are you going all the way to checkout? I think the field comes up at the very end. Anyone know? I also think you can call them and have them put the code in for you over the phone. Good luck!
xo,
s
Whitney says
Question, about how many square feet did you tile? Did one large bag of quickset and grout cover everything?
YoungHouseLove says
Yes, one large bag of quickset and grout covered everything. We can’t remember how many square feet we tiled, but I believe if you read back through these comments we covered that info in past comments. Hope it helps!
xo,
s
Stacey says
It doesn’t look like you guys had to do anything with the walls in order to tile. We just took off our backsplash and took away a little bit of the wall. Did you run into this problem, or have you in the past? If so, what did you do to keep the wall flush? I am trying to “copy” your kitchen remodel, and your blog is making it look much easier than reality :)
Thanks for everything!
YoungHouseLove says
Oh yes, we had to cut out all the drywall and attach backerboard. I think if you search through all of our tiling posts there’s info on that (along with lots of pics). Hope it helps!
xo
s
Cindy says
Hi,
Thank you for all of your blogging and posts! the link on the type of thinset you used for the penny tile doesn’t work, do you by any chance remember the brand of thinset you used? :) I’m being told by homedepot I need to buy a mortar mixer :(
YoungHouseLove says
So sorry, we don’t remember but it was from The Tile Shop I think!
xo
s