Monday’s backsplash post kinda dove straight into the middle of the project, so we thought while we were back to share our progress we should rewind a smidge to explain a bit more about the process for anyone else out there who wants to tackle something similar. First we had to prep the room. So everything came off the counters.
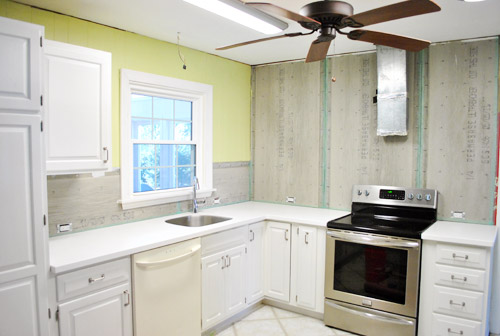
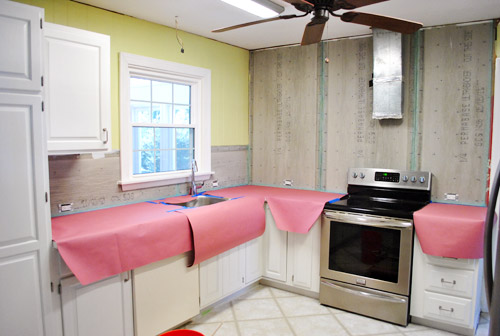
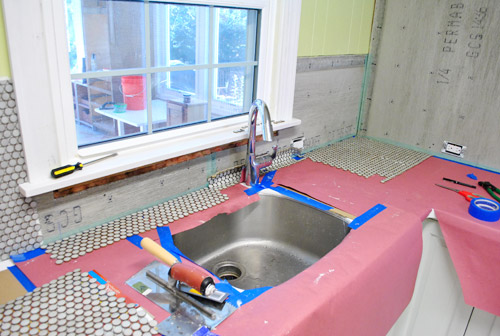
Then down went the rosin paper (from Home Depot). It was recommended by our counter installation guy when we mentioned we were doing a backsplash. It’s basically like brown construction paper, but with an added moisture barrier that keeps any thinset drips from seeping through. We covered each of the counters with cardboard (for extra protection against sharp trowel corners) then taped rosin paper over it, with the painter’s tape going right up to the wall.
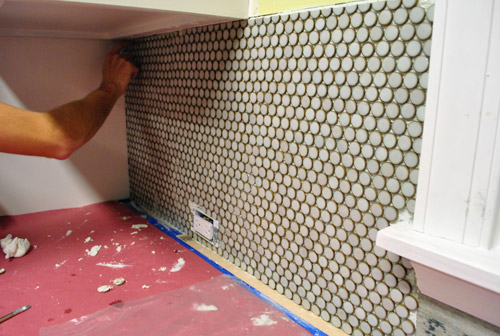
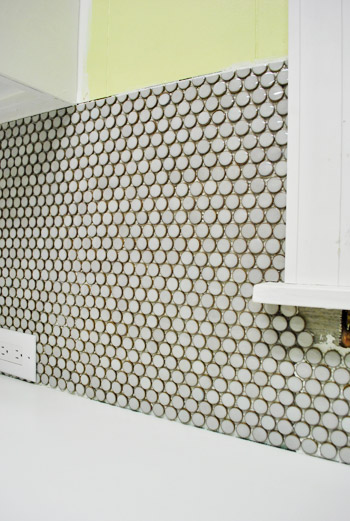
Finally we got to start planning our tile placement. We decided to start in the corner under the microwave because it felt like a nice fairly inconspicuous spot to learn the ropes. And it was basically three sheets wide in that area, so we took it as sign that it’d be an easy way to get our feet wet.
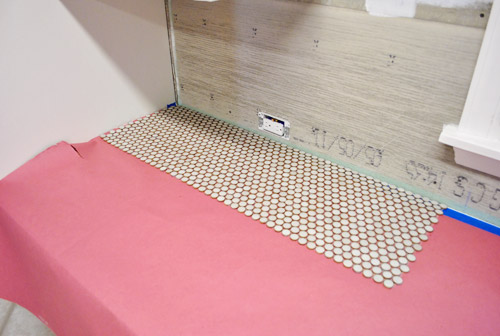
Not knowing how long it would take to make cuts, we didn’t want our whole batch of thinset to dry out while we fumbled with the nippers for an hour (which happened, as you know from Monday’s post). I’m glad we took it slow to start, but we later learned it’s MUCH faster to put up as many full sheets as you can and then just backfill with cut pieces along your edge (even if you have to use some freshly mixed thinset to place those).

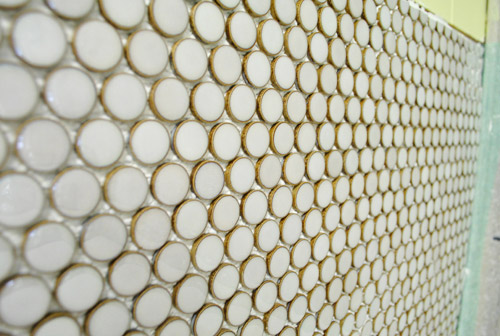
The staggered pattern is to help disguise the seams by alternating where they lie. So instead of your eye catching one long horizontal seam, things are mixed up a little so there’s hopefully a more seamless effect once it all gets grouted.
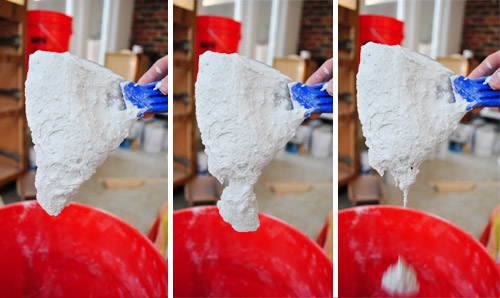
Anyways, now that we were FINALLY ready to put some tile on the wall, I had to mix up the thinset (we got this kind from The Tile Shop). Not gonn lie. This step made us nervous because we ruined a whole bag of grout during our first house’s bathroom project by misreading the label and pouring in too much water. Oops. So we read the bag about ten times and then found this Ask The Builder video on YouTube. And we’re happy to report that we had no trouble getting our thinset to the right consistency.
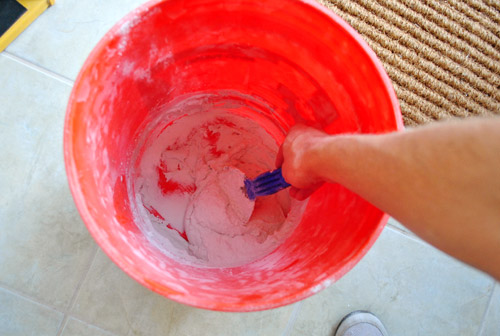
As we’ve heard, the thickness is supposed to be somewhere in the neighborhood of toothpaste or pancake batter. It should hold together, but still be loose enough to spread – and fall slowly off your putty knife like so:
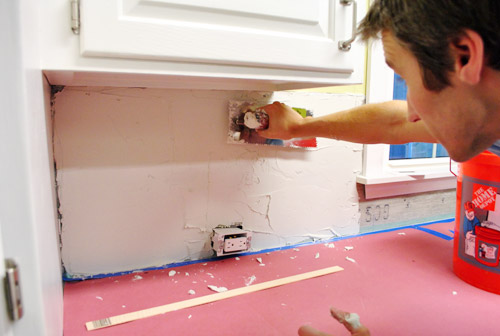
With the thinset mixed, we spread it on the wall using the flat side of the 3/16″ notched trowel (from The Tile Shop). I also used the putty knife sometimes since it fit better in the tight space.
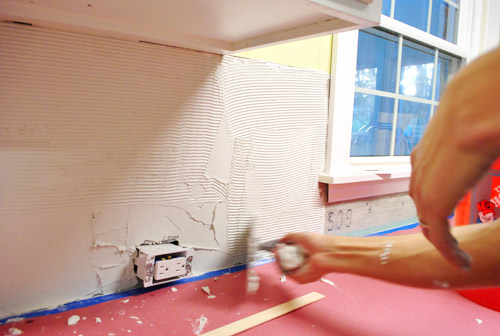
Once it was on and fairly even, we held the notched edge of the trowel at a 45-degree-ish angle and scraped along the thinset, creating little grooves to grab the tiles (we used a small 3/16″ trowel notch since we’ve got small tiles).
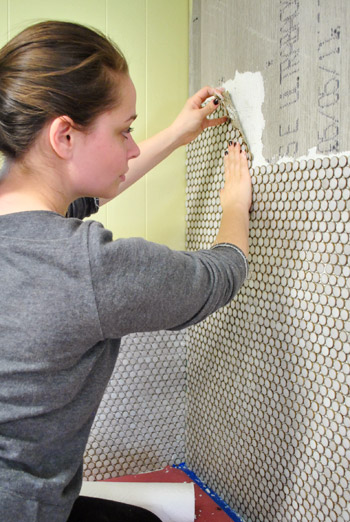
And at last, the first tile sheet was pressed into the wall. It was scary and awesome all at the same time.
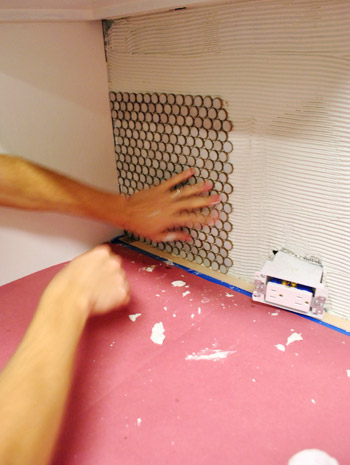
Oh, and we used a veryveryvery thin piece of scrap wood as a spacer against the bottom so that we’d be sure to leave some room between the tile and the counter for caulk (you don’t want tile resting right on your counter, so a tiny smidge of space akin to the spacing between each tile is ideal). So our wood spacer was about as thick as a paint stick if that helps you picture it. Maybe even a little thinner.

These pieces were fairly easy to lay because there was a lot of stuff (counter & cabinets) to help keep things straight. So once we actually started tiling, it didn’t take us too long to get to the point that you saw on Monday (maybe an hour and a half?). We had just spent so much time prepping that we were too spent to continue on into the night…
… but the next day we had our mojo back and made our way along the sink wall with renewed energy. We even removed the piece of molding under the window so we wouldn’t have to do any tile cuts around it (we’d just place the molding on top of the finished tile for a seamless look).

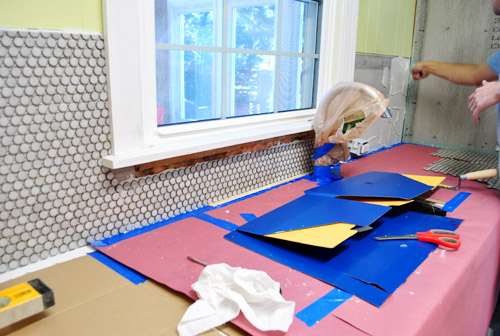
This time we were a bit less type A and didn’t plan out all of our cuts ahead of time… we just removed the full tiles that would interfere with the disposal switch before mixing up thinset and back-filled the rest as we went (popping off half and full tiles and sticking them wherever we needed to fill those in).
So this whole part went pretty quickly, especially in comparison to the day before.
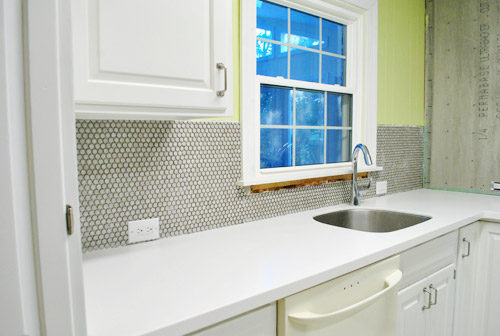
But Clara didn’t give us much of a nap, so we had to call it quits and clean up before we could move our tiling party onto the big back wall. Sigh. At least we got one side done! It’s the easy side, but still. Oh and see how the widow looks off center? Once we add the open shelving to the stove wall there will be 14″ of space on either side of the window so it’ll look nice and balanced again. Note: we’ll share how we’ll be “capping” those 14 inches of tile on either side of the window that won’t be under a cabinet or shelf as soon as we can snap pics to explain things better.

We’re hoping the back wall goes relatively quickly. On the one hand, it’s a huge space to tile. On the other, we’re sort of getting the hang of it now AND the wall is pretty much all full tiles (aka: fewer cuts).

Until then, we’re just enjoying the work we’ve already done. We’re pretty much obsessed with it actually. The weirdest thing is that our favorite thing to do is look at it in the dark. I can’t explain it, but it sort of gleams at night. Like it’s wet. We love that fancy shine. It definitely elevates things like our white Corian counter and our painted cabinets. Can’t wait to grout it and see the finished result. And replace that dishwasher with our stainless guy (just waiting to get the floor down so it runs under it).
What penny tile lacks in quick application points, it makes up for in looks-good ones. We read so many things online about folks having issues lining them up and hiding seams but ours seem to be pretty easy to slide around in the thinset until we like how it’s all lining up.
So we just stand there and keep noodling until we get nice even rows. So as tedious as it can be, the result is 100% worth the finished result in our humble opinion.
In writing this post I also realize we mentioned that we’d make another video and completely spaced on that. Next post for sure! We wanted to show you how we spread and scrape the thinset and set (and scooch around) the tile. Good thing we still have an entire wall to do. Haha.
But wait, you don’t think we stopped there, do ya? Late last night we got a chance to start some of the back wall. Slowly but surely is the name of the game here (we wish we could snap our fingers and be done, but… we tried and there was still a whole wall to tile). Our goal is to be completely finished by the end of this weekend. We’ll just inch along through the weekend and hopefully be back with some wide shots of a fully-tiled-monty post on Monday! Look how serious Sherry is about it. Hah.
Anyone else doing tile stuff? We went into this project not knowing if it would take us three weeks or three days, so I’d say that we’re pretty excited if we get to share a completed tile job around a week after starting it. Not too bad for just stealing evenings and the occasional nap time to chip away at it. So if you’re wondering if you can do it, penny tile can be slow going, but it’s definitely not the hardest thing we’ve tackled. It’s probably not even in the top ten actually. So… you can do it.

Jillian@TheHumbleGourmet says
My parents recently went up to Oregon to spend New Year’s with their best friends. When my mom called to check in with us, she said she was tiling her friend’s backsplash for her and having the best time! Instantly made me think of you guys. :-)
YoungHouseLove says
Haha, I love it!
xo,
s
Alissa says
Looks beautiful! When you finish, could you post a close-up shot of the corner there where the two tiled walls come together? I’m curious to see what that looks like.
YoungHouseLove says
Yes, for sure!
xo,
s
Christy K says
I don’t comment often so I don’t want to be that spell checker person lol! But you did forget the N in window up there it says Widow. Just thought you’d want to know since I didn’t see anyone else point it out! ;)
Also love your kitchen! I’m always on pins and needles waiting for new kitchen posts! :)
Christy K says
Hmmm… I think you guys caught it before I could post I don’t see it now! ;)
YoungHouseLove says
So funny! I didn’t catch anything but maybe John secretly fixed it! Sneaky man.
xo,
s
Ann says
Where the tile stops mid-wall to the left and right of the window…are you planning on putting a finished edge between the tile and wall paneling? It might be too late now, but these work wonders and give a nice finished appearance…for next time maybe: http://www.schluter.com/2267.aspx
YoungHouseLove says
Oh yes, we mentioned that we’ll be adding something to cap it before we grout! We’ll share more info (and photos) in Monday’s post!
xo,
s
Ann says
oops…sorry I missed that piece of info :) Can’t wait to see what you have planned!
YoungHouseLove says
No worries!
xo,
s
MIMI says
It looks amazing! I am going to try to redo my backsplash this year; I’m a newb and don’t even know how to begin removing the ugly granite tile that’s there now. =( Anyway, I’ve been following your kitchen remodel and it’s the first thing I check everyday!
Sherry, how do you manage to have pretty nails with everything that you guys do?! Love you guys!
YoungHouseLove says
Haha, they’re terrible up close! All chipped, but at least I do them myself so I’m not as bummed as when I pay to get them done and they get wrecked!
xo,
s
Heather W says
I just bought the Essie top coat that is no-chip or is supposed to help and so far so good. I work an office job and am constantly typing on the computer etc. and usually after a couple of days there are chips galore but none so far. I bought it at Target. I know you love that store too =).
YoungHouseLove says
Haha- thanks for the tips guys!
xo,
s
Melissa Evans says
Very exciting! The kitchen is coming along nicely! :)
Krystal says
I’ll admit that I wasn’t so confident on the penny tile choice, but I absolutely love it. And Sherry, I can totally relate to being really serious and concentrated in the midst of a project. In fact, I just got out of my drawing class and in the middle of a sketch I had my professor come right up behind and say, “You are so tense, like a lioness ready to pounce. RAWR!!!” Yes, he screamed the last part, and yes, it scared the shite out of me.
YoungHouseLove says
Haha- he sounds like Bruno from Dancing With The Stars.
xo,
s
Lyndsey says
Wow, you guys have done a great job! Loving the tile choice, I can’t wait to see the room done with accessories!!
Your tile job is seamless! Even the kitchen on the cover of the January Martha Stewart Living issue had visible gaps where the seams were (at least to me). Hope you are super-proud of yourselves!!:)
YoungHouseLove says
I noticed that too! It struck fear in me because I worried ours would have the same issue! I think it might have been made more obvious since the tile was dark blue and the grout was white (lots of contrast) but it also looked like the spacing was just a little weird there!
xo,
s
Nicole says
It looks awesome guys! Keep up the great work. You have inspired my husband and i to tile our backsplash as well…and to think out of the box
with what type of tile to uae. :)
Jane says
Oh my gosh! I can’t believe how far you guys have come in such a relatively short amount of time! It looks great!
Very inspirational. : )
Kate says
The tile looks fabulous! I think it would look best with something other than the grellow color, however…something like a blue grey would suit it best, in my opinion! Really, really love your tile though. Looks so great!
YoungHouseLove says
On some monitors it looks funky but in person we love the color choice! It ties so nicely into other nearby rooms like the office, the living room, and the dining room. Definitely a personal preference thing though!
xo,
s
Diane says
When you post again (don’t know if you covered this in the comments already) would you address how you handled the corners where two walls of tile came together…and when you grout those very same corners…would you share about that too! I’m hoping to see the techniques for concave(?)and convex(?)corners-if that’s what they are called!
Thanks!
Your blog makes me happy!
YoungHouseLove says
Sure! We’ll share that info in our next post for ya (about how they meet) and then once we grout we’ll try to talk about that too! You use a flat grout float so I imagine you just cram it into the corner and wipe it down like we did when we tiled our shower. More deets as we go!
xo,
s
Alicia Sherman says
I gasped when I saw how the penny tile looks up on the wall. And I’m pretty sure some drool escaped. I want to be you guys when I grow up. Or Burger… he has it pretty good, too.
Cannot wait to see the rest!!
YoungHouseLove says
I want to be Burger when I grow up!
xo,
s
Sloan says
Hey! I’ve been looking forward to this post all holiday season! Let us know how you handled the corner where tile meets tile. Did you tackle it differently? Also, you said cutting the tile in half was the only way to go, but did you come across a seam that needed 1/3 of a penny tile or less? Thanks!
YoungHouseLove says
Oh yes, we’ll share corner pics in the next post! We just tiled up to the corner and started on the next wall so they matched up. Hard to describe but the pics will make sense of it. As for cutting the tiles, you just want to make sure the nipper is centered on the tile (from left to right) but you can cut off a small 1/3 piece or even less if you need to with the nipper. If you watch the video in Monday’s post at the end you can see that John wasn’t cutting that sheet in half because he needed the pennies to be a bit larger than half. Hope it helps!
xo,
s
Morgan Vucurevich says
It looks wonderful! My fiance and I are going to be doing a kitchen remodel this year. It is encouraging to see you finished in a week and did such a great job! I absolutely love the tile idea you used.
Andrea H Ross says
I’m impressed, those tiles are not easy to put up and not show the lines as to where one sheet ends and the next begins and i couldn’t tell at all! impressive!
YoungHouseLove says
Aw thanks Andrea!
xo,
s
Kelly says
Lookin’ good!! Would love to see the “in the dark” picture. Now you’ve piqued my interest!
Kelly
YoungHouseLove says
Haha, I’m not sure we can capture the effect in such low light, but we’ll give it a shot!
xo,
s
Carla says
I’m in love with the way things are starting to come together! So many projects (well, and the fact that I follow YHL from the office while drinking copious amounts of coffee) are confusing me and maybe you already mentioned this a hundred times, but what are your plans for the ceiling? (please don’t hate me haha)
XOs!!
YoungHouseLove says
Haha- we’ll be adding four can lights in the cooking area and two pendants over the peninsula (and one over the sink we think). Buh-bye fan and ugly fluorescents!
xo,
s
Kelly says
Just saw another comment that I wanted to add to – same here. . .on my monitor the tile looks like those gross gray plastic discs you can stick on the bottom of furniture legs so the furniture won’t damage your floors. That’s the only thing bad about the internet – the colors make all the difference in the world!! I believe you though on the penny tile – I’m sure it BEE-U-TI-FUL!!!
YoungHouseLove says
Haha, it’s a lot softer gray and gleaming- like tiny marble-ish ceramic disks, not plastic ones! I bet once we grout it’ll make more sense on your monitor! You can also try adjusting the colors on your monitor (I think there are even sites that help you adjust it by running some tests). Good luck!
xo,
s
aileen says
Hey John and Sherry!
I love your blog! I totally check in on you guys all the time to see what you’re doing next!
I’m giddy with anticipation to see your finished kitchen! It looks fantastic so far! I also love how detailed your posts are. I’ve often passed on your blog to friends who are new home owners as a great DIY resource!
p.s. Sherry, Clara totally has your profile. You can see it so much in the last picture of you tiling. I think it’s kinda cool!
YoungHouseLove says
Aw thanks Aileen! I love to hear that!
xo,
s
Adrienne says
So I’m a new reader of YHL, well new to blogland in general, and I’ve been reading all of the kitchen posts…I got so excited today, giddy, when I saw the new post – thinking we were finally going to see the BIG WALL completed. Without even reading I scrolled down through all the pictures aannnd…NUTS! haha I still loved the post though, I just find it funny how anxious I am (which I’m sure doesn’t compare to what you both feel) to see it all done. Thank you for continuing to inspire.
The Parkers Blog says
You guys constantly amaze me! It must feel so great to do it yourself and see the finished product.
Michael says
Um, yeah…that last pic in the post, from the side…Sherry looks just like Angelina Jolie. I even did a double take. So now we know what AJ would look like hanging penny tile. Though I doubt that will ever happen.
Can’t wait to see the final result!
YoungHouseLove says
Haha, that never fails to flatter me. It’s my favorite “you look like…” because I think she’s so hot. But I just don’t see it! Haha. I’ve been getting the Game Of Thrones chick a lot lately.
xo,
s
Regan @ RenovatingRothenbergers says
It’s looking amazing!!!! :)
Sherry from BC says
The tile is so beautiful (trying not to use the word awesome this year). It really is a nice change from endless subway tile. Don’t get me wrong, subway tile is nice but so common. You guys always come up with slightly off beat choices that are envy producing. I hope Clara has a few good naps for you this week.
Now that you have the play kitchen built for Clara, have you tried Montessori water play/pouring with her. My granddaughter is 2 and a bit. She sits for at least an hour with this activity. I have a little cruet, a tiny pitcher and 2 shot glasses. I have a large low plastic container that they sit in to contain the water. Here is a link to someone else’s.
http://mymontessorijourney.typepad.com/my_montessori_journey/2009/09/water-pouring.html
Anyway, I can just see Clara deep in thought with this at her kitchen. It is great small motor skill building and my 5 year old grandson still wants to do it when his sister is done.
YoungHouseLove says
Ooh I love that! It sounds awesome. I was a Montessori kid until 6th grade, so I’ve been meaning to add some Montessori stuff to C’s repertoire!
xo,
s
Mary says
How come one of you doesn’t entertain Clara while the other keeps working? Because you need a photographer? (Yes, I’m anxious for finished pics!) I forget how hard it is to get messy stuff done with a toddler around, too.
YoungHouseLove says
Haha, yes it’s too messy to do with a toddler around, we need a photographer handy, and someone needs to be on the blog too during the day (to answer comments like this one, write posts for tomorrow, size pics, arrange giveaways, etc). So right now for example I’m on the blog and John is supervising Clara while sizing pics for a post tomorrow. We generally work at least 8-7 on the blog (one on it while the other watches Clara). YHL is just really active during the day so we end up doing projects at night (and sometimes when Clara naps if things are quiet on the ol’ blog).
xo,
s
Mary says
Wow, that’s a lot of time on the blog! No wonder it’s so cool. I blogged for about six weeks and never wanted to upload another photo, and I only did about 4/day and didn’t re-size or anything!
YoungHouseLove says
Haha, yes we always warn people that blogging is most definitely a desk job (there’s fun projects, but those are usually delegated to nights and weekends, when folks with a 9-5 do them too!).
xo,
s
aynorth says
I am more excited about your tile going up then my own birthday. My heart rate actually increased when I saw this post. I think I need to avoid the blog until the weekend reveal.
On a side note, have you thought of what to do with the broken tiles? They may make nice Christmas ornaments or coasters. Here is a link to one idea.
http://www.wikihow.com/Make-a-Mosaic-from-Broken-Tiles
YoungHouseLove says
Love that idea!
xo,
s
Jennifer says
What happens in the corners where the tile meets? I would love it if in your post for Monday you include what happens in the corner and how you lay the tiles there. My visual learning self can’t seem to grasp what is happening there. One wall will end up overlapping the other, right? Please consider throwing in a picture from that space in your post!Thanks!
YoungHouseLove says
Sure, well share pics. Basically we just continue the tile as we would if the wall continued but it just turns. So things line up and just get put in on a 90 degree angle. More pics to come!
xo,
s
Katie @ Katie Without Restrictions says
I LOVE how your backsplash is looking!
Barbette says
We just completed our bathroom tiling job. We took out a plastic tub surround and tub and replaced it with a full shower. We used 3×6 subway tile and love it. We used a pale grey grout and it turned out great. Have small subway tile to do backsplash in kitchen we renovated last year. Tiling is definitely for the young! We had to take several breaks, just in the first hour.
YoungHouseLove says
Sounds gorgeous!
xo,
s
Karen L. says
Lookin’ so super good, Petersiks! I admire your courage to tackle such a job of tiling backspash. You both are so patient and good at keeping your perspective in all that you do, with always willing to start over if necessary or scrap an idea without feeling like failures in that one area. Good way to be since you’re always doing new things. :) I’m loving see y’all put up the pretty penny tile which has saved you more than a few pennies putting it up yourselves.
kathleen says
We just finished our penny tiles a few weeks ago. We went with white. It looks good but you are right about having to chagne up the pattern. We put up three rows and you can vaguely see the horizontal lines- oh well. It’s a learning process!
Natalie says
My tip of the week :P
Put water in the pail FIRST (when mixing grout or thinset) and slowly add the powder to the water, mixing until you have your desired consistency. Also, when applying your thinset with your notched trowel, leave grooves in both horizontal and vertical (and even diagonal) directions, just making sure that the thickness is consistent. It gives you better adhesion.
Bonus tip: When you’re grouting 45 degree angles are key for floating and sponging. Have two or three sponges so when you get to the almost done phase you can use a clean sponge. Have one person sponging and one person constantly fetching pails of clean water. Makes a huge difference. Also, when you think you’re done go over them with a clean sponge one more time. And if you do end up with a film on your tile, you should be able to buff it off once the grout is totally dry with a heavy papertowel and a circular motion (like a Kim towel).
Can’t wait to see it all finished!
YoungHouseLove says
Great tips one and all!
xo,
s
Brittnee says
The tile looks really good and is making everything look so put together. Good luck with the rest.
P.S. I have to say Thank you for still being good bloggers and not having little projects (aka. rearranging your book shelf to include a new book or tray) or giveaways, or other bloggers for that matter take over your blog (like when there is a guest blogger every other day). There are so many blogs out there now that started out great but have turned into something not worth reading. Your blog is always one of my first to read each day and I read your blog every single day. Thanks for staying true to real blogging. :)
heather s. says
Looks great! So are you swapping out the dishwasher with a stainless steel one once you get the new floor installed? And what are you going to do about the off-centered window? j/k ;) I’ve started guessing at which point in your post you will mention those exact same details again and again.
YoungHouseLove says
Haha- we get so many questions about those things it helps to drop a mention!
xo,
s
Abby says
quick question: i know you will be hanging the floating shelves post tile install. are you DIYing those? or getting something off-the-shelf (like from ikea)? thanks!!
YoungHouseLove says
We think we’ll be DIYing them or getting them from a source other than Ikea since the ones they sell are 8″ deep and we want 12″ so they fit all of our plates!
xo,
s
Courtney Prior says
Hey guys! Are you thinking about changing any of the light fixtures/ceiling fan that you have in the kitchen? I’m not saying you should, just didn’t know if you were thinking about putting in something a little more “fun” (or DIY’d by yourselves)!
YoungHouseLove says
Oh yes! All new lighting plan! Goodbye ugly fan and fluorescents!
xo,
s
Jaime says
Sooooo.. when are we going to discuss lighting?
Awesome job on the backsplash! I learned a lot from this post and will put it to good use.
YoungHouseLove says
We found pendants for over the peninsula at a local lighting outlet! Will have to take photos of them when we’re out of thinset/tile town. Haha. We want to clean things up and tie up this project and then we’ll dish!
xo,
s
Megan E. says
I *love* your blog and I’m guessing that you guys are part of the reason I’m so excited to start my own kitchen renovations. I’m actually tiling my backsplash this weekend–so it was great to see you guys do it first!
P.S. I read the cabinet painting posts and was totally inspired. I was thinking about just paying more and buying those Rustoleum cabinet kits, but I think I’ll just take your paint suggestions and do it the old fashioned way.
Michelle N says
So nice! Can’t wait to see it all finished.
by the way you guys were mentioned on The Colortopia blog by Ana White
http://mycolortopia.com/blog/color/a-project-that-makes-me-smile
YoungHouseLove says
Aw thanks! We love Ana!
xo,
s
Jodie M. says
The tile looks fantastic! Will you be showing us how you cut the tile? I heard you can’t do it with a wet saw and using a nippers didn’t get nice straight cuts.
Beautiful job!
YoungHouseLove says
We actually posted about cutting tile in Monday’s post (even added a video for ya) so just click the link to that post within this post for those deets!
xo,
s
Seina says
This is probably a dumb question, but why will the cork flooring run under your dishwasher, but not the oven or the refrigerator? Or will it go under those as well?
YoungHouseLove says
It will run under those too- but since those are easy to unplug and pull out we’ll just do that when we lay the floor (installing a dishwasher is more of an annoyance, so we only want to do it once)! Hope it helps!
xo,
s
Kate M says
I’m so excited to see this all come together! Also, good job on the staggering…it drives me NUTS when I see penny tile with really visible seams (which I do, all the time–House Beautiful even had a bathroom with really awkwardly-done penny tile a few months back). Yours looks so much better!
meg says
I did the tile backsplash in our house! I was super nervous but its actually how I found your blog by googling “how to tile a backsplash” and young house love came up and I have been a reader ever since!
We bought a 1920s bungalow that was a fixer. We initially were going to live with the kitchen, but during our dining/living and bathroom renovations, we just started demo-ing. Three layers of tile floor, two brick backsplashes, a peeling formica countertop came up and we re-used the cabinets by moving and painting them. We put down our own butcherblock countertop and I varnished/sealed them. We also redid an entire bathroom. We had never owned a house before or renovated anything! But, the Internet can teach you anything!
I picked out recycled glass tile and it comes in 12 by 12 sheets like yours to go with the butcher block, white cabinets and stainless steel.
The tile backsplash was me alone on a Saturday in July. I just started it. I think it looks awesome, but I definitely learned a TON. Aka corners are hard, and dont start on the most visible place in the kitchen (right over the sink!) I see the spots where the gaffs are, like spacing slightly off, a bad cut with the nippers, but no one else does!
YoungHouseLove says
Amazing that you did it all yourself Meg! Congrats!
xo,
s
Erin says
We’re in the process of renovating our kitchen and are considering penny tiles for our back splash. I love the color of the ones you guys are using, but I also like maybe a minty green. I’ve been stalking your progress because I’m dying to know how your penny tiles look! I sort of need to convince my Fiance that penny tiles are sweet… Thanks for being awesome!
caitlin says
maybe you already answered this in the last 200 comments, but your post made me want to ask (and maybe you could make a post about it)—so what ARE the top ten most difficult things you DIY’d? Would you do it again now that you have the experience? I know there are some things that you say you always hire for, but this is a little different… what were the extra varsity things that were harder than you thought they’d be?
:)
YoungHouseLove says
Haha, we were just talking about how we’ll have to write a post about that! Soon hopefully!
xo,
s
Marla says
Great job so far on a job that can be so frustrating and painful! It does get easier as you move along though, like you said. We haven’t tiled anything too recently, but have some plans. Can’t wait!
Katie says
This is amazing! We are getting ready to paint our cabinets and install penny tile, as well, so you have no idea how helpful the last month of posts will be for us! Thanks for your detailed posts and I’m looking forward to your tiling/grouting tips!
Kate says
Just wanted to say I LOVE the penny tile. As an apartment dweller with a railroad style 1920s kitchen I am having major kitchen envy. Great job!