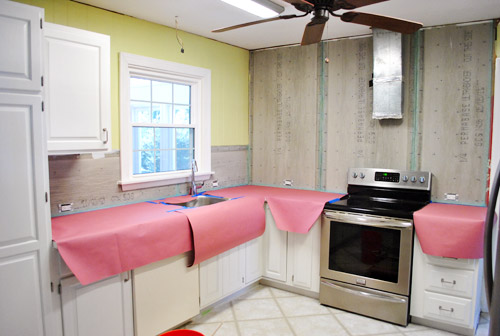
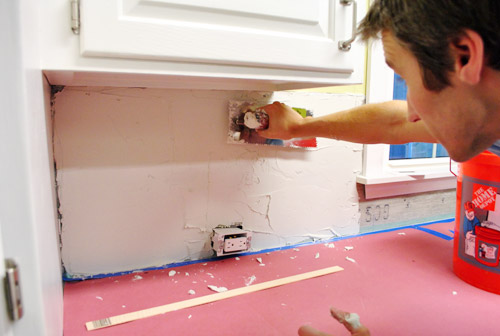
Monday’s backsplash post kinda dove straight into the middle of the project, so we thought while we were back to share our progress we should rewind a smidge to explain a bit more about the process for anyone else out there who wants to tackle something similar. First we had to prep the room. So everything came off the counters.
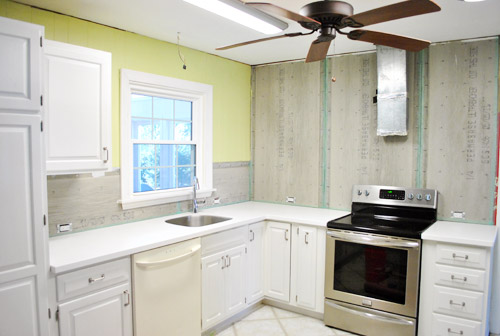
Then down went the rosin paper (from Home Depot). It was recommended by our counter installation guy when we mentioned we were doing a backsplash. It’s basically like brown construction paper, but with an added moisture barrier that keeps any thinset drips from seeping through. We covered each of the counters with cardboard (for extra protection against sharp trowel corners) then taped rosin paper over it, with the painter’s tape going right up to the wall.
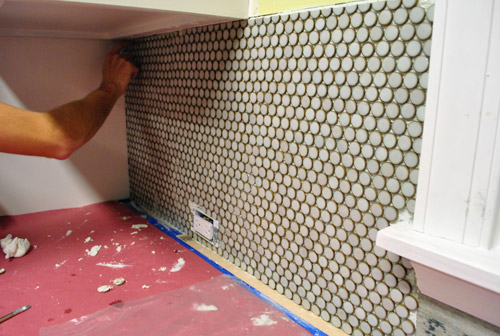
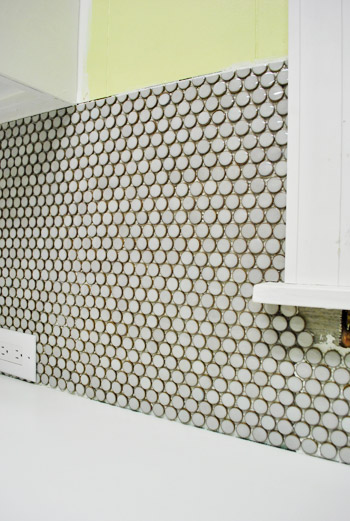
Finally we got to start planning our tile placement. We decided to start in the corner under the microwave because it felt like a nice fairly inconspicuous spot to learn the ropes. And it was basically three sheets wide in that area, so we took it as sign that it’d be an easy way to get our feet wet.
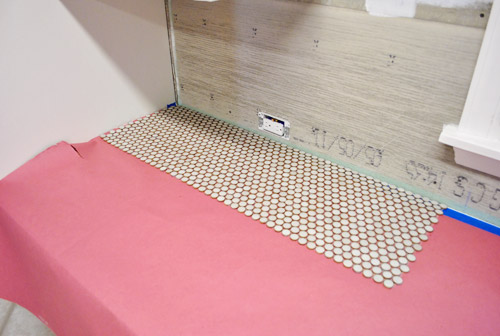
Not knowing how long it would take to make cuts, we didn’t want our whole batch of thinset to dry out while we fumbled with the nippers for an hour (which happened, as you know from Monday’s post). I’m glad we took it slow to start, but we later learned it’s MUCH faster to put up as many full sheets as you can and then just backfill with cut pieces along your edge (even if you have to use some freshly mixed thinset to place those).

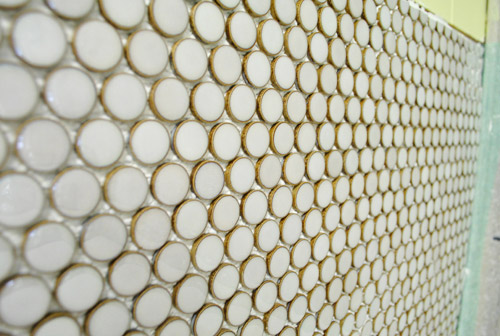
The staggered pattern is to help disguise the seams by alternating where they lie. So instead of your eye catching one long horizontal seam, things are mixed up a little so there’s hopefully a more seamless effect once it all gets grouted.
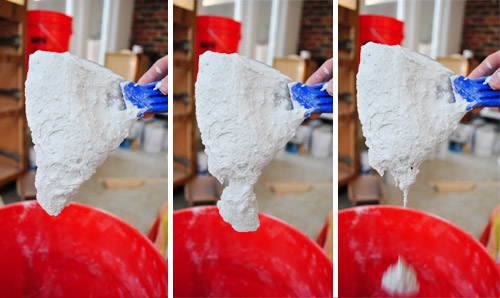
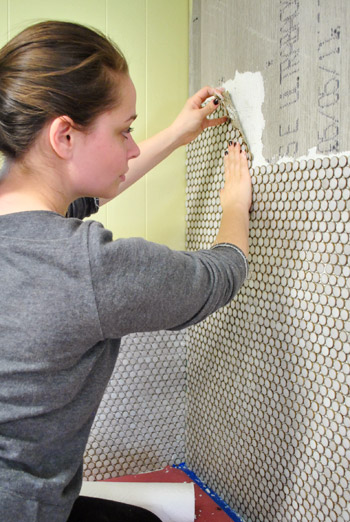
Anyways, now that we were FINALLY ready to put some tile on the wall, I had to mix up the thinset (we got this kind from The Tile Shop). Not gonn lie. This step made us nervous because we ruined a whole bag of grout during our first house’s bathroom project by misreading the label and pouring in too much water. Oops. So we read the bag about ten times and then found this Ask The Builder video on YouTube. And we’re happy to report that we had no trouble getting our thinset to the right consistency.
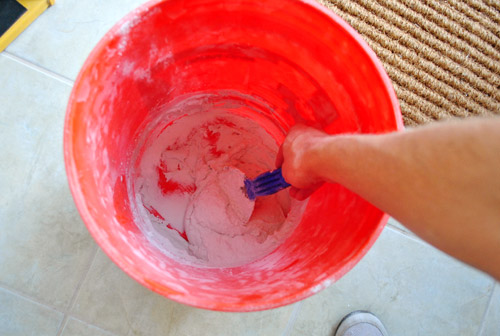
As we’ve heard, the thickness is supposed to be somewhere in the neighborhood of toothpaste or pancake batter. It should hold together, but still be loose enough to spread – and fall slowly off your putty knife like so:
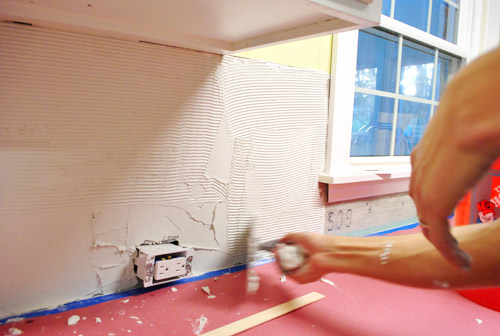
With the thinset mixed, we spread it on the wall using the flat side of the 3/16″ notched trowel (from The Tile Shop). I also used the putty knife sometimes since it fit better in the tight space.
Once it was on and fairly even, we held the notched edge of the trowel at a 45-degree-ish angle and scraped along the thinset, creating little grooves to grab the tiles (we used a small 3/16″ trowel notch since we’ve got small tiles).
And at last, the first tile sheet was pressed into the wall. It was scary and awesome all at the same time.
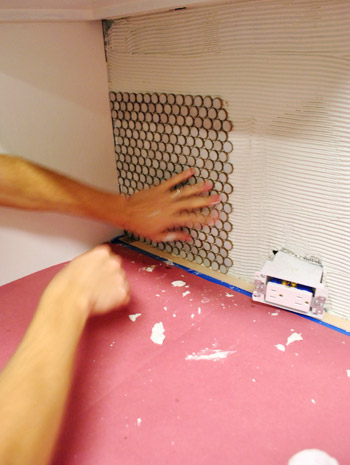
Oh, and we used a veryveryvery thin piece of scrap wood as a spacer against the bottom so that we’d be sure to leave some room between the tile and the counter for caulk (you don’t want tile resting right on your counter, so a tiny smidge of space akin to the spacing between each tile is ideal). So our wood spacer was about as thick as a paint stick if that helps you picture it. Maybe even a little thinner.

These pieces were fairly easy to lay because there was a lot of stuff (counter & cabinets) to help keep things straight. So once we actually started tiling, it didn’t take us too long to get to the point that you saw on Monday (maybe an hour and a half?). We had just spent so much time prepping that we were too spent to continue on into the night…
… but the next day we had our mojo back and made our way along the sink wall with renewed energy. We even removed the piece of molding under the window so we wouldn’t have to do any tile cuts around it (we’d just place the molding on top of the finished tile for a seamless look).

This time we were a bit less type A and didn’t plan out all of our cuts ahead of time… we just removed the full tiles that would interfere with the disposal switch before mixing up thinset and back-filled the rest as we went (popping off half and full tiles and sticking them wherever we needed to fill those in).
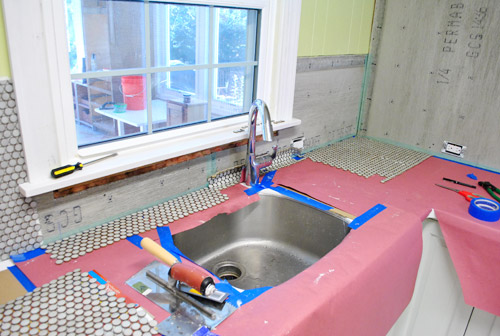
So this whole part went pretty quickly, especially in comparison to the day before.
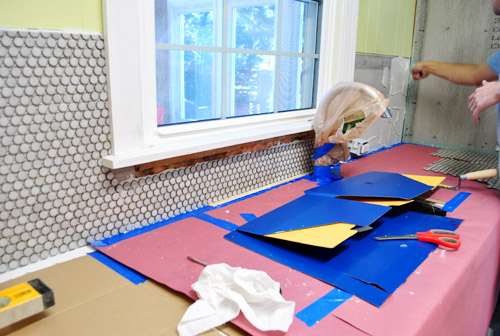
But Clara didn’t give us much of a nap, so we had to call it quits and clean up before we could move our tiling party onto the big back wall. Sigh. At least we got one side done! It’s the easy side, but still. Oh and see how the widow looks off center? Once we add the open shelving to the stove wall there will be 14″ of space on either side of the window so it’ll look nice and balanced again. Note: we’ll share how we’ll be “capping” those 14 inches of tile on either side of the window that won’t be under a cabinet or shelf as soon as we can snap pics to explain things better.

We’re hoping the back wall goes relatively quickly. On the one hand, it’s a huge space to tile. On the other, we’re sort of getting the hang of it now AND the wall is pretty much all full tiles (aka: fewer cuts).

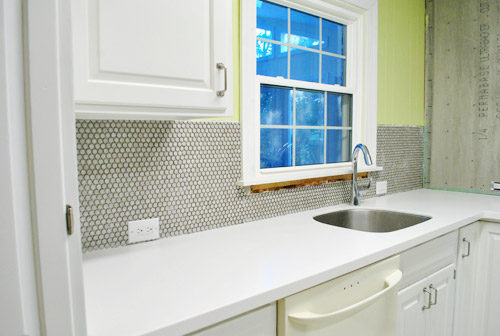
Until then, we’re just enjoying the work we’ve already done. We’re pretty much obsessed with it actually. The weirdest thing is that our favorite thing to do is look at it in the dark. I can’t explain it, but it sort of gleams at night. Like it’s wet. We love that fancy shine. It definitely elevates things like our white Corian counter and our painted cabinets. Can’t wait to grout it and see the finished result. And replace that dishwasher with our stainless guy (just waiting to get the floor down so it runs under it).
What penny tile lacks in quick application points, it makes up for in looks-good ones. We read so many things online about folks having issues lining them up and hiding seams but ours seem to be pretty easy to slide around in the thinset until we like how it’s all lining up.
So we just stand there and keep noodling until we get nice even rows. So as tedious as it can be, the result is 100% worth the finished result in our humble opinion.
In writing this post I also realize we mentioned that we’d make another video and completely spaced on that. Next post for sure! We wanted to show you how we spread and scrape the thinset and set (and scooch around) the tile. Good thing we still have an entire wall to do. Haha.
But wait, you don’t think we stopped there, do ya? Late last night we got a chance to start some of the back wall. Slowly but surely is the name of the game here (we wish we could snap our fingers and be done, but… we tried and there was still a whole wall to tile). Our goal is to be completely finished by the end of this weekend. We’ll just inch along through the weekend and hopefully be back with some wide shots of a fully-tiled-monty post on Monday! Look how serious Sherry is about it. Hah.
Anyone else doing tile stuff? We went into this project not knowing if it would take us three weeks or three days, so I’d say that we’re pretty excited if we get to share a completed tile job around a week after starting it. Not too bad for just stealing evenings and the occasional nap time to chip away at it. So if you’re wondering if you can do it, penny tile can be slow going, but it’s definitely not the hardest thing we’ve tackled. It’s probably not even in the top ten actually. So… you can do it.

Jennifer says
Looks SO amazing! I have to confess to our copycat-ness — we’re also doing grey penny tile, and ordered a sample of the Tile Shop moss. I wanted to ask you — the sample WE got had several weird tiles with lots of blue around the glaze edge, and a lot of the brown unglazed tile showed. It seems like the ones you got have more grey coverage, for lack of a better word . .. or is it just how it photographs? Did you find any freaky tiles that you just popped out and replaced with nicer looking ones? My husband wants to veto this option for that reason, but I still have hope . . . since the price is right.
YoungHouseLove says
Hmm, that sounds weird! Maybe different boxes or shipments vary? Ours did have a few in each box that we popped out and replaced because they had flaws (maybe a scrape or the brown rim was super thick) but how they photograph is how they look in real life! Hope it helps!
xo,
s
Sara says
Looking good!! I wish my kitchen was that big..
We tiled the kitchen with ceramic last weekend. We’re going to tackle our bathroom this weekend. Tile tub surround and marble floors need to be put in. We don’t live in the house yet so it’s a “do some work if someone can watch the baby” kind of thing.
Good luck with the rest!
Ryan says
That is looking sooooo good you guys! Congrats on all your awesome work paying off.
ryanres1
Kristin says
Wow, the tile looks absolutely gorgeous. When I was a kid we often went to a water park that had the pools tiled with penny tile in various shades of blue, so in addition to its overall fabulous-ness it wakes great childhood memories for me.
Sherry, did you start using nail polish again? I remember you saying that you prefer the natural look and don’t use much make-up, but the dark nails look nice! I started using nail polish more frequently when I tried the quick-dry top coat from essie because it prevents having to hold your hands still for hours for the polish to dry, haha.
Have fun DIYing (we know you do)!
YoungHouseLove says
Something crazy happened and I’m back on the nail polish band wagon! I was having an issue with not feeling like I was having any me-time (literally, there were days I didn’t even get to shower) so I have started painting my nails on the sofa at night between writing posts and sizing photos and doing projects. It’s amazing how that ten minute slice of time somehow makes me feel like I’m giving myself a break!
xo,
s
NatalieM. says
My brother in law just re did his kitchen and when he did his back splash he was telling me about this almost two sided tape (larger) material that he used to be able to set up the tile. Seems more forgiving then thin set. Have you heard of it. It seem like it came in sheets. Or is this (me) DiY dabbler talking out of her bumm?
YoungHouseLove says
I think someone mentioned that on Monday but said it might actually be harder because you can slide things around in the thinset to reposition them so things line up more easily. We definitely do that a lot, so it’s really helpful!
xo,
s
Megan E. says
Maybe you’re talking about SimpleMat? I used it during a tile class at Home Depot. Super simple to use, but about $20 for 10 sq ft, which was way out of my budget–thinset adhesive was cheaper.
And Sherry, you’re right, with the SimpleMat there is no room for error. Once you place the tile, they’re set for good.
Megan E. says
http://thesimplemat.com/settingTile.html
YoungHouseLove says
Eeks, no room for error = scaaaaaary! I like to smoosh things around. Haha.
xo,
s
Krystle @ Color Transformed Family says
This motivates me to tile our backsplash. Maybe if I start saving now I could have enough to file by the end of the year.
Your seams look great… I couldn’t even see them in the pictures.
Kasey M. says
Sherry are you sitting on the new counters so that you can reach the wall to tile? (I have to climb on our counters to reach anything on the top shelf at home, I’m 5’2).
When the shelves go up behind the stove are you going to plan them so that you can easily reach them all, just put things that you don’t need to access often on the top shelf, or do you have a really cute stool that hangs out in the kitchen to aid with all this clambering about on counters?
YoungHouseLove says
Haha, yes! I’m 5’2″ also! I think I’ll easily be able to reach the first shelf but the second one will be a “John can you get that for me” shelf. Thankfully he’s the chef in our family so I’m sure the stuff up there will get a lot of use – just not always from me. Haha.
xo,
s
Jazmin says
How do you guys know how to do all of this stuff?! My husband and I can barely paint! HA! This is a talent, I swear because I tried to paint my desk, and lets just say we are now shopping for a new one! You guys are awesome!
YoungHouseLove says
Aw thanks Jazmin! It took us years to work up to where we are today! We too were terrible painters once upon a time! But it gets better with practice! Good luck!
xo,
s
Bethany says
Nice!!! Ooh for a future post could you share what the top ten tough projects have been? I’m so curious! Also when you’re doing tedious projects like this, do you have music on, an audiobook, etc. Or does that distract you? An audiobook got me through my bathroom painting :)
YoungHouseLove says
Oh yes, we usually do music but have done an audio book before (for a 40 hour drive to Texas) and loved it! As for the ten hardest projects, we’ll have to write a post that counts them down. I’m dying to see if John agrees with me on which ones were the hardest!
xo,
s
Jen says
Haha, that was my first thought as soon as she mentioned hardest projects…post idea!!
Mel says
It looks so chic! Love it like woah!! I think I’d hang out on the kitchen floor all day just admiring it!
debbie c says
Looks awesome!!! Cant wait to see if all done!!
Lindsay says
Looks fantastic! I can’t wait to see how you guys edge your tile. We ran our penny tile backsplash just 8″ inches up the wall. We only have 2 small upper cabinets in our kitchen so we thought it would look weird to go the full 18″. So every bit of our backsplash needed to be edged. We put up 5/8″ wooden half round trim and painted it to match the tiles before we grouted. It ended up looking amazing! And was so cheap and easy. Thanks again, you two, for all the DIY inspiration!
YoungHouseLove says
That sounds so pretty!
xo,
s
Jenny says
You said it wasn’t even in the top ten of the hardest things you’ve done. I know you’ve probably skimmed over those things before (like how Sherry mentioned how much she hated ripping the stuff off the front porch frame of the last house), but I’d love to know what some of the actual hardest things you’ve tackled are? Mostly just because I’m really curious :)
YoungHouseLove says
When I read that this morning I was thinking – that would make a great post! We’ll have to make a list and blog about them!
xo,
s
karen says
wow..it’s looking really good! you really did a good job applying it…so seamless! it’s going to look so nice with the grout in!
Elaine says
Awesome job so far guys! Would you recommend against going through the tiling process before painting the cabinets? Or does it not matter at all?
YoungHouseLove says
You usually install backsplash tile as one of the last steps (after doing things like replacing cabinets and counters). It probably could work either way, but I’d be tempted to recommending painting cabinets first, just so you can sand all the sides without worrying about messing up your tile (or getting primer or paint in your grout)!
xo
s
Tara O says
WOW!! I totally thought penny tile really?! When you guys kept showing it but WOW that looks gorgeous!! Totally not something I would consider. It had an amazing impact! LOVE it keep up the good work!!
Chrissy Henry says
Looking good!!!
Can’t wait to see the full wall of tiles :)
Monika says
Beautiful! The cabinets are looking delish btw! I am wondering if we could put up the penny tile backsplash (only about 14 inches tall under the cabinets)without having the heavy-duty wall to hold it up? Any thoughts? Will definitely ask someone at Home Depot or the Tile Shop. Amazing job you guys!
YoungHouseLove says
As long as there’s drywall back there it should work I think! Definitely ask to be sure though!
xo,
s
Lisa says
ahhhhhhhhhhhhhhhhhh! the backsplash and the white cabinets are looking amazing! can’t wait to see the final result. if I were you I’d probably walk through the kitchen 20 times more than I actually needed to just so I could stare at everything.
Ashley@AttemptsAtDomestication says
Oh man! It looks so awesome! I can’t wait to see it all done! So you have plans for where the tile meets the wall on the right side of the sink?
I’m dealing with what to do with wood trim that I hate and my husband loves on my blog today. http://www.attemptsatdomestication.com/much-ado-about-trim/
YoungHouseLove says
Yes, we’ll share photos of how we’ll cap that tile in Monday’s post! And as for your post about dark wood, those inspiration photos are stunning! I say go for it!!!
xo
s
Sarah- Nadine says
I’ve been following your kitchen renovation and especially painting the wood paneling. I have wood paneling in my hallway that I am contemplating to paint until we can redo it properly. However, in between the panels it has the fuzzy little stuff (very technical)
Did yours have that too, since it looks amazing when I look at your kitchen painting project?
Thanks Sarah
YoungHouseLove says
Hmm, fuzzy stuff? We don’t have that in ours. Does it need to be sanded down? Or wiped down? Not sure! Might want to try gently sanding it to see if that helps!
xo,
s
Sarah- Nadine says
Thanks Sherry.
I guess I didn’t make myself clear but sounds like you didn’t have it. Not all our panels are wood. Between the boards we have little bristles so it looks like paint brush endings in between the wood paneling (Hard to explain). Unfortunately that is how the paneling came but I don’t think I’ll be able to paint it then since the brittles would stay black (unless I can spraypaint them white…). Hm now that might be an idea.
Oh the beauty of old Ranch Houses. Greeting from NJ.
Sarah
YoungHouseLove says
Haha, good luck! I bet it’ll look great when you’re done with it!
xo,
s
Melissa says
I got super giddy looking at the tile against the white counters and green paint. I can’t wait to see it finished! It looks great so far!
Patti says
Oh.my. This is looking beautiful and soooo sophisticated! I think your color choices make it so. Quick question, when you say you’re tiling slowly and when you can, what do you do with the left over thinset? Are you able to save it or do you have to throw it out and start fresh each time?
YoungHouseLove says
We just mix up enough thinset to set about 3-6 tiles (that took a bit of getting used to, but we now know how much powder and water to mix to make the right amount). That seems to help because we set 3-6 tiles and either mix up more or stop there if Clara’s waking up or we have a post to write, etc.
xo,
s
Allen says
When I saw that first pull-back shot of the half wall I immediately heard myself saying ‘It’s Haaaaaapening’ in a slow, scary movie kind of way!
And just like a scary movie, I can’t wait to see what’s around the next corner! That same combination of terror and excitement.
YoungHouseLove says
Hahaha, I’ve totally whispered the same thing. It’s haaaaaapening…
xo,
s
KathyG says
YAY! progress! I know it feels good in your soul, even if it doesn’t feel so good on the muscles!
OT Question, is anyone else having odd commenting “problems”?
F/E, it will say 112, I click on it, then it says 39, and I’ll have to refresh. I have even had it flip back and forth. Is this my new Google Chrome? Or are other people having same problem?
YoungHouseLove says
Hmm, it could be Google Chrome. Maybe try clearing your cache?
xo,
s
Lynnette says
I use Safari on a Mac and I’ve had this happen off and on since the site redesign. I think it’s just a server glitch due to all the traffic though since it seems to happen most when there are lots of comments being posted at once, like right after a new post goes live. Usually if I come back to a post later, it’s fine.
YoungHouseLove says
Hmm, so odd! Glad it’s only glitchy for a little while and then fixes itself!
xo,
s
Katie Lee says
We were not very experienced in home improvement when we decided to do our own tile backsplash in our first house. Now that we accomplished that we feel like we can tackle anything. Of course our family thought we were crazy. Thanks for sharing your tips on how to make it go better next time.
YoungHouseLove says
Isn’t it amazing? I think tile might give you the most confidence when it’s all said and done. It just seems so “leave it to the pros” sometimes that it’s a huge relief/coup to complete it. Can’t wait for that moment when we lay the last tile in that big ol’ wall!
xo,
s
emmarose says
Got my penny tile backsplash delivered yesterday. Was kinda dreading installing it but I think Ive been reassured and will do just fine!
I was extra happy cause the tile matches the sink perfectly and I wasn’t expecting it to.
Lindsay says
Eeeeeeee!!! Getting so excited to see the finished product! We tiled our backsplash about a month ago and it makes such an immediate difference.
http://meedandpea.blogspot.com/2011/11/little-tiling-how-to.html
YoungHouseLove says
Wow- that’s gorgeous! I love it!
xo,
s
Stefanie says
Love it! Love penny tile! Given my hubs is currently completing our second bathroom reno, it will be a while to we do anything to the kitchen…but this does get me dreaming! I don’t have a site or the pics linked anywhere to show off, but its a beautiful 20 inch porcelain tile shower stall with pebble tile on the bottom. We’re hoping the pebble tile will be a good non-slip surface that doubles as a morning foot massage. :-)
megan says
YAY! I’m so excited to see it all done! My husband doesn’t get it when I talk about my friends (is that creepy? lol) John and Sherry getting new countertops or tiling the kitchen..I say “Just you wait till they get the floors put down, it’s gonna look so good” :)
Ginny @ Goofy Monkeys says
The tile is looking great! What color grout did you go with?
YoungHouseLove says
It’s sort of a soft white color with a hint of gray. It’s the one they had in the sample tile plaque at the store and we fell in love!
xo,
s
Morgan says
So yesterday after seeing your loveseat on Craigslist I told my husband we just replace his futon in the office for a sleeper. I proceeded to tell him where I got the idea and he called me out. He said I just wanted to buy yours so I could meet you! He knows me so well!!
I love the tile and can’t wait to see it with the floor!!!
YoungHouseLove says
Haha- too funny! Wish we could have met you! The guy who bought it last night was very nice indeed and was going to use it for the same reason we did (they have a baby on the way so the guest room will become a guest room/playroom)!
xo,
s
Margaret says
Wow! After seeing this, it makes me realize I may be able to re-do some kitchen tiling myself :) Thanks guys!
Andrea says
Love, love, LOVE it!!!!! It looks fantastic!
Kim says
LooKs awesome! Coming along! Now I’m considering penny tile for our kitchen. How do you finish off the top edge of penny tile (I.e. like using a bull nose on the top edge of subway tiles) (an sorry I didn’t read all the the Other posts so don’t know if you already answered that ques!)
YoungHouseLove says
We’ll share those details on Monday!
xo,
s
Barb says
Breath-takingly beautiful so far. So very happy for you and so very jealous for me. I wish, I wish.
CARRY ON…….
B.
Katherine Victoria says
So E-X-C-I-T-I-N-G…
Can’t wait to see the final result next week, guys!
Life Begins at Thirty, Right? says
You guys did a great job. I’m one of the people you could have been talking about who had issues with a penny tile install.
http://lifebeginsatthirtyright.blogspot.com/2011/04/on-bloggingand-honesty.html
And we had so called professionals install those!! So you are beyond ‘pro’ with your penny tile install. Very impressed. We LOVE our penny tiles (now that they’ve been fixed) and get compliments on them all the time. You will definitely be happy with yours for a long time to come, especially since you are doing that one full wall with them. Gorgeous!
YoungHouseLove says
Aw man- that’s so sad about the first tile job! I’m glad he came back and fixed them! That room is gorgeous!
xo,
s
Kathy says
Now that you have the penny tile up, I can see the difference in the white of your cabinets and the white of the countertops (I really couldn’t see the taupe undertones in the cabinets before).
It’s really looking great! Maybe one year we’ll conquer tile but right now I’m still looking for the motivation to paint my halllway/entrywy/greatroom (it’s been primed since June.. eegads.)
YoungHouseLove says
Haha, isn’t it funny that the addition of the backsplash helps define the counters and the cabinets a bit more? I noticed that too in the pics!
xo,
s
Penny says
I came by to say the same thing! It really enhances the cabinet color. Everything looks so dang good. Y’all.
YoungHouseLove says
Aw thanks Penny! It’s like we’re using penny tile in your honor!
xo,
s
Penny says
Aw, shucks! I’m not worthy!! :)
Erin @ The Impatient Gardener says
Thanks for talking about the seam issue. I see so many horrible installs of small tiles mounted on sheets on TV where you can obviously see the seams that it made me think that it’s not possible to put up those sheets of tile without seeing seams (and that bothers me enough to think I’d never do that kind of tile for just that reason). Yours looks great and it’s nice to know it CAN be done. I can’t wait to see it grouted. Have you decided on grout color yet? I know I’m jumping the gun a bit because you have a lot of tile left to do, but I’m impatient, ya know? Thanks for taking us on the journey with you step by step.
YoungHouseLove says
Aw thanks Erin! We have decided to use the same grout in the sample that we shared in our post called Lucky Penny, so it’s a soft white creamy gray color. Can’t wait!
xo,
s
Katie says
I’m glad it’s doable and worth it. I’m going to be putting penny tile in our new kitchen and I’m a little worried about it looking right.
Petra says
LOVE! What are you going to do once kitchen renovations have been completed? Throw a party? :)
YoungHouseLove says
Oh yes, we’re going to party for days when we’re finally done! Or sleep for days. Probably that. Haha.
xo,
s
Vidya @ Whats Ur Home Story says
Looks really great. Waiting for the long shot pic.
Anne says
Are you keeping the walls the same color? Maybe it’s the lighting or maybe I just need to see it all finished, but I’m not really digging the look with the penny tile right now. Definitely could be the “unfinished” edge that is throwing me off.
YoungHouseLove says
In person we love the the color! Sometimes in photos or on different monitors it can look funky though!
xo,
s
Karen F says
I had the same thought about the color! I also figured it was the raw edge of tile that was throwing me off…
Anne says
That makes sense. It was looking kind of neon grellow on my computer. I can’t wait to see the finished product!
Laura @ My Pink Thumb says
you have officially convinced me that we need to do some sort of tiled wall in our kitchen as well. ;) it’s looking amazing! can’t wait to see the whole wall done!
Maureen @ This (Kinda) Old House says
This looks amazing guys! I really love the “wet” look of the tile also. That whole wall will look so fantastic when it’s done. Can’t wait to see what you will be capping it off with.
bfish says
It looks really nice and kudos to you for selecting a timeless tile design. Penny tile may be of the moment but it seems a lot more classic and enduring than the multicolored, mixed mosaic tile backsplashes that have become common in the past few years. I think in our kitchen we may opt for subway tile (my husband once set tile for a living — before you guys were born — but he can still install nice straight rows of loose tile) to make things easier!
We use that rosin paper for projects too — it’s good for protecting wood floors among other things.
Bridgette says
So, why is penny tile more difficult to get right than other tile? I guess I just assumed tile was tile :) Obviously, I’ve never dabbled in tile…lol
It looks great!!
YoungHouseLove says
Haha, I think it’s just all the small cuts you have to make (each sheet of tile can have twelve small cuts around the perimeter) so that can take longer than running one big piece of tile through a wet saw. I also think that placing other tiles can be easier since you can use spacers (and you have to noodle and eye each of these tiles). So it’s more tedious but still kinda fun (and a lot of fun when it’s done! Haha).
xo,
s
Erica @ Erica's Inspirations says
It’s looking SOOOO good! I am dying to see the finished product!!
Travis@wellappointedhome.blogspot says
OMG! I LOVE it!!! It’s so pretty, did you guys wire for under cabinet lights?
YoungHouseLove says
We didn’t since we’re adding four can lights in the cooking area of the kitchen and will have a pendant light over the sink and a hood light over the range). We actually only have one upper cabinet that could be wired for lights (the microwave one) – haha.
xo,
s