So yeah… our fridge is white now.
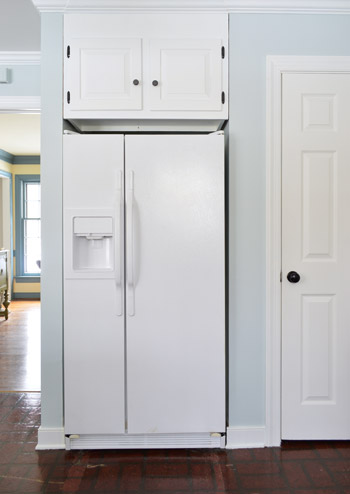
It’s not a new fridge, it’s just our old almond-colored one “freshened up” a bit with some appliance paint so that it would play along more nicely with our white cabinets. After tons of you (literally dozens) mentioned that you had great luck with appliance paint in this post, we were encouraged to give it a try.
I’ll admit that I initially had my doubts, but after hearing such rave reviews from you guys, we figured at its best, this update would help an old fridge blend in more until we save up enough money to replace it during Phase 2 of this kitchen makeover. And if it completely tanked, we could tell you guys the truth, share the awful photos, and just generally save you the trouble of doing whatever it was that we did.
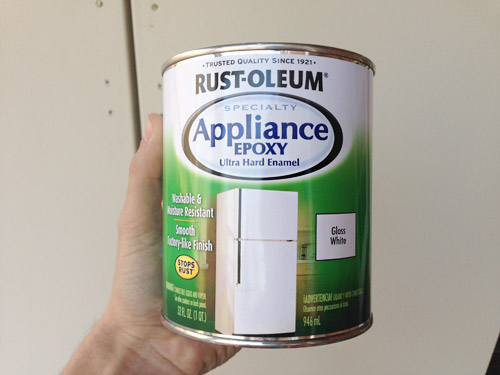
After doing a little bit of what-had-good-long-lasting-reviews research, we settled on this Specialty Appliance Epoxy that was $15 from Home Depot, which was only available in exactly the color we needed: gloss white. I know it’s not as cool or trendy as something like chalkboard paint (which Sherry had mentioned a few times) but I’m weird about chalk and all that dust near my food source gave me the heebies jeebies. Plus I knew if we craigslisted this fridge down the line we could probably ask more for a white one than a chalkboard painted one.
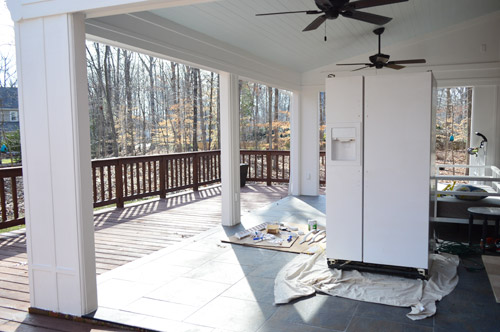
The refrigerator “refinishing” process itself was pretty darn easy. It was the prep that took some muscle – namely moving the fridge outside so that I could paint without stinking up the house (the epoxy smelled like rubber cement, so we definitely wanted to follow their “do this in well ventilated area with a mask on” instructions). After I turned off and disconnected the water line, my dad came over and with a dolly we got it ready to head out to the sunroom… until we realized the handles made it too big to fit out the doorway.
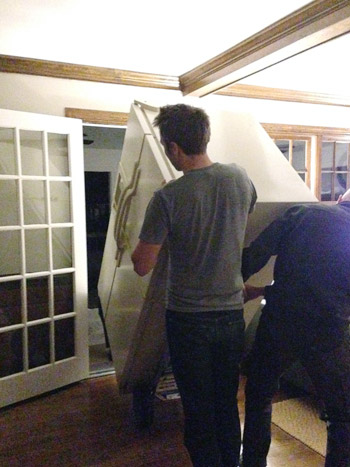
So off came the handles (well, and one of the doors too – it’s a long story) so we could bareeeely squeeze it out the door. We actually left most of the food inside (except for some especially heavy, breakable, and spillable stuff that temporarily came out during transport) to avoid the extra hassle of unloading and reloading everything. Oddly enough, it worked.
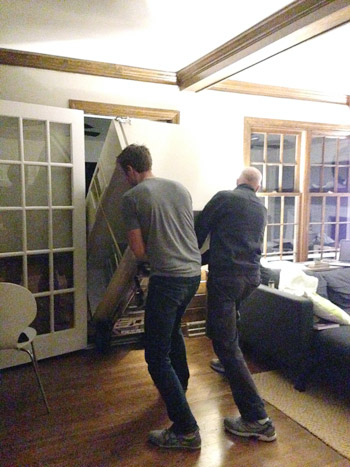
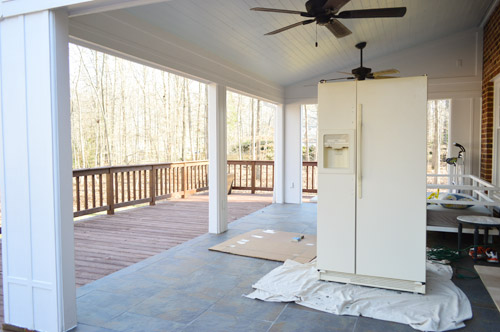
The move took place on Friday night so that we’d be ready to go on Saturday morning, since the weather forecast was nice for the weekend and the epoxy is supposed to be used in 50°+ temperatures. We weren’t the classiest neighbors for a couple of days, but at least it’s better than having it on the front porch. We even plugged it in out here so the food would keep. Nothing like going outside to get milk for your cereal in the morning.
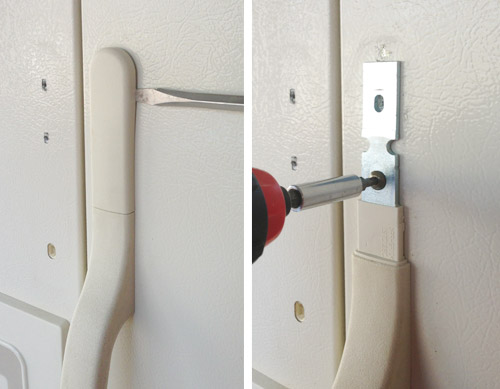
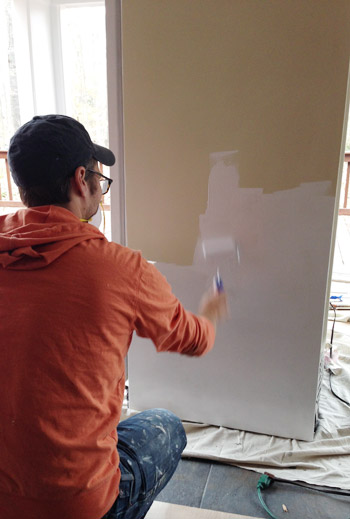
The project didn’t get going until later in the day on Saturday (once temps crept up enough to meet the can’s requirements). Obviously I had reattached the one door that we took off to keep the food cold, but Sherry decided it’d be best to have both handles off when painting for the most seamless and hopefully drip-free result. All it took was popping off a cover on either end and then unscrewing them.
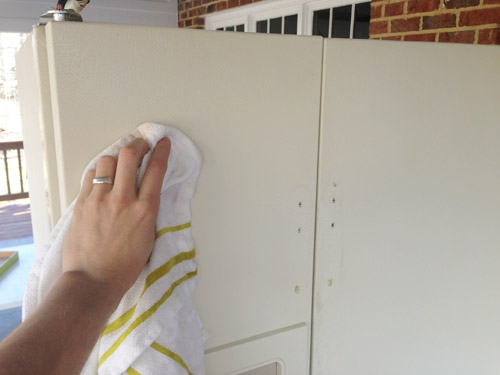
Per the directions on the can, Sherry and I started by lightly sanding the whole fridge – just enough to get the gloss off. A power sander felt like overkill, so we each used sanding blocks of 150 grit.
I did the front two doors while Sherry did the sides. You can see the difference between the door I roughed it up and the door I hadn’t done yet in this picture.
Then we went over it with a damp cloth to get all of the sanding dust off followed by a dry cloth to, um, dry it.
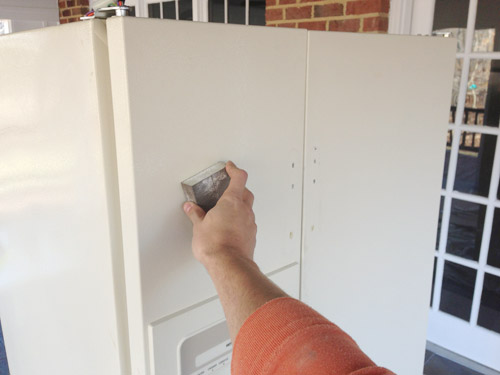
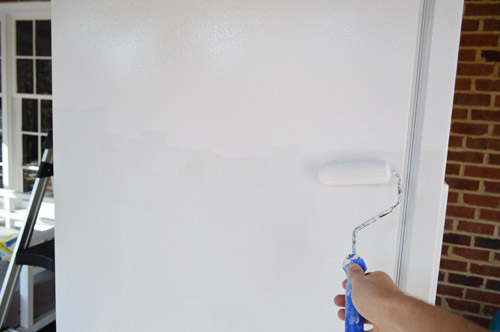
I used a foam roller to apply to epoxy while wearing a mask, just as the instructions suggested (and Sherry, Burger, and Clara went inside and steered clear, so they weren’t exposed to the stink). This stuff basically has the exact consistency of paint so the process wasn’t unfamiliar at all. It goes on a little bubbly but it quickly smooths itself out.
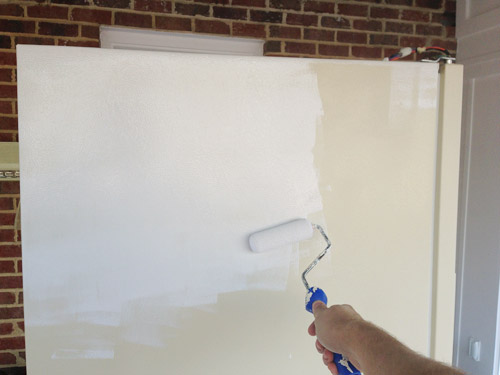
I did break out a brush to help me get into some tight spots, like some of the nooks around the doors and the ice dispenser. We chose to just paint right over that whole area too (covering up the much coveted “Hot Point” brand logo – gasp!). The paint doesn’t actually touch the water/ice dispensing apparatus (that’s tucked up under a cover) so it was nice to know that this definitely-not-food-safe product wouldn’t interfere with anything that goes into people’s mouths – but we could achieve an all-white look from the front instead of having to leave some trim parts cream or something.
I painted three sides and the top, leaving the backside unpainted. There were enough cords, tubing, and venting back there that it didn’t seem worth the hassle (in what installation scenario is that visible?). I probably didn’t need to do the top either but someone even an inch or two taller than me would get an okay view of it, so I just did it to be thorough.
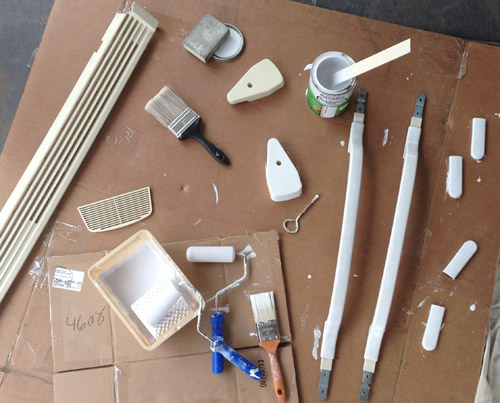
Sherry had spread out all of the little parts – the handles, door hinge covers, bottom grille, etc – on a piece of cardboard so that I could paint them separately. It was easier this way and also minimized the opportunity for drips on the main fridge.
The can said you can recoat in one hour assuming that 70° temperatures were met, so I decided to give it at least overnight before continuing since it was only around 55 degrees on Saturday. But at least the fridge was looking somewhat less offensive out there in white. I’m sure that’s exactly what the neighbors were thinking: “Oh nevermind, honey! It’s white now so no need to call the HOA anymore. I wonder if there’s any beer in that thing…”
You can’t really tell in pictures, but it did need a second coat. So on Sunday morning I rolled on another one pretty quickly and let it dry in the awesome 70° day that we were suddenly having.
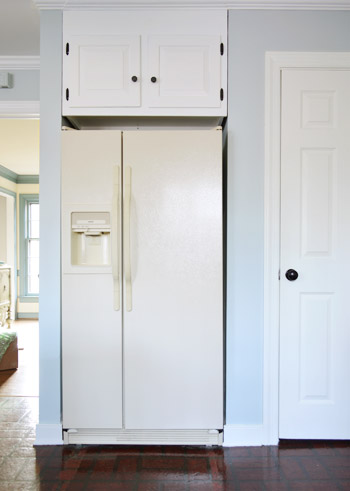
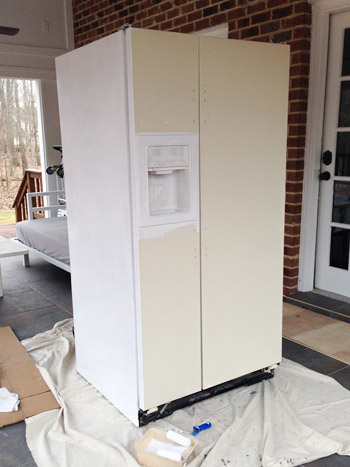
We didn’t get it rolled back inside until it was too dark to take pictures on Sunday night (which is why this post is coming to you today, and not yesterday as we originally planned) but here it is, back at home looking much more blendy with the cabinetry.
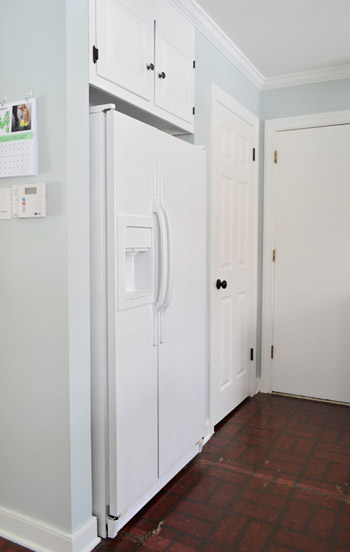
It’s not a perfect color match (the fridge is slightly whiter in color) but it’s only about a shade off instead of being a lot more noticeably clashy like it was when it was cream. Our white range hood is the same slightly whiter tone as the fridge, so we think appliances just tend to be that color when they’re “gloss white.” It’s actually a surprisingly big help in making the room feel a bit more current (I’ll admit that I didn’t think it would make as much of a difference as it does).
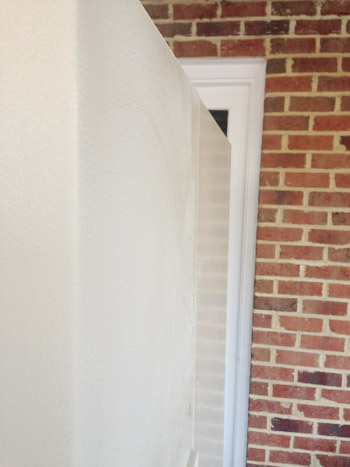
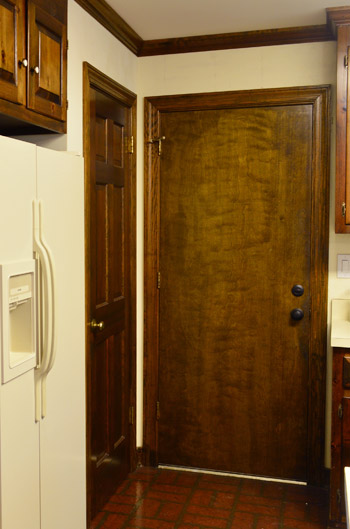
And it’s definitely a vast improvement from what this corner looked like back in the day:
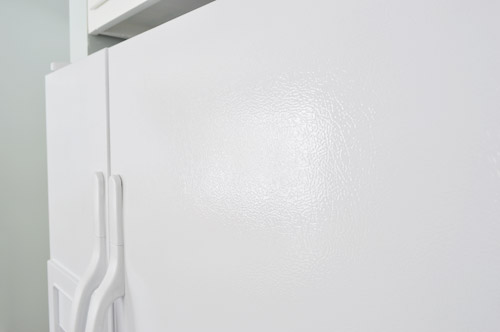
As for how the epoxy feels, it’s very smooth, very hard, and looks/feels pretty much just like the fridge was always this color. If you stare at the glint of light reflecting off the fridge in the picture below you can see how the sort of lightly marbled texture of the fridge was maintained, and it’s glossy and convincing, just like a factory finished white fridge would be. I actually don’t think you could tell that it was painted unless someone told you. And I’m not just saying that. Picture me as the negative naysayer who had to see this to believe it.
We’ll keep you posted on how it holds up over time, but from what we’ve heard from you guys and read in reviews, it seems to be good for 5+ years and we’re hoping to get to Phase 2 a good deal faster than that. So it won’t be a big loss if it nicks or chips as we go, but it’ll still be interesting to see if this stuff is as good of a cheap and easy upgrade ($15!) as it seems so far.
Has anyone else had luck with appliance paint? We hear for a stove you need to use high heat paint, which seems to only come in spray form. Or has anyone done anything different or bold with theirs? We were contemplating painting the handles an accent color (like navy or ORB) but it just didn’t feel right for our goal, which was just to let this guy blend into his surroundings and draw attention to the better stuff like our succulent art, rope chandelier, and the rough wood dining table nearby.

The Advicist says
It looks great! I’m weird about chalk dust too. I cannot stand the feel of it on my hands, I seriously never use chalk just to avoid it.
rachael says
wahoo!! a 9am post!
YoungHouseLove says
Aw thanks Rachael! We’re trying to get posts up a little earlier so it frees up more time to do all the crazy showhouse/book/secret project stuff that’s going on these days. With only six weeks until this baby comes we’re in a tizzy to get stuff done! And we figure if anyone notices the early post, it’ll be a nice little surprise ;)
xo
s
rachael says
That makes sense! Speaking of weeks, how many until we get to know your secret project!?
YoungHouseLove says
Less then two! We hear that March 17th is the “yes, you can spill those beans” day!
xo
s
katie {deranchification} says
Yay for March 17!
Julianne says
Would this be the secret project that has to do with your shot out the front door a while back????
YoungHouseLove says
Yes, that’s the one! We can finally reveal that picture, along with a bunch of other stuff!
xo
s
taetae says
looks awesome guys!! never would’ve thought painting an appliance was possible! crazy!
can we assume the absence of a wide shot of the kitchen means those counters are getting the concrete treatment? so excited to see phase 1 finished!!!
YoungHouseLove says
They just were full of clutter! Haha! But we’ve tracked down a local Ardex vendor, so as soon as the snow melts (we’re snowed in thanks to freezing cold temps and snowy/icy roads) we’d love to run out and grab some.
xo
s
Alex says
Looks lovely!
Ha, for a second I forgot you bought those prints of the succulents and I was thinking, “Succulent art? Man, they are really grasping for adjectives these days!” :) :)
YoungHouseLove says
That’s hilarious. I just told John and he says we need to use it as a catch-all adjective. Like “those shoes are so succulent” and “that was the most succulent movie.”
xo
s
Addie says
Thank you for that. I just laughed so hard I cried.
Evie says
The negative form of the adjective succulent is suckulent.
YoungHouseLove says
Haha!
xo
s
Laura says
Me too!! haha :)
John says
Looks really great! Add me to the list of people who can’t stand chalk dust. The idea of having chalkboard paint in my house creeps me out too. All that chalk dust to clean….yuck!
Allison Nelson says
I too was creeped out by the chalk dust. I discovered they have chalk pens. CHALK PENS!!! They are not dusty! They are not messy…they have CAPS! (yes, yes, I’m weird…shhh!) So there is one mystery solved. If you want a chalkboard wall, etc. Get the pens. Great for drawing really nice art too.
YoungHouseLove says
I’ve heard good things about those except that they etch (if you don’t erase them often they can leave marks permanently in chalkboard paint – sort of like a ghosted image). Have you had that experience? Or have they gotten better?
xo
s
Allison says
Oh! (about the etching) I don’t know, it’s too soon to tell. I *just* bought them. And my chalk pen was for chalk labels which I don’t intend to change. Anybody else?
YoungHouseLove says
Definitely keep us posted! Anyone else have info for Allison?
xo
s
CandiceMcC says
I’ve only used the chalk pens on this tiny window we have above our front door. I was thinking vinyl lettering there but couldn’t decide on something. Now I draw. On the house. :) Change it up about once a month and no etching on the glass. Can’t speak for an actual chalkboard surface as that project is half-finished in the garage.
YoungHouseLove says
That sounds like fun!
xo
s
Bethany Ann says
I used Chalk Markers (which I’m assuming are the same as chalk pens? or at least similar?) on a chalkboard for a friend’s wedding coming up soon. They worked really well, and felt basically the same as using a paint pen. I was nervous they wouldn’t erase well, but everything came off really easily with a damp rag whenever I goofed up and needed to fix something. I can see how they’d leave a ghost image if you left them on for too long, but I’ve had that same experience with regular chalk too. I think if that happens you should be able to just recondition the chalkboard by rubbing a piece of chalk all over it and then wiping it off right away.
Heather says
I use chalk pens on my spice jars. They do leave a “ghost image” behind, but I’ve been able to remove that with a magic eraser.
YoungHouseLove says
Really great tips guys! Thanks for sharing!
xo
s
Casey @Waffling says
Thanks for the tip about the magic eraser! I have some chalk pen ghosts on my wall that was driving me nuts!
Hayley says
I used chalk markers/pens whatever you call them, on a chalkboard at school once. Hated them. Took every ounce of scrubbing to get them off. On the bright side, worked great for those announcements that needed to be on the board for a whole quarter. Kids couldn’t erase them by leaning against the board.
It was about 4 years ago, so maybe they have changed? I sure hope so, because the ones I bought were crazy expensive!
Sara says
I use chalk markers on my menu board because they write more clearly and they do leave behind an image even though I primed my board. I just slap up a fresh coat of paint once a year or so. You can see it here http://www.sexandtheknitty.blogspot.com/2014/02/meal-plan-monday-2-in-1.html and if it were an art board, I’d use actual chalk for a variety of reasons.
YoungHouseLove says
Love it. Also, your blog name cracked me up!
xo
s
Tamara says
John, I find it amusing how you and your father have the exact same stance as you push the fridge out the doors! It looks great! I’m curious to see how it holds up, especially in the water dispenser area. I had to laugh about the whole HOA comment. We had our microwave out on our patio for over a week once to air it out after our teenager had a small cooking emergency! No authorities were called in. ;)
YoungHouseLove says
So funny about our stances. I didn’t even notice that! I’m also relieved that no reinforcements were called in for the loitering microwave.
-John
Mary | Lemon Grove Blog says
So. Much. Better! Very interested to see how this holds up for you guys! Seems like a fridge would be a much better candidate for the painting routine vs. an oven or dishwasher. Since it’s more textured, it seems like the paint will be more likely to stick over time. Definitely need an update post on this one! :)
YoungHouseLove says
We’ll definitely keep you posted! So far this morning Clara slammed a tiny stroller into it while pushing Barnacle around the kitchen and it held up like a champ. It’s still early days though, so who knows if the periodic Clara-beatings will wear it down over time ;)
xo
s
Abby says
I have used the epoxy touch up paint for my stove when it got nicked while cooking. That lasted pretty well and you had to really look to find it. My white stove top hadn’t yellowed so it matched pretty well.
Evelina says
What a great update! I totally agree that it looks like it’s always been that white. Job well done.
Can’t wait for the big secret reveal!!!!
Hannah says
Looks awesome! I’ve never heard of appliance paint.. but.might want to use it on our fridge! Also, I think photos #12 and #17 might have been accidentally switched… :)
YoungHouseLove says
Thanks Hannah! Is anyone else seeing switched photos? Sometimes it’s an iPhone glitch, but if you refresh they fix themselves. We oddly enough don’t see it on our end.
xo
s
Hannah says
Weird! I’d refreshed it a couple times before and it was the same… but now it’s fine. Ah, technology! :)
YoungHouseLove says
So strange! Sorry for the trouble!
xo
s
DanielleR says
We had to bite the bullet and buy a new fridge last year when ours died in the middle of summer. Our 10 year old white warrior finally quit on us. I had NO IDEA how expensive a new one would be til we were forced to look. $1400 later, we ended up with a stainless one with a bottom freezer. Huge upgrade but OUCH. Yay for paint, looks much better and that’s a huge money saver while you wait til you have enough to buy a new one!
YoungHouseLove says
Ooh, but a bottom freezer is so nice! Do you like that better?
xo
s
Jamie D says
I LOVE!!!!! my bottom freezer! It is nice for our family since the fridge is the more-used of the two, so it is nice to only bend down when reaching in the freezer. I would add that to your phase 2 appliance must-haves! Also think about whether you want the water dispenser inside the fridge or on the front. Having it outside is probably more energy efficient and convenient.
Awesome post today!
YoungHouseLove says
Thanks for the info Jamie!
xo
s
mailergoat says
I think for efficiency it may be better to have a dispenser on the inside…I think it’s not as well insulated as the rest of the beast, so the ones on the outside let air leak more.
I expected to love our bottom freezer when we got it three years ago, but find it’s not conducive to organizing things so stuff gets lost in there all the time. It also doesn’t feel like it holds as much, but maybe that’s because there’s old, lost stuff taking up all the space?? Not sure how that works…
Amanda says
Mailergoat, try using baskets to organize things in your freezer. Do a quick “drawer freezer organization” on Pinterest for lots of ideas on how to organize it, so maybe that would help your need!
Leslie says
Wow, what a transformation! And yet… with such a simple thing, like paint (paint always seems to have that magical effect, huh?).The fridge looks great! I am new to the blogging world and just found YHL- I am having fun exploring your site and learning some of the ins and outs. Thanks for posting!
YoungHouseLove says
Thanks Leslie!
xo
s
Mary says
Wow–looks great. My fiance has been on a mission to freshen up our used-to-be-white-slightly-yellowing appliances. Its especially the plasticy parts like handles, so this could be a great fix. Do you know if it works on microwaves?
YoungHouseLove says
I think for anything that gets hot they recommend the high heat appliance spray paint (as opposed to something you can brush on), so you’d have to tape things off like the glass window but I think it would work. Anyone have experience with a microwave or oven?
xo
s
Mary says
I’ll pass it on to him for sure. He must have missed painting in all of his searching. He made various concoctions that he soaked the handles in already and this sounds way easier!
CandiceMcC says
They do make a brush on version of that same high heat spray paint. I used it inside our fireplace. It’s held up fine on the back wall but not as well on the floor beneath the fire. You know, where burning embers fall and husbands scrape up ashes with the tiny fireplace shovel. Ok, fine. Just one husband. :)
YoungHouseLove says
So good to know! I was on amazon looking for a brush on version in “high heat” and couldn’t find it anywhere!
xo
s
Karen J says
Has he looked for just new/replacement handles? We replaced our scratched up dishwasher control panel; it was easy and affordable. The plus is you get a brand new part.
Elizabeth says
I spray painted the yellowing plastic handles on my white fridge and they have held up extremely well. I used the spray paint specifically made for plastic (can’t remember which brand). I have to scrub them periodically with a magic eraser to get the grime off, but the paint is still perfect and it has been a few years. Made a HUGE difference in the look of the fridge. I did take them off (and outside) to spray them.
Shannon says
Crazy what a difference a little white paint makes! The fridge looks good as new!
LesleyL says
Nice work! My mother deeply adored her 70s avocado green appliances and misses them very much. I wonder if this paint could be colored?
YoungHouseLove says
That’s the sweetest idea ever! I didn’t see if you could tint it on the can (and was honestly surprised it only came in gloss white). Anyone know of a way to get avocado green going on for Lesley’s mom?
xo
s
Cathy C. says
Does she want a functional double oven? I have one that will be moving along shortly…
Jackie says
This looks awesome! So glad you went for it! Curious how the ice dispenser looks up close. If you were to do this again seeing what it looks when complete, would you still decide to paint over that?
Best,
Jackie
YoungHouseLove says
For those small spots that I needed a brush to get into, I just rolled them as well as I could afterwards to maintain the same smooth roller-texture everywhere. It was all made of the same type of plastic, so it looks like the rest of the fridge. I would definitely opt to paint it again instead of leaving that part cream.
-John
Kristen | Popcorn on the Stove says
The fridge looks great – and it’s nice to know that this is such an easy update!
MonW says
Back in the 90’s, Dad redid their appliance colors from the original avocado to white. Oven(a double), ventahood and backsplash over stove were all done. Ovens are looking a bit ragged now, but they held up quite well. He pulled the door panels off and painted everything outside.
His test run was on the BBQ grill with black paint every spring. West sun + black paint + Texas heat= faded after 1 year.
YoungHouseLove says
So cool that he redid all of them! And I love the BBQ test run.
xo
s
Brit [House Updated] says
Wow, the white makes it so much better! I love seeing the “before” of your kitchen, you guys have come so far already. We did the exact same thing for our phase 1 kitchen, but we fixed up our refrigerator with chalkboard contact paper. We love it so much, we may just keep it for phase 2 kitchen as well!
PS. Super excited for you to spill the beans on March 17!
YoungHouseLove says
Thanks Brit! And the contact paper sounds really fun!
xo
s
Cat @ MaryMarthaMama says
I have always wondered about that paint when I passed it in the paint aisle. Thanks for sharing this experience. I know it’s a little thing to some, but the white and the cream clashing would have bothered me too. I will say though that my jaw dropped when you said it was 70 degrees on Sunday! I will have to hide my jealousy, you know, under the down jacket I wore on Sunday to shield me from the snow.
YoungHouseLove says
Not to worry, it’s all snowy and icy here now. It was such a tease day! Haha!
xo
s
Anele @ Success Along the Weighn says
It looks awesome! You’d never know it was another color.
I had to laugh though because it reminded me of our own journey into epoxy painting when we were 21 and 23. It’s totally okay to spray epoxy paint in the basement with a tiny window open and gaps between newspaper on the floor in your aunt’s basement, right? I’m pretty sure the pilot light on the hot water heater probably wasn’t turned off either. Wow. Thank God we lived…and learned…and the aunt didn’t totally kill us for leaving newspaper outlines on her basement floor.
YoungHouseLove says
Holy cow, I’m glad you lived to tell the tale!
xo
s
Andrea says
It looks great! We also have an almond fridge, but I am holding out for a new one instead of painting it. I didn’t know they made appliance paint!
Kelly {the Centsible Life} says
We were planning to replace our fridge ‘someday’ but it’s still going strong 7 years after we moved in. It was manufactured in 1990! I never thought about painting it because our oven is the same bone/cream tone and has parts that can’t be painted (digital keypad), so we’ve lived with it. If we decide to keep it as a second fridge when we replace it (for the garage) I’ll definitely give it a coat of paint!
Lauren says
It’s kind of funny how the more updated and polished your kitchen becomes, the better is makes the vinyl floor look by association. It’s almost as though the flooring is now an intentional retro, slightly ironic look you’re going for against all the fresh crisp cabinets and details. Like you’re “in” on the faux brick as some sort of hipster statement!
YoungHouseLove says
Haha, I appreciate that sentiment. To us the floor is THE ENEMY! Can’t wait to do something about that…
xo
s
Heidi says
That’s one of the best $15 spent ever! I know it’s a short-term upgrade, but the fridge looks amazing. And, I’m right with you John – I am not a fan of chalk near my food! Sorry amazing Pinterest ideas of chalkboards on the pantry door or side of the fridge, but it’s not happening.
http://jax-and-jewels.blogspot.com
Heidi says
WHOAAAA!!! That’s crazy that you can just re-paint a fridge! And this is one of the funniest posts I’ve read in a long time…just picturing you guys walking outside to get your food!
YoungHouseLove says
Now picture a hugely pregnant lady out there in fleece pants with snowflakes on them struggling to carry in ten items for dinner. I’m sure it was a sight to see ;)
xo
s
Soffia says
I love it!
Brilliant solution. Did you ever consider painting it black, using chalk paint? That could have been a fun option as well.
You could even just add a chalk decal to the fridge: http://www.amazon.com/ChalkSeries-Chalkboard-Contact-Paper-Inches/dp/B00EIOT3CK/ref=sr_1_2?ie=UTF8&qid=1393945220&sr=8-2&keywords=chalk+decal
YoungHouseLove says
I actually mentioned that but John has a weird aversion to chalk – especially near his food, so he squashed the idea. It’s a really fun solution though, especially with contact paper and chalk pens (no dust!).
xo
s
Larissa says
I use the chalk markers at school since I’m in an old part of the building with actual chalkboards. My students think it’s such a novelty. The chalk markers are way better than actual chalk, but there is still some dusty type stuff that gets on my hands and leaves the board looking dusty. I haven’t had a problem with ghost images, though. I’m using baby wipes to clean it. The next kid that gets detention is definitely going to be cleaning it with a toothbrush.
Karen J says
Looks so much better. Well worth the time. Next you should tackle the range (an experience with a different type of paint??). And then paint the vinyl floors (I just googled that and it looks like there are tons of great ideas).
caitlin says
It’s time for you kids to buy a respirator! Even working outside, all those epoxy/non-waterbased products are seriously bad for your health, especially if used over many years. That little dust mask doesn’t to da for exposure to chemicals. Do it! You’ll feel good that you are protecting your health for your loved ones.
YoungHouseLove says
We have one and I use that baby all the time (paranoid prego here)! Since John was out on the back porch with tons of ventilation he just grabbed a mask, but I’m with you – the respirator is a lot more thorough. I definitely prefer it. Sweaty cheeks and all ;)
xo
s
Fun mama says
It looked perfect until you covered up that beautiful logo. ;)
My parents painted their fridge 5+ years ago and it still looks great. I don’t think they’ve ever even touched it up.
YoungHouseLove says
That’s awesome!
xo
s
Sherry@The Impatient Remodelers says
We did that to our very first fridge, in our very first home. (ten years ago). It held up for the 4 years that we were there.
I wish I could paint my stainless fridge, stove, dishwasher and micro all white. I HATE the stainless. We have had white, black and stainless in all different homes.
Brand new stainless appliances all came with our house when we moved in. I thought they would be great. What PAIN to keep clean. I love my white cabinets, so easy to wipe down. But I can’t wait for them to die so I can have glossy white (not the old school bumpy white). Just don’t tell my hubby that I said that. LOL
YoungHouseLove says
That’s so interesting to hear! We had a special coating on our stainless appliances at our last house that was awesome (it made them fingerprint proof). I wonder if that’s an option to add to them after the fact – like a clear poly you could apply. Anyone ever heard of that?
xo
s
Ely says
I didn’t think it was terribly noticeable until I saw the pictures of the white going over the almond color. It looks great!
Also, I would just like to “copy and paste” your house onto mine. That’d be great too, lol.
YoungHouseLove says
Haha!
xo
s
DJS says
A wonderful cleaner for stainless appliances is:
WEIMAN stainless steel cleaner & polish.
Cleans, shines and protects. Somehow prevents smudges and finger prints for awhile after using it. I have tried just about everything and this works the best. Great for fridge, dishwasher, stove. I can get it at the grocery store, home depot, etc. Gray can with black print.
katie {deranchification} says
The fridge looks great! I always wondered how well that appliance epoxy would work — I totally need to give our old, black dishwasher a facelift until we replace it. I’ve been debating between that stainless contact paper (to look like our other appliances) and the white appliance epoxy (to hide out with the cabinets) – decisions, decisions…
Cheyenne says
We used the spray version of that stuff for the underside/outside of a vintage cast iron claw foot tub. We haven’t gotten to install it yet because we are saving our pennies or our bathroom remodel. But so far it looks pretty!!
YoungHouseLove says
That sounds really nice!
xo
s
Katie says
That looks amazing!!! A great tip to pass along:) off topic, but what color are your walls?;)
Thx,
Katie
YoungHouseLove says
In the kitchen they’re Nelson Blue by Ben Moore.
xo
s
Mrs. G says
After 3 moves and several years of DIY, how do y’all not have a dolly? My mind is boggled.
YoungHouseLove says
We actually just bought one! It made things so easy with the fridge we were like “um, yeah, we should have bought this eight years ago.”
xo
s
Mrs. G says
Or I might have misread that. Sorry if so. I see an “and” before with a dolly. Oops.
YoungHouseLove says
Yes, sorry, that was a weird sentence with one too many ands. That was our dolly that we just bought. John’s dad had one that we used to borrow but it had a tire blowout, so we finally got one after realizing how helpful they are to have around.
xo
s
Lindsay says
Hehe. Someone in my husband’s family bought him a dolly as a college graduation gift. At the time, he thought it was ridiculous, but dutifully moved it across the country and then from apartment to apartment (he was too polite to get rid of it). 14+ years later, it’s one of the best things we own (I consider it mine now too – bonus of marriage! heh). It comes in handy so often we even ended up buying it a new set of tires!
YoungHouseLove says
I love that story!
xo
s
Heidi says
We might need to try this on our own horrible, yellow- handled, almond color fridge we just inherited with our “new” house!
Gretchen Brown says
It looks so much better! GREAT JOB! We have used appliance paint…. my husband DIY’ed a kegerator out of a small freezer (I know, right?!?!), and he painted it black with the spray paint made for appliances. Granted it doesn’t get nearly as much traffic as a fridge, but it has held up great for many years!
YoungHouseLove says
Good to hear!
xo
s
Sooozi says
Hi guys – fridge looks great!
I had to touch up some chips on an avocado stovetop and a turquoise bathtub. I could only get white enamel touch up paint, so was pondering for a while how to tint the white, and I only a needed tiny quantity. Then I realized that nail polish is enamel based, and these days you can get all kinds of whacky bright colours too. A couple of dollars in cheap green and blue nail polish later, mixed with the white touch up paint to the correct shade, and the chips were disguised!
YoungHouseLove says
SMART!
xo
s
Ginny @ Goofy Monkeys says
It looks great! What a great “for now” fix!
What I’d like to know is how to go about selling a fridge – we’ve listed on CraigsList and have apparently encountered the flakiest buyers on the planet. Are there other ways of selling appliances?
YoungHouseLove says
We sold the old washer and dryer in our last house on craigslist to the sweetest girl. Her dad came and helped her haul it and everything. My best advice would be to look at what others are charging for something similar and undercut that (fast easy sale, baby) and of course take good pictures. That seems to motivate people to actually buy instead of flake out. Hope it helps!
xo
s
Julia says
I am SO glad you did a post on this. I have a newish washer/dryer (about 6 or 7 years old maybe). Works great, but the top of the dryer where we set the baskets is dinged up and rusted in spots. I just did some google-search and who knew… they sell paint for that. There are plenty of you-tube tutorials, so guess what I’m doing this weekend!
:-)
Julia says
p.s. I’m already a little paint happy, and now my kids are going to think I’m crazy. “Hey guess what… mom’s painting the dryer”
YoungHouseLove says
So funny! Clara loved it! When we brought it back in she said “is that a new one?!” and seemed genuinely excited when John said “it’s the same one, we just painted it!”
xo
s
Reenie says
WOW!! That turned out great ~ looks brand new.
Angela-Rose says
Such a vast improvement! Looks great! My OCD forces me to point out that you missed a spot ;) (unless it’s just the color on my iPad) I’d just take a white-out pen to those bottom hinges!
YoungHouseLove says
You’re right! We thought the grill would cover those up, so there might be tiny touch ups in our future…
xo
s
jenw says
You want to know the best thing about this post?? Those pics that show how to get the fridge handle off!! Our handles are clearly made of two different kinds of plastic. One which has significantly yellowed over the 10+ years we’ve had it and the other which has not. I’ve cleaned and cleaned and cleaned and Magic Erasered the crap out of that thing and it’s definitely not just dirty. So happy that now I know how to remove them and give them a nice coate of intended for plastic spray paint and whiten them up again! Thanks for including the painful details of your projects!!
YoungHouseLove says
Of course! So happy to help.
xo
s
Michelle says
FYI I painted our really old 1980’s rusty almond fridge with
Chalkboard paint about a year ago. I saw the idea on Lauren Liess’s blog “Pure style home “. I loved how it turned out!!! And for the chalk dust… It never got to be an issue. It is a neat, kinda rustic element in the kitchen and surprisingly I really loved the black accent in the room. For those really old fridges out there I suggest having some fun with it! Probably not on ones that have any resale value. Go for it with the old ones… You’ll love it I bet!!!
YoungHouseLove says
I love the look on those old flat-front fridges the best too, Michelle! So charming!
xo
s
Jess says
This is great, I love it when you guys try out products, I know you’ll be honest.
Speaking of classing up the neighborhood, we had a toilet emergency last week that required a hurried trip to Lowe’s for an unexpected (and expensive) purchase. The original 1960’s pink (yes, Pepto) toilet is now sitting proudly on our FRONT SIDEWALK, which is where we left it after lugging it out of the house. My husband refuses to move it again until trash night, which is tonight thank god. It was really funny the first day, but now I’m mortified everytime I have to pull into the driveway with cars behind me to witness the weirdo with a pink toilet sitting out in front of their house. And of course we got packages from both USPS and UPS the next day, so our delivery people think we’re insane I’m sure.
Oh yeah, changing out a leaking vintage toilet? Worst job so far, hands down. I swear I can still smell it. The leak also damaged the subfloor around the base, and we haven’t bought tile to replace the floor yet, so I’ll have weird, bubbly, blue carpet for a few more months :(
YoungHouseLove says
Oh man, that sounds terrible Jess!
xo
s
Julia says
The fridge looks fantastic! We recently bought a house with a black one that sticks out like crazy. I love your Phase 1 updates and am taking that approach to our kitchen as well (goodbye dark rust walls, embracing the black/sparkly/night sky granite counters for now I guess…). Do you think the coverage is good enough to work that well on black?
p.s. You guy totally inspired us to get a house we can work on and so far it’s a blast, thanks!
YoungHouseLove says
Thanks so much Julia, you’re so sweet! I think it would work well on black, you might just need a third coat for full coverage. Good luck!
xo
s
Kay says
“Plus I knew if we craigslisted this fridge down the line we could probably ask more for a white one than a chalkboard painted one.”
Ok I had an extreme reaction to this and cried out b+}}$#¡+ (similar to my reaction in Frozen when Hans revealed his true self) I can totally see some lady seeing a chalkboard fridge on CL and demanding that she have it despite not having a place for it. The whole dust in food I get but a chalkboard fridge in the garage holding drinks would be fabulous!!
YoungHouseLove says
So funny! I completely agree about Hans. That traitor. We’ve seen a few chalkboard fridges on craigslist that seem to be super cheap (like $20 or less) while white french-door versions like ours are at least double that, but I do think a chalkboard fridge in the garage would be adorable! I think John knew both options would eventually sell, but thought the white one might just sell for a bit more (and faster) since it’s less “niche” and more standard/commonly searched?
xo
s
rachel says
Just a tip: when you do decide to CL your fridge, don’t list it as a french door fridge. Yours is a side-by-side. French door fridges have a pull-out freezer door on the bottom.
(Or maybe I misunderstood your response to Kay.)
rachel says
* freezer drawer, not freezer door
YoungHouseLove says
Oh yes, you’re right! Thanks Rachel. I meant side-by-side!
xo
s
Jen J says
Our first house came with a goldish/yellowish fridge. I painted it with just oil based white paint. It held up for the time that we lived in that house, about 3 years. Our current house has white cabinets and a almond fridge, stove and microwave. I would love to pain them all white or black. New appliances just aren’t in our budget yet.
Jen @ The Decor Scene says
We actually did this to our extra frig in our home. It was white, but it was all messed up from the previous home owner. I don’t remember which brand we used, but we did this about 6 years ago and it still looks GREAT!!! It should last you guys a long time. LOVE how it looks in your kitchen. ;)
YoungHouseLove says
Love hearing that!
xo
s