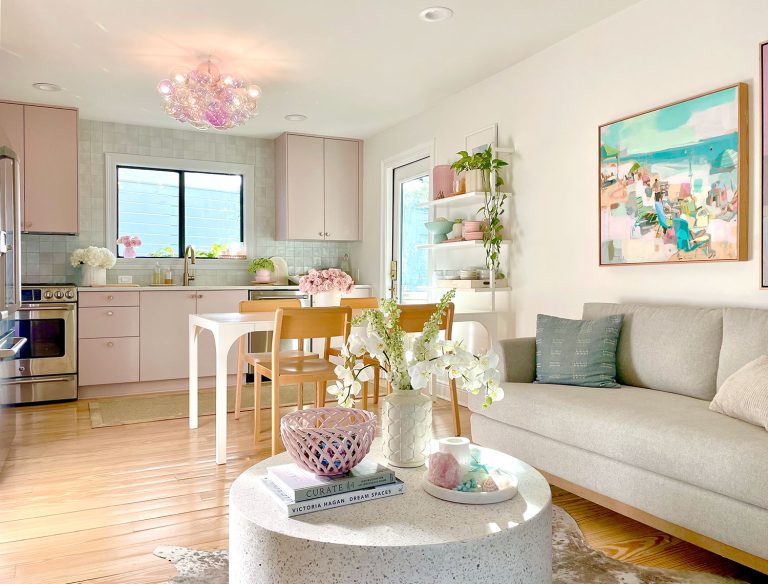
Author Archive
What Wood We Do?
Let’s talk about wood, shall we? As we mentioned on Tuesday, we decided to go with solid oak hardwoods for the four bedrooms and the hallway upstairs since many rooms downstairs along with the stairs themselves have a nice medium toned oak already (pretty similar to the hardwoods in our first house that ended up being super dog/kid friendly).
As for where to get it, first we looked on craigslist to see if anyone had a large quantity of something in the right tone/amount (no dice) and then we headed to Lumber Liquidators, since we’ve had luck with them when it came to buying hardwood floors for half of our first house back in 2007 and it’s also where we got the cork flooring for our kitchen in 2011. They always have a ton of selection, and tend to have lots in stock along with all of the underlayment & tools in one place, so they’re pretty much a one stop shop for us now that it’s our third time to the flooring rodeo.

Clara walked right in and made herself comfortable (the girl’s right at home on wood flooring, what can I say?) and we had a look around.

She also had some fun on the tiny set of display stairs. According to the guys who work there every kid who enters the store does that as some sort of unspoken toddler rite of passage.

We ended up grabbing six different samples to hold up against the stairs to see which one would be the best match (we tackled this “sampling phase” right before ripping out all of that nasty upstairs carpeting). Since the sun was setting, we waited until the next morning to take them to the new house so we could judge them in natural light.

We decided to try stripping the carpet off of just the top stair so we could be sure the wood under there was still in good shape (if it was completely damaged we’d have to refinish them, which would mean that we could be less careful about picking a matching wood tone for the upstairs). Thankfully the floor under the runner was in great shape (after we pulled about a hundred staples out by hand) and we loved the medium brown tone (not too yellow, not too dark, not too light). Basically it’s the Goldilocks of hard wood.

For a bit more on why we love not-too-dark-not-too-light-not-too-yellow-not-too-red-toned oak, it’s probably 50% personal preference (some people love it redder or more golden) and 50% practical (if you go too dark with hardwoods we hear that every spec of dust and pet hair can be seen, and if you go too light we’ve heard that wear and tear is also easier to spot since it’s such a light surface). And since we had practically the same tone of oak hardwoods in our first house for years (and it worked well for us – we loved how it looked with our furniture, etc) that ended up swaying us.
Can you tell from this bad iPhone picture of all the samples (sorry!) which one works the best with the stairs?

Yup, it’s the bottom left guy. He was the only one in almost exactly the same color and with the same variety of grain (some dark grain and some light grain). It was also the same thickness (2 1/4″) as the hardwood downstairs. So although we loved some of the wider board options, it felt true to our house and nice and cohesive to go with the one that was the right color, had the right amount of wood grain, and was the same width as the rest of the wood flooring in the house.
It took everything in us not to keep going down each step with the crowbar and the pliers, stripping that stained old carpet as we went. But we knew we had a date with the carpeting upstairs (it’s more important to rip that out and lay the new hardwoods before we move than it is to get it off the stairs, which can be done at any time). In the bad news department, that top step took us about 20 minutes to wrestle free (which means we have about three hours worth of work in our future). But stair runner, you have been warned. We’ll be back.

So after judging those samples in the nice natural light of the morning, we returned to Lumber Liquidators a day after our first trip to officially put in our order. We were armed with the square footage for all of the areas we needed to do, so now that we had picked our Hardwood Bachelor (he accepted our rose and everything), it was pretty straightforward.
Here’s a close up of our winner winner chicken dinner. It’s called Lono Oak and it’s a solid wood floor (it’s not engineered, and it’s 3/4″ thick so it can be refinished many times) and it comes with a 25 year warranty. Most hardwood flooring is in the $4-7-ish range, but LL’s list price was $3.69 per square foot.

Here’s where I smiled sweetly and asked my favorite negotiating question, which is “what’s your best price?” Then you just stand there. Resist the urge to mumble “uh, not that I’m trying to be tough” or “I’m sorry, forget it” Just stand there in silence and wait to see what they say. If they can come down, they’ll tell you. And if they can’t they’ll say they can’t and you can smile and say “just had to ask.” John hates this step, so it’s always my job. And before I threw out my favorite line, I also mentioned how this was our third big order from them so we’re definitely loyal repeat customers.
Boom: 10% off our entire order for those two sentences. So that took the price per square foot down to $3.29 and also scored us 10% off other things we grabbed like a special type of underlayment to work with our subfloor (more on that when we get to the installation process). Speaking of installing it, we’re going to attempt to do it all ourselves, and we better get started soon if we hope to move in 2.5 weeks! Plus we want to paint all of the blue/mauve trim (and maybe even the doors?) while the carpet’s out but before the floor goes down. So… yeah. Tick tock, Petersiks.
Meanwhile Clara was busy spicing up their brochure displays…

We left feeling pretty excited about our big upstairs flooring overhaul. Especially since we asked how much it would cost to hire their guys to install all the flooring and they said it would be around four thousand bucks! So assuming we can do it (knock on hardwood) it’ll definitely add up to some serious money saved.
So our hardwoods are ordered and we have a whole mess of blue trim to paint. We’d like to buy a paint sprayer and try our hand at that, so we’ll keep you posted. Should be interesting…
The New House Floor Plan
Just like our first house floor plan and our current house floor plan from yesteryear, a bunch of you have requested a new house floor plan. So here ya go! They definitely help visual people like us see what walls are where, and what flows into what. So we whipped this up with floorplanner.com (which is, as the name might suggest, a free floor planning site). One big difference from the last two floor planning posts that we shared? This time there’s a second level. Who’s got two thumbs and a set of stairs? This girl.


The funny thing is that when we shared a video tour of the new house, some people said “wow, the new house seems so much bigger!” and some other people said “wow, your new house seems so much smaller!” so that was interesting to us. I think it’s hard to judge room size without furniture, so since the new house is empty – and covered in blue trim and wallpaper – it might be throwing people off. In reality the new house and the current house are almost exactly the same square footage (there’s literally only a 20 square foot difference). The new house just looks a lot bigger from the outside since there’s a visible second story instead of a hidden 1000 square foot addition off the back of the house that you can’t see from the street.
As for a few first thoughts about what we’d like to do to alter the actual footprint…
- we’d love to convert the big triple window in the eat-in part of the kitchen into a big french door that leads out onto the deck
- there are a bunch of doors closing everything off on the first floor (they block the flow between the dining room and kitchen, the kitchen and foyer, etc) so we’ll be taking those down to open things up
- the wall between the living room and the kitchen will come down, but we’d love some built in bookcases on each side with a large centered opening (sort of like the built-ins in our current dining room but perhaps with glass doors and lighting)
- we’re planning to fully renovate the chopped up bathroom and sink nook in our master so they’re all one space with a nice big double sink and a soaker tub
- someday we’d love to fully finish the unfinished storage space at the end of the hallway (right now it’s just a raw space full of exposed beams and ducts, but maybe down the line we can floor it and drywall it to create a movie room/bunk room for Clara, potential Bean #2, and their friends when they’re older) Update: due to lots of questions, I wanted to clarify the stairs you see in the unfinished storage space – those lead to the attic, but the area labeled as “unfinished storage” is on the same floor as the bedrooms (no walking up or down to get to it).
This video tour of the new house will probably make more sense out of those bullets, and of course we have a bunch of other stuff banging around in our heads (we change our minds every minute) so we’ll be back with a big ol’ List O’ Planz for all the items on the agenda. Get ready guys, we might break 3,000 words with that baby. Oh wait, we forgot measurements! Here’s an extremely approximated rundown for ya (tape measure + three year old = immediate mayhem).
- Foyer: 9.5 x 8′
- Office: 16 x 13′
- Dining Room: 13.5 x 13′
- Kitchen: 21 x 11′
- Hall Bath: 4.5 x 5′
- Living Room: 20 x 13.5′
- Sunroom: 18 x 12′
- Master Bedroom: 13.5 x 19′
- Master Bath + Sink Nook (since we hope to combine ‘em down the line): 8.5 x 7′
- Possible Future Nursery: 11.5 x 13.5′
- Clara’s Room: 13.5 x 12.5′
- Hall Bath: 8.5 x 7′
- Guest Room: 13.5 x 11′
- Laundry Nook: 3 x 7′
- Unfinished Storage (with exposed beams, ducts, etc): 17 x 19.5′
Ever made a floor plan? Ever been so excited to have stairs? Tell $herdog all about it.
Smell Ya Later, Upstairs Carpet
Dude, removing wall to wall carpeting (and all the layers under it) is no joke. We learned that when we finally tackled that task this weekend – and lived to tell the tale. Let me just tell you, progress smells a lot better than old carpeting. Even when there’s a substantial amount of sweat involved…
When we bought this house we knew that the four bedrooms upstairs (along with the hallway) needed new flooring since the once-cream (now mostly tan) wall to wall carpets were stained, threadbare, and even holey in some areas.

Thankfully a few areas were so loose we could peek under them during our very first walk-through to see what we were working with. Sadly, there was no hardwood to be found under there, and we were greeted with subfloor. But we’re so glad we made that discovery before buying (we definitely factored that expense into our decision). And after we got over the sadness of not having old hardwoods under there to revive, we got excited about picking out new flooring.

We considered a whole range of things for a while (hardwoods, new wall to wall carpeting, bamboo, tile) and after a lot of thought ended right back at oak hardwoods, since it’s what we had in our first house as well as our current one (even in the bedrooms). We like that we can always toss down an area rug to cozy things up (and since those can change over time it feels a little more flexible than committing to a certain type/color of wall to wall carpet for a decade or two). Plus with a kid and a dog we have just found wood flooring to be easy to keep clean/wipe down/etc.

We also already have oak flooring on the stairs that lead to the second level as well as in the future office, dining room, and living room – so we thought finding some in the same finish and grain would be a nice seamless this-has-always-been-here choice. But before we could bring in some delicious new hardwoods to install ourselves (at least that’s the plan!) we were faced with stripping away all of the aforementioned nasty carpeting in all four bedrooms up there and the hallway… which turned out to be quite the job. Here’s how we got ‘er done.
First we used a mini crowbar to pry back the corner…

With some gentle force it popped right up and we could start to pull it out from that corner.

It definitely wasn’t delicate pulling, more like forceful yanking, but with John working on one corner and me in another we were able to free up enough of it to start rolling it towards the other side of the room (we paused to take this photo, but picture me standing next to John rolling along with him). It’s definitely one of those four-hands-are-better-than-two tasks if possible.

Oh and wear gloves! And long sleeves if you’re smart. We wised up after our forearms got raw from carrying rolls of carpeting down to the garage, where we’re storing it all until we can figure out what to do with it (it’s too gross to donate, so we might need to rent a Bagster or something to get rid of it). Update: thanks for all the info on recycling carpets, cutting them down for curbside pickup, and all the other cheaper/greener alternatives than just trashing them. You guys are geniuses!

Room by room we repeated that process (and down the hallway as well). Pry up the corner, yank yank yank, roll roll roll, and drag that baby down to the garage. In some areas there was so much carpeting that we cut it in half with a box cutter before carrying it down to lighten our load. Then we were left with this lovely blue carpet padding underneath. Which was stapled and nailed down in about a thousand places per room (sadly that’s not an exaggeration).

Just like the carpeting, it could be yanked up, but it left a ton of little staples and nails and tack strips all around the room once it was stripped from the space.

These are tack strips. They run around the perimeter of a room and are thin little shim-like pieces of wood with nails poking up through them (they grab the carpet pad and carpet to hold it in place).

Sometimes you can shove a crowbar under them (this takes borderline brute strength, so your palm is red even with gloves on afterwards) and pop them up all as one piece. The hard thing is that if they’re old and brittle (check) sometimes they splinter as they go, which means instead of slamming a prybar against them to try to get each 2′ long strip up in about 30 seconds, if it splinters a ton it can take five minutes to dig out all of the nails and splintered wood that break apart but are still stuck in the floor. You can see me gracefully (and breathlessly) doing this in the video we made for you about five photos down.
I worked on all of the tack strips in the master bedroom while John did the hallway and the nursery and then I tackled the guest room while John worked on Clara’s room. It probably took us about an hour and a half to get that part done, so one person trying to do that all by themselves might be in it for 3+ hours (probably with some blisters even with gloves on).

Once the tack strips were all up we were faced with the harder part…

… these guys.

They were everywhere and the prybar was of no help since it couldn’t really get under them. At first the only way we could get them up was by hand with a needle nosed pliers. One by one. But after John did Clara’s closet that way and it took over an hour (for one closet!!!) we decided we needed to find an alternative. Thankfully a little googling turned up the idea of a nice heavy duty long-handled floor scraper (we got ours for $25 at Lowe’s) and that was a lot faster! It still took some serious strength, and we both had sore backs, but we were able to get all of the staples up in all four bedrooms and the hallway in about two hours (at the by-hand-with-a-pliers-rate we thought it might take us about two days). Warning: if you have hardwoods, you might not want to use a scraper since it could ding them up, but it’s great for subflooring.

The next day we returned to clean up, using a broom to make piles followed by the shop-vac to suck up all the staples and nails.

You can see in this video how each step of the process went (it shows how to get up those tack strips and staples a little better than still photos can):
Now we have smooth, bare subfloors that are ready for hardwood.

We never thought we’d be so glad to see pure unadulterated pressed wood in our lives!

And now our garage looks like this:

That, my friends, is what progress looks like. Turns out progress looks a lot like stinky rolled up carpeting.
But oh happy day, we’re moving in the right direction!

Any other carpet stripping going on? Are the staples your arch nemeses? Those little buggers were infuriating until we discovered The Amazing Wonder-Scraper! Seriously, my “what superhero power would you have?” answer would now be to have a paint roller on one arm and a floor scraper on another. Never know when you’ll need one…


