Since we last checked in on the sunroom last Thursday, Sherry and I have managed to check four more things off the list: installing two ceiling fans, cleaning the concrete floor, leveling it, and cutting the tile and planning out our pattern (aka: dry fitting). But excuse me while I backburner the fan installation tutorial (I promise it’ll pop up in a few days) because we’re just too psyched to share those three tiling prep steps with you guys. We made some serious weekend progress – more than we thought we would – and we couldn’t be more excited about the tile pattern that we landed on. In fact, I’m probably outside tiling as you read this… so hopefully within a week it’ll all be fully installed and grouted and ready for the big reveal!
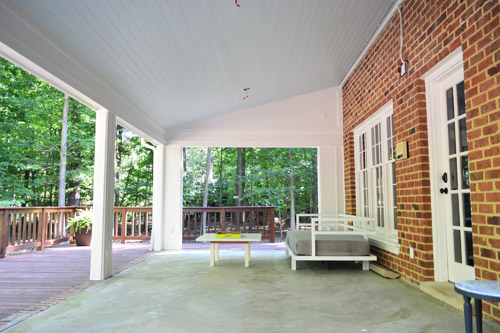
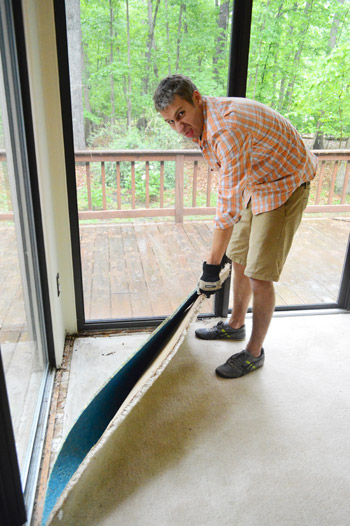
So let’s talk about how we got this tile train moving (and if you didn’t realize you boarded the tile train, you can check out this post for why we’re headed to that destination). Our trio of prep tasks were to: remove a lingering smell, level the ground since this is now open to the elements and we didn’t want water pooling in certain places, and determine our tile pattern (border? no border? running brick pattern? modern grid?). Let’s start with deep cleaning the concrete to eliminate the odors it was holding onto – because, as you may recall, this room was once covered in a wall to wall carpeting that got wet over time due to broken doors and wood rot, so it was definitely something we needed to attend to.
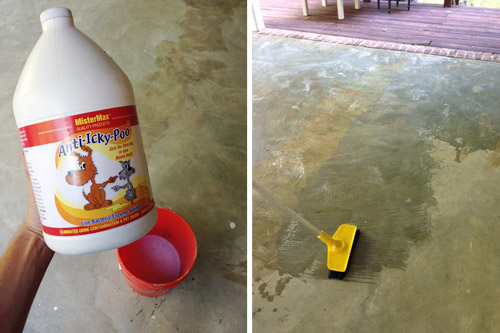
In our post about removing the old carpet a bunch of you actually recommended using this product (MisterMax Anti-Icky-Poo) which many of you described as having a hilarious name but also being the best thing you’ve ever tried on deeply penetrating odors. Even though we’d be tiling over the cement, we wanted to make sure every time it got hot outside there wasn’t any old whiff of something that wafted up from the cement floors). Most of the more obvious smells had thankfully vanished once we removed all of the glass doors to permanently air things out, but since we’d already bought the bottle based on your recommends, we figured it couldn’t hurt to scrub some on just to be sure nothing would re-emerge on a muggy day. It’s really easy to apply (scrub on with a brush + let dry = smell’s gone).
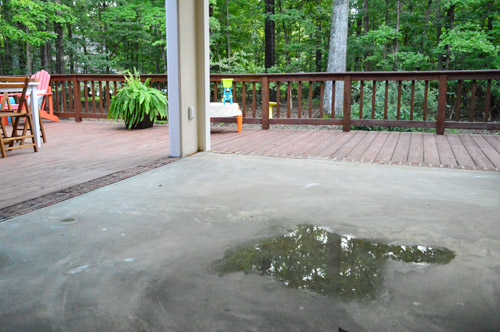
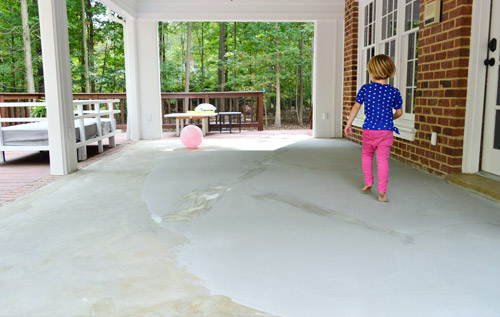
The other issue we needed to solve before tiling was taking care of some not-so-level spots. With the glass doors removed, the space does collect a bit of moisture when it rains. For the most part it dries off quickly, but small puddles do form in a couple of low spots – most of which seem to be closer to the house (in spots where we’ll probably have furniture). And furniture sitting in little puddles after every heavy rain = not so great.
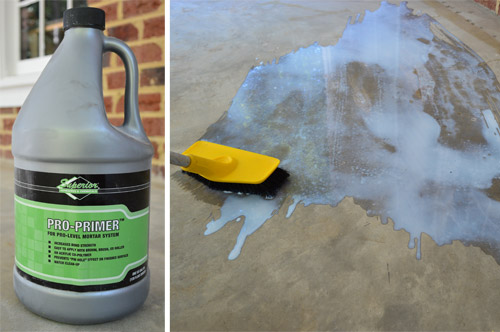
So we decided to give self-leveling concrete a try. It sounded scary (and messy) to us at first, but after watching a few videos online it actually didn’t seem so bad. We got all of our supplies at The Tile Shop which, in addition to the concrete mix itself, included a primer they recommended to help the new cement bond to the existing surface. Unlike a paint primer, it was a really watery substance that I could brush on super fast.
One bag of self-leveling concrete was supposed to cover 15 sq. ft. and I wasn’t planning to do the whole sunroom floor (since I just wanted to fill in some low spots and, if anything, create a very slight slope away from the house). So I ended up getting five bags – but only using four of them. I also got two buckets so I could mix two batches at once, but only used one because the 5-gallon Home Depot bucket ended up not being big enough. So if you’re attempting this at home, go straight for a 6-galloner (the Tile Shop one fit the bill).

Speaking of buckets, I also bought this “measuring bucket” that’s designed to measure out the perfect amount of water for one bag of concrete (if you fill it too high the water drains out of the hole and then you’re all set). I felt a little silly for paying $2 for a bucket with a hole in it, but it ended up being worth the peace of mind that I got from not having to worry that I made my mix too soupy or not soupy enough.

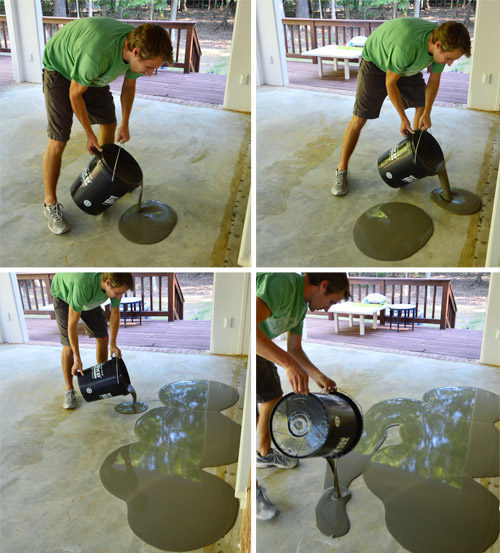
After pouring the water in my 6-gallon mixing bucket, I added a bit of the cement powder at a time – mixing it really well before adding more, until the bag was empty. You basically have to mix this stuff with a paddle-mixer (i.e. giant whisk attached to a drill) so I was glad to have already purchased one for my upcoming tiling job.

This stuff is actually really watery. You picture cement being kinda like a thick cake batter consistency, but this was more like sunscreen that’s been sitting out in the heat. But it’s that liquid-y property that actually helps it level things off mostly on its own.
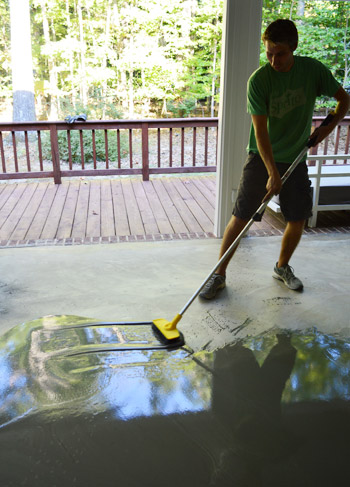
It doesn’t do all of the work for you, but it definitely works with you as you go. I used a broom to push some of my puddles together and into corners. But it wasn’t hard or meticulous work by any means. Wherever I swept, the liquid just magically reformed into a level, flat surface. It’s almost like that liquid that Alex Mack or those kids from those old Capri Sun commercials would turn into, just less silvery.
I ended up using four bags in total and you can see how the area closest to the window was already starting to harden by the time my last batch (to the left of it) went on.
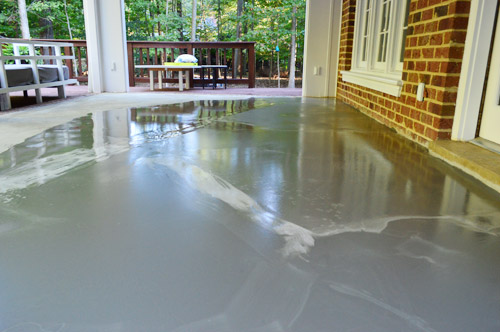
But it wasn’t until the next morning that it was completely solid and ready to walk skip on.
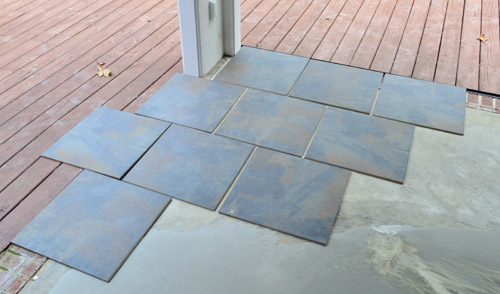
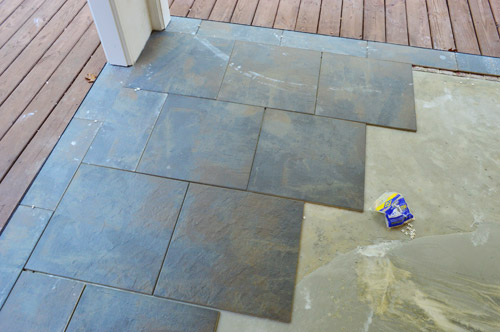
With that out of the way, we could finally start placing tile. Well, start planning to place tile. Sherry and I were 99% sure we wanted to do a brick-layer pattern with our 20″ x 20″ square tiles. But we weren’t quite sure where we wanted to start the pattern and whether or not we wanted some sort of a border. So we broke open a box or two and started playing around.
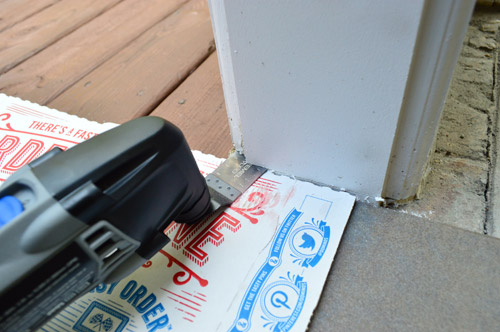
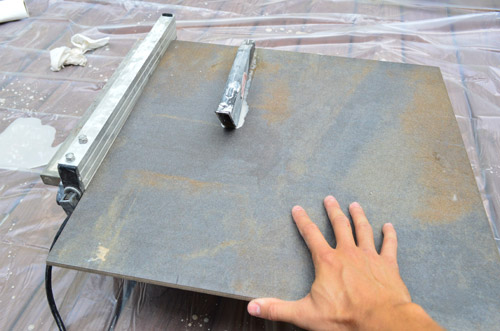
The first thing that the exercise confirmed is that we needed to cut out the bottoms of our door jambs. We did this for our wood floors inside too. It basically lets the flooring slide under the trim, saving you from having to intricately cut your tile around it and ultimately gives you a cleaner look. To determine the height I set my flat saw (aka Dremel Multimax) against a tile and a piece of cardboard (to protect the tile from the saw and to adjust for thinset height).
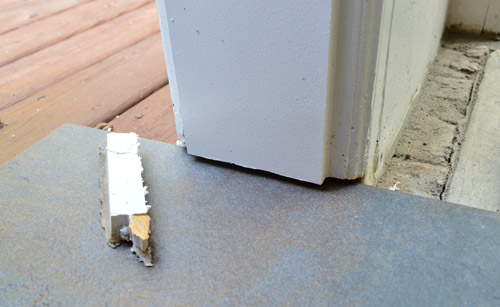
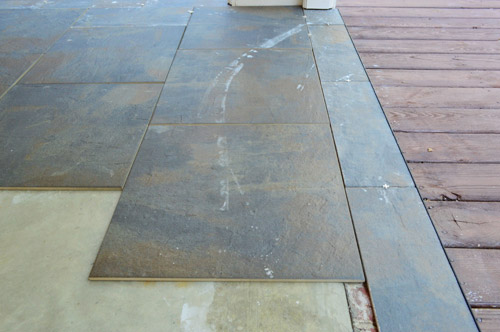
See? You end up with a much cleaner edge once that chunk of trim is gone. And once the thinset raises the tile a smidge more it should be a nice tight fit (which we’ll then seal with clear exterior caulk to protect the wood from any moisture/rot).
The other thing this exercise confirmed for us is that we definitely want a border. It not only helps to define the edge more crisply (and ended up looking a lot more high end to us) we realized it would also make the tiling job a lot easier when it came to cutting tiles around the posts (instead of notching things out, I could make the border the same width as the posts and just lay them down to create that outside edge which squared off everything so that interior rectangle of tiles would require fewer cuts). So after a lot of moving and cutting and shifting and more cutting, this is the final pattern that we came up with:
I had to create the border pieces myself by cutting the square tiles on the wet saw. But luckily I was able to get three border pieces out of one tile, so we didn’t have to sacrifice too much scrap to this cause!
It wasn’t the most fun task to slice up eight tiles this way (to make 24 border tiles to complete the perimeter) but we think it was a huge improvement over the unbordered look. It defines the edge nicely (which is helpful because there is a slight step up from the deck into the sunroom) and, by doing all of these cuts during my prep stage, it’ll hopefully make my day(s) of tile-laying go a lot faster. Oh yeah, and forgive the hazy water mark from the hose in the shot below, it wiped right off.
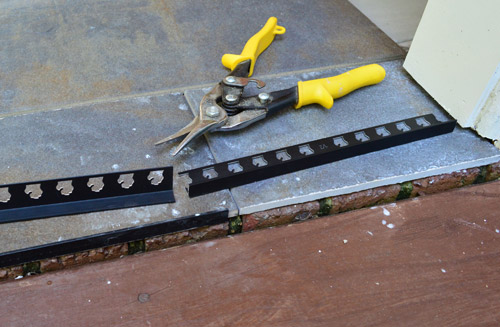
But before I leave the topic of edges, one thing we were concerned about was how the exposed edge of the tiles would look from the deck (and if it would get beat-up over time). So we bought these metal edging pieces (that can be easily cut to size with some metal snips) to give our edges a finished look. I realize they look very in-your-face in this photo below (they’re more of a matte charcoal tone, but for some reason they look shiny and black below) but if you look at the photo above you can see it actually blends pretty nicely with the tile to create a thin charcoal rule around the border that looks clean and finished (without exposing the chalky cut edge of the tile).
My goal is to get all of the tile set by the end of the day tomorrow and then it just needs to be grouted and clean up for us to share those big before and after pics with you guys – hopefully by the beginning of next week. And fan enthusiasts – fret not. I’ll be back with a pretty detailed post about how we installed them (turns out they weren’t as bad as we feared). What did you guys do this weekend?

Mary | Lemon Grove Blog says
That color combo looks awesome with the deck material. Excited to see the finished product! :)
Samantha says
Will definitely admit that I sat and refreshed the page until the post was published this morning! The sunroom is looking great, you guys are such an inspiration to be able to do big projects like this. Thanks for sharing, and congratulations on baby #2!! :)
YoungHouseLove says
Aw thanks Samantha!
xo
s
Stacey says
At 4:00pm every day I refresh this page! YHL is the last thing I read at work while I wait for the traffic to die down a little before leaving for home. It’s my little bit of sunshine at the end of a hectic day!
Forgot to say I lurve the tile border, Sherry & John!
YoungHouseLove says
Aw thanks Stacey!
xo
s
alexandra says
wow, so glad I’m not the only one. I usually get in the office around 9:30 and will always say to myself “I’ll start getting work done after I read this morning’s YHL post”
YoungHouseLove says
Aw thanks guys!!
xo
s
Amanda Wolf says
That looks great! I love those tiles, I am completely amazed by the old sun room, you guys had a vision and went with it! I know you are talking about an outdoor fire place – which would be cool, but what about an outdoor kitchen? I keep kicking myself that we didn’t plan on that when we added our deck, otherwise before we got the new siding I would have attached an outdoor sink to our normal sink and had the grill built in next to it. Oh well.
YoungHouseLove says
Oh man, that would be awesome!
xo
s
Sarah says
The Alex Mack reference is hilarious!!!!!
Wendy @ New Moms Talk says
We’re only 9 days into our new home, but we finished ripping out the built ins and I started removing the ponds. Do you have any tips for removing concrete ponds? (Eek!)
Oh, we also took a break to go clamming. My wonderful hub dug made the most of it and turned them into chowder before frying others. (He said the best was breaded with tumeric.)
YoungHouseLove says
Hmm, has anyone ever removed a concrete pond before? Can you use a sledgehammer? Or do you need a mini-demolition hammer?
xo
s
Manda Wolf says
Depending on how large the pond is and how thick the concrete is you may want rent a jack hammer to remove it. That would be quicker and easier than trying to destroy it with a sledgehammer. Or you can have a koi pond! My parents love theirs. ?
Wendy @ New Moms Talk says
Manda,
Thanks.
The ponds are mostly solid concrete with the occasional loose rock, brick, or other. I started digging out the plants around them, and have nearly conceded the jack hammer option after some pick axing away.
We have a 10 month old active girl (like her ex-Special Forces Daddy), so changing them to a koi pond isn’t best for us. I have hopes of making them into a Music Garden, as she was the girl who kept a steady 4-beat kick in utero and continues to thrive with music.
Carrie says
You need to rent a smaller jackhammer and break up the concrete. Back fill the pond with the concrete, add gravel as needed and then use top soil and sod on top. Make sure to remove the liner if there is one. This should make it able to drain and will settle over time.
Seeing all this tiling makes me itchy to retile the laundry room.
Rene @thedomesticlady says
We are tiling right now too :)
Can’t wait to see this outdoor room complete. I would live out there.
http://thedomesticlady.com/2013/09/20/home-improvement-readers-i-need-your-help-really/
YoungHouseLove says
Wahoo! Happy tiling!
xo
s
Anele @ Success Along the Weigh says
That self leveling stuff scares me. :) I know we’re going to have to do that in the basement at some point. La, la, la…*plugging ears*
I know it might not have been the most fun job but the border of the tile looks awesome! Well worth the extra work.
jennT says
pretty tile configuration! yall are just a little bit gifted with the ESP, me thinks. I was just wondering how you’d finish the edge between the border tiles and the deck wood and then BLAMO!, you told me. :)
Lauren says
Looks amazing! I recently tiled my bathroom (first big DIY project, go me!) and it looks so polished compared to other flooring styles. Just make sure you wear really old clothes for doing the grouting between the tiles, that stuff sticks (looks sadly at favourite jeans)!
A says
Do you think the tile will be slippery? Even though it’s under cover, it seems like there will be moisture from the elements and just being in the open air? How will you prevent slipping?
YoungHouseLove says
Good question! Check out the tiling post we linked to in the second paragraph (here’s a shortcut). We actually were having an issue with the concrete floor being too slick, but the tile is meant for outdoor use and is nice and grippy and rough/textured, so it’s a lot less slick. We even tested a sample at home with water and walked over it (trying to slip) and it performed the best out of a few other samples we tried.
xo
s
erika says
It is going to be so pretty! Definitely worth all this prep work.
I can’t tell from the photos–is there going to be any kind of lip between the tile and the wood from the deck, or are the two parts going to be flush? If there is a difference, are you going to leave it as is or will you do something to make the transition smoother? I ask because the people who owned our house before us left a one-inch difference in the levels of adjacent rooms when they put on an addition, and it drives us crazy! Not to mention that my klutzy self always manages to trip over it…
YoungHouseLove says
It’s about a half-inch rise into the sunroom but there has always been a small ridge there (even when the doors were on) but since the floor color changes and there are those posts all around it’s a pretty defined edge (so it’s harder to miss than the average floor change I think). So far after living with it that way for a few months with relatives and kids over we haven’t had any tripping (even Clara and her cousins) and we hope that adding the border even goes further in defining things. Of course if it causes an issue we can build up the deck with a small piece of wood to essentially make a tiny sloped transition all around the sunroom, but so far, so good!
xo
s
Avone says
My question is similar; will that tiny sliver of brick still be exposed? I might be tempted to paint it to match the tile??
YoungHouseLove says
Yes, we have thought about using a small brush and some charcoal exterior paint to make it match, but in person the brick color is the same tone as the deck (sort of red-brown) so it blends with the deck, which seems less clashy than it does in photos. Will have to see if it bothers us when we’re done since painting it with a little brush would be a really easy change at the end if it bugs us!
xo
s
Aimee says
I wonder if bull-nose tile comes in such a teeny size? That would really polish off the edges.
Katie O says
That tile looks great! I can wait to see the finished product, and I’m a sucker for a good “before” and “after”.
This weekend I primed a new door we installed into our office/guest room(as part of the long long process of replacing all our hollow core doors with real wood doors) and the trim around it. The hollow core door and trim that were there before were both brown (the rest of the trim around the room was already painted white), and I can’t believe how much of a difference it made with just the primer! I’m finishing up painting it tonight while I *hopefully* watch the Cardinals make a comeback against the Pirates. The room feels much lighter and more open. A new door knob is on the way, and it’s sad how excited I am.
YoungHouseLove says
Wahoo! I’m excited just hearing about it. Is that even sadder? Haha!
xo
s
Sara Jean says
You guys never cease to amaze me. LOVE that tile! The transformation of this area is incredible. Would a project like this have scared your pants off a few years ago? I keep telling myself that practice makes perfect but I doubt I’ll ever reach Petersik status. But hey, a girl can dream. :)
YoungHouseLove says
YES! We would be pantless and afraid. Seriously, it’s so funny how this blog has basically chronicled us hiring out an entire kitchen renovation and then tackling one ourselves a few years later and learning how to gut a bathroom and build a deck. We are truly just figuring stuff out as we go. And there’s a definitely a pretty awesome momentum and confidence that slowly grows over time. You can do it!
xo
s
Kelly says
The holes in the edging looks like Michigan :)
YoungHouseLove says
Ha!
xo
s
Anne @ Planting Sequoias says
That’s exactly what I was thinking!
Jason says
That caught my eye as well. Who makes the edging?
YoungHouseLove says
Hmm, I’m not sure if it’s made by The Tile Shop or just carried by them. Anyone know?
xo
s
Amy says
I thought the same thing! I guess I must be a Michigander! :)
Kathi M. says
We just ordered that same edging for our penny tile backsplash in our kitchen. The edging is indeed made here in Michigan, which is why the holes are shaped like that :).
YoungHouseLove says
I love that!
xo
s
Katy @ The Non-Consumer Advocate says
Lookin’ good!
The self leveling concrete looked like fun. Kind of magical.
YoungHouseLove says
I agree Katy. There was a magical quality to it. I felt like Harry Potter in there.
-John
Kaesey says
The tile looks great – especially the border. Can’t wait to see how it looks when you’re done! And yes, I’d like to see the fan install. We have an enclosed porch in need of one and I need to convince my spouse that we can do it ourselves.
You asked what your readers did this weekend….walked around in the woods in the rain. Because we could. =) And put up more Halloween decorations! http://kaesey.wordpress.com/2013/10/04/something-is-stirring/
YoungHouseLove says
Aw, sounds like a fun weekend Kaesey!
xo
s
Brit [House Updated] says
So excited! I love tile and tiling. Good call on the border, I think that will make it. Good luck on getting ‘er done!
Taya says
Can’t wait to see the floor finished! And btw….the Alex Mack reference just made my day!
Elle says
Dude, love the Alex Mack reference!
When you do your next tile update, can you talk a little bit more about the edging stuff from the last picture? I’m not really getting how it’s used. Is it just for aesthetics or does it serve some sort of structural purpose (like a soldier course of bricks)? I’m guessing it tucks under the edge tile so only that little bit is showing – are the holes and teeny prongs within the holes for additional grip?
YoungHouseLove says
Yes, we’ll try to touch more on that for you Elle! The holes on the bottom sink into the thinset when you set the borders and the tile to hold them in place but they’re mostly for aesthetic reasons. In other words, the tile would stay in place in the thinset without them, but a raw edge of the tile would show without them (which can be especially unattractive if it’s a cut edge). So they’re mostly just for looks (to make things feel polished) and also can help protect the edge of the tile from cracking/degrading when it’s exposed.
xo,
s
tasha roe says
wow!! the tile choice looks great! looking forward to seeing the finished project. The border is fantastic too. love the clean edge it gives the area.
Kate says
Are you going to find a way to incorporate a transition piece to bridge the two different heights of the new tile floor and the surrounding wood deck or just leave it the way it is? I’m only asking because we’re thinking about doing a similar project but we’re worried about stubbing our toes all the time!
YoungHouseLove says
It’s about a half-inch rise into the sunroom but there has always been a small ridge there (even when the doors were on) but since the floor color changes and there are those posts all around it’s a pretty defined edge (so it’s harder to miss than the average floor change I think). So far after living with it that way for a few months with relatives and kids over we haven’t had any tripping, and we hope that adding the border even goes further in defining things. Of course if it causes an issue we can build up the deck with a small piece of wood to essentially make a tiny sloped transition all around the sunroom, but so far, so good!
xo
s
Andrea in australia says
I read that as “lingerie smell” and then thought whoa the tone of this blog has changed lately! Then I realised I was an idiot who can’t read properly. Great post though, as usual :)
YoungHouseLove says
Hilarious!
xo
s
Geertrude says
That looks wonderful! Can’t wait to see it finished. And I love the idea of border tiles. it makes it look so much more… finished (hmn, that doesn’t seem to make sense, but I think you know what I mean).
What did I do this weekend? Nothing diy, that’s for sure (we’re in a rental apartment on a Caribbean island right now). Although you might call going through my manuscript for the last time (oh those tiny typo’s!) diy too ;-)
YoungHouseLove says
Wahoo! Congrats on that last run through your manuscript Geertrude! We were fighting those tiny typos ’til the end!
xo
s
betty (the sweaty betty) says
looking great! I just did this pattern (with a similar, smaller porcelain) in my laundry room. love it! cant wait to see everything come together!
Coran says
It’s going look awesome!
Jan says
The border really looks great … can’t wait to see the finished job! We cleaned out the garage this weekend (so exciting). Donated a ton of stuff to the church rummage sale, and now we can get both cars in the garage before the winter!
YoungHouseLove says
That’s awesome Jan!
xo
s
Karen L. says
I love the way you just dive into new areas of home improvement. Like your tile choice and the pattern—-you’ll love the airy place to hang out! I see far too many glassed-in, former screen porches with houses that nobody uses for fear of mosquitoes. We live in Williamsburg, and use our deck, and our screen porch a lot with no bug issues! You’ll love the openness of your new area!
YoungHouseLove says
That’s so awesome to hear Karen!
xo
s
Laura @ Rather Square says
Great call on the tile border. It’s looking polished already! Glad you posted your experience with self-leveling concrete too, this is something we are looking into for our (91-year-old) concrete basement floor to even things out.
Angel says
Are those tiny Michigans on the tile edging?
Love from the Mitten :)
YoungHouseLove says
Haha! Someone else said that too!
xo
s
Angel says
Eminem will be proud :)
YoungHouseLove says
Detroit, what?! Detroit, what?! (that sounded cooler and more Eminem-esque in my head than it did when I actually wrote it out…)
xo
s
Laurie says
Well, I did less than you, that’s for sure! The tile is looking really good!
I know the tile and patio are different heights so this isn’t possible but I liked how the tile looked when you were testing the placement and pieces were overlapping with the deck. It’s an interesting idea; the borderless border.
Anthea says
I love the Alex Mack reference, though Miss Alex in her silvery glory never quite filled the void of Clarissa Explains It All. #90steenproblems
Barbara says
I learn SO much from you guys. In fact I don’t even know if I would have bought my slightly fixer upper house if it weren’t for your blog (promise it’s good that I bought it) (usually). Thanks!!
KarenH. says
I hope your tiling is going well in pouring rain :) (Maybe it’s not so bad in the Richmond area). I do love the pattern you decided on. It will look very nice.
YoungHouseLove says
Ahh, it’s not raining yet but it’s pretty windy!
xo
s
Tara @ Nicole Michael Crochet says
I was hoping you’d do a border. That porch is going to be fabulous!
Melissa D says
Looking great! My son will be so excited about the fans. LOL I’ve been asked daily whether you have them up yet or not. ;)
Rachel says
The holes on the edger looks like the Michigan mitten to me.
Lydia says
Is that the Michigan mitten in your metal edging? I’ve lived in the Detroit area my whole life and I love everything Michigan related! Wonder if I could use that in a project somehow…
P.S. love that you used a border.. it really defines the space and makes it look great!
YoungHouseLove says
Haha, so funny how many Michigan folks are saying that!
xo
s
Lydia says
It is Michigan! Great Lakes Tile makes them. They are based in Shelby Township.
http://www.gltileproducts.com/products.php?id=1
YoungHouseLove says
That’s awesome!!!
xo
s
Vivian says
I cracked up at John buying a bucket with a hole in it … not something I ever expected! You did a great job with the concrete leveler … I didn’t find it quite that easy when I used it in the master bath … in fact I had to chip/sand/cry it all out and start over!
Porch looks fantastic!
Lisa @ Double Door Ranch says
Man was I pumped to see the tile start going down and its looking exactly as awesome as I pictured!
This weekend I whipped my mess of a garage into shape! I just finished it up last night so I hope to have it up on the blog later this week. The difference blows my mind. I’m considering a garage camp-out. :)
xo,
L
YoungHouseLove says
Ah, the garage clean-out! We used to do that every few years (so addicting when it’s clean, so annoying when you blink and it’s crazy again a year or two later). Hope yours sticks better than ours!
xo
s
Stacey says
I love weekends when more is accomplished than anticipated! I’m on a window treatment updating spree! Rather than buy all new curtain rods I’ve cut down the pine finials and ORBed the brackets, rods and finials for a more modern look. (I am soooo on the ORB train – I buy 10 cans of it at once since it’s like hen’s teeth here in South Africa.) I’ve also been using Contact to frost windows where we require privacy – I will post photos to your Facebook page when the job is done since I’m pretty chuffed with the rapid results thus far!
YoungHouseLove says
Sounds so smart! Can’t wait to see!
xo
s
Kelly says
Looks fantastic!
Since outdoor tile like that will be exposed to greater temperature extremes than its interior comrades, do you have to allow for any expansion/contraction? You know, like how a sidewalk has a line every few feet for expansion? It seems unusual to see one big slab like that, and then I was wondering how the tiles would do on top of it without expansion joints. (But then again, I’m from the midwest — maybe you don’t get the extreme temps we do.)
Great job — I really love this space.
YoungHouseLove says
Yes, thankfully here we don’t get much in terms of extreme temps, so this tile is recommended for outdoor use and we add something to the thinset (called flexible admixture) that allows for a little bit of expansion/contraction) which along with grout and the small space between each tile seems to be great for this area.
xo
s
Megan @ Rappsody in Rooms says
Wow! I am impressed how you are just rolling through this sun room project! It’s amazing! Can’t wait to see how the tiling ends up looking. I also appreciate all the details. There are so many tools you used in this that I have never heard before!
Stacey says
Tile looks great and I really like the pattern. Funny enough my favorite part was the metal edging pieces – because it’s one of those details that I would never have thought of, but it looks finished (and professional) with them.
This weekend we actually removed an extra closet in the nursery – I know, removing closet space! But we gained so much useable square footage in a room that already had a closet!
YoungHouseLove says
That’s awesome Stacey! Congrats!
xo
s
Isabel says
Ah, there’s nothing better than the feeling of progress, very excited to see the finished product! We’re on a painting kick up here, repainting every room much like you guys did on your first house. This weekend was our bedroom. We have a little window nook where I envision a window seat down the line, so we opted to paint it a couple shades darker then the rest of the room. We primed the entire room, then painted the main walls and went for a walk. We figured, come back, paint the nook and it’s done with time ti spare for some TV. Well I guess because the primer sat without paint in that corner, when we came back there were huge bubbles all over… Surprise! That room used to be wallpapered but had been painted over at some point. Apparently the primer had caused the wallpaper to come up. So after sitting there for half hour peeling off the primer, and mourning the waste of said primer, we sucked it up and took it all down with the wallpaper. Mind you, we only did that corner, no sense in upsetting the rest of the room where the wallpaper wasn’t coming off, but it took the better part of fours hours and some serious elbow grease. Oh DIY, you’re a fickle one! Happily, we now have a freshly painted semi wallpaper-free room.
YoungHouseLove says
OH NO! I’m so sorry Isabel! Sounds like a total DIY curveball. I can SO relate! Glad it has a happy ending!
xo
s
Jessica Andolsen says
I just wanted you to know that my husband and I finally painted our living room, hallway, and kitchen this weekend! Its not nearly as big a job as your sunroom, but I don’t think we could be prouder! We used your How to Paint a Room (YHL Style) tutorial and I even went freehand around the trim. Thanks for the daily inspiration!
YoungHouseLove says
You should totally be proud! That’s a huge job and I bet it’s so nice just to stand in those rooms and stare at the walls now. Amazing!
xo
s
Donna Jean says
I love the tile – especially how well it goes with the stain on the deck. And the Alex Mack reference = awesome. Off to search Amazon Instant Video to see if it’s on there!!
Eric says
This is so perfectly timed for me. I’m actually getting ready to tile my Garage! Yes, where the cars go.
I’ve got a bunch of work to do, and this is exactly what I needed.
YoungHouseLove says
That’s awesome Eric! We’d love to see that – send us pics!
xo
s
Jess @ Little House. Big Heart. says
Having just finished our own big tiling job, I can now totally appreciate all the work that goes into this! Good luck and I can’t wait to see how it turns out!
PS. Love the border. It definitely makes things look much cleaner!
YoungHouseLove says
It looks gorgeous Jess! LOVE it so much!
xo
s
Audrey says
I just love seeing your exterior updates. I would love to eventually get a nice back yard. We’ve started a little this weekend with buying two tomato plants (because my daughters and I have always wanted a garden)… and I got a FREE Ash Tree this weekend (Thank you Palm Fest!!!!), that will will be planting. And lastly, last evening when my daughter went to cut the yard (we use the man powered mower), she found two watermelons growing on the side of our house. Holy Moly, we had a garden and didn’t even know it!!!
OH, we also went happened to go to Home Depot when they had a kids workshop. My youngest being 13 was able to build a little plan, and we all got hotdogs for lunch!! SCORE!!!
YoungHouseLove says
No way! The watermelon discovery is awesome!
xo
s
Megan says
Love a good Alex Mack reference! I’m counting the days till Netflix adds Alex Mack, Clarissa Explains it All, and Doug. Oh Doug. Still jammin’ on that trash can after all these years?
YoungHouseLove says
I woke up singing the Doug song in my head the other day. Still not sure if this makes me super cool or super weird.
xo
s
Megan says
Clearly, it makes you super cool. After I read this post, I emailed the You Tube link to Doug’s song to my husband so he has some sweet tunes to wake up to. Doug makes everything better.
YoungHouseLove says
Haha!
xo
s
Donna Jean says
Doug and Clarissa are totally available for free if you have amazon prime. My 3 yr old loves Doug! “Oh-eeee-oooooo! Killer tofu!!”
Sadly, while Alex Mack is available, it’s not free. *sad face*
YoungHouseLove says
Might need to start an internet campaign….
xo
s
Meg says
I was thinking the exact same thing!! (And apparently we’re two incredibly hip chicks, given our super cool names. ;-)) Are they going to add them to Netflix?!?!?!
Dang. I won’t be able to leave the house!