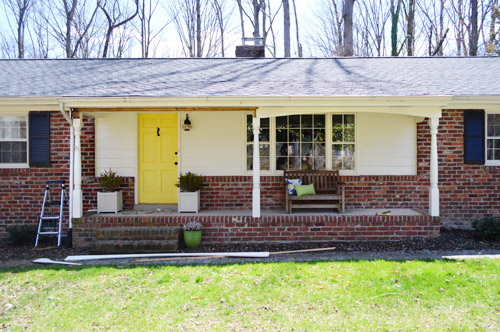
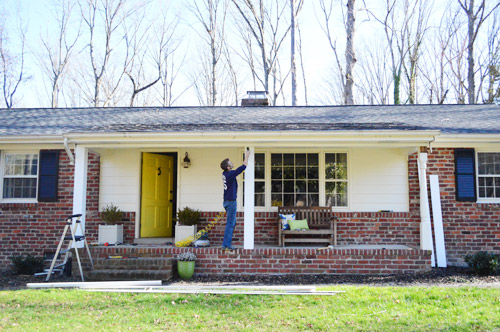
We’ve been talking about streamlining (buh-bye scallop) and beefing up the porch (namely those columns) ever since we moved in back in 2010. And it’s finally warming up enough for us to tackle an outdoor project after a long winter – seriously, we were still getting snow a few weeks ago.
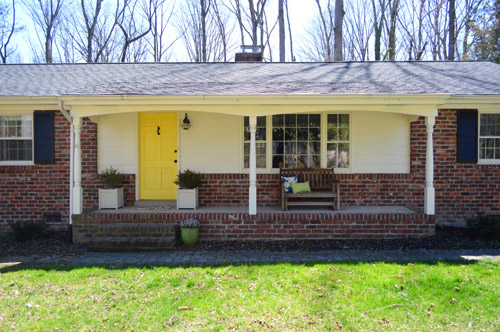
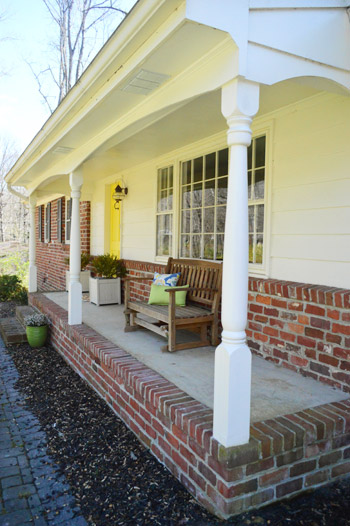
Most of the ranches in our neighborhood either have chunky square columns or a more traditional colonial style. We prefer the former, but inherited the latter. Along with a curved scallop header that isn’t exactly our style either.
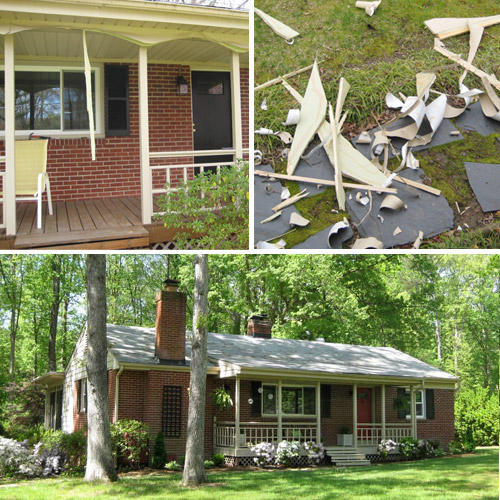
Our first house had an issue with a scalloped header too, which Sherry tackled back in 2008 (one of her most exhausting projects to date – which she recounts here). She ran into some challenges when some metal flashing didn’t want to give up the ghost – and thanks to the fact that she wasn’t quite tall enough to make the task easy (she did this by herself as a surprise for me while I was at work one day). But we loved the more updated, clean-lined look that it gave our first house. So it was finally time to get on it here…
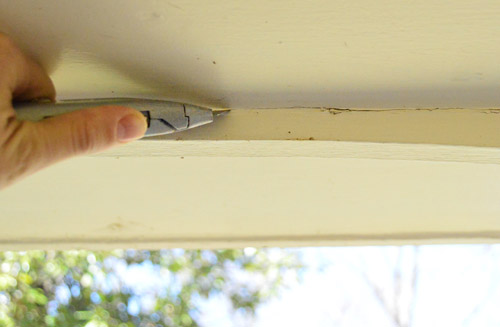
Of course this porch is a whole new beast (no metal flashing, a lot more wood trim and stuff to deal with, and columns that we’ll be altering this time). So before we started hammering away at things, I ran a utility knife across the seams to “encourage” the paint the break in the right spot – not crack, peel or flake off in areas that we didn’t want it to. This is always a good idea before demoing surfaces that have been painted together – especially with lots of thick layers of exterior paint.
I was fully prepared for our demo process to be exhausting, considering the horror stories that Sherry told me about her last attempt at scallops, so I was cautiously optimistic when a few whacks with a rubber mallet easily loosened the scalloped header while Sherry watched with bated breath.
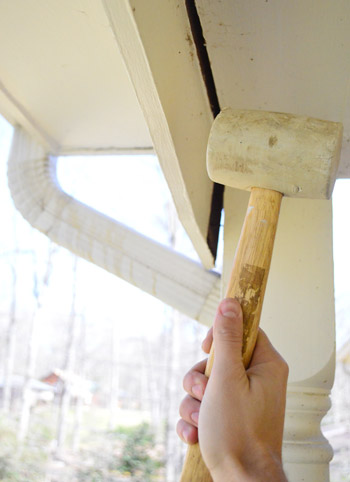
Thankfully, once things were loose, we were able to quickly pry that part of the curved scallop off with a crowbar.

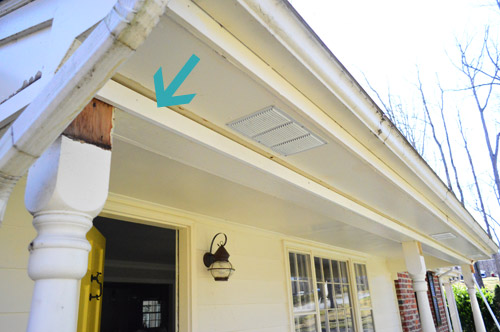
Not too pretty looking yet, but at least the demo wasn’t too bad:
The combo of not having metal flashing to contend with AND my height being available (along with 4 hands, which are always better than 2) helped things work in our favor for sure this time. Soon enough all of the scallops were gone and we were already feeling better about things. Now we just had to put a new straight header (along with those boxed our columns) together.
We started off by nailing and gluing a simple pre-primed piece of 1 x 3″ pine where the scallops had been. Curvy header out. Crisp, straight header in.
That was the easy (slash boring) part. This is where the fun began – boxing out the columns.
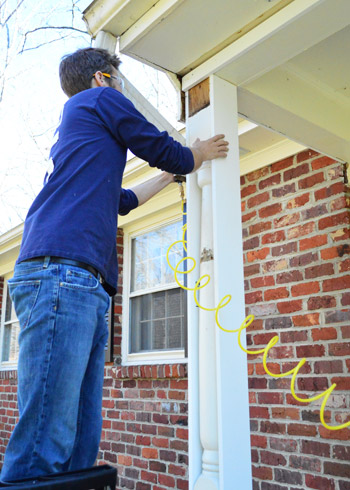
Rather than go through the trouble of removing the existing columns, we decided to achieve our more modern, chunky square column look by just “boxing” them in on all sides with some pre-primed pine boards – which is faster and easier (not to mention cheaper). Our columns were a few inches shy of 8 feet tall, so we had to trim each board first (thanks circular saw!).
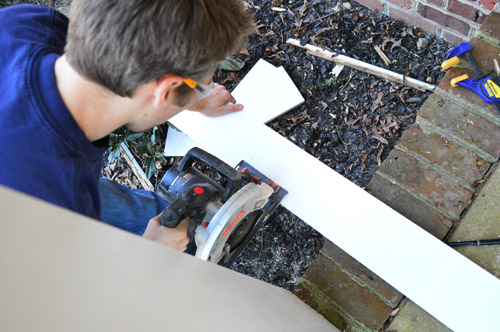
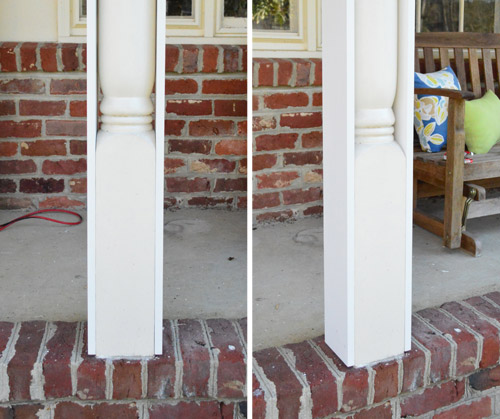
Here you can see what one column looks like with two sides of the box added. Our columns were exactly as wide as a 1 x 6″ board (we will now pause to thank the home improvement gods for that awesome discovery) so it didn’t require any additional cutting besides trimming the length, as shown above.
We attached them with some heavy duty wood glue followed by a few 2″ nails into the bottom and top (where the new boards rested flat against the square part of the old columns). We also added a few screws to keep them extra secure for the long haul.

Since adding those two 1 x 6″ boards essentially made our columns wider, we had to use 1 x 8″ boards for the other two sides. That sounds confusing, but it made them end up as 8″ x 8″ squares since the sides of the boards overlapped (this very rough Sherry-sketch should hopefully make sense of the overlapping concept that I’m trying to explain).

Well, actually they’re around 7.5″ square since 8″ boards are never really 8″ (they’re more like 7.5″ wide). But you get the idea.
As for physically boxing the columns out, two things really helped: our nail gun, and Sherry’s hands. Obviously the nail gun made things go faster and this whole project is ideally a two person job (although once we had things secured in a few places Sherry could step back and snap some fantastic photos like this one).
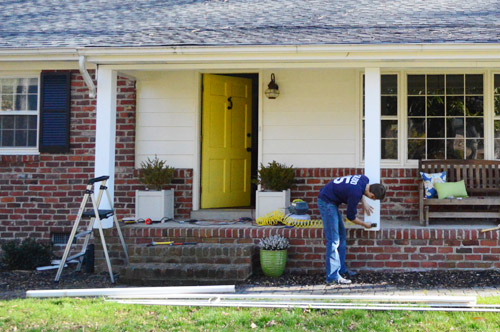
The process actually went fairly fast, just not fast enough for us to finish before Clara came home from her afternoon with Grammy & Tom Tom. So our progress got cut short a bit – but you can at least see where we’re headed. Oh but see how the header looks a little thin compared to the newly boxed out columns? We have plans to beef that up under the roofline so it’s nice and balanced. Stay tuned…
So here’s our remaining to-do list:
- get that last column boxed in
- add a chunkier header piece to visually balance the columns
- get all of those seams caulked (don’t want any moisture getting in there)
- paint everything so it’s seamless
So we hope to be back with some true before and afters once we knock those things out. In the meantime, you can also check out this little loot-related craft that Sherry whipped up for Clara (and Will Bower) over on Young House Life.

Anyone else moving on to outdoor projects finally? What’s on your spring DIY agenda? New flower beds? A patio upgrade? Mulch galore? Or are you making fake money? Be careful that it’s not too realistic (don’t wanna end up in trouble…).

Rene' @ thedomesticlady.com says
We are getting ready to rip off our whole front porch and start over. Our builder was an idiot and didn’t lay a foundation under the porch…sagging,sagging sagging now. Your porch looks so great! Gives me inspiration.
http://thedomesticlady.com/2013/04/10/recipe-review-pecan-sour-cream-pound-cake/
YoungHouseLove says
Oh no! Good luck with your porch Rene!
xo
s
Erin says
Looks great! Where did you get the green planter? I’m looking for something just like that.
YoungHouseLove says
That was Home Depot a while ago. Hope it helps!
xo
s
S.Lynn says
If you have a Home Goods store nearby they have great looking pots, plain/with designs/rectangle ones made of concrete, and all sorts of yard nick-nacks, too.
Henna | HENNA BLOSSOM BLOG says
This is one of those projects that would bother me but I might never get to. So smart though to tackle it since it’s the first thing you see every time you see your house.
But then again, I’m crazy and I DO think of things like cutting into our house and adding more window (yep, already done two)…but we live in a 100 year old home and while I love character, I also need LIGHT! :)
Looking forward to seeing your porch all finished off! Always an inspiration! :)
Madeline says
Horray its time for new flowers! http://createbakecelebrate.blogspot.com/2013/03/create-spring-gardening.html
And hopefully a new porch when we get moved in- but that is a much bigger project & kinda scary! Note to self: read YHL & know you can do it!
Anele @ Success Along the Weigh says
I’m getting to know you guys too well, I thought “they’re gonna box those in.” *scroll* “Score!” (Classic Peg) It’s gonna look great.
YoungHouseLove says
Haha, Classic Peg.
xo
s
Anne @ Planting Sequoias says
I am so ready for spring weather! It hasn’t been warm enough in MI to go with just short sleeves, but I’m crossing my fingers that it’ll be soon.
Megan @ Rappsody in Rooms says
Hmmm…giving me ideas for our porch! We have a ranch house to with scallops and curvy posts. Thanks!
Susan Hines says
That looks so good! We have a huge pergola out back that my husband built 5 years ago. He used wooden trellis on top for more shade for me. This year we have to replace the wooden trellis that isn’t holding up well and replace part of it with opaque roofing stuff (?) that will allow us a rain free area over part of the patio and the dog door. I can’t wait!
Ellen says
Do you have any plans to paint the exterior of the house now that you’ve added crisp white in the form of the columns and header? The paint behind it is a bit creamier…
YoungHouseLove says
Oh yes, the columns and the header will be painted to match the rest of the house (it’s on the to-do list once we’re done and it’s all caulked). It’s too much work to repaint the entire house (the whole back of the house is that color and much of the sides) so we don’t mind it too much :)
xo
s
Meagan {Green Motherhood} says
I was wondering the same thing! I recall some gray test paint on the porch over a year ago (memory like a steel trap!) and always wondered what y’all decided to do. The gray would have been neat to see, but yes! A huge undertaking.
Courtney @ FamilyGoneHealthy says
We have a small porch but spend a lot of time sitting out there. This week we have to finish mulching the flower beds and herb gardens and then fertilize the grass. So many outdoor tasks but at least the weather is beautiful here in NC!
Wendy @ New Moms Talk says
Thank you for these in-process posts. Sometimes it seems there’s a rush to the finish in life, and yet (to me) it’s not always a microwave or fast food kind of life!
Casey says
I would love to get working on outdoor projects or projects that need to be done outside… but our lovely Minnesota weather just dumped more snow overnight. Hopefully it melts fast and warms up. The cold weather makes things as simple as spray painting difficult…
Catherine says
I am in MN too and looking forward to seeing this last lot of snow melt and some warmer temps so I can GET OUTSIDE. I really don’t like the heat of summer but I could do with some warmth right about now.
Jenn says
Good god! Just removing the scallop changed the whole look! So much more open and welcoming!
Lu says
Looks great! Love the lack of scallops!
Shannon says
It is amazing what a difference that makes! I am going to do some planting tonight and get the porch going! Spring Fever!
Gabriella @ Our Life In Action says
Seeing this makes me want to get outside and start little projects around the yard. SPRING AT LAST! SPRING AT LAST!! LOL – that cabin fever was killin me. ;-)
Suzie says
Beefy = Awesome. Looks great y’all!
Chris says
Where did the link for Young House Life go? I don’t see it under shortcuts anymore.
YoungHouseLove says
It’s up on our header (see the green line that says “Our family blog”)?
xo
s
Teresa @ wherelovemeetslife says
Love the changes!
I am tackling the flower beds this spring. I tried to do a full, lots of flowers and plants thing..but I just don’t care for it. So I am diggin up and de-cluttering my flower beds :) One hydrangea (that I have worked hard to keep alive) and some hostas may be all that remains. I have a bunch of hyacinths that I want to move indoors so we can enjoy that wonderful fragrance!
Robin @ our semi organic life says
Looks great! do you have plans to make them boxier on the bottom half or add a railing? I like that look but perhaps wouldn’t work with a small porch.
YoungHouseLove says
We can’t make them boxier on the bottom or they’ll overlap the foundation of the porch in a weird way, so we’re happy with the straight chunky look (many other ranches in our neighborhood are sporting the same look). As for the railings, we’re just afraid it’ll close it in, and it’s not very high at all (Clara jumps off the side if that illustrates how low it is).
xo
s
JenB says
I wouldn’t have thought that getting rid of the small arches and boxing in the posts would make such a difference. Wow! It really does!
We have more of a front “stoop” with black metal railing about 4′ X 5′ or 5′ X 6′ (I’m terrible at guessing that kind of thing. But it’s so 70s or maybe 50s? I keep trolling the net looking for ways to make it over. No clue.
Lisa in Seattle says
Jen, we have the same thing (late 60s for us) and I haven’t found any good inspiration either. Nobody in our neighborhood has successfully upped the wow factor. I get so jealous of people who can decorate their porches for various holidays. We don’t even have an overhang!
Laura says
Can you change out the railing? I had a rusty, dated railing that I had a local railing company replace with an updated, bronze finished railing that I love…its not something I could have done myself. Mine was about $250 for a handrail with spindles underneath along 3-4 steps. The company I used specializes in railings…for porches, decks, etc, and is the only supplier for many local builders. If that isn’t an option, I wonder if you could spray paint it?
Sandra says
I love the new columns. The old columns look like they would be a catcher of all things allergic since the pollen could easily collect on the ridges. Pollen season has started early in Georgia, so I am a little obsessed with ways to reduce the collection of it. :)
YoungHouseLove says
Amen! Me too. Our poor car is getting dusted right now.
xo
s
Holly Aldredge says
Thank you for your posts! You’ve inspired me to start my own blog and for my husband and I to take time in getting our house the way we want it! Love, love your book!
Victoria • Restoring our 1890 Victorian says
After three years, we finally restored our (rotting) old-house, front-porch last summer… we had put things like working bathroom ahead of it… but after we were done, we realized we should have made it the first project… it’s so nice to drive up and not mistake our house for a crack den. (It was really bad)
p.s.- reading your post from yesterday about time management… I find it incomprehensible how you do seven posts a week. AND the projects behind them. Literally… I cannot imagine it.
YoungHouseLove says
Aw thanks Victoria! I promise it’s fun :)
xo
s
Jess @ Little House. Big Heart. says
Looking so much better already!
We’ve been wanting to clad our lone front porch column since we moved into the Little House (you can see it here in our April Fool’s post). It’s that old curly wrought iron and just not our style. Do you think we could clad it even though it’s not wood? Maybe with brackets?
YoungHouseLove says
Oh yeah, I bet you could! That would look great!
xo
s
Allison says
I wish we could get outside, but here in MN we got a rain/snow mix last night (thundersnow!) and it looks like more to come today! *sigh, where is spring! At least I can live vicariously through you both, so keep up the good work, it’s looking great!
Elizabeth @ Southern Color says
I love how boxing in the posts completely modernizes the porch. Living in an apartment there’s not much I can do to my patio, but I hope to at least add some fresh potted plants. Looking forward to seeing pics of your finished porch!
Micha says
Wow, that a difference! Your porch just grew an inch in height (visually and in self-confidence, I think).
Well, the plan is to paint the exterior of our house this year and add a fence to the front yard. We’ll see how much we get done *L*
Melinda says
You guys are amazing! Small changes make such a BIG difference!
Ok – so I want you to come to Maine, make a list of all the things I need to fix in my house and then directions on how to do it. K? thanks. We’ll pay you in lobster and beer :)
AMAZING!
YoungHouseLove says
Haha, mmmmmm, lobster!
xo
s
Wendi S says
Are you guys considering shutters for your big picture window? We bought our home last year and the front is very similar to yours and I’m wondering how to beef up the windows.
We also have a brick pony wall lining the outside edge of the porch with flower boxes inside of it (kind of hard to explain) that had overgrown ranunculus in them and we want to tear that out before the end of the summer. I wish the porch overhang extended out a bit more so we can make the porch wider without it looking wonky. If you have any suggestions that would be great!
PS I think we have the same porch light!
YoungHouseLove says
I bet shutters would be awesome for that window. We would want them to match the rest, so we might see if we can find some (and give up if we can’t since we don’t want to replace them all, haha!). Hmm, as for extending the porch, can you build long wide steps or something on that side to visually extend it and somehow make it feel integrated?
xo
s
Reenie says
WOW… just knocking off that lil scallop opened it up so much more. Can’t wait to see the finished thing :)
Taya says
Love it! Can’t wait to see the finished product!
jenn aka the picky girl says
I’ve wanted to do this exact thing for ages. I just really don’t like the colonial columns. But here’s the thing – my neighbor used to own my house, and when I mentioned boxing in the columns, he seemed upset. He talked about having to replace one and how expensive it was (our houses are over 100 years old) and about how much work he had done on the house. Now I feel like I *can’t* do it. And I hate that, but I also want to keep friendly with the natives. :)
I can hear you guys chanting: Do it anyway…Do it anyway…
YoungHouseLove says
Haha, heck yeah! You bought the house! Do what makes you happy :)
xo
s
Angel says
If you do it like J&S, looks like if someone in the future wanted to pry the wood off and have the old columns, they could. Also, if you didnt do it that way, you could always offer to take down the old columns carefully and give them to the neighbor, to sell or something. Or sell them yourself on craigslist!
I would hate living next to the person who used to own my house! Makes me think of that show “Moving Up” where people tour their old houses after the new person moves in and makes changes. Its so funny how crabby some people get! But, also, I get it. My grandma hand painted a mural in my old house and I would die if I saw the new owners painted over it (which, I’m sure they have).
The circle of life, house style!
Ashley@AttemptsAtDomestication says
Love the columns so much better now! They look good!
We have plans to repaint our porch and front door this spring/summer and I seriously cannot wait!
Nora Rose says
How do plain painted pieces of wood hold up outdoors? Not really familiar with using anything but pressure treated outside. I’m sure you guys have done more research so I’d love to know!
YoungHouseLove says
As long as they’re primed and painted with exterior paint (and all of the cracks are caulked) they’re great! We used the same method when we rebuilt the porch header in our first house in 2008 and it still looks great (we drive by it and stare, haha).
xo
s
Ashley @ 7th House on the Left says
This is going to look great, guys! It’s crazy how changes like this can totally change the facade of a house. Speaking of curb appeal, I came across this Pin a few weeks ago of a house in Alexandria and couldn’t believe the before and after! http://pinterest.com/pin/46161964902991353/ (the original source and story behind the house is in the description). The change is crazy awesome!
YoungHouseLove says
HOLY COW THAT’S INSANE! They had amazing vision. Wow.
xo
s
Cat Johnsen says
I literally woke up this morning to a gorgeous sunny day up here in New York and thought “man, John and Sherry better get on boxing those porch columns out before it gets too hot outside!” Great progress and can’t wait to see the finished product :)
YoungHouseLove says
Hahah!
xo
s
Heather says
It looks fantastic!
Our spring DIY project (our kitchen) is DONE!!!
I’m so excited with how it turned out.
http://www.bakecreatelove.com/2013/04/stick-4-ft-fork-in-it-this-kitchen.html
YoungHouseLove says
Looks great Heather!
xo
s
Sadie says
Looking good! We woke up to snow in Minneapolis, so no outdoor projects in the immediate future here. Boo, snow!
cindy says
Sadie, the snow hasn’t started up here yet and I have a porch needing similar destruction /construction. Just a quick 45 minute drive from downtown and you could be hard at work. ;-)
Jamie says
John – is that shirt you’re wearing the shirt I think it is?!?!
YoungHouseLove says
Heck yeah it is.
-John
bridget b. says
Looking good already! I love how you guys are able to show how easy intimidating-looking projects can be. I’m working on some landscaping for our front yard. http://623designs.tumblr.com/post/46508020536/springing-into-spring
YoungHouseLove says
Love those plans!
xo
s
Katie DeYoung says
So awesome! You guys make everything look so easy! I can’t wait to get outside and work on yard and exterior projects. We have some new window boxes to hang! Yippee! :)
Karen says
This may sound silly to you, but I’m not very good at visualizing things–is there a rule of thumb you use for balancing things or does this just come naturally to you two?
Thanks!
YoungHouseLove says
I honestly think that our best method is trial and error. We put up the small header and boxed out those two columns and stepped back and said “a slightly beefier header would balance them more” so that’s where we’re headed. There’s lots of course correcting! But I definitely think the best way to visualize something is to do it, and step back, and see what you think as you go :)
xo
s
nick says
J, the nail gun has to be the early odds-on favorite to win tool MVP of the year.
YoungHouseLove says
Hands down.
-John
Emily says
The progress looks great, guys! We would love to be starting on outdoor projects, like planting our new garden and removing an old sandbox, but it’s snowing here in Minnesota still! Can’t wait for spring to finally get here!
Emily says
Awesome job! Btw, newest HGTV mag is showing more love for another YHL pendant light! Page 78 :)
YoungHouseLove says
Isn’t that crazy?! Just saw that last night!
xo
s
Annelies says
Such a different view without the scallops ! And yeah for the sun to come out !
Will you be making a fence around the porch as well as was in your old house? And is there any improvement foreseen for the porch stairs?
YoungHouseLove says
We don’t want to add a railing since this porch is lower to the ground and we think it’ll close it in (we love the openness) – and as for the stairs, if I had my way they’d run the whole length of the porch (I love wiiiide brick steps) but for now that’s not in the budget :)
xo
s
Sarah says
Wow what a difference! I absolutely can’t wait to get outside and start working on my long list of exterior projects! If only this whole rain/snow/hail/freezing rain situation we’re currently experiencing would get lost!!
Parke says
Are y’all planning on painting the house’s siding? I can’t remember if you mentioned that at some point
YoungHouseLove says
We wanted to paint just the porch siding gray about a year ago but over time we realized it might look strange since the cream siding is on the sides and almost the entire back of our house (and that’s too much painting to bite off right now, haha) so it has grown on us! We’re hoping other curb appeal updates like the columns and our big carport project will freshen things up that way instead :)
xo
s
Erin says
Ahh, spring. What a wonderful word! Here in New England, it’s been long awaited. We finished building our new construction home in September so we can hardly wait to get our hands on our blank slate of a backyard! We’ve already started putting together a fire pit made from cobblestones. Summer nights here we come!