It’s Wednesday the 27th… so it’s time to share this season’s (completely unofficial) Pinterest Challenge project (not sponsored by Pinterest or anyone else, just dreamed up by Katie to make us stop pinning and start doing). Huzzah!

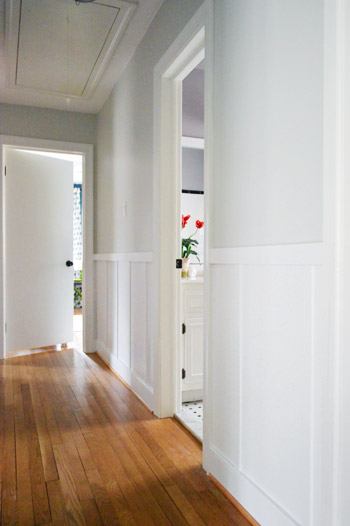
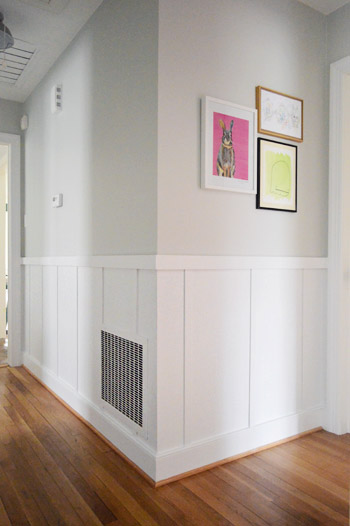
And this season’s challenge was the biggest one we’ve tackled by far. We tried our hand at adding some character with some easy board & batten in our formerly bare hallway.
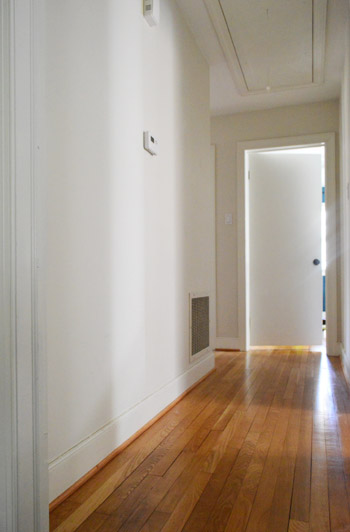
Which now, a week later, is looking like this. Woot!

Is it weird that I’ve been sitting on the floor just staring at it?
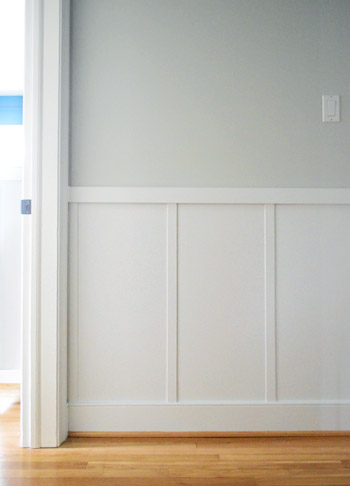
A few folks who had already installed board & batten or wainscoting commented last week to say that pictures don’t do it justice and they’re right. Photos are flat. But in person it’s just so dimensional. It really adds a ton of polish and interest to a formerly drab little hallway that we walk through dozens of times a day.
And when it came to how we got ‘er done, there’s thankfully no shortage of tutorials on the subject. So as per the challenge rules, I took inspiration (or Pintspiration, har-har) from a few awesome board-&-batten-tackling bloggers out there, and then we did own spin. Still have some more art to hang of course…
Here’s a rundown of the tutorials that we read before we took a crack at it:
- This one from Ana at Ana-White
- This one from Sara at Thrifty Decor Chick
- This one from Kate at Centsational Girl
- This one from Emily at Decor Chick
We’ll be back tomorrow with a full tutorial (including a video of each and every step!). We just have to get that all together (we were rushing just to take the photos for this post by today, so we didn’t have time to edit the video and write out the full step by step tutorial). The good news is that although the project took us nearly the full week that we allotted for the challenge, none of the steps were too hard by themselves, so it’s one of those projects that anyone can tackle as long as you take it one step at a time. And although we’ll be back with more details tomorrow (and a video of our entire process) our general order of the steps was this:
- measure & gather materials
- mark, level, and attach the top rails
- nail and glue the battens
- fill the wood holes and caulk the cracks
- sand the holes we filled and prime all of the wood
- paint the wood and the walls below the rail white
- paint the walls above the rail your color of choice (doing this beforehand is even easier)
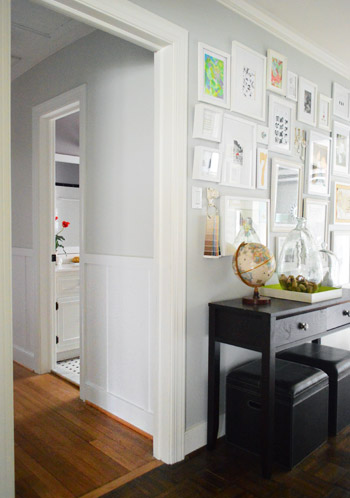
As for what color we went with on the walls, we thought the same soft platinum gray color (Moonshine by Benjamin Moore) that’s in our adjoined frame hallway would make for a nice cohesive and open feeling (we worried that anything too dark on the walls would close in the small hallway too much). We really love how it accents the white board & batten effect on the bottom without being too high-contrast. It’s a soft tone-on-tone look for sure, and the dimension in the board & batten adds so much interest. Note: you can see in this pic that we still have to paint the trim in the frame hallway so it’s pure white like the board & batten.
We’ll have a full budget breakdown for you tomorrow too (still have to go through those receipts!). Seriously, the paint was still drying when we grabbed these after pics for you, so we can’t wait to sit down and write up all the hows and the whys. But anyone can do this! It took a fair amount of time, but nothing was too complicated. Thank goodness or it would have been the first Pinterest challenge that we didn’t actually finish. Haha!
Don’t forget to check in on Katie, Megan, and Michelle to see what awesomesauce projects they’ve whipped up (they’ll all be sharing theirs sometime today as well)!

And now here’s the part where we tip our homemade hats to you guys and invite you to share all of the fun Pinterest Challenge projects that you’ve tackled in the last week (right along with us, well at least virtually with us). If you’ve already blogged about it, just:
- click on the blue “Add Your Link” button with the odd cartoon head at the bottom of this post (you might have to do some scrolling, depending how many projects are added)
- add a link to your specific blog post about your project in the url field (not your home page)
- where it says “name” write a descriptive name for your project (ex: “Homemade Leaf Wreath”) as opposed to your actual name
- we’d also love if you could quickly link back over to our project posts within your own (here’s Katie’s, Megan’s and Michelle’s) – it’s also nice to link to your inspiration project on Pinterest as well as to directly link to the original project/site, just so they get some love too.
And if you’d rather just link over to your project in the comment section, feel free to do that – or even add a link to a free photo sharing site like Flickr with your pics if you don’t have a blog (remember to set the gallery to public so we can all see it). I’m waay too excited to see what you guys have been up to! Seriously, Petersik. Calm down.

Leave a Reply