Vanessa sent us her kitchen makeover that clocked in at just over a hundred beans and it made us more than a little giddy. But we’ll let her take you through the story of how she got so much bang her buck. Here’s her letter:
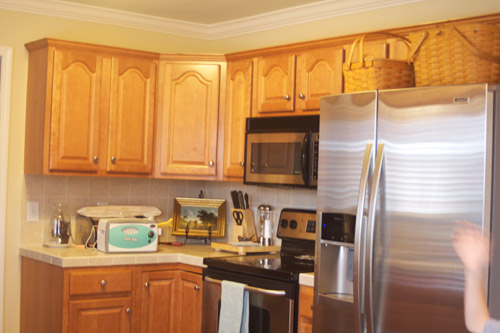
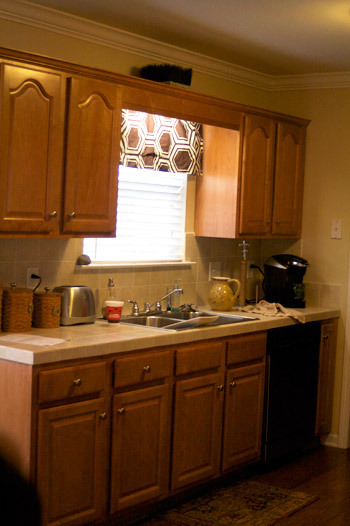
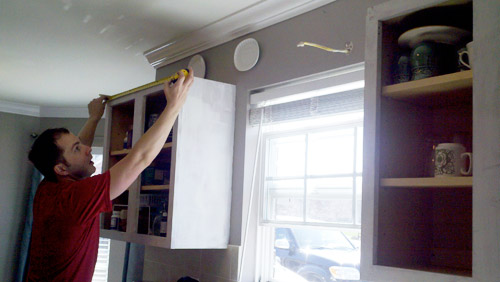
In 11 years of marriage, my husband and I have lived in seven cities and sometimes have moved multiple times in each city. Needless to say, I have become a pro at making each house a home. One thing I have always wanted to do, but have been too chicken to tackle it – is paint my kitchen cabinets. Now, in our seventh home, I finally decided to do it. All. By. Myself. When we moved in, things looked like this:
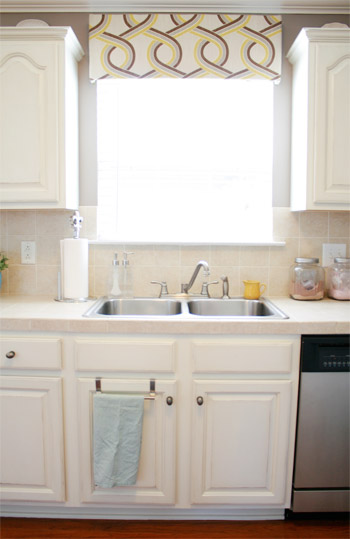
After priming and painting several coats, I rehung the cabinet doors and began sanding the edges. I then used some distressing oil around the corners where I’d sanded. After letting the oil sit on the door for a minute or so, I simply wiped it off (you can see the oil sitting on the picture on the left below, and what it looked like after I wiped it off on the right).
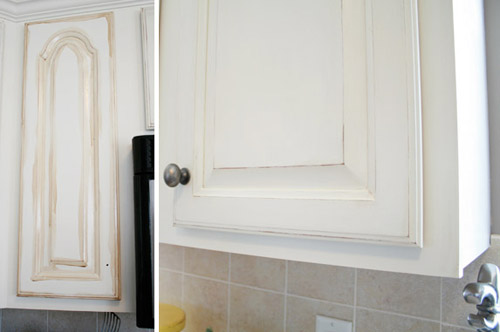
I love the way the oil brought out all the little scratches in the wood and created a sealer of sorts. Once all the cabinets were distressed, I replaced all the knobs that I bought for a steal! I chose an antique pewter for a nice contrast against the cream, but to tie in with the stainless appliances.
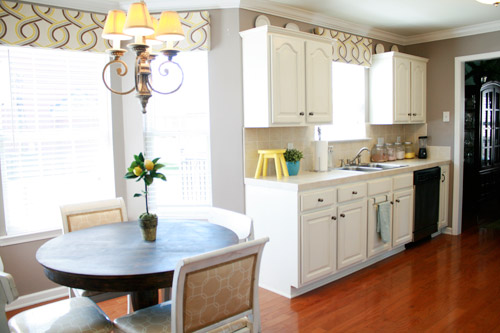
One thing I had always hated about the kitchen was the apron that connected the two cabinets on either side of the sink. My awesome husband took down that piece along with the cabinet molding. Then he recut the molding to fit around the two cabinets. It is amazing how much more light came in with that simple fix.
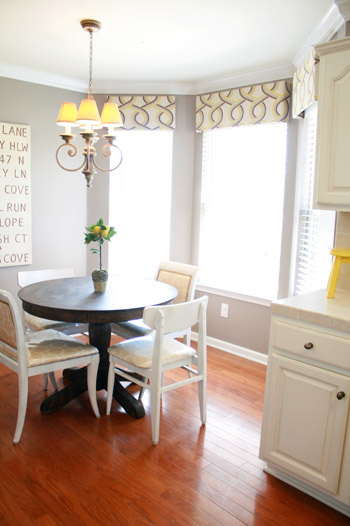
In addition to refinishing the cabinets, I also made new window treatments. I used a tutorial from Little Green Notebook for some awesome pelmet boards that were so easy to make!
Source list:
- Paint: Valspar cream oops paint $5, Danish oil for distressing $11
- Primer: Zinser oil-based $14
- Cabinet hardware: Resale shop $10.50 (21 @ 50 cents each)
- Valances: P. Kauffman fabric (Old Time Pottery) for $20, other supplies $11 (used this tutorial to make them)
- Accessories: Yellow step stool (Hobby Lobby) $12, small yellow pitcher (Goodwill) $1, three glass jars (Target) $6 each
- That’s $102.50!! Woo hoo!!
And as a bonus little tidbit, the kitchen chairs were Goodwill finds that got a new life for less than $100. The table was originally black (from Target) that I already owned. I simply stripped it and re-stained it for less than $20. All the other accessories, I already owned. If you consider these previously completed projects in the final total, the makeover still comes in around $300. I say, that’s not too bad for a full kitchen makeover, right?! -Vanessa
Not too bad at all, Vanessa! Actually, it’s pretty darn amazing. We love how fresh and light it feels, and the existing backsplash and counters work so well with the new look. Anyone who’d like more pics / details can hit up Vanessa’s blog, but first let’s play the favorite part game. Sherry loves the window treatment fabric and that fun yellow step stool, meanwhile I loved reading about distressing oil since we haven’t tried our hands at it yet.

Shelley says
Love the fabric used for the window treatments!
Krystle @ ColorTansformedFamily says
I love the look of he white cabinets. What a transformation for some builder grade cabinets. She did an awesome job!
Kahli says
Wow she really stretched her dollars! I love the white cabinets the kitchen looks so open now!
Allison @ Quite Simply Home says
WHOA! I can hardly believe that. Amazing! Totally proves that you don’t have to sink a ton of money just to make dramatic changes. Inspiring!
Veronica Flores (@VeronicaInLA) says
wow it looks great! amazing what $100 can do sometimes :)
Ashley@AttemptsAtDomestication says
LOVE the cabinets! What a beautiful job she did!
Lauren says
We also removed the apron between our cabinets and it made a HUGE difference. Great job!
Melanie@MailboxJourney says
Wow! Great transformation!
Beth-BTW says
Can’t see the pics. Odd.
YoungHouseLove says
Hmm, every time we hear about this it’s someone on a work computer that did some sort of update on virus protection and then they come back a few days later (usually 48 hours) when they realize we’re not spam, haha.
xo,
s
Alise Hagan says
Wow! I’ve been so scared about painting my kitchen cabinets but this is a great transformation. My favorite part is how light it all feels! The room is glowing, and I love the pops of yellow.
Mandi Miller says
Great job!! It’s so bright & beautiful! I love the way it turned out!
Allyn says
I really love that valance! Now considering that as an option to bring some color into our living room. Curtains are so much fabric and can so dang expensive.
Totally impressed!
hyzen says
Wow, for $102, that is downright inspirational!! Looks like a fair bit of work, but it was worth it. One problem with this great tour, though–there’s no mention of the color for the lovely paint she has on the walls! I’m looking for something similar for my dining room…
Amanda says
Hyzen,
I was wondering that too(!), so I went over to her blog and did some digging – and found her answer! The wall color is Mushroom Taupe by Colorplace (Walmart). Hope it helps!!!
Staci @ My Friend Staci says
This looks fantastic! The distressing oil is a nice touch, and might even encourage people to paint their cabinets–it can forgive some “mistakes” and lend to the purposeful “less than perfect” vibe. Bravo, Vanessa!!!
Stacey says
That is incredible! I’m dying to paint our kitchen cabinets, but my hubby is one of those “it’s sacrilege to paint original wood/brick” people. A piece of advice to you single ladies…finding out where your man stands on an issue like this is just as — if not slightly more — important than his political and religious views! ;)
tamara says
HAhahhaha, oh Stacey, my hubs too. too funny. we have basic-builder cabinets that are almost orange-y colored wood. they are cheap & not a pretty wood tone. he’s (finally) on board with sanding and staining them a different tone, but will never ever (EVER) let me paint over them, or any other wood for that matter. Gah!
Cindy says
I’m glad I’m not the only one whose husband feels this way! We have the most awful builder’s grade cabinets, and the problem is that except for the doors, they’re just super super thinly veneered MDF — so I don’t think there’s any way to successfully restain them. I think he’s finally starting to come to terms with that and consider painting…but now the line has been drawn over paint color. He says no white, but maybe if I show him these pics… :)
Kim says
Ok, third person here chiming in to say that my husband doesn’t want me to paint our oak cabinets either!
I’m considering stripping and sanding and restaining them to at least freshen them up… But I can’t seem to find inspiration photos of an all-white kitchen with natural, modern-looking wood cabinets. (In other words, everything white except for the cabinets.)
Anyone?
YoungHouseLove says
I would try pinterest and search wood cabinets! Sounds pretty! Good luck!
xo,
s
Crystal @ 29 Rue House says
Very nice Vanessa – I love the window treatments too! I think I’ll have to take a look at that tutorial. :)
Wom-mom Ethne says
I LOVE the look of the cabinets with the wood floors. Not sure what a little stepstool is doing on the counter though. It’s cute, just not sure on its function.
John says
Nice window treatment too! Perhaps a Clara inspired worm design for your kitchen window.
YoungHouseLove says
Haha, I like the sound of that…
xo,
s
Christine says
I love the little hand waving at the bottom on the first photo! Seriouly, beautiful colors. I really love the wall color, and the contrast with the cabinet cream. The window fabric is very fresh & fun.
Kristen @ Popcorn on the Stove says
$102?! The kitchen looks like they spent much more then that (it’s beautiful!)!
Nikki says
How was paint only $5?
YoungHouseLove says
She mentioned it was “oops paint”, which means it’s sold super cheap since it was someone else’s mistinted paint. They usually have oops paint for a steal at places like Home Depot and Lowe’s. Hope it helps!
xo,
s
Sherri says
Thanks for asking this, I was wondering what “oops paint” was. I’ll have to ask about that next time I’m at Home Depot. I could stock up on cool colors for future projects for cheap! :)
Lindsey @ arkadian belle woods says
WOW! That’s amazing! I’m all about being cheap without looking cheap! Great job!
Psssst….I see you guys have the gorgeous Dwell Studios Gate – Charcoal fabric in your ‘We’re Digging’ and I too am a big fan….so big I did two pieces of furniture you might like! Check these babies out if you can :-)
Mini-ish Armchair (I’m really proud of this one) – http://wp.me/p1xCc0-1q
Coffee table turned ottoman – http://wp.me/p1xCc0-6T
YoungHouseLove says
Wow- those look awesome! Such an amazing job.
xo,
s
nancyo says
How did painting the cabinets work out? Would you suggest it over the rusteloum cabinet paint that it seemed like every blogger was writting about 6 months ago?
Did anyone else notice that every blogger was writing about cabinet paint, but it hasn’t been written about since. It makes me question whether the reviews were authentic and it also makes me wonder if regular ole’ paint just as good?
YoungHouseLove says
We actually used the regular technique here and loved the result, but have also heard good things about the Rustoleum stuff.
xo,
s
Beth says
We used Rustoleum cabinet transformations to go from oak cabinets to “pure white” and although the process may have been simpler than sanding, it was kind of a nightmare. Tedious and time consuming. 4 coats in all to cover completely. (We skipped the glaze to make our cabinets a bright white.) It took 4 coats to cover completely, because the kit didn’t require or recommend a primer. Then with the application of the top coat, we ended up with a yellowed cabinet. After talking to Rustoleum, their answer was that a small amount of users attempting to go from oak to “pure white” will experience a yellowing of wood that is in fact from oil in the wood grain itself that the top coat enhances rather than the top coat itself yellowing. Their solution, start completely over, this time using a primer. They were great about refunding us our money. But our cabinets took us, literally twice the amount of time and work. (And if you’ve ever painted your cabinets before, you know how big of a job it is.) And now that it’s all over, we (for the most part) love our cabinets compared to the before. But if we had it to do over, we would just go the traditional route of sanding/priming/painting.
YoungHouseLove says
Oh man, that’s brutal! So sorry they told you that after it was all said and done- eeks!
xo,
s
John@Our Home From Scratch says
Looks awesome! Good tip about the distressing oil. Never even knew about that stuff!!
Christina says
Dang!!! Now that is impressive!
Heather G. says
I personally love the cabinets! Never knew there was such a thing as distressing oil and I cannot wait to try it out!
Ann says
Good for her, it looks amazing! I can’t believe how much texture her distressing technique adds.
Sharyn says
Impressive! What brand/color is the wall paint?
YoungHouseLove says
Here’s hoping she drops in with that info for ya!
xo,
s
Amanda says
Hey Sharyn,
I was wondering that too, so I went over to her blog and did some digging – and found her answer! The wall color is Mushroom Taupe by Colorplace (Walmart). Hope it helps!!!
Fran says
Why oh why do people distress? It looks like it needs a paint job. I just don’t get it.
YoungHouseLove says
Just one of those personal preference things I think! Like how everyone might pick a different color to paint their wall, ya know?
xo,
s
Ashley @ sunnysideshlee.com says
wow wow wow! looks great!
Wendy says
Awesome…
Small typo alert “and it made use more than a little giddy” … I’m guessing “use” should be “us.”
Thanks for the great work that you all do!
YoungHouseLove says
OH yes, thanks! Haha. Off to fix it!
xo,
s
Laura says
That’s incredible! What a difference for $102! I spent 4x that just to make some raised garden beds and she redid her whole kitchen! Very inspiring! :)
Lauren says
It came out beautifully! Congrats!
Terhi says
I can’t believe how cheap the paint is over there. I’m so jealous. I’m doing a bit of painting at the moment, and I just bought 2,7 litres (about 0,7 gallons) of plain white paint for my ceiling for 27 euros (about 35 dollars), 2,7 litres of white paint for some interior doors etc for 54 euros (about 70 USD), and 9 litres (2,4 gallons) of wall paint cost me amazing 90 euros (116 USD).
But this post is still very inspiring. And I love your blog, it is actually the reason I started doing some painting and other improvements in my apartment. So thanks for the inspiration! :)
–Terhi (Finland)
YoungHouseLove says
Aw, good luck with everything Terhi! I bet it’s going to look amazing!
xo,
s
Sarah says
Hi Terhi,
Here in Canada it’s not unusual to pay 35-40(Canadian) dollars for one gallon of paint. Granted, things are usually a little cheaper in the USA than in Canada, but it’s generally a small difference…Vanessa’s paint was only cheap because someone made a mistake when they tinted it.
Cheers,
Sarah
Candice says
I’ll be tackling my kitchen cabinets soon and have soem questiosn for Vanessa.
1. Did you paint the inside of the cabinets?
2. Did you sand or use a chemical deglosser at all?
YoungHouseLove says
Here’s hoping she drops in with info for you guys!
xo,
s
Julie says
This is totally on the wrong post, but I wasn’t sure you’d see it on the older post. If you happen to find a good natural shampoo/conditioner for wee ones would you mind sharing? I tried the Dr Bonners for me and I really like it. I’ll be trying it out on them soon but would like something for their hair. Thanks!
YoungHouseLove says
Hmm, maybe try BabyGanics? We’ve heard good things about them. Or Bert’s Bees has a line called Baby Bee. Hope it helps!
xo,
s
Julie K says
I work as a nanny for multiple families and it seems like most of them love the Burt’s Bee line for babies and all the children have different skin types.
Julie says
Thanks, I’ll give it a try. We tried the diaper cream on our oldest when she was a babe and it completely burned her skin so I’ve been hesitant to try anything else on the kiddos!
Amber says
Beautiful kitchen! I would love to use that tutorial to make a similar window treatment, but when I use the link it is hitting the main blog page (not the specific tutorial).
Vanessa, if you are out there…do you have the specific link? I tried poking around on the site, but couldn’t find it. Thanks!!!
YoungHouseLove says
Here’s hoping she drops in with that link!
xo,
s
Amber says
Haha. Of course, as soon as I post…I think I found it.
http://littlegreennotebook.blogspot.com/2009/09/easy-pelmet-boxes.html
Erin says
I love how clean white cabinets make a kitchen look. Such a little change makes such a big difference. I was so happy that my rental had white cabinets that looked freshly painted.
anna see says
wow, vanessa! it looks fresh and beautiful! great job on everything. love the window coverings!
Stephanie L says
I’m impressed. I painted our cabinets in our small condo kitchen 2 years ago. I had budgeted about $100 for paint and primer but spent at least double that because the dark stain of the 1970’s-era cabinets kept showing through (I used Sherwin Williams ProClassic Interior Acrylic Latex and would NOT recommend it – aside from the coverage issue, it had major sag problems). Finally got it covered after 2 coats of primer and 3 coats of paint. Thrilled with the result but the process was grueling.
daryn says
@Amber,
I think I found the tutorial link! The Little Green Notebook did a shaped valance (so to speak) in the blog entry, but the basic idea is the same as the treatments Vanessa used in her kitchen…
http://littlegreennotebook.blogspot.com/2009/09/easy-pelmet-boxes.html
Good luck!
Kacy says
Wow, it looks great! I love the pewter knobs – soooo cool!
Megan says
Amazing! I do think it’s the combo of the wall paint and the cabinet paint that makes the biggest difference. Thanks to the commenter who dug up that detail of paint color on her blog.
As for the cabinets I’m not a huge fan of distressing myself so I would probably go with a plain white finish but the overall aestethic is stunning and clearly brightens up the room vs. the natural wood.
And the price can’t be beat!
Sylvie says
Definitely inspires me to take on cabinet painting. But it seems that every kitchen makeover has stainless steel appliances. We have white appliances and no budget to upgrade. So I have no idea what color to paint the cabinets (especially since I love white cabinets). Do I match the appliances? Find something subtly different? Or go to a completely different color? (Countertops are brownish).
YoungHouseLove says
I would go white so the appliances blend in and it all looks airy and seamless. Just bring home white swatches to make sure you go with the appliances (and aren’t too yellow or cool for them). Good luck!
xo,
s
Jen says
Sylvie,
We have a white fridge and white cabinets and, while we plan on updating to stainless steel some day, it works for now. The white of fridge blends in nicely (even though they aren’t 100% the same white). It helps that appliances like fridges tend to have a different texture or finish to them, so it doesn’t look like you’re trying to match. We went with the off-the-shelf white of a paint called Cabinet Coat. We’ve had it on the cabinets for two years and its held up extremely well.
Paige @ Little Nostalgia says
It looks amazing! Another example of The Power of Paint!
jessica@fourgenerationsoneroof says
It always amazes me how much white will change the look of a kitchen. This is beautiful and the price is even more beautiful :) Nicely done and love the window treatments.
Melanie says
What an amazing transformation! Beautiful!
James Malone says
That looks exactly like what I’ve been looking for for my little condo, a nice MCM-ish pendant to replace what’s here now. And now I know what you got at IKEA!!! I told Bud to say hi, follow you, and take notes, he thought yall would prefer your privacy. Good job!
YoungHouseLove says
Haha- that’s too funny!
xo,
s
Jason says
Now that’s what you stretching a budget. Great tips, I really like the style of the changes as well. Budget tips are no good if it doesn’t end up looking good.
Jason
Keisha says
That is just awesome. Way to stretch those dollars, very inspiring!!