It’s Wednesday the 14th… so it’s time to share this season’s (completely unofficial) Pinterest Challenge (not sponsored by Pinterest or anyone else, just dreamed up by Katie to make us stop pinning and start doing).

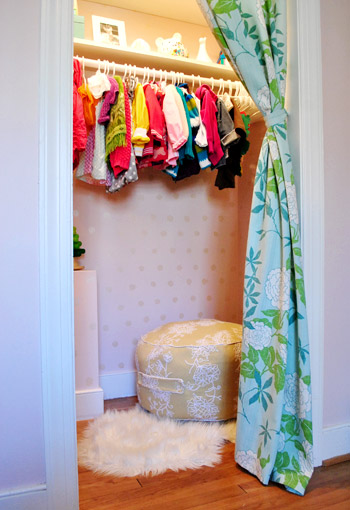
I actually tackled a homemade beanbag for Clara’s closet, which I mentioned last Wednesday when Katie, Erin, and Cassie and I issued our little get-off-our-bums-and-make-something challenge.
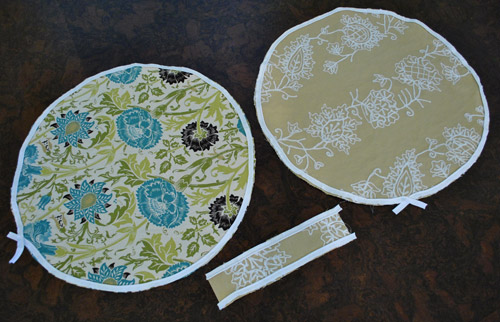
As are the rules, I took inspiration (or Pintspiration, har-har) from the projects below and then I did my own spin. Which added up to this comfy little bean-bag…
… for the bean to plop down on…
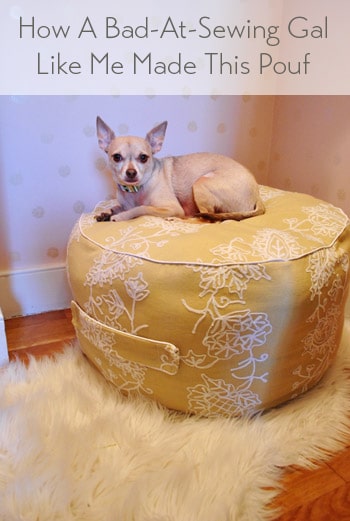
… or the pooch to hang out on…
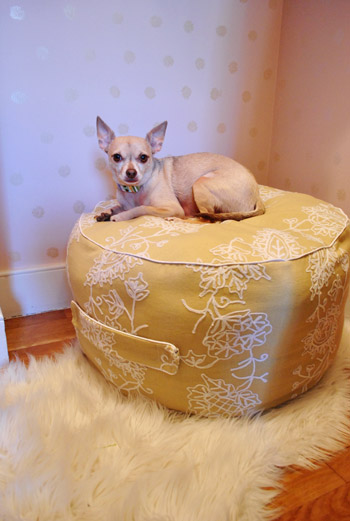
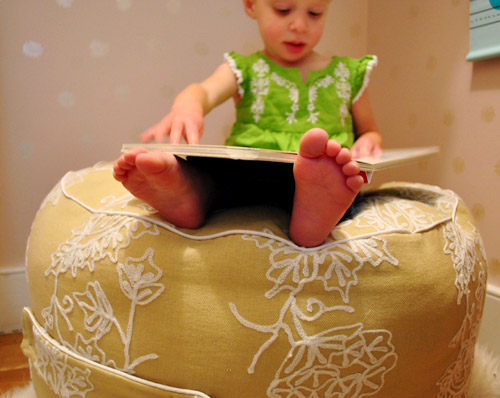
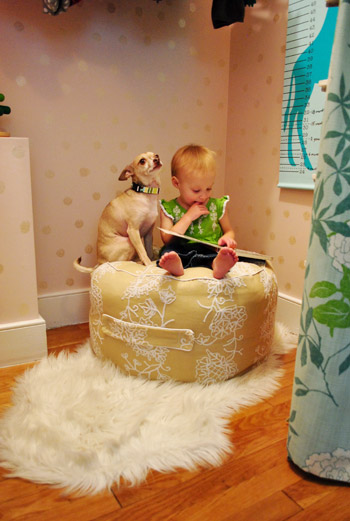
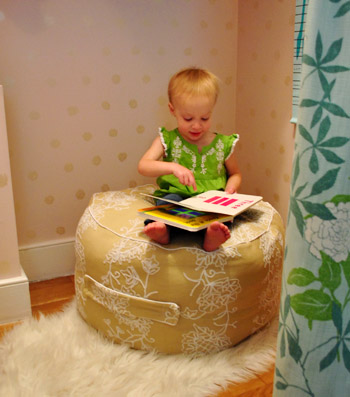
… or for a toddler reading to a chihuahua…
… or a tired momma or daddy (it works for that too).
And after declaring my goal, two kind commenters shared a link to this blog, which had an awesome tutorial that I decided to go with.
It was clear, concise, and pretty darn easy to follow, even for a novice like me, so I can’t say enough about how much it came in handy! Oh my gosh, and I actually mastered piping. This is big guys. So big I actually had to call my mom and tell her. Big sewing strides going on in our house. Haha.
My method? I just crossed my fingers, tried to follow the instructions, and did my own riff when it came to size (I wanted something a bit bigger than 17″ wide, so I made my pattern 22″ wide (by just sizing up the instructions that were over here). But seriously, a seamstress I am not. So all you fancy sewing folk try to hold your giggles as you read about the most-likely-not-proper ways that I cobbled this thing together. The result is comfy, looks good, and gets two toddler thumbs up, so I’m thrilled! And it made all of that sewing machine wrestling (more on my tumultuous relationship with my sewing machine here) worth it. And now, more pics:

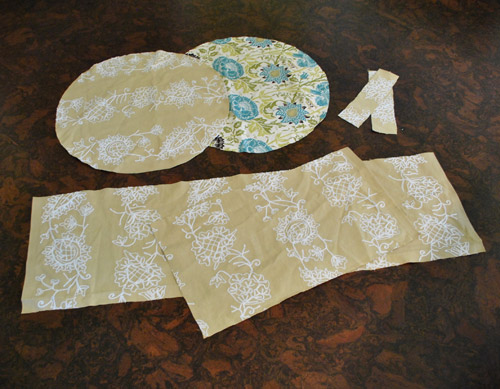
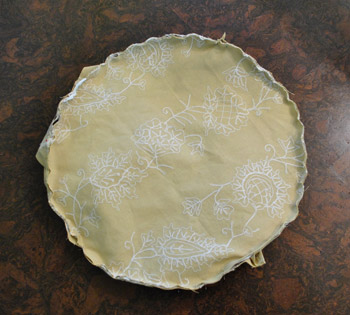
And here’s how I made it (there are much clearer explanations and pics over on this blog, where she clearly knows gobs more about sewing than I do!). First I cut out two 22″ circles, two tabs to make the handle, and fabric to make the rectangular-wrap-around part (all measurements/pattern details are on this blog). I used leftover fabric that I had from a book project actually (wahoo, secret sneak peek!) but only had a yard so I was just shy of having enough to make the last circle so for the base I just used other fabric I had on hand (both are from a local fabric store called U-Fab but I don’t know the fabric name/model since it’s an outlet – so sorry!).
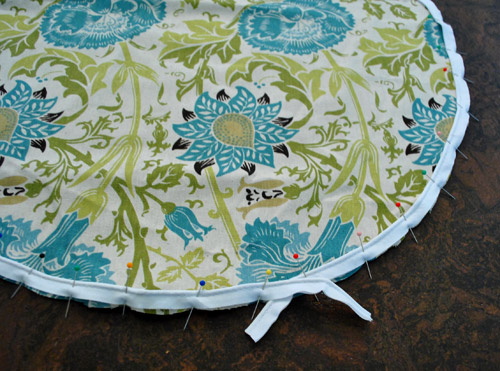
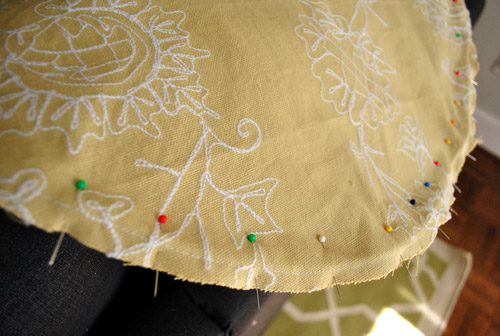
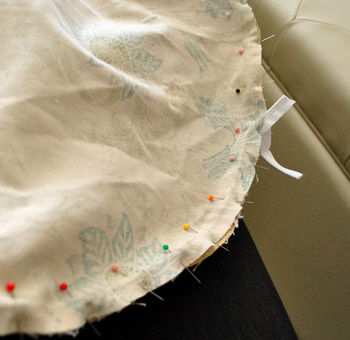
Then I pinned my piping around the perimeter of the fabric (piping side in, with the end lining up exactly with the perimeter of the fabric, print side up).
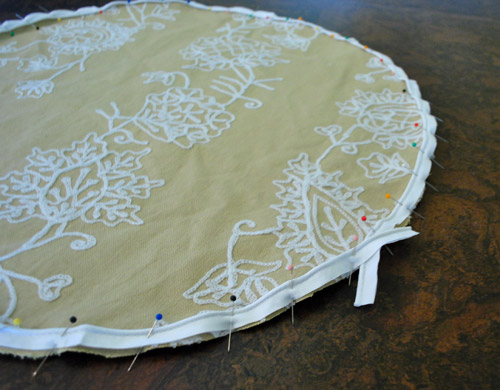
And I left the ends like this as directed in the tutorial. I also did the same thing for the other circle of fabric…
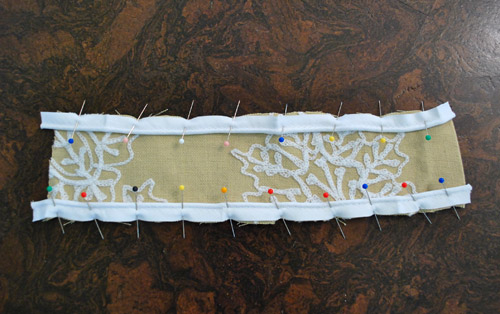
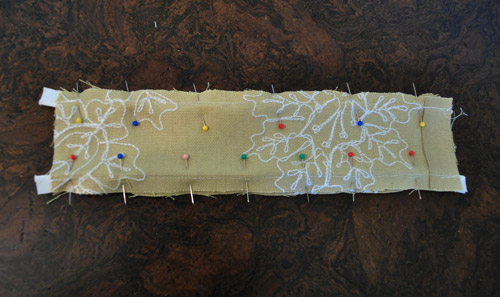
… and used piping on either side of one of my fabric tabs to make the handle.
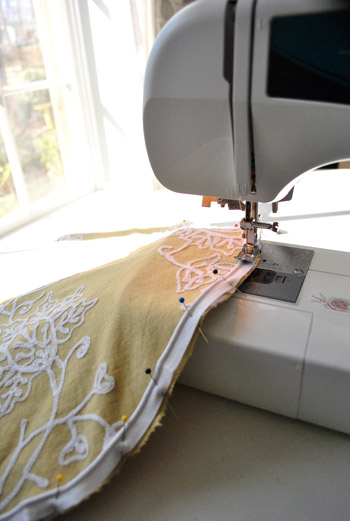
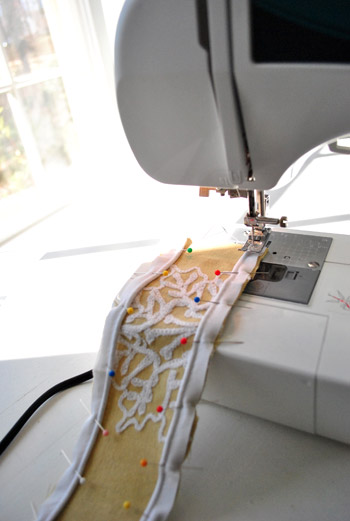
Then I stitched them all on the sewing machine, being sure to follow the stitching in the piping with my needle. I thought it would be hard to stay right on top of that line of thread, but it was actually really simple and I got into this zen-like rhythm with it. So there’s hope for non-sewers out there (I would have laughed if you told me last week that I’d describe any sewing step as zen-like).
Then I did the exact same thing with the other circle…
… and also ran a little stitching along the piping on each side of the handle.
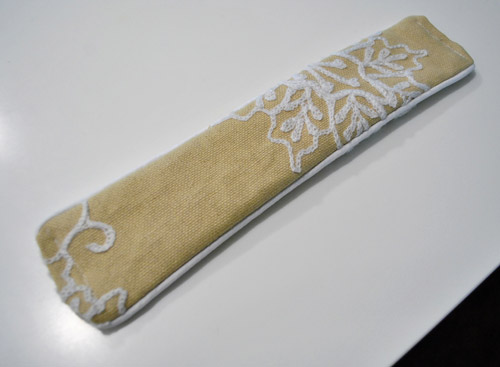
Then I had these:
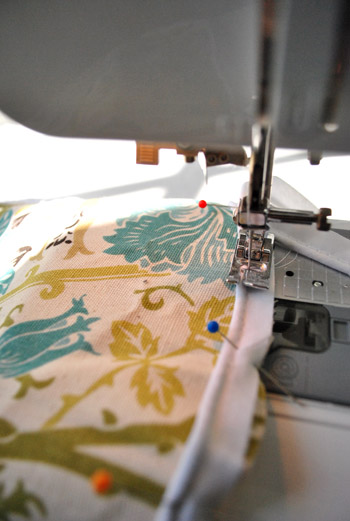
Next I pinned the other side of the handle to the first side (print side in) and stitched along the thread on the other side that I had stitched when I followed along the piping.
Then I turned it inside out, which is where I got to see my purrrty purrrty piping. I know it’s just a handle, but at this point I ran outside to show John. Seriously, I was proud with a capital P. Then the sewing gods brought me back down to earth.
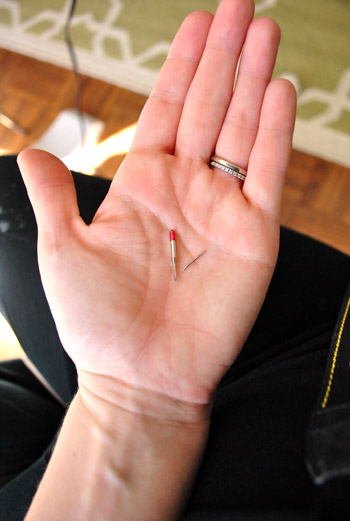
While sewing the ends closed (just tucking them under and running them through the machine to get a line of thread to hold the handle closed) I broke a needle. Bam! And it was scary and frustrating and all that jazz. But I got back on the veritable horse. Thank goodness my sewing machine came with some extra needles so I just popped one back in there and was off to the races again.
Next was pinning the circle to the long rectangular piece of fabric that wrapped around the entire perimeter (print side down).
Then I ran that through the sewing machine, again following the line of thread that I made when I sewed the piping on. See that subtle line of white thread around the perimeter below? I just stitched right over that.
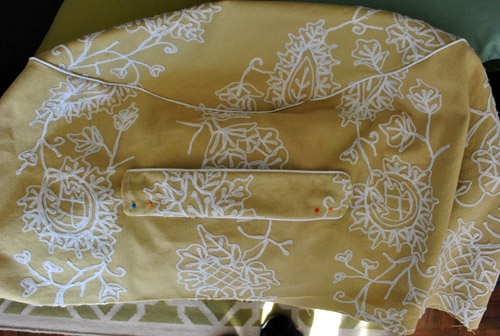
And then turned things rightside out, to see this beautiful sight. Wahoo! A partially piped beanbag! Then I pinned my handle in place and stitched that into place by making a box with an X in the middle of it (there are great pics of this on the site with the tutorial that I linked to ten million times above).
Then I turned it back inside out and pinned the other circle to the bottom of the rectangular piece of fabric that creates the middle part of the beanbag and stitched along the piping thread line again.
Except I didn’t seal the whole circle because I needed to turn the whole thing rightside out again…
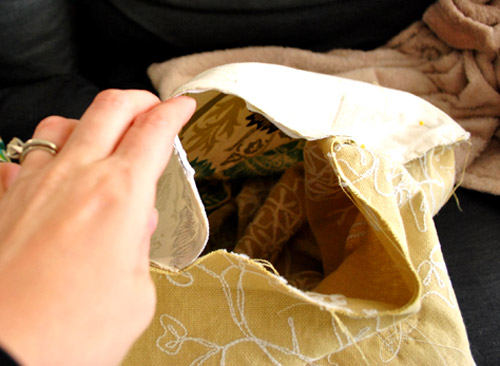
… and stuff it with batting (I used four old pillows we had stashed in the linen closet that were well past their prime for the guest room but perfect for being recycled as beanbag innards).
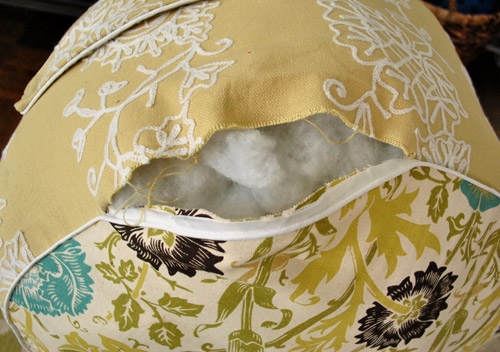
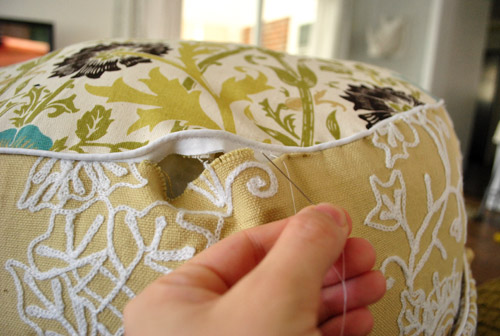
Then I hand stitched it shut. I gotta admit that I purchased a zipper in the hopes of adding that (so I can unzip it and remove the batting to wash the cover) so I hope to “upgrade” my little beanbag someday. But in the meantime, I can always use a seam-ripper to open the hand-stitched part and just resew that up after I run it through the wash (sewing this five inch part shut took about four minutes total).
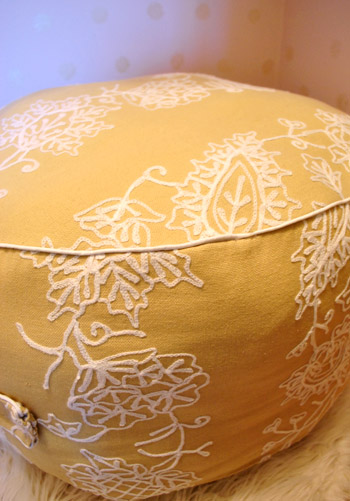
And now for the craziest thing of all. See how the pattern on the top of the beanbag sort of curls over the top and drips down the side since it all lines up?
Um, yeah, that was an accident. The fabric was inside out at that point, so I randomly pinned it and stitched it and turned it rightside out later and said “holy cow, that was the best accident ever.” John even noticed it and sweetly complimented me on my “attention to detail” later, to which I sheepishly responded “total accident, dude – the fabric was inside out and I didn’t even notice- I just randomly pinned it and sewed it up.” How crazy is that? Must be beginners sewing luck.
So that’s how it all went down. Of course for the tenth time, this tutorial is waaaay better than mine, so be sure to check it out if you have any questions! Now for the money stuff – here’s the budget breakdown (thanks to a bunch of 50% off coupons at JoAnn):
- $0 for one yard of leftover fabric (originally from U-Fab here in Richmond)
- $2.38 for two 25 yard packs of white piping (from JoAnn thanks to coupons)
- $1.19 for a zipper that I vow to someday add (from JoAnn, again thanks to coupons)
- $1.50 for white thread (from JoAnn)
- Total: $5.07
Oh and don’t forget to check in on Katie, Erin, and Cassie to see what amaaaaazing projects they whipped up (they’ll be sharing theirs sometime today as well)!

And now here’s the part where we invite you to share all of the fun Pinterest Challenge projects that you guys have tackled in the last week (right along with us, well at least virtually with us). If you’ve already blogged about it, just:
- click on the blue “Add Your Link” button with the odd cartoon head at the bottom of this post (you might have to do some scrolling, depending how many projects are added)
- add a link to your specific blog post about your project in the url field (not your home page)
- where it says “name” write a descriptive name for your project (ex: “Homemade Beanbag”) as opposed to your actual name
- we’d also love if you could quickly link back over to our project posts within your own (here’s Katie’s, Cassie’s, Erin’s, and ours) – it’s also nice to link to your inspiration project on Pinterest as well as to directly link to the original project/site, just so they get some love too.
And if you’d rather just link over to your project in the comment section, feel free to do that – or even add a link to a free photo sharing site like Flickr with your pics if you don’t have a blog (remember to set the gallery to public so we can all see it). We can’t wait to see what you’ve been up to! Freaky-deek-excited doesn’t even begin to describe it.

Kelly @ DTTDidc says
That is one beautiful beanbag :-) And so versatile! Totally cool that the pattern just happened to line up, whether you meant for it to or not :-)
I have no idea how to sew, so I won’t even attempt to make one of these myself – but you sure made it look like it’s a very do-able project for anyone who knows how to operate a sewing machine :-)
Mandy says
First of all… love the beanbag, you did such a great job! Just had to comment to let you know I have the same fabric as your random swatch for the bottom… it is now covering my patio bar stool seats. I’ve never seen it anywhere else so this is capital WEIRD.
YoungHouseLove says
Haha- no way!
xo
s
Elise says
So cute! I am thinking about making one for my son…like your bigger size. How many extra inches did you add to the side rectangular piece? 5″? Thanks!
YoungHouseLove says
I just used math to figure out the new circumference for a 22″ circle (it was 73 inches or so I think).
xo,
s
Katy @ The Non-Consumer Advocate says
I love how you used the batting from old pillows to stuff a new pillow, I would not have thought to do that. I have a large number of flatty-flat pillows that I have doubled up as bolster pillows, but I am going to keep this idea in mind for a future project.
Very cute “bean bag,” great job. I would have been intimidated to do piping, so I am uber-impressed.
I shared a couple of recent Pinterest inspired projects above, and I look forward to clicking onto everyone else’s as well!
Mwah!
Katy
Katy @ The Non-Consumer Advocate says
Erg . . . I just realized that I put the wrong link on one of my Pinterest projects. Here’s the right link:
http://thenonconsumeradvocate.com/2012/03/easiest-diy-project-ever-faux-iron-grate-from-rubber-mat/
Katy
Nikole says
I love her little reading nook! So fun!
Jessie says
The ends of the piping are not supposed to overlap. It’s really easy to finish the ends correctly-you simply grab your seam ripper, open one end of the piping, cut the cord inside a bit, an then stick the remaining end into it. Fold the unfinished edge in, and sew (with a zipped foot). Voila! Professionally finished piping! But it’s amazing for a beginner. Good job!
YoungHouseLove says
Never knew that!
xo,
s
Jessica F. says
Look at you Sherry!! …and your fantastic sewing skills! Awesome job! :)
Louise says
Your ottoman is soo lovely!! And I cannot believe that you attempted sewing piping!! I’m a seasoned sewing pro, and sewing piping always gives me the scary, can’t do it jitters everytime! Go Sherry!! It really does look like you bought it at a store…”SEW” very proud that you sewed that!! =)
cara says
How long did it take you to make? I have a 16 week old who seriously slows down all my projects!
YoungHouseLove says
It took me about two naps to complete (maybe 4 hours total including cutting, etc).
xo,
s
cara says
Thanks, I do not have a good napper but she is gettign a little better. This will be added to my project list. Just got rid of some older pillows :(
Erika says
What a cozy little nook! Clara will love that spot for years to come!
Dana @ House*Tweaking says
Congrats, Sher! Clara’s pouf is ADORABLE.
If you can master piping, I don’t think you’re considered a sewing rookie anymore!
YoungHouseLove says
Aw thanks Dana! I definitely still have a lot to learn!
xo,
s
Alison says
Hey Sherry,
In case anyone likes the teal fabric it’s called “Sweet William, Teal” and can be purchased at Tonic Living (http://www.tonicliving.com/productsDetails.asp?categoryid=26&productid=1185¤tpage=3&onsale=0). I’m sure it’s other places too, but that’s the place I’ve seen in on the interwebs.
Your poof looks awesome! Totally inspiring!
Alison
YoungHouseLove says
Thanks for the tip Alison!
xo
s
Courtney {a thoughtful place} says
That is amazing. I am so inspired to make that. I always thought it looked more difficult. Not a pinterest girl yet! Can I link up two magazine copies I made?!
YoungHouseLove says
Sure!
xo
s
Sarah H. says
The pic of Clara reading to Burger on the beanbag is SO adorable!
Erin says
That pic of Clara reading to Burger is too cute. Loving your fabric choice for the giant bean too!
Dianne says
OMG Sherry, you totally ROCKED this bean bag!!! GREAT JOB and keep up the sewing. Just an fyi: There are no right or wrong in sewing. Just do what works for you – I find that everyone just “thinks” differently. Also, keep reading tutorias on the web. There are some super talented people out there willing to share their tips.
I’ve been working on my Pinterest challenge since January. I sew slow!!!!! I’ve starting sewing 3 years ago and quilting 2. So to massively improve my techniques I am making a sampler quilt.
http://www.flickr.com/photos/23808754@N03/sets/72157628812267285/
I was inspired by this one:
http://freshlypieced.blogspot.com/2011/12/sampler-for-all-seasons.html
Keep it up!!!!!
Dianne
Monica says
LOVE it! You make sewing look easy Sherry. I still have to set up my brand new sewing machine I got for Mother’s Day 2009? 2010? And yay for happy accidents! The photo of Clara and Burger on the bean bag together is adorable.
Pam the Goatherd says
Great job on the beanbag! I think you’ve mastered the machine!!! I’ve got to do some piping when I re-cover a stool cushion for my kitchen. Not looking forward to it!
Megan says
I’m so impressed! The floor poof is awesome! Thanks so much for hosting – I had so much fun with my project!
Alison says
Wow thats really impressive! I’m tempted to try that myself.
Kate says
I don’t have a blog so I can’t link up, but yesterday I finally finished my (modern) farmhouse bed from Ana White’s site! I even slept on it last night and I didn’t wake up in a pile of wood! It had some very frustrating moments (especially last night when I was using a Dremel to sand off a little bit of wood so the frame would fit into the headboard and footboard, lol) and I think it ended up a little bigger than I was hoping for the size of our room, but it’s (finally) finished!
Amanda says
I LOVE your project! So cute! :)
Brittany says
So funny that you chose a little upholstery project, as I just finished my first welt-cording-making challenge as well! I made an ottoman from our coffee table. Linking up right now and I’m definitely going to be doing a little poof next! Thanks for inspiring!
http://brittanyanddylan.blogspot.com/2012/03/weekend-project-2-ottoman.html
YoungHouseLove says
LOVE all the projects everyone! Thanks for linking them up and leaving links in the comments! So much fun!
xo,
s
Alison says
Love it! Maybe I should dust off my sewing machine.
you mean for you pinterest challenge link to go to the link from last fall?
YoungHouseLove says
Oops, thanks! All fixed!
xo,
s
Kristal says
Thank you for doing this project! I definitely want to tackle making some square poufs for my house sometime in the near future and now I have a tutorial to look back on. Now all I have to do is get a sewing machine. Lol…
Tamrah Ryan says
Super gorgeous, and I love the fabric you used. Way to sew! :)
Helen says
*slaps forehead*
Old pillows as innards….what a great idea! I’m currently working on this pillow: http://www.modabakeshop.com/2011/07/jelly-roll-floor-pillows.html and I didn’t want to take another trip to the fabric store AND was feeling guilty about those lumpy pillows I was going to throw away. You’re awesome, thanks!
Grace Adkins says
Love it! makes me want to make one too!
Melanie says
Cute. :)
That fabric w/ the teal flowers is a William Morris fabric called Sweet William (teal). I spied it on Tonic Living a while back and contemplated buying it for a while.
YoungHouseLove says
Thanks for the tip Melanie!
xo
s
Alison says
I think you have officially moved from the Freshman sewing team to Junior Varsity! Good work, this is awesome!!
Jenn @My Southwestern Life says
This turned out amazingly cute! I’ve never attempted piping before, and you’re making me want to try it!
Emily says
I’m super impressed with your piping!! The cushion looks awesome!! Unfortunately I wasn’t able to create anything this last week from pinterest but I do have a dress I made since your last challenge. Is that okay?
YoungHouseLove says
Of course!
xo,
s
Kathy says
You rocked it Sherry.
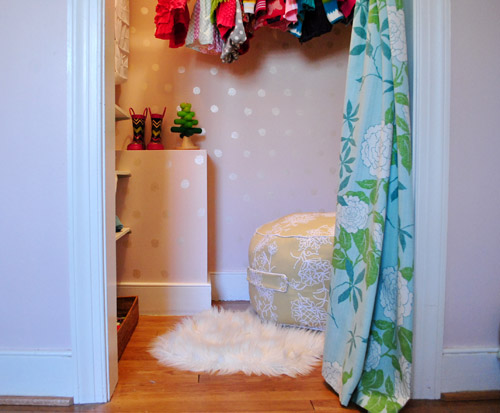
It looks SO good, and looks SO good in Clara’s closet.
The fabric is perfect.
Like you, I think Clara’s closet is top 5 fav decorated places in your house…..so far!
Charlotte | Living Well on the Cheap says
Love it! I made a pouf out of painter’s drop cloth for my living room once, but I like how yours is so much more structured. Mine tends to lose its shape and requires frequent fluffing to look nice.
Also, bee tee dubs, the fabric you used for the bottom circle is called Sweet William. I remember stalking it on the Internet back when I saw it used for another project on your blog but I never got around to purchasing it for myself.
YoungHouseLove says
Thanks for the tip Charlotte!
xo
s
Kristen says
Um WOW!!! It’s BEAUTIFUL!! You give me so much hope :)
Jennifer says
Here are mine!!
http://media-cdn6.pinterest.com/upload/100627372894100591_fixh8bwG_c.jpg
http://media-cdn1.pinterest.com/upload/100627372894100601_TzdPkOC4_c.jpg
Missy says
The “other” fabric that you used looks ALOT like the fabric that Katie Bower is lovin’ on for her next re-do. It might be one and the same. She spoke of it in today’s “reading room redo” post. Too funny!
YoungHouseLove says
Haha, so funny. We’re on the same page!
xo,
s
Leslie says
Wow. That looks amazing. I love the fabric.
Stephanie says
You Rule!!! I am totally making these for my daughters and my niece!!!
Sue says
Wow! I am supremely impressed that you tackled piping. I never tried that until I had been sewing for a number of years. Way to go!!!
Megan - Newly Wife says
Looks gorgeous! I love it!
AliCountry says
•$2.38 for two 250 yard packs of white piping
What?!? 500 yards of piping? This can’t be right.
If it is, what a deal!! ;)
YoungHouseLove says
Oh yeah, something’s wrong with that. Ha. Maybe they were 50 yards? Ack, wish I still had the packaging!
xo,
s
Elizabeth says
Seasonal Pinterest Challenges are one of my new favorite things! Thanks for hosting them. It is such a wonderful way find inspiration from other bloggers.
Katie Rose says
Looks like you could’ve bought it in a store! So profesh looking Sherry. Great job!
I am a new sewer (just got a machine in December). I must say, a detailed tutorial is what I look for in a potential project. It could be the easiest thing but if there are not enough pictures and instructions to go along with it, I am lost! I pinned your source’s page so I can make my own floor pillow one day. Thanks for the inspiration!
Sarah @ OneCraftyHome says
That turned out so cute! I made a reusable fabric coffee sleeve for my project: http://www.onecraftyhome.com/fabric-coffee-sleeve-diy-tutorial
Danielle says
So awesome! And it really inspires me! I can’t follow a pattern to save my life, but I can read instructions. yay! Thanks for sharing!
Jen W says
Great pouf! Where is your growth chart from? I’m lookig for inspiration for my 7 month old. Thanks!
YoungHouseLove says
That’s from nameyourdesign.com.
xo,
s
Katie @ Katie Without Restrictions says
I love it ~ what a great way to use closet space!! And the pictures of Clara are always totally adorable. ;)
Amber Wallace says
Thanks for doing these Pinterest Challenges. I love them! And I am so impressed with your bean bag! It rocks! I love that you took apart old pillows for the batting too. I was excited my project was 20 bucks but $5! Good job! Time to be less afraid of my sewing machine. I did some pillows a few ago but, I think I might have to up the ante. Thanks!
Susan @ Living with Punks says
Wow! Thanks so much for using my tutorial! I feel like a rockstar right now ;) Yours turned out great and I love the bigger size. I’ve made a few more since that origianl post and made them a bit bigger too…more room for the tushies! Thanks again!!!
YoungHouseLove says
Aw, thank YOU Susan! You saved me with your great pics and easy instructions!
xo
s