It’s Wednesday the 14th… so it’s time to share this season’s (completely unofficial) Pinterest Challenge (not sponsored by Pinterest or anyone else, just dreamed up by Katie to make us stop pinning and start doing).

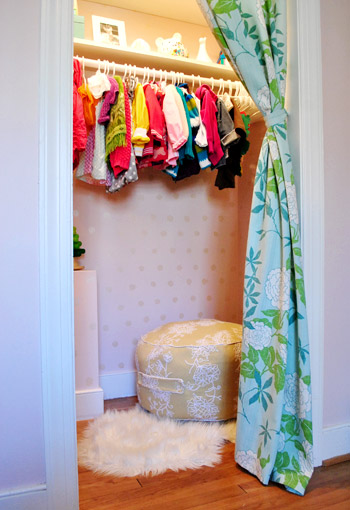
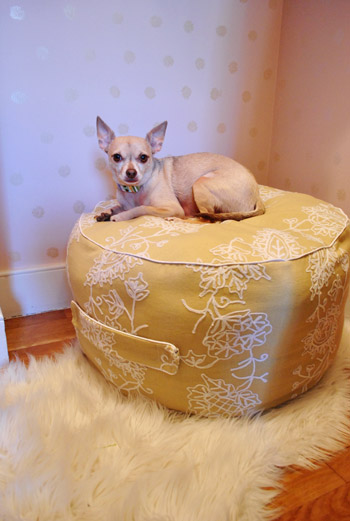
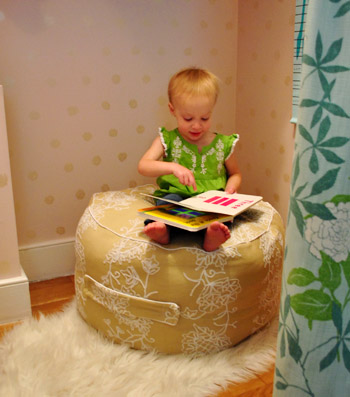
I actually tackled a homemade beanbag for Clara’s closet, which I mentioned last Wednesday when Katie, Erin, and Cassie and I issued our little get-off-our-bums-and-make-something challenge.
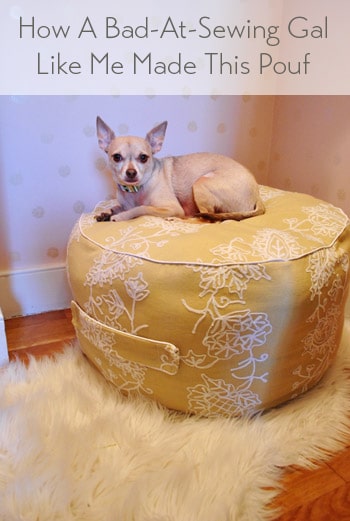
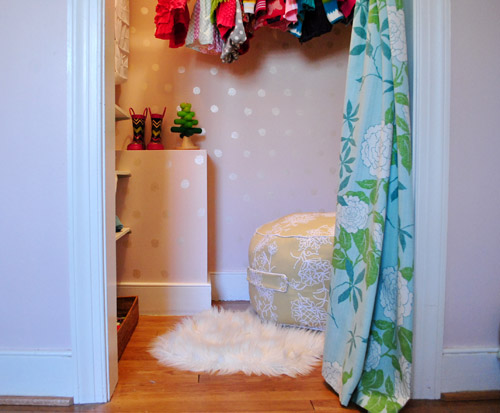
As are the rules, I took inspiration (or Pintspiration, har-har) from the projects below and then I did my own spin. Which added up to this comfy little bean-bag…
… for the bean to plop down on…
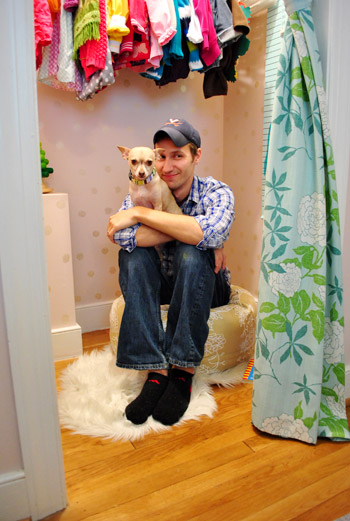
… or the pooch to hang out on…
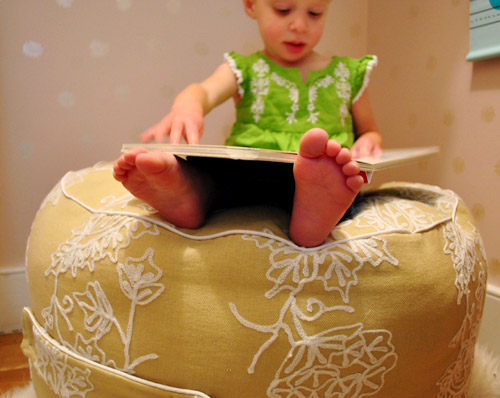
… or for a toddler reading to a chihuahua…
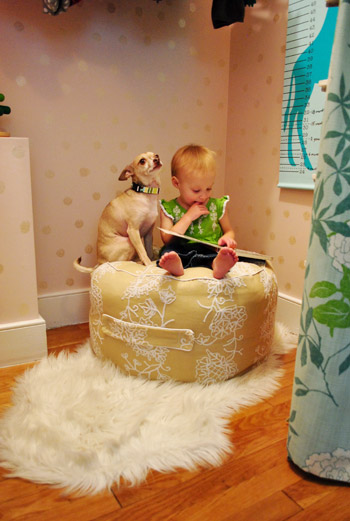
… or a tired momma or daddy (it works for that too).
And after declaring my goal, two kind commenters shared a link to this blog, which had an awesome tutorial that I decided to go with.
It was clear, concise, and pretty darn easy to follow, even for a novice like me, so I can’t say enough about how much it came in handy! Oh my gosh, and I actually mastered piping. This is big guys. So big I actually had to call my mom and tell her. Big sewing strides going on in our house. Haha.
My method? I just crossed my fingers, tried to follow the instructions, and did my own riff when it came to size (I wanted something a bit bigger than 17″ wide, so I made my pattern 22″ wide (by just sizing up the instructions that were over here). But seriously, a seamstress I am not. So all you fancy sewing folk try to hold your giggles as you read about the most-likely-not-proper ways that I cobbled this thing together. The result is comfy, looks good, and gets two toddler thumbs up, so I’m thrilled! And it made all of that sewing machine wrestling (more on my tumultuous relationship with my sewing machine here) worth it. And now, more pics:

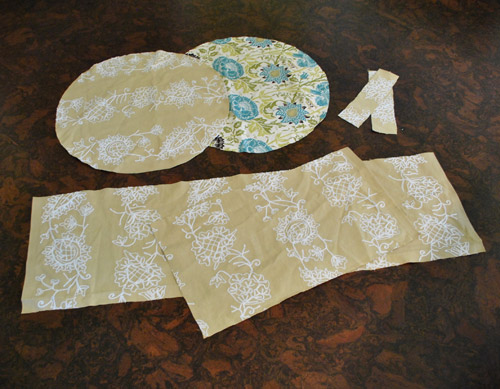
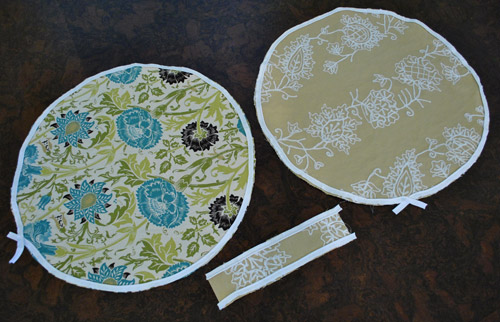
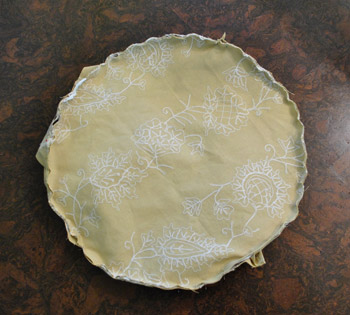
And here’s how I made it (there are much clearer explanations and pics over on this blog, where she clearly knows gobs more about sewing than I do!). First I cut out two 22″ circles, two tabs to make the handle, and fabric to make the rectangular-wrap-around part (all measurements/pattern details are on this blog). I used leftover fabric that I had from a book project actually (wahoo, secret sneak peek!) but only had a yard so I was just shy of having enough to make the last circle so for the base I just used other fabric I had on hand (both are from a local fabric store called U-Fab but I don’t know the fabric name/model since it’s an outlet – so sorry!).
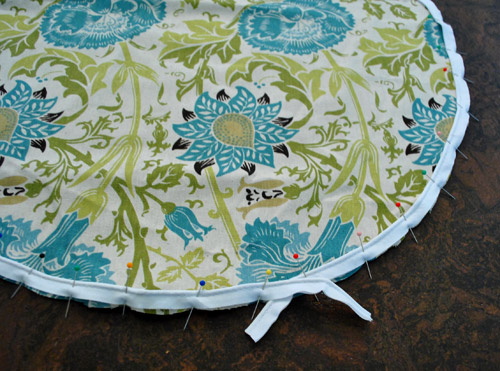
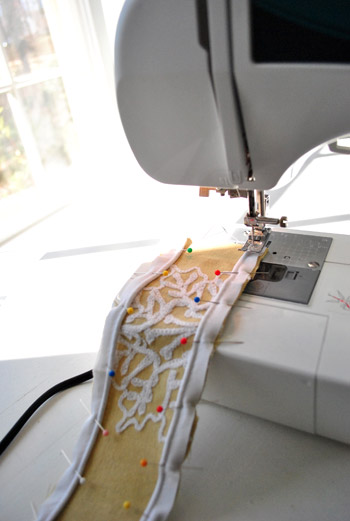
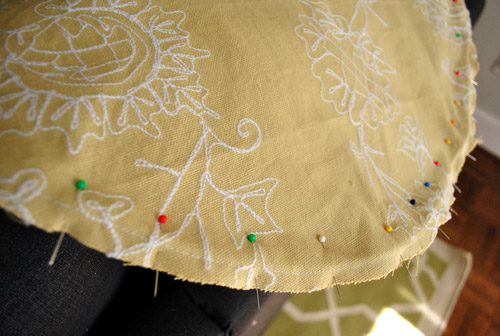
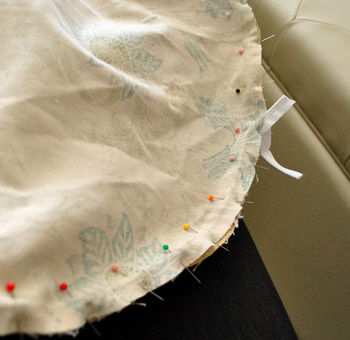
Then I pinned my piping around the perimeter of the fabric (piping side in, with the end lining up exactly with the perimeter of the fabric, print side up).
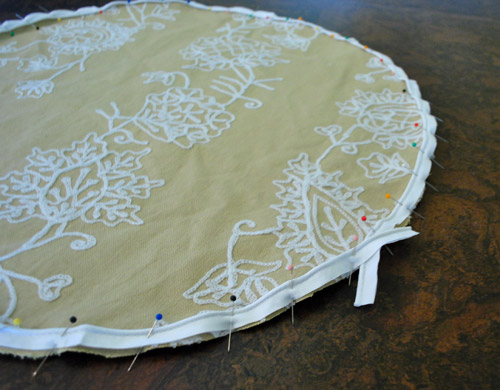
And I left the ends like this as directed in the tutorial. I also did the same thing for the other circle of fabric…
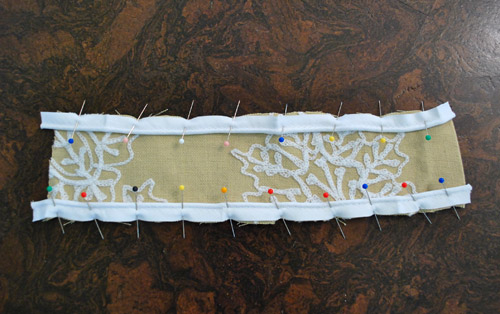
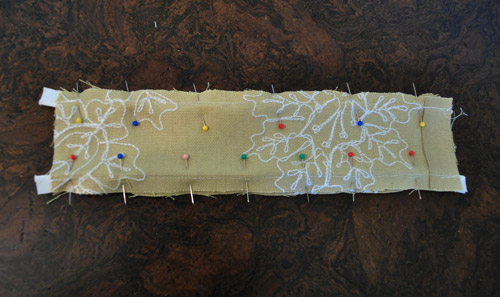
… and used piping on either side of one of my fabric tabs to make the handle.
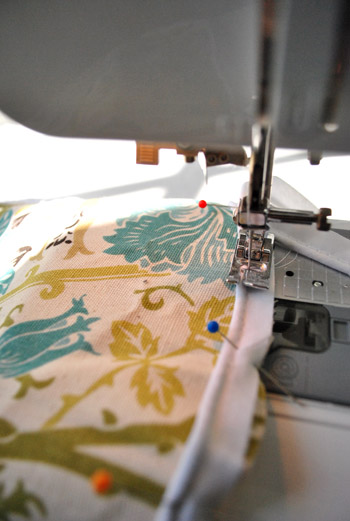
Then I stitched them all on the sewing machine, being sure to follow the stitching in the piping with my needle. I thought it would be hard to stay right on top of that line of thread, but it was actually really simple and I got into this zen-like rhythm with it. So there’s hope for non-sewers out there (I would have laughed if you told me last week that I’d describe any sewing step as zen-like).
Then I did the exact same thing with the other circle…
… and also ran a little stitching along the piping on each side of the handle.
Then I had these:
Next I pinned the other side of the handle to the first side (print side in) and stitched along the thread on the other side that I had stitched when I followed along the piping.
Then I turned it inside out, which is where I got to see my purrrty purrrty piping. I know it’s just a handle, but at this point I ran outside to show John. Seriously, I was proud with a capital P. Then the sewing gods brought me back down to earth.
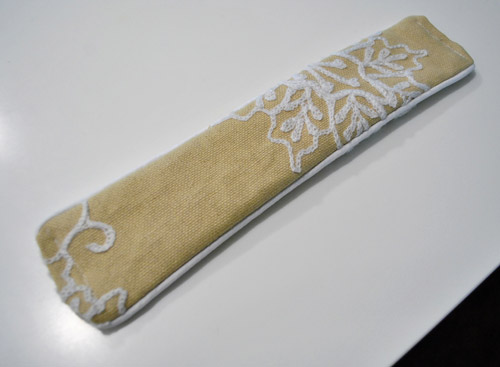
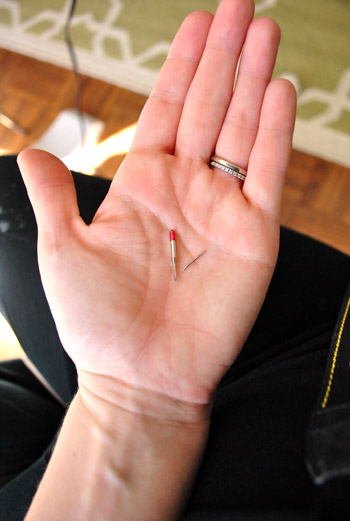
While sewing the ends closed (just tucking them under and running them through the machine to get a line of thread to hold the handle closed) I broke a needle. Bam! And it was scary and frustrating and all that jazz. But I got back on the veritable horse. Thank goodness my sewing machine came with some extra needles so I just popped one back in there and was off to the races again.
Next was pinning the circle to the long rectangular piece of fabric that wrapped around the entire perimeter (print side down).
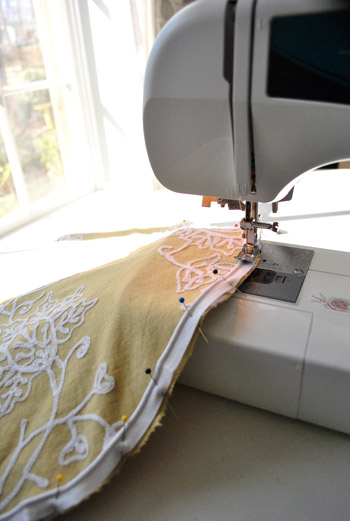
Then I ran that through the sewing machine, again following the line of thread that I made when I sewed the piping on. See that subtle line of white thread around the perimeter below? I just stitched right over that.
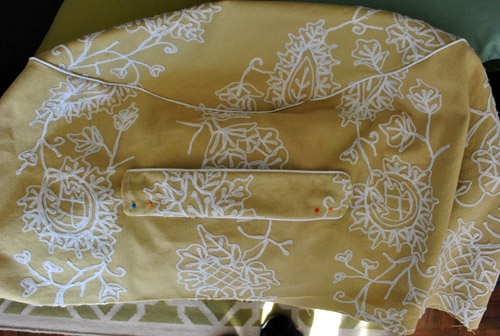
And then turned things rightside out, to see this beautiful sight. Wahoo! A partially piped beanbag! Then I pinned my handle in place and stitched that into place by making a box with an X in the middle of it (there are great pics of this on the site with the tutorial that I linked to ten million times above).
Then I turned it back inside out and pinned the other circle to the bottom of the rectangular piece of fabric that creates the middle part of the beanbag and stitched along the piping thread line again.
Except I didn’t seal the whole circle because I needed to turn the whole thing rightside out again…
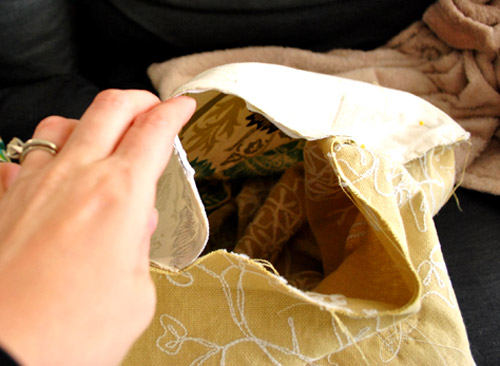
… and stuff it with batting (I used four old pillows we had stashed in the linen closet that were well past their prime for the guest room but perfect for being recycled as beanbag innards).
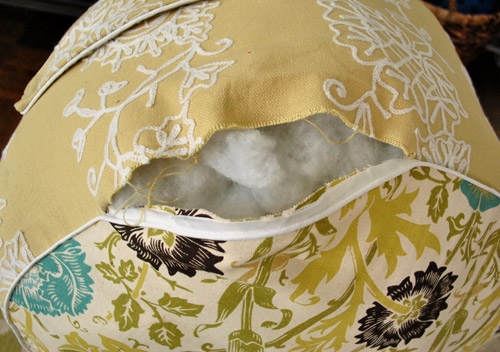
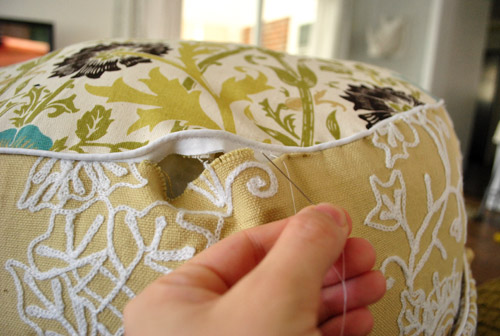
Then I hand stitched it shut. I gotta admit that I purchased a zipper in the hopes of adding that (so I can unzip it and remove the batting to wash the cover) so I hope to “upgrade” my little beanbag someday. But in the meantime, I can always use a seam-ripper to open the hand-stitched part and just resew that up after I run it through the wash (sewing this five inch part shut took about four minutes total).
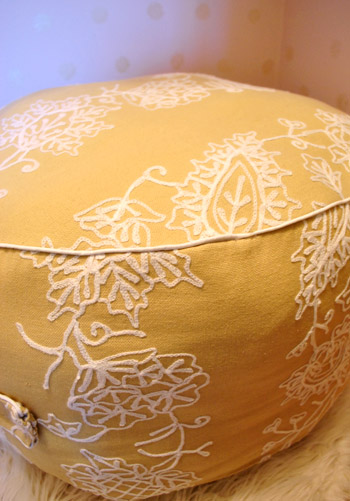
And now for the craziest thing of all. See how the pattern on the top of the beanbag sort of curls over the top and drips down the side since it all lines up?
Um, yeah, that was an accident. The fabric was inside out at that point, so I randomly pinned it and stitched it and turned it rightside out later and said “holy cow, that was the best accident ever.” John even noticed it and sweetly complimented me on my “attention to detail” later, to which I sheepishly responded “total accident, dude – the fabric was inside out and I didn’t even notice- I just randomly pinned it and sewed it up.” How crazy is that? Must be beginners sewing luck.
So that’s how it all went down. Of course for the tenth time, this tutorial is waaaay better than mine, so be sure to check it out if you have any questions! Now for the money stuff – here’s the budget breakdown (thanks to a bunch of 50% off coupons at JoAnn):
- $0 for one yard of leftover fabric (originally from U-Fab here in Richmond)
- $2.38 for two 25 yard packs of white piping (from JoAnn thanks to coupons)
- $1.19 for a zipper that I vow to someday add (from JoAnn, again thanks to coupons)
- $1.50 for white thread (from JoAnn)
- Total: $5.07
Oh and don’t forget to check in on Katie, Erin, and Cassie to see what amaaaaazing projects they whipped up (they’ll be sharing theirs sometime today as well)!

And now here’s the part where we invite you to share all of the fun Pinterest Challenge projects that you guys have tackled in the last week (right along with us, well at least virtually with us). If you’ve already blogged about it, just:
- click on the blue “Add Your Link” button with the odd cartoon head at the bottom of this post (you might have to do some scrolling, depending how many projects are added)
- add a link to your specific blog post about your project in the url field (not your home page)
- where it says “name” write a descriptive name for your project (ex: “Homemade Beanbag”) as opposed to your actual name
- we’d also love if you could quickly link back over to our project posts within your own (here’s Katie’s, Cassie’s, Erin’s, and ours) – it’s also nice to link to your inspiration project on Pinterest as well as to directly link to the original project/site, just so they get some love too.
And if you’d rather just link over to your project in the comment section, feel free to do that – or even add a link to a free photo sharing site like Flickr with your pics if you don’t have a blog (remember to set the gallery to public so we can all see it). We can’t wait to see what you’ve been up to! Freaky-deek-excited doesn’t even begin to describe it.

Melanie @ Mailbox Journey says
OMG, that is so freakin’ cute! I love the fabric you used.
I made some bottle cap magnets for my project: http://mailboxjourney.com/2012/03/14/pinterest-challenge-2/
Melanie @ Mailbox Journey says
By the way, I wanted to thank you for hosting these challenges – It gives me an opportunity to find so many more awesome and inspiring blogs to follow! :)
YoungHouseLove says
Aw, you’re welcome Melanie! It’s our pleasure. We love finding new blogs too. Haha.
xo,
s
latoya @ the scott's crib says
I love her little bean bag chair! It’s so cute:) Thanks so much for the challenge, it was very umm relaxing so to speak:)
annabelvita says
I made a teeny night light in the shape of a cute house we saw on holiday! http://annabelvita.com/spring-pinterest-challenge-with-free-printabl
I LOVE your beanbag! It looks so professional.
Ainhoa@ALittleBite says
The fabric is beautiful! It turned out so well!! I reaaaally need to learn how to sew.
Jessie @ Imperfectly Polished says
LOVE your bean-bag:) Super cute! Thanks for hosting-always love linking up to your Pinterest Challenges!
Kristen @ Popcorn on the Stove says
Sherry – this turned out amazing! A beanbag for your beanette! I’m not sure I would be brave enough to try this (my machine and I are not BFFs yet) but maybe one day I will. I love that beige fabric – where did you find it??
YoungHouseLove says
It’s from a store here in Richmond called U-Fab. Wish I knew the brand name though!
xo,
s
Bobbie Brown says
TOTALLY in love with this! GREAT job!!!!!
Kate says
A beanbag for the bean! So adorable. And only $5, amazing.
Rebecca @ the lil house that could says
This turned out amazing! Very impressed with your growing sewing skills :)
YoungHouseLove says
Aw thanks Rebecca!
xo,
s
Michelle @ Ten June says
The beanbag looks great, Sherry! Definitely keeping this one in mind for our little pea pod on the way : )
Lani says
You officially cannot call yourself a novice on the sewing machine anymore! This looks AMAZING!!! I got beanbags for my boys from pottery barn 2 years ago because I thought they were “the best”…and they are already collapsing on themselves. I am SO making these this spring! We plan on having them share their rooms and these would be great for their reading nook in their walk in closet. Thank you for all the inspirations!
Crystal says
Way to go Sherry! You’re giving me courage to tackle a more advanced sewing project. Sewing a circle always freaks me out a bit. This looks awesome and I love the fabric you chose.
I linked up my DIY bench for my entry nook: http://theweekendhomemaker.com/winter-pinterest-challenge-diy-bench-entry-nook
Thanks for the challenge!
Melly says
You should be so proud of yourself! I am a fairly experienced sewer and I haven’t been brave enough to try piping. You are giving this old gal courage.
YoungHouseLove says
Aw thanks Melly! It instantly made the whole thing look so pro! I definitely recommend trying it!
xo,
s
pam says
Great job!!! You have some cuties there.
Just an FYI for future piping projects. It is so much easier to sew on piping if you use the zipper foot. You can get right up to the cording with the foot. You did good tho! pam
YoungHouseLove says
Really? Good to know! Although I thought it was really easy this way. I got zen with it. Haha. Maybe I like the challenge of trying to stay in the line? Haha. Such a rebel I am.
xo,
s
Kelly says
Agreed about the zipper foot and piping… I’ve been sewing since I was about 5 years old and JUST figured this out. It’s seriously changed my LIFE. So much easier. And yes, great job!
Donita says
FABULOUS job Sherry. That is just so cute. I too was going to suggest the zipper foot. It makes is SO much easier. Looks like you did fine though, without it.
Krystle @ ColorTransformedFamily says
This is so much cooler than the bean bag I had growing up. I will have to make one of these for my little girl. Congratulations on conquering another sewing project!
cassie {hi sugarplum} says
LOVE THIS!!!! And it looks like Clara and Burger (and John!) do too! Thanks for sharing, and including me!
ps — you’ve accidentally got erin and ana from the last challenge listed and linked twice in this post.
YoungHouseLove says
Oh yes, all fixed! Sorry about that Cassie! Love what you made!!
xo,
s
Christa @ BrownSugarToast says
Super cute beanbag!!! Love the fabric you chose! Thanks for the par-tay. :)
Urban Wife says
$5?! It looks fabulous! That fabric is gorgeous, too. Did Clara know what it was and that she could sit on it? Just curious. :)
YoungHouseLove says
She woke up for a nap and I got to proudly present it to her. She loved it. I had to tell her to sit on it and crawl all over it though. But she got the hang of it quickly enough. Haha.
xo,
s
Traci says
Too cute! What a great job! Do you sew often or was the tutorial just that thorough? I have a sewing machine, but I’ve only ever made pillows. I’d never be brave enough to try piping.
YoungHouseLove says
I have sewed like three things in my life ever. So I’m definitely a novice! The tutorial made it easy though! Well, except when I broke a needle, but I survived.
xo,
s
Alex - Old Town Home says
Thanks so much for hosting this challenge! We had fun giving an alternate use to our wine bottles.
I really like the end result on your effort, it turned out great. Besides, any project that makes Burger’s life more comfortable (even if he’s just claiming it for himself) is a win in my book.
Amanda J. says
Yay! I’m so glad you tackled this tutorial – I’d seen the tutorial before and thought it was brilliantly adaptable (this could so easily turn into footstools or go giant, if you’re intrepid). My SO and I will be facing a cross country move in the next couple of months that requires us to get rid of almost all of our furniture, so cheap alternatives like this MAY have to be a sit-in (ba-dum, pishhh) until we can afford “real” stuff.
I’m a fellow village sewing idiot, and I’m thrilled to see a newbie complete this project with a fabulous end result. Cheers!
YoungHouseLove says
Ooh it’s true! Someone could make a really giant one to use as a coffee table alternative! I love that idea!
xo,
s
paige :: approaching joy says
How cute!
That fabric is just about the best thing ever and fits that little space so well!! It looks like Clara lives in an Anthropolgi store- I’m totally jealous.
Julia @ Chris loves Julia says
Hahaha! I thought the same thing! The little sheepskin. The champagne polk-dot walls. The posh patterned curtains. And now, the PERFECT little beanbag. The girl lives in a lovely world.
I can’t get over your fabric choice. I am in love with it!
YoungHouseLove says
Aw thanks guys!
xo,
s
Jessica says
oh my gosh, as i was surfing pinterest waiting for this post to come up, i see your beanbag on pinterest!! I had just checked to see if there was a post up only 2 minutes before. People are fast!
YoungHouseLove says
Haha- no way!
xo,
s
JMJE says
I love your bean bag. I made an apron once a few months ago and yelled at my sewing machine (and perhaps my husband) all day. It might be time for me to attempt to use it again.
Katie says
I just recently learned how to use a sewing machine and have been eyeing beanbags like this too. You have just inspired me to give it a try! Great job and I hope I have as good of luck as you with mine. Thanks for sharing!
Lori says
Wow! Mucho impressed with your sewing :-) Not to mention how pretty the fabric is also. Great job and thanks for the kick in the pants to get this challenge done!
Andrea says
I’m so afraid of using a sewing machine, so I definitely feel your anxiety…but holy wow. You did a terrific job! What an awesome little pouf for Clara (or Burger, or you or John!)! =)
Tyra says
Amazing. Now trying to decide what I could possibly need a beanbag for so I can try one too! Maybe a dog bed.
Christine @ Casa-de-Christine says
This turned out great! Well done Sherry! Looks like you have conquered the sewing machine- I’d almost dare to say you are becoming friends! This definitely has me thinking about tackling something like this for a niece come Christmas time!
Shannon says
I’m obsessed with the fabric you choose for the bean bag! It looks great under that white fur rug.
Thanks for hosting the pinterest challenge! Last time I found some wonderful crafts, recipes, and blogs and I can’t wait to see what everyone did this time around. My sister and I started a blog a few months ago to document all our attempts at pins we’ve seen – pinstersisters.com. It’s been a blast so far!
Amanda says
OMG I totally LOVE this! It doesn’t look like it was that hard to make! I’m still a beginner with sewing. Do you think I could make it?
YoungHouseLove says
Yes! I’m totally a beginner. I’ve made like three things ever. You can totally do it! Just take it one step at a time and follow the original tutorial. Her pics/words make more sense! Haha.
xo,
s
Allyn says
I still think that Clara’s closet might be my favorite room in your house, probably partly because I love that you want her to be a bookworm in it! Such an awesome bean bag too. I remember wanting a bean bag SO BADLY when I was about 11 (to read in, natch), and my friends surprised me with one for my birthday.
It wasn’t nearly as cute as Clara’s.
We’re doing the challenge too!, But with cocktails.
http://lollingabout.wordpress.com/2012/03/14/wasted-wednesday-white-sangria/
Barb says
THE BEST PROJECT EVER!
I have looked at all of them and yours is the nicest! Love it. Susie seamstress you are becoming. Nice work Sheriseamstress!
Be proud!
B.
domestiCate says
Oh, your beanbag is awesome! I know Clara will love it. I think our own little Bean (who’ll be 1 this weekend) will love one of her own in a year or so.
Thanks for hosting! Can’t wait to see all of the projects.
justine says
Holy impressive sewing batman! I may have to make one of these for my son’s nursery.
Karen says
That looks AWESOME!!! I’m impressed, seriously. How much stuffing did you end up using to get it the right ‘fluffiness’?
YoungHouseLove says
I jammed four whole old pillows in there. They were kind of flat, but pulling out the batting and stuffing it into the beanbag sort of fluffed it up, so I really packed it since I don’t want it to deflate over time. Haha.
xo,
s
r8chel says
Nice job, Sherry! Did your machine come with a zipper foot? (A zipper foot looks like the left side of the presser foot is missing.) That would make it so much easier to stitch down the piping, because you can just guide the foot along the edge of the piping. I’m surprised and impressed that it went so well for you with a regular presser foot!
Also, are you sure your packs of piping are 250 yards each? What a bargain! Haha. ;)
YoungHouseLove says
Yes, it came with one! I was just nervous to change feet. Haha. But it was fun to follow the line slowly in my little zen-state.
xo,
s
Emma says
Oh my gosh! So pretty. That fabric is amazing Sherry. I started sewing about the same time you did and I’m always terrified of the results during the project and a bit surprised when something actually turns out OK. Thankfully, only take on pillows, curtains, aprons, and other simple projects. Zippers aren’t too bad either – just need a zipper foot (which may-haps you used when you sewed on your piping?). Looks great! Congratulations!
Amy @ Elephant Eats says
Wow, I’m seriously impressed! That’s a pretty damn good beanbag chair for a self-proclaimed sewing novice. I think you’re well on your way to being an expert ;) I just took a sewing class for the first time and now you’ve indspired me to try something out of my comfort zone!
Gracie says
Hey Sherry, you put Ana’s name by accident at the top of the post when you mentioned the other contributers to this edition of the Pinterist Challenge. Just wanted to let you know so you could switch it out for Cassie’s.
Your bean bag looks amazing! I love the fabric and the piping!
YoungHouseLove says
Thanks! All fixed!
xo,
s
Kasey M. says
I dropped the crafty ball and didn’t work on a pinterest challenge this time :( However I am crocheting up some baby flower headbands for my girlfriend!
Love to crochet :)
Oh and Sherry Clara could totally wear this baby hat: http://pinterest.com/pin/252905335294541632/
YoungHouseLove says
Bwahahahaha, I love it!
xo,
s
Diana @ Boy + Girl says
Love this. It turned out fantastic!! I’m so glad I participated this time. And in honour of you guys I ORB’d my first item…and now I’m addicted.
Amanda @ Serenity Now says
Thank you so much for hosting, John & Sherry!
Kelly @ Eclectically Vintage says
I love poufs and your $5 one is fab (as can be seen from the contented expressions of your cute chihuahua)!
Oh how I wish I could sew – not even a button!
Happy to link up my Peep Wreath today
Kelly
bridget b. says
wow, i’m impressed! that beanbag looks like something you would find at a store.
i linked up my diy flower pins (http://623designs.tumblr.com/post/19289679270/pinterest-challenge-flower-pins)that we’re giving as party favors for our daughter’s second b-day party this weekend.
Corrie says
Oh, how funny! We used the same exact blog/project for our ‘pinspiration’! Except that I used it to make an extra large dog bed for my Great Dane.
http://housemadeblog.blogspot.com/2012/03/diy-dog-bed.html
I LOVE how your cushion turned out! The fabric is gorgeous. Plus, ‘free’ fabric is the best kind :o)
Rachel says
I LOVE that fabric!
Erin @ The Great Indoors says
Love it! And pat yourself on the back that you didn’t have any crazy complications this time around. :-)
YoungHouseLove says
Aw I love yours too Erin!
xo,
s
Amanda @ Serenity Now says
And, P.S., the “poof” turned out so nicely!! It looks great in the closet. :)