After victoriously completing the two end sections of our three-piece DIYed console table (explained here), I turned my attention to the middle portion. You may recall that this piece will be entirely hidden between the other two (and sandwiched between the back of the sectional and the wall) so I could’ve gotten away with a very simple platform on which to lay the long tabletop that will span across all three pieces that we’re planning to make out of our already-around reclaimed pallet wood. But we figured that would just be wasted space, so we took the less simple route of creating some hidden storage in the middle piece. Allow my sketch to explain:
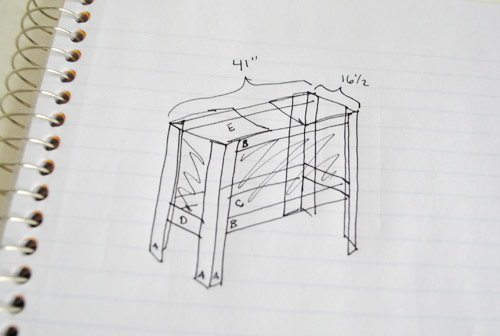
Who am I kidding, my sketching skills haven’t improved so allow me to explain instead. Basically the piece is a 41″ long table with an opening in the middle of the top. Under that is a platform shelf that will act as the bottom of the storage “area.” We considered building sides out of wood to enclose the entire storage “box” (where I’ve “shaded” on the sketch) but to save money and keep the weight of the piece down, we’ve decided to just staple taut fabric around those four sides instead (again, since no one’s gonna see it). Basically it’ll be a fabric box with a strong wooden frame and a solid wooden bottom.
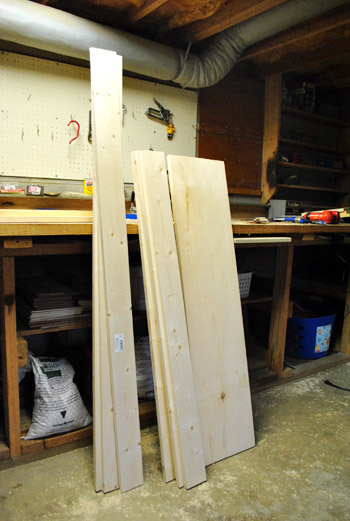
Maybe this will make more sense once you see it being built. Here are my supplies – a bunch of 1 x 4″ boards and one 1 x 12″ board. We had a lot cut at Home Depot again, but didn’t worry about getting them cut nearly as precisely (since I can easily cut 1 x 4″s with my miter saw at home).
First up was the process of creating four 24″ tall legs. I of course was reminded that cutting a 48″ piece of wood doesn’t leave you with two precise 24″ pieces (notice the uneven tops). The width of the saw blade leaves you with one that’s more like 23 7/8ths. But I managed to work around it, so don’t worry about that for now.
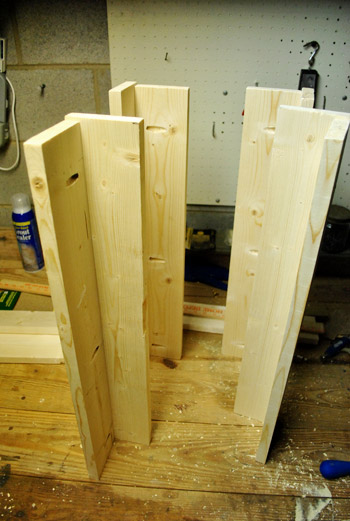
Then I added a long rail at the top to connect two legs together (I lined it up with the 24″ leg, not the slightly shorter one, which ensured that it would be level and the right height when it was complete). Again, all of this was done with my beloved Kreg Jig, which I also used to make the other two sides of the console table that I shared on Monday.
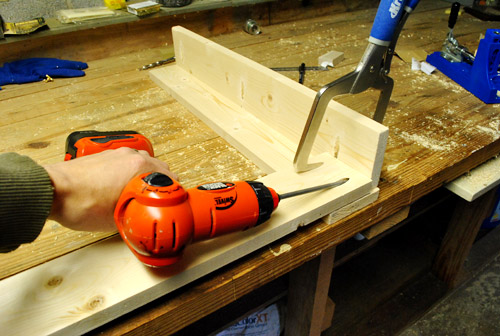
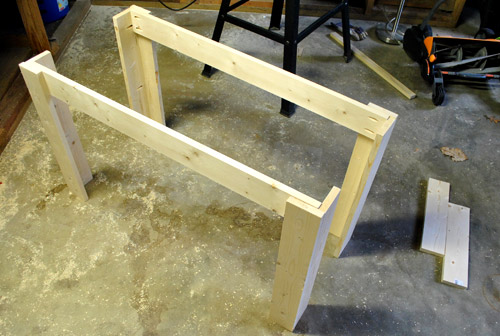
Next I used those two shorter boards (seen on the floor of the picture above) to connect these two pieces. These pieces would also become the support for the bottom shelf.
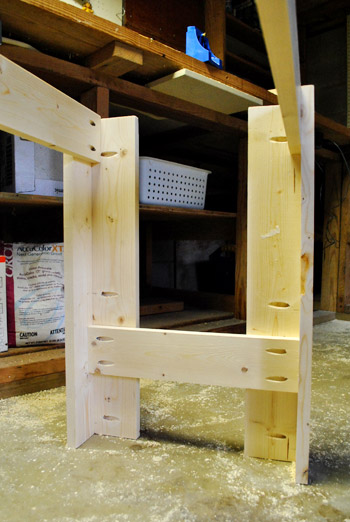
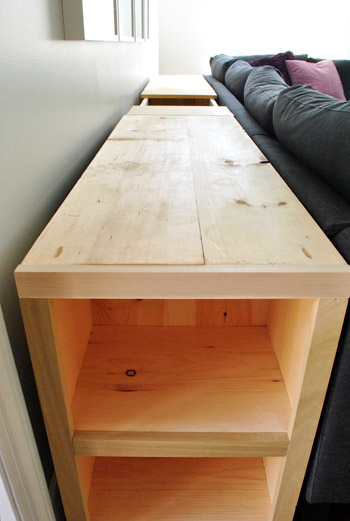
I sorta forgot to photograph the next step (boo me), but it was creating that lower shelf. To save money I just laid two 1 x 4s flat across the piece (resting on the support shown above). Obviously this didn’t fully fill the 16″ space, which is where that 1 x 12″ that I purchased came in handy. I just laid it on top of the newly attached 1 x 4″s (centered on top of them) to create a nice solid shelf.
You can sort of see what I’m talking about in the finished pic below:
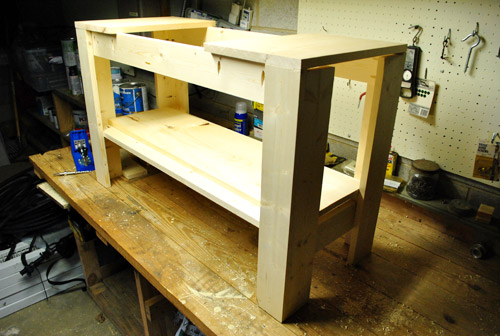
As for the top, it’s just some of that 1 x 12″ that I had leftover from building the two end pieces. I affixed it to the top on either side – leaving the hole in the middle that we wanted.
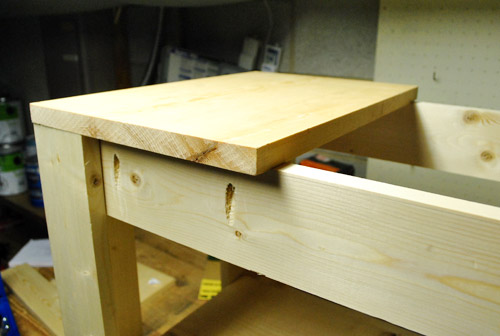
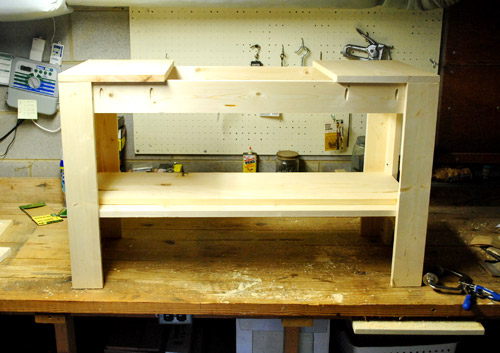
Not the prettiest piece in the world, but once we get the fabric stapled to the sides to enclose the storage “bin,” it’ll do the trick (heck we might even drop some storage baskets in there for some separation/organization). And it doesn’t have to be that pretty since we’ll be adding our long reclaimed pallet “counter” on top of all three consoles (with a small and flush lift-off-able piece to access the storage compartment whenever we’d like).
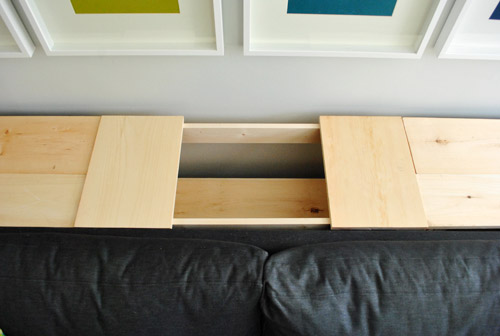
I know it’s really hard to envision how we’ll make the rustic countertop – and how we’ll keep that top-entry storage area accessible from above – so we’ll share those details when we tackle it along with lots of photos (we’re still not 100% set on a specific plan of attack) .
Oh yeah and obviously we’ve moved all of the pieces into the room (even though they still need to be stained and countertopped):
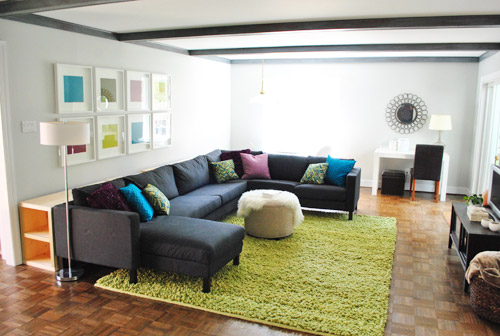
Admittedly it was a bit jarring to see everything shifted like that. But after one night living that way, it felt like a big improvement. The relationship between the sectional and the too-small-just-for-now media cabinet seemed cozier and sitting 17″ closer to our pretty small TV certainly made it easier to read subtitles and weather forecasts. Plus when we finally ditch the awkwardly placed floor lamp on the end of the sofa and bring in two chunky table lamps on either side of our huge console table it’ll feel even more balanced and connected to both the wall and the sofa. They’ll help us bridge things and add function and some height on either side of our big frame grid, which should be really nice. And you know Sherry’s already on a serious lamp hunt. She’s crazy like that.
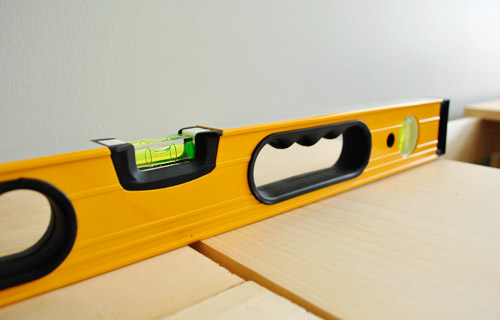
But there was one let down to the whole thing. It’s not level. Not because of the way I built it, but because of the room. The floor in there is a bit “wavy” at points. We noticed it from our very first walk through of the house, but our inspector assured us that there’s nothing structural to fear – just a little settling (which is apparently why they installed parquet, instead of less “flexible” and forgiving hardwood planks). So even though they’ve made my console adventure more challenging, at least Clara has figured out one plus to the situation: it makes playing with her ball a lot less work (she found a “magic spot” on the rug where her ball always comes back to her, no matter which direction she rolls it):
So I knew going into this that expecting a piece of furniture spanning 140″ (almost 12 feet!) of uneven floor might be asking for trouble. Luckily it wasn’t too bad. There was mainly just this one spot where two of the pieces didn’t line up.
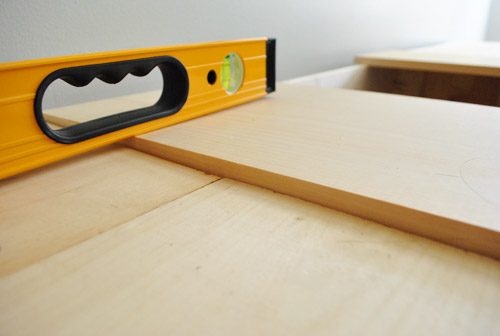
Enter these little fellas to the rescue:
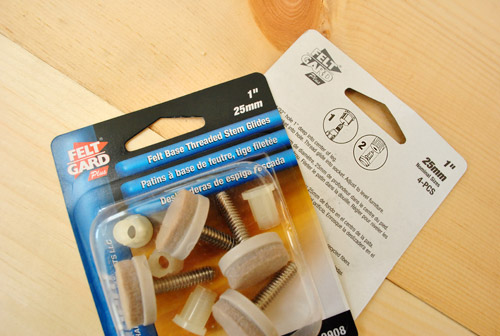
They’re basically like those adjustable feet you find on appliances. I opted for them over felt pads alone because the ability to tweak the height by spinning each foot ’til everything was perfectly level would be invaluably time-saving.
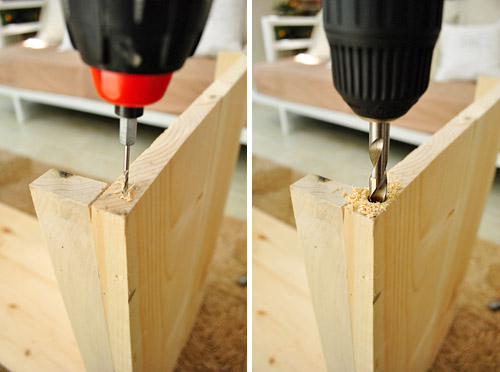
Installing them was pretty straightforward. Just drill a big hole in the bottom to fit the plastic guide and then screw the foot in. Since the hole was so big (nearly 3/8ths of an inch) I worked up from a small pilot hole to the big kahuna (which even required me breaking out my bigger drill) so I wouldn’t crack the wood.
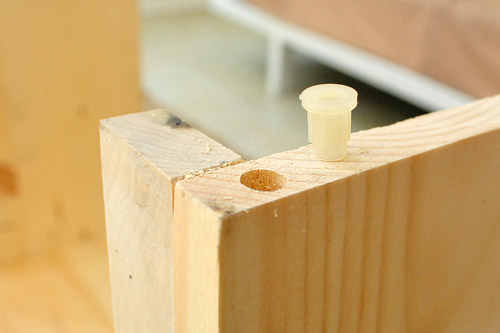
I also realized that using an even bigger drill bit to make the opening at the top a bit wider would allow the top lip of the plastic guide to sit flush in the wood. So with the padded leg screwed in it looked something like this:
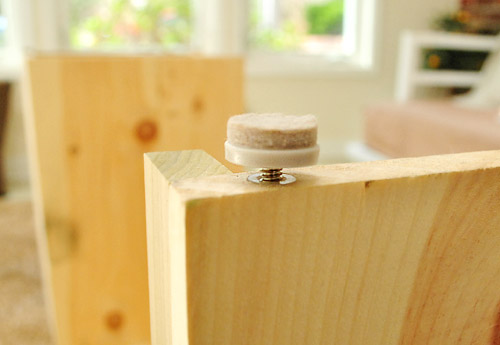
After adding these to most of the corners (and couple of flat felt pads to others that needed less of a lift), I eventually achieved what I was going for: LEVELNESS! (or is it levelocity? leveliciousness?)
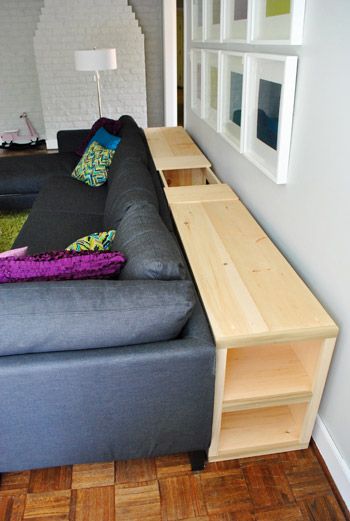
I have to admit that I was a bit nervous that getting it level would be impossible, so I was pumped when it happened – and relatively quickly. Plus this wasn’t the only time that luck was on my side. We also realized that we serendipitously built this center piece so that we still have access to the wall outlet behind Karl (which will be imperative once we buy table lamps for the console). Gotta love happy accidents.
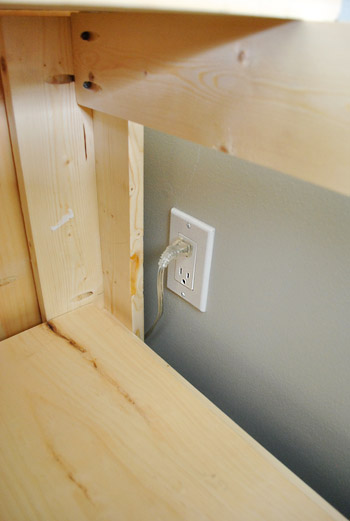
It means we’ll have to be a bit creative when it comes to stapling the fabric sides on, which we still plan to do so we don’t lose remotes or baby toys down that crack between the wall and the console (thanks to the baseboard that keeps them from being perfectly flush- but that smidge of space is imperative for lamp cords anyway, so it’ll all work out in the end).
But we’ll cross that bridge – and the staining and top building bridges – when we come to them. You know we’ll take a ton of photos to share too. For now I’m just basking in the glorious totally-level situation we have going on now. Ahhhh….

Blake says
I’m glad you were able to pick up a bit for these photos ;)
YoungHouseLove says
Haha, the blankets were shoved into the basket with Clara’s toys and we were good to go. Oh and now my purse is on the kitchen table. Sometimes mess just moves from one room to another- haha.
xo,
s
Cait @ Hernando House says
I can completely identify with “Sometimes mess just moves from one room to another” haha.
Kel says
My mess always moves from one room to another
ALittleBite says
I love the middle piece, so smart! By using fabric you won’t have any problem accessing the outlet, too. Can’t wait to see the finished product.
I own a Kreg Jig as well but I haven’t used it yet – although now that I’m getting addicted to building I’ll have to learn how to use it!
Michelle says
Looks great, John!! I love that it still gives you function and storage but leaves the middle of your space open and airy.
Carla says
Very impressive. The solid design and excellent construction really works well with your massive sofa. And the end pieces add some great visual interest and practicality. I’m wondering, though, if two matching lamps might be too matchy-matchy and balanced, but it will be fun to see how things turn out. Since Karl is very sleek and modern, I’d love to see some vintage spunk in that room and more height to round things out. The white frames weren’t a favorite of mine at first (it kind of seemed like you were relying on old tricks from the other house), but they create some needed consistency with the white annoying bed in your master (hehehehe) and the white frames in the hallway. So I’m loving them now. I know you don’t need all this commentary, but I can’t help myself … that’s part of the fun of visiting a site like yours. Asta pasta, guys!
Elisa says
Wow, looks great so far! I love that you did this entire project with ONE tool (not counting the math you did with your brain.. hah). It’s definitely inspiring!
Elisa says
Err.. also not counting the drill. But safe to say most people already have a drill!
Kristina Strain says
You are officially my hero! This tutorial is SO inspiring. Now that we’re moving to a house with a big garage, it makes me all inspired to start building my own stuff.
Amanda @ Our Huble A{Bowe}d says
Oooh! The console is looking great! Nice building, John! It will be perfect for the space, espeically once the top and is on and with a coat of dark stain. Thanks for sharing!
julie g. says
Love the console!!! I am especially grateful for the tip about those pads. We have a 70’s house with sloping hardwoods and that has posed a problem for a few smaller pieces of furniture.
And you could not pay for a toy to do what Clara has discovered with that ball – she is delicious and brillant too!!!
Jen Migonis says
Looks fabulous, John! I showed my hubby every detail of your first post! :)
annabelvita says
Looks great already! For the storage bin fabric and the wall outlet, I’m wondering about putting a vertical strut in, with fabric stapled on one side as planned and a small, velcroed on bit of something a bit stiffer in front of the socket.
But I’m sure you’ll figure the best thing out anyway!
Hannah says
I noticed you got new pillows! I really like the teal ones and am surprised that John went for a light pink pillow. The console table looks awesome! I had always wanted to do something like that behind my couch, but sadly the room isn’t big enough. Can’t wait to see it when it’s finished!
YoungHouseLove says
That’s actually a light purple pillow from his momma. Anything free that I like from his mom seems to stay. Haha.
xo,
s
B @B Getting Hot says
Wow o wow! Really incredible. Question: Not sure if I missed this from previous post… but where did you all get the original idea? Not the plan from Ana, but the idea to put the console against the wall like that behind the sofa? I’ve seen tables behind sofas that are in the middle of the room, but I’ve never seen one in between a wall and a sofa. Or did you just see the problem and brainstorm a solution?
So creative! Wondering if one of your style files inspired it or something else. Love it!
YoungHouseLove says
We just thought it made sense because we didn’t want to bring in a heavy wood coffee table instead of something soft and round like our ottoman (it’s more Clara friendly and easy to pick up and move when we entertain). We’ve seen consoles against the wall behind sofas a few times in magazines and blogs though, so it’s definitely not an original idea or anything. Haha.
xo,
s
Kate says
Growing up for many years we had some console tables (they were really just plywood strips with pre-turned wood legs screwed in and stained by my mom) between our couch and the wall. My mom put them there while I was little and she didn’t want a coffee table. I always though it seemed like a good idea and might do it in our house some day!
I have fond memories of crawling under those to dust because I was little enough to fit, haha!
Elizabeth says
Did you consider removing the baseboard behind the console?
YoungHouseLove says
Yup, we landed on removing the shoe molding because that’s so easy to find and reinstall, but the baseboard just felt too important to take out. When it’s all finished we think it’ll look great even with that half inch of space (since none of the furniture in our house, like my desk or the TV cabinet, are flush thanks to baseboards everywhere).
xo,
s
Elizabeth says
Cool. I can’t wait to see what lamps you find.
Gracie says
To keep stuff from falling back behind the console, I would just extend your ‘top’ the 1/2 an inch or so to be flush with the wall.
YoungHouseLove says
We’ve definitely considered that, we just don’t know if it would look weird from the side to have a lip off the back and not off the front (since that side is flush with the sofa).
xo,
s
mribaro says
I thought either make the top a bit wider so it covers the gap (I don’t think it would look weird), OR maybe you could attach a board which is as thick as the trim to both the back and front side of the console, so it looks equally thick on both sides when you face the little bookcase part of it. On the back side (next to the wall) it would only reach to the trim, and on the front side (next to the sofa) it could go all the way down, or again the same height as the back (whichever looked better to you).
mribaro says
Or maybe the top board that you gonna make from boards can lip off the back AND off the front (so it would cover an inch of the sofa’s back)?
YoungHouseLove says
Always a possibility!
xo,
s
Radhika Paruchuri says
Looks really good. Great work! John, when I saw your sketch, I thought you were going to use glass on the sides, because of the hatch that you used. But what was I thinking? why glass for a storage piece that is covered on all sides. No wonder I am not building anything! haha… You both do a wonderful job at everything. Can’t wait to see the finished product!
Noelle says
I am shocked you did not use a piano hinge so you can open the top instead of the hole in the middle.
Of course you will go through the process of putting the fabric in even if no one will see it you guys!
YoungHouseLove says
There will be a top that rests on top of that hole, it just won’t be hinged so we can remove the whole top like the top of a box, and put it back on- but it’ll be flush. So hard to explain but we’ll share pics when we get there!
xo,
s
Manning says
Good Job! I was a little worried I have a hard time invisoning things….but it is going to look great. Can’t wait to see the finished product!
Jennifer says
Lookin’ good — the scale of the new console makes such a difference in the room! Can’t wait to see the final result. So glad you shared the tip about the leveling feet, too. I have a wonky table that would greatly benefit from a couple of those.
Tanya from Dans le Townhouse says
WOW! Quite the craftsman. That is a genius console table. I can’t wait to see it all completed!
Cait @ Hernando House says
I looks awesome! And those threaded feet things are great. And haha to levelocity!
Krysta @ Domestic for Dummies says
Wow! That looks like a ton of work but I think it will pay off in the end. I was a little confused at first but I am starting to see your vision and loving it. Clara is so super cute as usual!
Candice says
I just know the console table will look fabulous when finished. Question: Is Karl wobbly at all with his front legs on the rug and back legs off?
YoungHouseLove says
We added little furniture pads to even things out. Worked like a charm!
xo,
s
Dawn K. says
Could you, instead of stapling the fabric on all sides, use velcro on the panel where the outlet is? You could even leave a section free of velcro on one of the sides where the cords can snake through.
YoungHouseLove says
Yup, that could definitely work! Should be interesting to see where we end up! Pics and details soon…
xo,
s
Threadbndr says
What a great looking piece. And building it in pieces was so smart – easier to move, possible to level…. It’s making me reconsider the built in bookcase in the bedroom, maybe I should do something modular? Since I own a turn of the LAST century house, there isn’t a square, plumb or level point in the entire buiding LOL.
Lisa says
I’m sure the piece of furniture is great and all…but I’ll admit I mainly just watched Clara’s Magic Ball Trick. She’s a cutie!
Line says
Ha ha! My words exactly. Great job John, but LOVE the Clara video :-)
Trish says
I just found your blog about 2 weeks ago. I love it! I started reading the most recent posts and then decided to go back and start from the beginning. Just finished, and sad to be done and know that I have to wait for you to post anymore before I can read more. Thank you for doing this. I have gotten so many great ideas and can’t wait to start putting them in place. We live in a 50’s ranch also and love it!
Courtney says
That video is too funny! The console table is looking good. What a great and creative idea. Can’t wait to see the finished product.
Katie Farrin says
I love it! Great work and so neat to be building your own furniture! Thanks for sharing….now, er want to come build something for my house? lol
Stacy says
Great idea on the adjustable legs – I would never have thought of that…
Kelly says
The video is my favorite part– I was cracking up! So cute!
karen @ our slo house says
It looks fantastic. I can’t wait to see what it looks like with it’s top on. Plus the stain coat.
I love when “happy accidents” happen, like your accessibility to the electrical outlet. I had a “happy accident” when I was painting stripes in my son’s room. The stripes in the corner of one room just happened to match up — I couldn’t have planned it more perfectly. :)
Laurie says
This is kind of reminding me of my desk….I have a little glass-top that slides over and its where the stapler, tape, batteries all sit. And I just opened it up and there are 6 chocolate bars in there as well….my husband hides food everywhere!
I can’t wait to see the finished product because I’m probably not envisioning what you are planning at all :)
Ashley @ Simply Creative Things says
I think this was mentioned before, but possibly a velcroed area on the back so you can access the outlet but also close it up as not to lose things back there
YoungHouseLove says
Yup, that definitely could work!
xo,
s
Melissa says
Love the video of Clara. My 4 year old watched it and wanted to know her name. As he walked away he said “thanks for the babyness.”
YoungHouseLove says
Aw that’s so cute. Tell him Clara sends him a big drooly kiss.
xo,
s
Wrenaria says
Fabulous. Now I’m itching to build something myself. And I totally want a Kreg Jig! Every time I see it in a post I think, man, I need that!
Cristy says
So, you’ve definitely got my curiousity piqued! Especially concerning your being able to access the middle storage from the top AND what you’ll be storing in there (Christmas tchotchkes? broken ceramic animal bodies? extra blankets? board games?)… inquiring minds want to know!
YoungHouseLove says
We have plenty of storage spots in the attic and basement for seasonal stuff that we don’t use often so those spots in the console will be filled with everyday stuff (blankets, toys, books, remotes, coasters for tea while we sit and watch TV, etc).
xo,
s
Kristi @ Addicted 2 Decorating says
Fantastic workmanship! I’m definitley going to have to get one of those jigs that make all of the perfectly angled holes for the screws. It looks so professional! Right now, I just use tons of wood glue and my nail gun. It works, but it doesn’t look nearly as neat and clean as yours does. Can’t wait to see the top!!
Felicity @ Our Little Beehive says
Possible typo, but I’m not sure if it’s just very small type – it looks like you have one hatch mark ‘ instead of two ” where you mean to indicate inches, not feet. Reads like 140 feet on my screen. In which case I’d be wondering what kind of crazy mansion you’re living in!
YoungHouseLove says
Thanks! Off to fix it!
xo,
s
Danielle says
Looks awesome! I’m so impressed with what you’ve accomplished – I can’t wait to see the finished product! :)
Laurie says
Oh and here’s a thought…if you are worried about that little space between the table and the wall, why not just make the *countertop* not even on top of the table and close-fitting to the wall? Does that make any sense?
YoungHouseLove says
Yes, that makes perfect sense! We’ve actually thought about that. We’re not decided yet because we worry if it’ll look weird from the side if you notice a lip off the back but not off the front (since the sofa is flush). We’ll have to see where we end up!
xo,
s
anu says
can’t wait for the next installment! do i spy sue the napkin pillows on karl?
YoungHouseLove says
Yeah we fake pillows with Sue all the time. Can’t wait to make real ones!
xo,
s
Kelley says
You’re going to have a Clara impression in that part of the rug :-)
KimB says
I love Clara’s magic ball trick. ;-)
And I can’t wait to see the finished console with fabric and filled with stuff!
Steph says
I love the table! I’m actually designing a room for my sister, and am using a smaller version of Karl. I bet I could talk my handy brother into building a table like this instead of purchasing a uuber expensive one!
p.s. Sherry, I found this super cute store on Etsy, and thought you’d love it. Look at all the animals! http://www.etsy.com/shop/allthingswhite?page=1
YoungHouseLove says
Cute!
xo,
s
laura says
Nice work! Looks great!!
Kirsten says
Awesome job on the console, but a WAY more awesome job on Clara:). Sooooo cute!!!
georgia says
Do you think burger will use it as his doggy stage?
My digs would be straught up there walking about, standing on my head etc lol
X
YoungHouseLove says
Haha, he has already been eying it. Could be cuuuute.
xo,
s
Christa M says
Hahahaha….it would be the dogwalk, instead of the catwalk…be sure to always think “I’m too sexy for this couch” when ever he walks the plank. PLEASE video and edit with music!!!
YoungHouseLove says
Will do!
xo,
s
georgia says
Hahaha just noticed i put my ‘Digs’ Typo Fail!
Obviously i meant dogs… doh!
Laci says
Your daughter is brilliant!
Steph says
Looking really great! I can’t wait to see it finished. I didn’t realize you guys were going to use reclaimed pallets for the top! We’re planning to build a deck banquette out of pallets and they seem to be all I’m thinking about these days. :)
mike @ the lil house that could says
Have you guys considered removing the baseboards so it sits flush? We have a bookshelf in the office that stands about an inch off the wall because of the molding — I’ve been so tempted just to remove the baseboard so it sits flush.
mike @ the lil house that could says
Sorry I didn’t read through the comments, I was anxious!
YoungHouseLove says
Haha, no worries!
xo,
s
Kelley says
https://www.younghouselove.com/2010/06/office-progress-bookcase-building/
http://kfddesigns.blogspot.com/2010/08/shelves.html
Do you plan to do this with the console table? Am I spoiling your surprises :-)
YoungHouseLove says
Woah that would be awesome, but nope that’s not the plan. Haha. We just like how the side has two very grid-like squares on top of each other, so adding a lip or carving into the bottom might break up that shape for us. We’re ok with furniture floating a half inch away from the wall since our desk and our media cabinet (and every other item in our house isn’t exactly flush). Maybe I’m not as Type A as I though. Haha.
xo,
s